Build a Heat Shield Behind a Wood Stove
Figuring out how to Build a Heat Shield Behind a Wood Stove can seem tricky for first-time stove owners. You want your home to be warm and safe, but the rules about clearances can feel confusing. Many people wonder if they can get closer to the wall or if they really need that extra space.
Don’t worry, it’s not as hard as it looks. This guide will show you exactly how to do it, step by step. We’ll cover what you need and how to put it all together so you can enjoy your cozy fire safely.
Why Build a Heat Shield Behind a Wood Stove
Building a heat shield behind your wood stove is a smart move for both safety and efficiency. Wood stoves produce a lot of heat, and this heat can damage nearby walls, especially those made of combustible materials like drywall or wood paneling. Building codes often require a certain amount of space, or clearance, between the stove and any flammable surfaces.
A heat shield effectively creates a barrier that significantly reduces the amount of radiant heat reaching the wall. This allows you to place your stove closer to a wall, which can be a big advantage in smaller living spaces. It’s a common project because it directly addresses safety concerns and offers practical benefits for stove placement.
Understanding Combustible Materials
Combustible materials are substances that can easily catch fire and burn. In the context of a wood stove, these include most common building materials. Drywall, for example, contains paper and gypsum, both of which can ignite and burn.
Wood framing, studs, and finishes are obviously flammable. Even certain types of insulation, if exposed, can pose a fire risk. Other materials like wallpaper, curtains, or furniture placed too close can also become fire hazards.
Recognizing these materials is key to understanding why clearances and heat shields are so important. Safety standards are designed to prevent these materials from reaching their ignition temperature when a stove is in operation.
Many building codes specify minimum distances from combustible materials. These distances are determined through testing to ensure that even with the stove operating at its maximum output, the temperature on the surface of the wall behind it remains below the ignition point. This usually means several inches or even feet of clear space.
When space is limited, a heat shield becomes a necessary solution. It essentially creates an artificial clearance by reflecting or absorbing the heat.
The Importance of Stove Clearances
Stove clearances are not just suggestions; they are safety mandates. They represent the minimum distance required between the wood stove and any combustible surface. These clearances are listed by the stove manufacturer and are usually found in the owner’s manual.
They cover areas around the stove’s top, sides, and rear. Ignoring these clearances is a major fire risk. The heat radiating from the stove can slowly dry out combustible materials over time, making them more susceptible to ignition.
Even if a wall doesn’t feel excessively hot, prolonged exposure to elevated temperatures can degrade materials and create a hidden danger.
Clearances are critical for protecting the structural integrity of your home and the safety of its occupants. When installing a new stove or replacing an old one, always refer to the manufacturer’s specifications and local building codes. If the required clearances prevent you from placing the stove where you’d like, or if they take up too much valuable floor space, this is where a heat shield becomes an essential component.
It acts as a buffer, allowing you to meet safety requirements while gaining more flexibility in your stove’s placement.
How Heat Shields Work
Heat shields work by reducing the intensity of radiant heat that reaches the wall behind the stove. There are two primary ways they achieve this. The first is by reflecting heat away.
Shiny surfaces, like polished metal, are excellent at reflecting radiant energy. The second method is by absorbing heat and then dissipating it more slowly. Materials with good thermal mass, like brick or stone, can absorb a significant amount of heat.
Often, a heat shield will combine these principles. For example, a metal sheet might be placed a small distance away from the wall, and then an air gap is created between the metal and the wall, with the air acting as an insulator.
The air gap is a very important part of many heat shield designs. It allows heat to rise and escape, or it can be designed with ventilation to draw cooler air in and let hotter air out. This keeps the temperature on the wall surface significantly lower than it would be without the shield.
The effectiveness of a heat shield is measured by how much it reduces the required clearance. Building codes and stove manufacturers often provide specific instructions on how to build and install an approved heat shield. These instructions typically detail the materials allowed, the dimensions of the shield, and how it must be mounted.

Build a Heat Shield Behind a Wood Stove Step By Step
Now that we understand why heat shields are important, let’s walk through the process of how to Build a Heat Shield Behind a Wood Stove. This section will break down the project into manageable steps, from gathering materials to the final installation. We aim to make this process clear and straightforward, even if you’re not a seasoned DIYer.
Following these steps will help ensure your heat shield is effective and meets safety standards.
Materials Needed for Your Heat Shield
Choosing the right materials is the first crucial step. The goal is to use non-combustible materials that can withstand high temperatures and effectively block heat. Common choices include sheet metal, cement board, tile, brick, or stone.
Sheet Metal: Galvanized steel or stainless steel are popular choices. They are readily available, easy to cut, and reflect heat well.
Sheet metal should be at least 26-gauge. Thicker metal provides better durability and heat deflection. Stainless steel is more expensive but offers superior corrosion resistance and a longer lifespan compared to galvanized steel. Ensure the metal is clean and free from any oils or coatings that could burn off and create fumes.
Cement Board: This is a panel made from cement and reinforcing fibers. It is completely non-combustible and provides good insulation.
Cement board is typically available in 1/4-inch or 1/2-inch thickness. The thicker board offers better thermal resistance. It’s easy to cut with a utility knife or scoring tool and can be painted or tiled over for a more decorative finish. Always wear a mask when cutting cement board to avoid inhaling dust.
Fire Brick or Natural Stone: These materials are excellent for absorbing and radiating heat, and they look very attractive.
Fire bricks are designed to withstand extremely high temperatures found in fireplaces and kilns. Natural stones like granite or slate are also suitable, provided they are dense and non-porous. These materials can be mortared together or attached to a backing board. Their thermal mass helps to stabilize temperatures.
Mounting Hardware: This includes screws, washers, standoffs, and any adhesives or mortar needed to attach the shield to the wall.
For metal shields, standoffs are often used to create an air gap. These can be metal brackets or ceramic spacers. If you are tiling over cement board, you will need tile adhesive and grout rated for high temperatures. Ensure all hardware is rated for exterior use or high-heat applications.
Designing Your Heat Shield
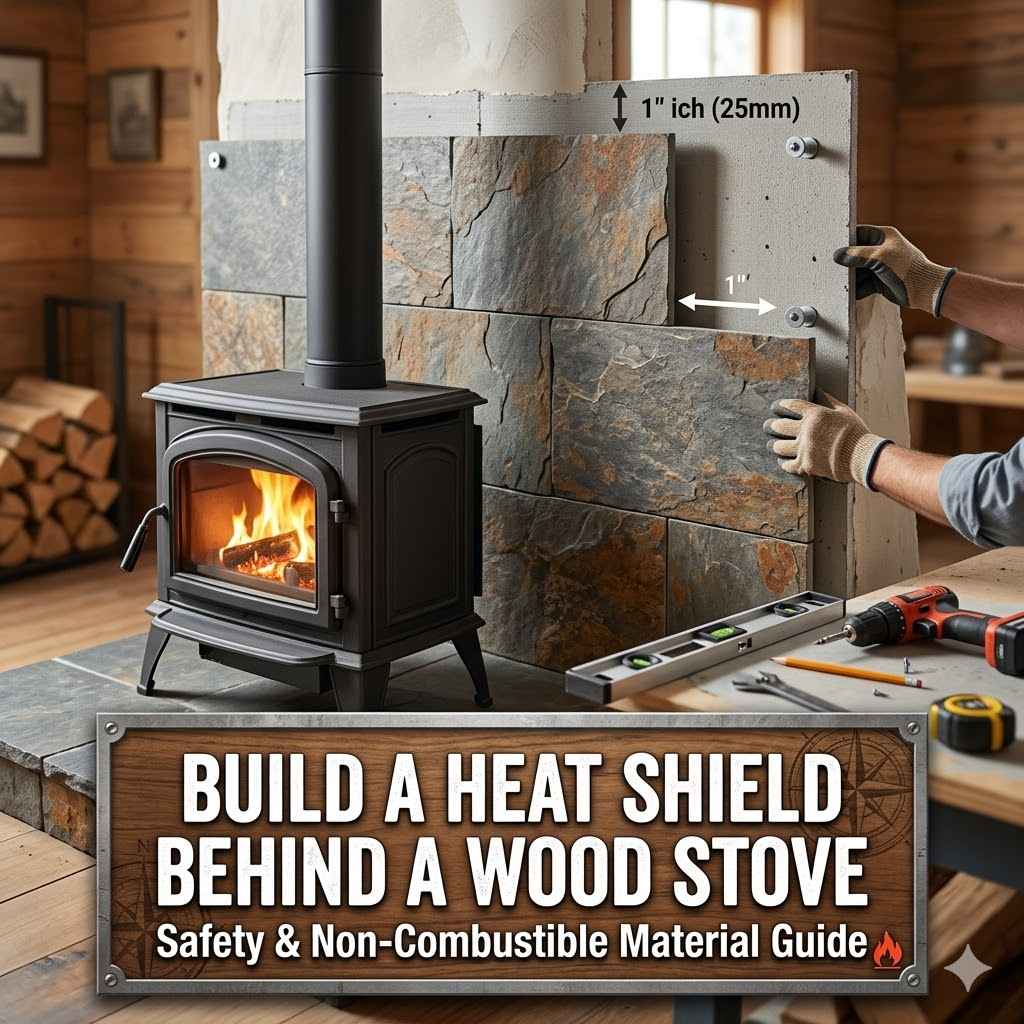
Before you start cutting or screwing, you need a clear plan. Your design will depend on the size of your stove, the available space, and the materials you’ve chosen. The most critical aspect is ensuring you create an adequate air gap if your design requires it.
Key Design Considerations
Dimensions: Measure the area behind your stove that needs protection. The shield should extend beyond the stove’s footprint, covering all areas within the manufacturer’s specified clearances. It’s generally better to make the shield slightly larger than strictly necessary for added safety.
Air Gap: Most effective heat shields incorporate an air gap between the shield material and the wall. This gap can range from 1 inch to several inches, depending on the materials and local codes. The air gap allows heat to dissipate and prevents it from directly heating the wall. Some designs use ventilation holes at the top and bottom of the shield to create airflow.
Attachment Method: How will the shield be secured to the wall? This depends on your wall construction. For wood-framed walls, you can screw directly into studs. For masonry or concrete walls, you’ll need appropriate anchors. Ensure the attachment method can support the weight of the shield.
Material Combination: You might choose a combination of materials. For instance, a sheet of metal on the front and cement board on the back, with an air gap in between. This can offer both reflection and insulation.
Building the Heat Shield
With your design and materials ready, it’s time to build. This is where the practical work begins. Take your time and measure carefully to ensure a good fit and a professional-looking result.
If you are using sheet metal:
- Measure and cut the sheet metal to your desired dimensions. Use tin snips or a metal-cutting saw.
- If needed, attach standoffs to the back of the metal sheet. These will create the air gap. The standoffs should be evenly spaced.
- Position the metal shield against the wall, ensuring it is level.
- Secure the standoffs to the wall using appropriate screws and anchors. Make sure the shield is firmly attached and won’t shift.
If you are using cement board:
- Cut the cement board to size using a utility knife or scoring tool.
- If you are creating an air gap, attach wooden furring strips or metal studs to the wall first, at the desired distance. Then, attach the cement board to these furring strips or studs.
- Alternatively, you can mount the cement board directly to the wall if the combustible material is far enough away, or if you are using a high-temperature adhesive.
- You can then paint, tile, or leave the cement board as is. If tiling, apply tile adhesive and grout rated for high-temperature applications.
If you are using brick or stone:
- Lay out your bricks or stones on a backing material like cement board, or mortar them directly onto a heat-resistant substrate mounted to the wall.
- Ensure a consistent pattern and spacing.
- Allow mortar to cure completely before proceeding.
Safety First During Installation
Wear Protective Gear: Always wear safety glasses, gloves, and a dust mask, especially when cutting materials.
Safety glasses are essential to protect your eyes from flying debris. Work gloves will prevent cuts and splinters. A dust mask is crucial when cutting cement board to avoid inhaling fine silica particles, which can be harmful to your lungs.
Secure Everything Firmly: The heat shield must be securely fastened to the wall. A loose shield is not only ineffective but can also become a hazard itself.
Use the correct type and length of screws or anchors for your wall material. Test the strength of the attachment by gently trying to move the shield. Ensure it does not wobble or sag.
Check Local Codes: Before you begin, and certainly before you finish, consult your local building department. They can provide specific requirements for heat shields in your area.
Building codes vary by region and can dictate the materials allowed, the size of the air gap, and the overall dimensions of the shield. Getting approval upfront can save you a lot of trouble later. Some areas may require an inspection after installation.
Mounting the Heat Shield
This is the final construction phase before it’s ready for the stove. Proper mounting ensures stability and effectiveness.
If using standoffs for an air gap with sheet metal:
- Hold the sheet metal shield in place against the wall.
- Mark the locations for the standoffs.
- Drill pilot holes at the marked locations.
- Screw the standoffs into the wall, ensuring they are all at the same depth to create a uniform air gap.
- Attach the sheet metal to the standoffs using appropriate screws.
If attaching cement board with furring strips:
- Attach the furring strips (wooden or metal) horizontally or vertically to the wall studs. The thickness of the furring strips determines the air gap.
- Ensure the furring strips are level and plumb.
- Screw the cement board panels to the furring strips. Use screws specifically designed for cement board to prevent them from cracking.
- If you want to cover the screws, you can use joint compound on the seams and screw heads, then paint over the entire surface.
If mortaring brick or stone:
- Prepare the wall surface or backing board for mortar adhesion.
- Apply mortar to the back of the bricks or stones and the wall surface.
- Place the bricks or stones with consistent spacing for grout lines.
- Use a level to ensure they are straight.
- Clean off excess mortar as you go.
- Allow the mortar to cure for the manufacturer’s recommended time, typically 24-72 hours, before it is considered fully set.
Testing the Air Gap
Confirm Spacing: Double-check that the distance between the heat shield and the wall is consistent across the entire surface.
Use a measuring tape or ruler at multiple points to verify that the air gap remains uniform. Inconsistent gaps can lead to uneven heating of the wall behind.
Check for Stability: Gently push and pull on the heat shield to ensure it is securely fastened and does not move.
A stable shield is a safe shield. Any looseness could indicate an issue with the mounting hardware or installation, which needs to be addressed before the stove is operated.
Inspect for Gaps or Cracks: Look for any openings or cracks in the shield material itself or where it meets the wall that could allow heat to bypass the barrier.
Seal any unintended gaps with high-temperature sealant or appropriate filler. Ensure all joints are properly sealed, especially where different pieces of material meet.
Materials and Methods for Heat Shield Construction
Delving deeper into construction choices reveals a variety of effective methods for building a heat shield. The best option often depends on your budget, the aesthetic you desire, and the specific requirements of your installation. Each material offers unique benefits and challenges.
Metal Shields
Metal heat shields are popular due to their reflectivity and ease of installation. Stainless steel and galvanized steel are common choices.
Reflectivity: Shiny metal surfaces reflect radiant heat very effectively. This means a significant portion of the heat energy is sent back towards the stove rather than heating the wall.
The polished surface of stainless steel is particularly good at reflecting infrared radiation, which is the primary form of heat transfer from a wood stove at a distance. This reflectivity is key to its performance.
Durability: Metal is robust and can withstand the high temperatures without degrading.
Unlike some other materials, metal will not crack, chip, or crumble under repeated heating and cooling cycles. This ensures a long lifespan for the heat shield.
Air Gap Requirement: Most metal shields rely heavily on an air gap behind them to be effective. This gap allows heat that does get past the metal to escape or dissipate.
Manufacturers often specify a 1-inch air gap as a minimum when using metal shields. This gap is usually achieved using standoffs or mounting brackets that hold the metal a set distance from the wall.
Example Case Study: A homeowner in a small cabin found their stove too close to the wall according to code. They installed a 24-gauge stainless steel sheet, 3 feet by 4 feet, mounted 1.5 inches from the wall using metal standoffs. The required clearance from the wall was reduced from 36 inches to 12 inches, allowing them to place the stove in their desired location safely.
Cement Board Shields
Cement board is a versatile and non-combustible material that serves as an excellent backing for heat shields.
Non-Combustibility: Cement board is made from cement and cellulose fibers, making it completely fireproof.
This material will not burn, melt, or off-gas harmful fumes, even when exposed to extreme heat. This inherent safety makes it a reliable choice for heat shielding applications.
Insulating Properties: While not as reflective as metal, cement board offers good thermal resistance.
It acts as a barrier, slowing down the transfer of heat. When combined with an air gap, it significantly reduces the temperature on the wall surface.
Finishing Options: Cement board can be painted, tiled, or covered with other decorative finishes.
This allows homeowners to match the heat shield to their interior decor. Applying high-temperature paint or ceramic tiles can enhance both the aesthetics and the heat resistance of the shield.
Installation Methods: It can be mounted directly to wall studs or over furring strips to create an air gap.
For a simple installation, cement board can be screwed directly into wall studs, provided there is sufficient distance to combustibles. For enhanced protection, furring strips can be used to create a 1-inch or greater air gap.
Statistic: According to building material experts, cement board can withstand temperatures exceeding 2000°F (1093°C) without structural damage.
Stone and Tile Shields
For a more decorative and high-end look, stone or tile can be used. These materials offer excellent thermal mass.
Thermal Mass: Materials like stone and tile can absorb a large amount of heat and release it slowly.
This characteristic helps to stabilize temperatures around the stove and reduces heat spikes that could affect the wall. The mass also acts as a physical barrier to radiant heat.
Aesthetics: Natural stone (like slate or granite) and ceramic tiles offer a wide range of styles and colors.
They can significantly enhance the visual appeal of the area around the wood stove, turning a safety feature into a design element. Choosing natural, unpolished stone can provide a rustic look, while sleek tiles offer a modern aesthetic.
Application: Typically applied over cement board or a metal backing.
Stone or tile is usually adhered to a solid, non-combustible substrate like cement board using high-temperature tile adhesive. This ensures a stable and secure installation. Grouting between tiles or stones is also critical for durability.
Sample Scenario: A homeowner wanted to protect their living room wall behind their new wood stove. They chose to install a 1/2-inch cement board as a backing. Over the cement board, they adhered natural slate tiles using a heat-resistant adhesive and grout. This created a beautiful, durable, and safe barrier that reduced their required clearance from 36 inches to 18 inches.
Building Codes and Safety Standards
Adhering to building codes and safety standards is paramount when installing any wood stove accessory, including heat shields. These regulations are in place to prevent fires and ensure the safety of your home and family.
Understanding Local Building Codes
Building codes are sets of rules that govern the construction and safety of buildings. They are established by local, state, and national authorities. When it comes to wood stoves, codes typically specify required clearances, chimney requirements, and the proper installation of heat shields.
Jurisdictional Differences: Codes can vary significantly from one city, county, or state to another.
It is essential to contact your local building department or fire marshal before starting any work. They can provide you with the specific code requirements applicable to your location, including any amendments or local interpretations.
Manufacturer vs. Code: Always prioritize the most stringent requirement if there is a conflict between the stove manufacturer’s instructions and local codes.
Generally, local codes set the minimum safety standards. However, some stove manufacturers may recommend greater clearances than the code requires for their specific model, and it is wise to follow their recommendations as well.
Permits and Inspections: Many jurisdictions require permits for wood stove installations and heat shield construction.
Obtaining the necessary permits ensures that your work is reviewed by a qualified inspector who can verify compliance with safety regulations. This process also helps to prevent potential issues down the line.
Approved Heat Shield Designs
Not all DIY heat shields are created equal, and some designs may not meet code requirements. Approved designs typically follow specific guidelines to ensure effectiveness.
Clearance Reduction Factors: Building codes often provide specific “clearance reduction factors” for approved heat shield designs.
For example, a heat shield with a specific type of construction and an adequate air gap might allow you to reduce the required clearance from 36 inches to 12 inches. These factors are based on testing and have been proven to provide adequate protection.
Material Restrictions: Codes may specify which materials are acceptable for use in heat shields.
Generally, non-combustible materials like sheet metal, cement board, brick, or stone are permitted. Materials that can degrade, melt, or ignite under high heat are typically not allowed.
Air Gap Specifications: The size and method of creating the air gap are critical components of an approved design.
Codes will usually specify a minimum air gap distance, often ranging from 1 inch to several inches. The method of attachment must ensure this gap is maintained consistently.
Sample Scenario: A common approved design involves a single layer of 26-gauge sheet metal mounted on non-combustible standoffs, creating a 1-inch air gap. This setup is often recognized to reduce clearances by 33%. Another approved method might involve a 1/2-inch cement board mounted directly to a non-combustible wall or attached to furring strips for an air gap.
When to Consult a Professional
While many heat shield projects are manageable for DIYers, there are times when professional help is advisable. This ensures that the installation is not only safe but also compliant with all regulations.
Complex Installations: If your stove placement is particularly challenging or involves custom cabinetry or unique wall structures, a professional installer can offer solutions.
Professionals have experience with a wide range of situations and can identify potential problems before they arise, ensuring a safe and effective installation.
Code Interpretation: If you find building codes confusing or are unsure about specific requirements, consulting an expert is a good idea.
A certified installer or local building inspector can clarify any ambiguities and ensure your project meets all safety standards. This avoids potential costly rework or fines.
Insurance Requirements: Some home insurance policies may require professional installation of wood stoves and related safety features.
Check with your insurance provider to understand their requirements. Professional installation often provides peace of mind and can even lead to lower insurance premiums.
Statistic: According to the Hearth, Patio & Barbecue Association (HPBA), over 60% of homeowners who install wood stoves opt for professional installation, citing safety and code compliance as primary reasons.
Maintaining Your Heat Shield and Wood Stove
Once your heat shield is built and installed, it’s important to maintain it, along with your wood stove, to ensure continued safety and efficiency. Regular checks will prevent issues before they become serious problems.
Regular Inspections
Just like your stove, your heat shield needs periodic checks to ensure it’s still doing its job effectively.
Check for Damage: Look for any signs of damage, such as cracks, dents, rust, or loose attachments.
Even minor damage could compromise the shield’s effectiveness or its ability to protect the wall. Address any issues promptly.
Verify Air Gap: Ensure the air gap is still clear and unobstructed. Debris or settling can sometimes reduce the gap over time.
Clear any obstructions that may have accumulated in the gap. The consistent airflow is vital for proper heat dissipation.
Assess Wall Condition: Periodically check the wall surface behind and around the heat shield for any signs of excessive heat or discoloration.
If you notice any unusual warmth or discoloration on the wall, it may indicate that the heat shield is not functioning correctly or that the clearances are still insufficient.
Wood Stove Maintenance
A well-maintained wood stove operates more safely and efficiently, which also benefits the longevity of your heat shield.
Ash Removal: Regularly remove ashes from the stove’s firebox. Excessive ash can reduce airflow and affect combustion.
Leaving too much ash can cause the fire to burn hotter than intended or unevenly, potentially stressing the heat shield and surrounding materials.
Chimney Cleaning: Have your chimney swept at least once a year, or more often if you burn frequently.
Creosote buildup in the chimney is a major fire hazard. A clean chimney ensures proper draft and prevents dangerous chimney fires that could compromise your heat shield.
Gasket Check: Inspect the door gasket for wear and tear. A worn gasket can allow smoke and heat to escape.
A damaged gasket can lead to inefficient burning and increased heat escaping the firebox, putting more strain on the heat shield. Replace worn gaskets promptly.
When to Replace Components
While a well-built heat shield should last a long time, some components might eventually need replacement.
Corroded Metal: If you have a metal shield and notice significant rust or corrosion, it’s time to consider replacement.
Corrosion weakens the metal, reducing its protective capabilities. This is especially true for galvanized steel in humid environments.
Damaged Cement Board: If the cement board develops significant cracks or is water-damaged, it should be replaced.
Structural integrity is key; a damaged board may not offer adequate protection.
Degraded Adhesives or Mortar: If the adhesive or mortar holding tiles or stones begins to fail, it’s a sign that the heat shield needs repair or replacement.
Loose tiles or stones can pose a falling hazard and reduce the shield’s effectiveness.
Statistic: The National Fire Protection Association (NFPA) recommends annual inspection and cleaning of chimneys and wood-burning appliances. Neglecting this can increase the risk of house fires by up to 30%.

Frequently Asked Questions
Question: What is the simplest way to build a heat shield behind a wood stove
Answer: The simplest method often involves attaching a sheet of non-combustible material like metal or cement board to the wall, ensuring a 1-inch air gap using standoffs.
Question: Can I use regular plywood as a heat shield
Answer: No, regular plywood is a combustible material and cannot be used as a heat shield. You must use non-combustible materials such as metal, cement board, brick, or stone.
Question: How large does my heat shield need to be
Answer: The size of your heat shield should extend beyond the stove’s dimensions to cover all areas within the manufacturer’s specified clearances for the stove.
Question: Do I need an air gap if I use fire brick
Answer: While fire brick has excellent thermal mass, many codes still require an air gap for optimal performance and safety, especially when reducing significant clearances.
Question: How often should I inspect my heat shield
Answer: It’s recommended to inspect your heat shield at least once a year, or more often if you notice any unusual signs of heat or damage.
Wrap Up
Building a heat shield behind your wood stove is a practical step for safety and placement flexibility. We have covered the essential materials, design steps, and installation methods. Following these guidelines ensures your shield is effective and meets necessary standards.
Enjoy the warmth and peace of mind that comes with a properly protected home.