Can You Buff Hardwood Floors Without Refinishing? Pro Tips
Many homeowners wonder, Can You Buff Hardwood Floors Without Refinishing? Pro Tips often seem tricky for beginners. They might worry about making things worse.
But it’s totally doable with the right steps. This guide will show you exactly how to buff your floors to make them shine again. We’ll cover everything you need to know to get great results easily.
Read on to learn the simple process.
Buffing Hardwood Floors vs. Refinishing Explained
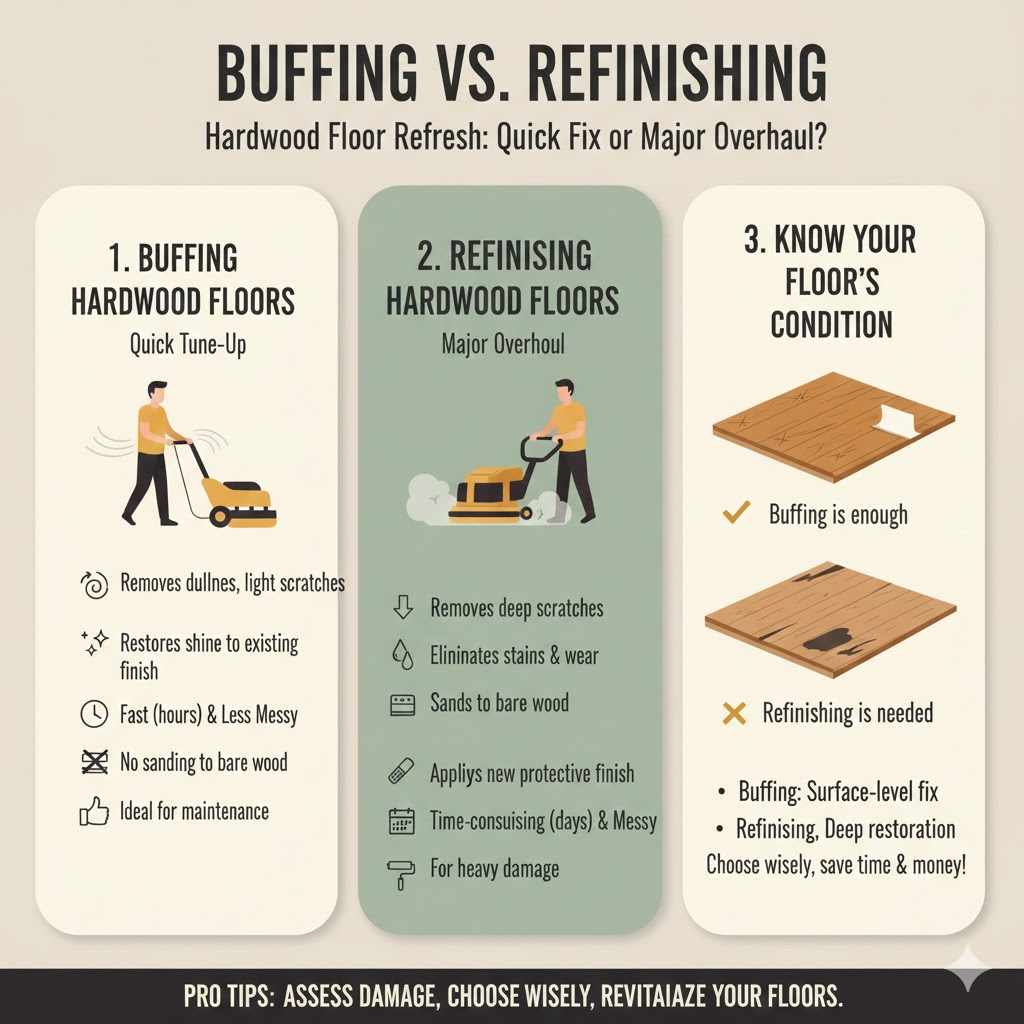
Buffing and refinishing are two different ways to refresh your hardwood floors. Buffing is like a quick tune-up for your floors. It’s a less intense process that aims to remove light scratches and dullness.
Refinishing, on the other hand, is a major overhaul. It involves sanding down the old finish to bare wood and applying a completely new one. This is a much bigger job, often done when floors are heavily damaged or worn.
Understanding the difference helps you choose the right approach for your floor’s condition.
When you’re thinking about whether Can You Buff Hardwood Floors Without Refinishing? Pro Tips are for you, it’s important to know what kind of wear your floors have. Buffing works best on floors that have lost their shine but don’t have deep scratches or significant damage.
If your floors have deep gouges, water stains that have penetrated the wood, or the finish is completely worn away in spots, buffing alone won’t be enough. Refinishing is the solution for these more serious issues. Buffing is a surface-level fix, while refinishing goes much deeper.
The Purpose of Buffing
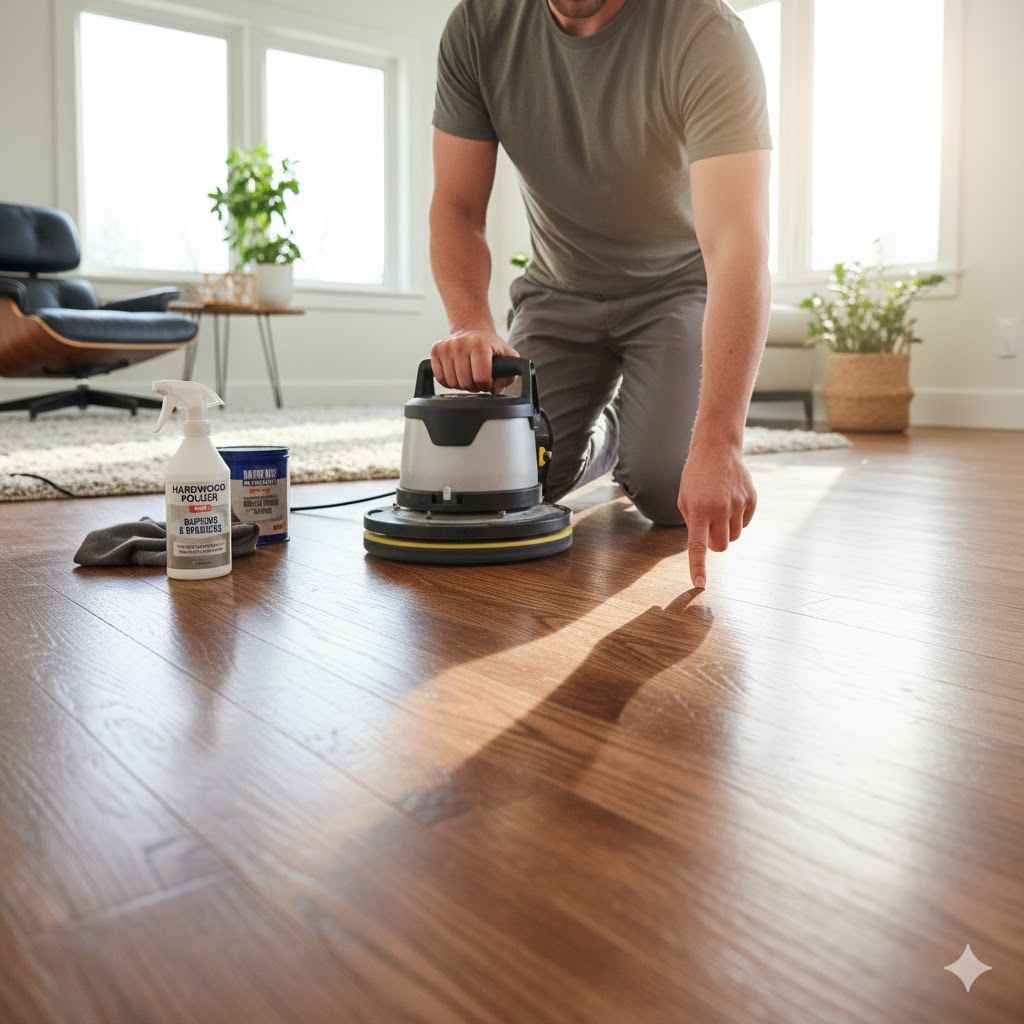
Buffing hardwood floors serves a specific purpose: to restore their appearance without the labor and cost of a full refinish. It’s designed to remove dullness, light scuffs, and minor surface scratches that accumulate over time. Think of it as polishing a car.
You’re not rebuilding the car; you’re making the existing paint job look its best. This process typically involves using a buffing machine with a special pad. The machine oscillates or spins, working a liquid or spray-on product into the floor’s surface.
This product helps to clean, polish, and sometimes even add a light protective layer, making the floors look brighter and smoother.
The key benefit of buffing is that it’s a much faster and less messy process than refinishing. You can often buff an entire room in a few hours, and the floor is usually ready to be walked on again relatively quickly, sometimes within a day. This makes it an ideal option for those who need to freshen up their floors before a party or a showing, or simply want to maintain their appearance between major refinishing projects.
It’s a great way to extend the life of your current floor finish and keep your home looking its best.
When Buffing Is Not Enough
There are certain situations where buffing simply won’t cut it. If your hardwood floors have deep scratches that you can feel with your fingernail, buffing will not remove them. These scratches have penetrated the protective finish and are in the wood itself.
Similarly, if you see dark stains from water damage, pet accidents, or spills that have soaked into the wood grain, buffing won’t lift these. These kinds of issues require more intensive treatments, often involving sanding down the affected area or the entire floor.
Another sign that buffing is not sufficient is if the finish is peeling, flaking, or completely worn away in large sections. This indicates that the protective top layer has failed and needs to be reapplied. Buffing works on the existing finish; it doesn’t create a new one.
If the original finish is compromised, buffing will only highlight the damaged areas. In such cases, a full refinishing job, which includes sanding off the old finish and applying new coats of polyurethane or other sealants, is necessary to restore the floor’s integrity and appearance.
Can You Buff Hardwood Floors Without Refinishing? Pro Tips
So, Can You Buff Hardwood Floors Without Refinishing? Pro Tips are here to guide you through this question. Yes, you absolutely can buff your hardwood floors without a full refinish, and it can make a significant difference.
This process is perfect for floors that have lost their luster but aren’t severely damaged. It’s about bringing back the shine and smoothing out minor imperfections. With the right tools and techniques, you can achieve a refreshed look that makes your floors appear much newer.
The goal of buffing is to renew the surface layer of your existing finish. It’s not about removing deep scratches or stains, but about lifting away the grime and dullness that accumulates over time. This can be done using a floor buffer machine and specific buffing solutions.
The machine helps to evenly distribute the product and work it into the floor, creating a smoother, more reflective surface. This process is much less invasive and time-consuming than sanding and refinishing, making it an accessible DIY project for many homeowners.
Choosing the Right Buffing Machine
Selecting the correct buffing machine is a crucial first step. For hardwood floors, you generally want a low-speed buffer. These machines spin at a slower RPM (revolutions per minute) compared to high-speed polishers.
A low-speed buffer is less likely to damage the floor’s finish. They are typically used with a scrubbing pad or a buffing pad that works with a liquid cleaner or a specific buffing compound. The machine’s weight is also important; heavier machines can provide more effective buffing action, but you need to be able to control them safely.
You can often rent floor buffer machines from home improvement stores or tool rental centers. When you rent, ask the staff for advice on the best machine for hardwood floors. They can guide you on models and demonstrate how to use them.
Make sure you understand how to attach and remove the buffing pads. The type of pad you use will depend on the product you’re applying and the condition of your floor. For most buffing jobs, a white or blue buffing pad is suitable.
These are designed for polishing and light cleaning without being too abrasive.
Essential Buffing Products and Supplies
Beyond the machine, you’ll need specific products. A good quality hardwood floor cleaner is essential to prepare the floor. This cleaner should be designed for finished hardwood and should not leave a residue.
For the buffing itself, you have a few options. Some people use a spray-on buffing product that you mist onto the floor ahead of the buffer. Others opt for a liquid buffing solution that is applied more broadly.
These products often contain mild abrasives or polishing agents that help to restore shine and smooth out minor imperfections.
You will also need appropriate buffing pads. As mentioned, white or blue pads are common choices. These are generally non-abrasive and designed for polishing.
Avoid aggressive scrub pads like green or black ones, as these can be too harsh and potentially scratch your floor’s finish. You might also want a soft microfiber cloth for wiping up any excess product or for buffing smaller areas by hand, such as corners or edges where the machine can’t reach. Having a good vacuum cleaner with a soft brush attachment is also important for thorough cleaning before you begin.
The Step-by-Step Buffing Process
First, thoroughly clean your floors. Vacuum them with a soft brush attachment to remove all dust and debris. Then, mop with a pH-neutral hardwood floor cleaner.
Make sure the mop is only damp, not wet, as excess water can damage hardwood. Allow the floor to dry completely. Next, apply your chosen buffing product according to its instructions.
Some products are sprayed on in a fine mist, while others are applied with a mop in thin coats.
Once the product is applied, attach the correct buffing pad to your floor buffer. Turn on the machine and begin buffing. Work in small, manageable sections, moving the buffer slowly and steadily in overlapping passes.
Typically, you’ll move the buffer in a straight line, then overlap the next pass by about half the width of the machine. Maintain a consistent motion to avoid creating uneven streaks. Continue buffing until the entire section looks uniform and shiny.
Repeat this process for the entire floor.
After buffing a section, you may need to wipe up any excess product with a clean microfiber cloth. Once the entire floor is buffed, allow it to dry completely. The drying time will vary depending on the product used and humidity levels.
Some products allow you to walk on the floor within a few hours, while others might require overnight drying. Always follow the manufacturer’s instructions for the specific buffing product you are using. The final result should be a floor that looks brighter, smoother, and more vibrant.
Common Pitfalls to Avoid
One common mistake is using too much product. This can lead to a sticky or hazy residue that dulls the floor instead of brightening it. Always follow the product’s dilution and application instructions carefully.
Another pitfall is using an abrasive pad on the buffer. These can scratch the existing finish, doing more harm than good. Stick to recommended pads like white or blue ones for buffing finished hardwood floors.
Over-buffing a single spot can also create an uneven finish or generate too much heat, potentially damaging the finish.
Not properly cleaning the floor before buffing is another frequent error. Any grit or debris left on the floor will be ground into the finish by the buffer, creating fine scratches. Ensure your vacuuming and mopping are thorough.
Finally, rushing the drying time can also cause issues. If you walk on a floor that hasn’t fully dried, you can create new scuffs and marks, undoing the work you just did. Patience is key, especially when waiting for the floor to be ready for use again.
What is Floor Buffing?
Floor buffing, often referred to as floor polishing or screen and recoating, is a maintenance process for finished hardwood floors. It’s designed to refresh the look of your floors by removing minor surface scratches, dullness, and scuff marks. Unlike refinishing, which involves sanding down to the bare wood, buffing works on the existing top coat of finish.
This means it’s a less invasive and time-consuming procedure that can be done more frequently to keep floors looking their best.
The process typically uses a floor buffer machine. This machine oscillates or spins a pad against the floor’s surface. Depending on the specific method, a buffing compound, a cleaning solution, or a screen (a flexible abrasive material) might be used.
The goal is to gently abrade the very top layer of the old finish, removing imperfections, and then to polish the surface. Sometimes, a new, thin coat of finish is applied after buffing or screening, which is why the process is sometimes called screen and recoat. This adds a new layer of protection and shine.
Understanding Floor Buffers
Floor buffers are specialized machines designed to clean and polish floor surfaces. There are generally two main types relevant to home use: low-speed and high-speed buffers. For most DIY buffing of finished hardwood floors, a low-speed buffer is recommended.
These machines operate at lower RPMs (revolutions per minute), making them gentler on the floor finish and easier for homeowners to control. They are typically used with a buffing pad that works with liquid cleaning or polishing solutions.
High-speed buffers are more powerful and are generally used for polishing concrete, stone, or heavily worn finishes. They can generate a lot of heat and are more aggressive, which can easily damage a delicate hardwood finish if not used with extreme caution and expertise. When you rent a floor buffer, always specify that it’s for finished hardwood floors.
The rental company can then recommend the appropriate machine, often a low-speed oscillating model, and the correct type of pad to use for your project.
Different Types of Buffing Pads
The pads used with floor buffers are critical to the success of the buffing process. They come in various materials and grits, each suited for different tasks. For buffing finished hardwood floors, you’ll want pads that are designed for cleaning and polishing without being overly abrasive.
Common choices include:
- White Buffing Pads: These are typically the mildest and are used for light polishing and applying finishes.
- Blue Buffing Pads: These are slightly more aggressive than white pads and are good for general buffing and cleaning. They can effectively remove light scuffs and dullness.
- Screen Discs (for Screen and Recoat): If you’re doing a “screen and recoat” which is a more involved process than just buffing, you might use flexible screen discs. These have an abrasive coating and are used to lightly abrade the entire surface before a new coat of finish is applied. These are more aggressive than regular buffing pads.
It’s vital to choose the right pad for the job. Using a pad that’s too aggressive, like a black stripping pad or a green scrubbing pad, can scratch or even remove the finish, necessitating a full refinish. Always consult the product manufacturer’s recommendations or seek advice from the rental store to ensure you’re using the correct pad for your specific buffing product and floor finish.
Buffing Solutions and Compounds
The liquids used during the buffing process are just as important as the pads. These solutions help to lubricate the pad, clean the floor, and restore shine. They can be broadly categorized:
- Spray Buffers: These are applied in a light mist directly onto the floor ahead of the buffer. They are often quick-drying and can provide a good shine with minimal effort.
- Liquid Buffers/Polishes: These are applied more broadly, often with a mop. They can contain mild cleaning agents and polishing ingredients to restore luster. Some may also add a very thin protective layer.
- Floor Cleaners (for prep): Before buffing, a thorough cleaning is essential. Use a pH-neutral cleaner specifically designed for hardwood floors. This removes dirt and grime without damaging the finish.
Some older methods might involve “buffing compounds,” which are more abrasive. However, for most modern polyurethane finishes, mild liquid or spray buffers are preferred to avoid unnecessary wear on the finish. Always check that the product you choose is compatible with your floor’s finish type (e.g., polyurethane, oil-based, water-based).
Using the wrong product could dull, streak, or even damage your finish.
Step-by-Step Guide to Buffing Hardwood Floors
This guide will walk you through the process of how to buff your hardwood floors to bring back their shine, answering the question “Can You Buff Hardwood Floors Without Refinishing? Pro Tips for success.”
Preparation is Key
Before you even think about turning on a buffer, proper preparation is crucial. Your floors must be perfectly clean. Start by vacuuming the entire area thoroughly.
Use a vacuum cleaner with a soft brush attachment specifically designed for hard floors. This ensures you pick up all loose dirt, dust, and debris. Any grit left behind will be ground into your floor by the buffer, causing micro-scratches and dullness.
After vacuuming, damp mop the floors. Use a cleaner specifically formulated for finished hardwood floors. Ensure the mop is not too wet; a damp mop is sufficient.
Excess water can seep into the wood and cause damage, such as warping or swelling. Work in sections, and allow each section to dry completely before moving to the next. You can speed up drying by using fans or opening windows, ensuring good air circulation.
A clean floor is the foundation for a successful buffing job.
Applying the Buffing Product
Once the floor is completely dry, it’s time to apply your chosen buffing product. Follow the manufacturer’s instructions precisely. If you’re using a spray buffer, you’ll typically mist it lightly onto a section of the floor, usually about 3-4 feet wide.
If you’re using a liquid buffer, you might apply it with a clean mop in a thin, even coat. It’s important not to over-apply the product, as this can lead to a sticky residue that’s difficult to buff out and can make your floors look hazy.
Work in small, manageable sections. This ensures the product doesn’t dry before you have a chance to buff it. Some products require a specific drying time before buffing.
For instance, a spray buffer might need just a minute or two, while a liquid product might need 10-15 minutes. Always refer to the product label for these details. Applying the product evenly is also important for achieving a uniform finish.
If you apply too much in one spot, it will be harder to buff out and may leave streaks.
Operating the Floor Buffer
Attach the correct buffing pad (e.g., white or blue) to your low-speed floor buffer. Plug in the machine and turn it on. Begin by working in a straight line, moving the buffer slowly and steadily.
Overlap each pass by about half the width of the machine to ensure you don’t miss any spots. Maintain consistent pressure and a smooth, even motion. Avoid stopping the machine on one spot, as this can cause damage to the finish.
As you move the buffer, you should see the floor’s shine beginning to return. The product will be worked into the finish, and minor imperfections will be smoothed away. Once you have buffed a section, move on to the next, applying more product as needed.
Continue this process until the entire floor has been buffed. If you notice any streaks or unevenness, you can go back over the area, ensuring your passes are even and overlapping.
Final Touches and Curing
After you’ve finished buffing the entire floor, take a clean, dry microfiber cloth and wipe down any edges or corners that the buffer couldn’t reach. This ensures a consistent look throughout the room. Most buffing products require a curing period.
This is the time it takes for the product to fully harden and for the floor to be ready for normal use. This curing time can range from a few hours to 24 hours, depending on the specific product used and environmental conditions like humidity and temperature.
Always check the product manufacturer’s instructions for the recommended curing time. During the curing period, avoid walking on the floors as much as possible. If you must walk on them, wear clean, soft-soled shoes.
Heavy furniture should not be placed back on the floor until the curing is complete. Proper curing ensures the longevity of the buffed finish and prevents new scuffs and scratches from forming.
Maintaining Your Buffed Floors
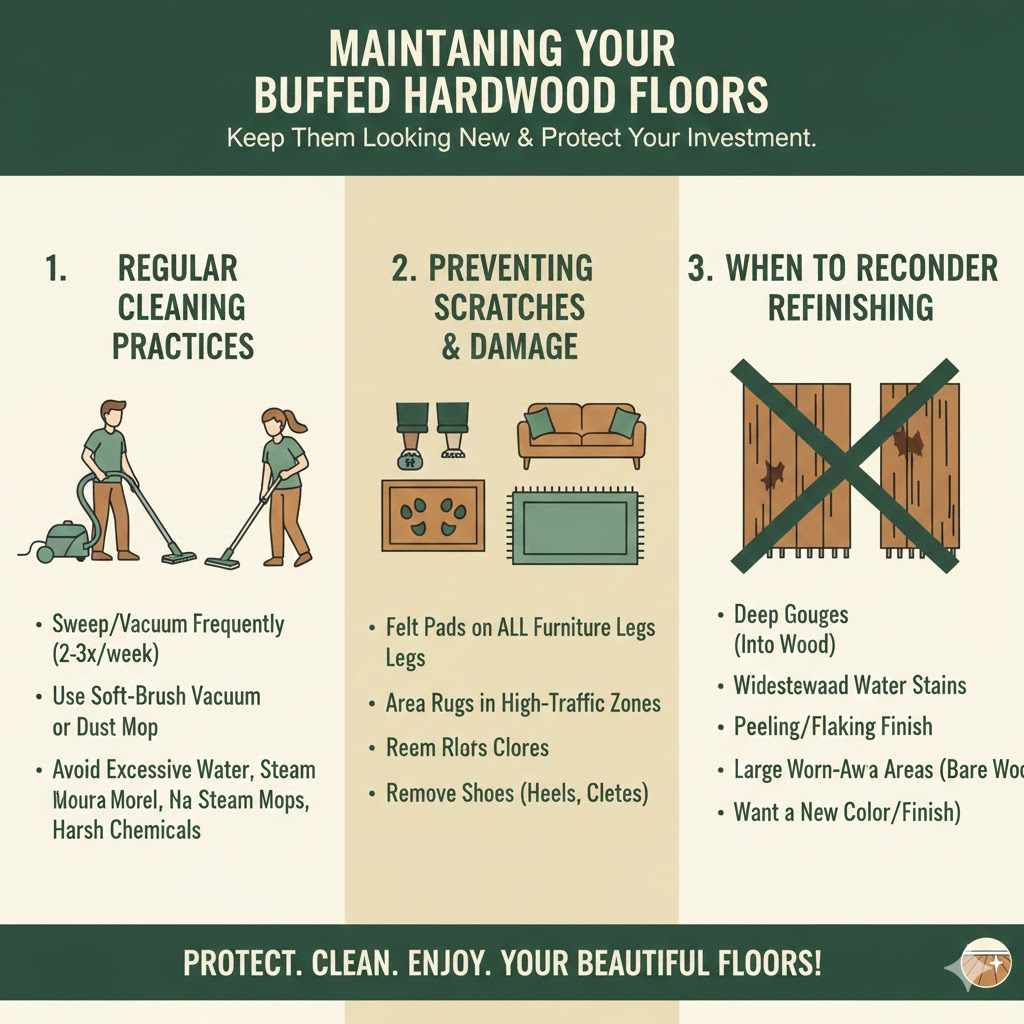
Once your floors are buffed and looking great, it’s important to maintain them properly to keep them that way. Regular cleaning is the most important aspect of floor maintenance. Sweep or vacuum your floors frequently, at least a few times a week, to remove dust and grit that can scratch the finish over time.
When you need to wash them, use a damp mop and a pH-neutral cleaner specifically designed for hardwood floors. Avoid using excessive water or harsh cleaning chemicals, as these can damage the finish.
Protect your floors from wear and tear. Use furniture coasters under the legs of all furniture to prevent scratches and dents. Place doormats at all entrances to trap dirt and moisture before it can be tracked onto your floors.
For high-traffic areas, consider using area rugs. Avoid wearing high heels, cleats, or any footwear that could damage the finish. By following these simple maintenance tips, you can extend the life and beauty of your newly buffed hardwood floors.
Regular Cleaning Practices
Consistent, gentle cleaning is the cornerstone of hardwood floor maintenance. The most frequent task should be dry cleaning, which means sweeping or vacuuming. Aim to do this at least two to three times a week, and more often if you have pets or live in a dusty area.
For vacuuming, always use a vacuum cleaner with a soft brush roll or a setting that turns the brush roll off. This prevents scratching the floor surface. A good dust mop is also an excellent tool for daily or every-other-day cleaning.
When it’s time for a more thorough cleaning, use a damp mop with a specialized hardwood floor cleaner. These cleaners are formulated to be pH-neutral, meaning they won’t damage the protective finish on your floors. Always wring out your mop thoroughly so it’s just damp, not wet.
Work in small sections, wiping the floor and allowing it to dry quickly. You can use fans to help speed up the drying process. Avoid using steam mops, as the heat and moisture can damage hardwood floors.
Also, steer clear of all-purpose cleaners, ammonia-based cleaners, or abrasive powders, as these can dull or scratch the finish.
Preventing Scratches and Damage
Proactive prevention is far more effective than trying to repair damage later. The biggest culprits for scratches on hardwood floors are furniture legs and dirt. Place felt pads or other protective covers under the legs of all furniture.
Check these pads regularly and replace them when they become worn or dirty, as a piece of grit stuck to the pad can cause more damage than the bare leg itself. For heavier items like sofas or beds, consider using furniture sliders when you need to move them.
Entryways are critical zones for preventing dirt and moisture damage. Install sturdy doormats both outside and inside every exterior door. These mats help to trap dirt, sand, and moisture that would otherwise be tracked onto your floors.
Consider placing rugs in high-traffic areas like hallways and living room seating areas. These rugs act as a protective layer, absorbing wear and tear. Also, remind household members and guests to remove shoes with sharp heels, cleats, or muddy soles before walking on the hardwood floors.
When to Reconsider Refinishing
While buffing can work wonders, it’s not a permanent fix for all floor issues. If your floors have sustained significant damage, such as deep gouges, widespread water stains that have penetrated the wood, or areas where the finish has completely worn away down to the bare wood, buffing will not be enough. These types of problems require a more intensive approach.
Deep scratches cannot be buffed out; they need to be sanded down. Water stains that have altered the wood’s color also require sanding to remove the discolored wood.
Another indicator that refinishing is necessary is if the finish itself is failing. If you notice peeling, flaking, or large areas where the finish is dull and worn away, the protective layer has broken down. Buffing works on the existing finish, so if the finish is compromised, buffing will only highlight these issues.
If you want a completely different look for your floors, such as changing the color or type of finish, then refinishing is the only option. Refinishing essentially resets your floor, allowing you to apply a fresh start with a new finish.
Frequently Asked Questions
Question: Can I buff my hardwood floors if they have pets?
Answer: Yes, you can buff floors that have pets, but you must be extra diligent with cleaning. Pet nails can cause light scratches, and pet accidents can cause stains. Buffing can help with minor scratches and dullness.
However, deep scratches or old stains from accidents will likely require refinishing. Frequent dry cleaning to remove pet hair and dirt is essential before and after buffing.
Question: How often can I buff my hardwood floors?
Answer: You can typically buff your hardwood floors every 6 to 12 months, depending on traffic and wear. It’s a maintenance process, so doing it too often can wear down the existing finish. It’s best to buff when you notice a loss of shine or light scuff marks.
If your floors are in good condition, annual buffing is usually sufficient.
Question: What kind of finish do I have on my hardwood floors?
Answer: Most modern hardwood floors have a polyurethane finish, which is very durable. Older floors might have oil-based finishes, wax finishes, or penetrating sealers. You can test your finish by applying a small amount of water to an inconspicuous area.
If the water beads up, it’s likely polyurethane or a similar modern finish. If it soaks in quickly or leaves a dark spot, it might be an older finish that requires different care.
Question: Can I buff floors that have been waxed?
Answer: Buffing machines can be used on waxed floors, but it’s a different process. Typically, you would use a buffer with a lambswool or soft polishing pad to bring up the shine of the wax. For removing built-up wax or preparing for re-waxing, a specific wax stripper product and a more aggressive pad might be needed.
Be cautious, as buffing too aggressively can spread old wax unevenly.
Question: Will buffing remove deep scratches?
Answer: No, buffing is a surface-level process and will not remove deep scratches. Deep scratches penetrate the finish and into the wood itself. Buffing can only address minor surface scuffs and dullness.
For deep scratches, you would need to consider repair kits for small areas or a full refinishing of the floor.
Final Thoughts
Buffing hardwood floors without refinishing is a practical way to restore shine and remove light wear. You can absolutely achieve a refreshed look with the right tools and methods. Focus on thorough cleaning, proper product application, and careful machine use.
This process extends your floor’s beauty between major renovations. Enjoy your brighter, smoother floors.