DIY Bee Box: Create Your Own Backyard Beekeeping Haven
Beekeeping is a fascinating hobby. It supports the environment and provides fresh honey.
Building a DIY bee box is a great first step. A DIY bee box offers a unique way to start beekeeping. It’s cost-effective and gives you control over the design. Plus, it’s rewarding to build something with your hands. Bees play a crucial role in pollination.
By creating a bee box, you can help support local bee populations. This guide will walk you through the process of building your own bee box. With simple materials and basic tools, you can create a safe home for bees. Let’s get started and make a difference in your garden and the world.
Credit: www.familyhandyman.com
Introduction To Backyard Beekeeping
Backyard beekeeping is a rewarding hobby for many. It’s a way to connect with nature. It helps the environment and provides you with fresh honey. Building your own bee box is the first step. It’s easier than you think and very satisfying.
Benefits Of Beekeeping
Beekeeping offers many advantages. Bees help pollinate your garden. This leads to more flowers and better crops. Fresh honey is another benefit. It’s natural and free from additives. Beeswax can also be used for candles and other products.
Getting Started With Bees
First, learn about the types of bees. Honeybees are the most common choice. Next, gather your supplies. You will need a bee box, protective gear, and a smoker. Find a good location in your yard. It should be sunny but sheltered from the wind.
Order your bees from a reputable source. Introduce them to their new home. Check on them regularly. Make sure they have enough food and water. Keep an eye out for pests and diseases.

Credit: www.youtube.com
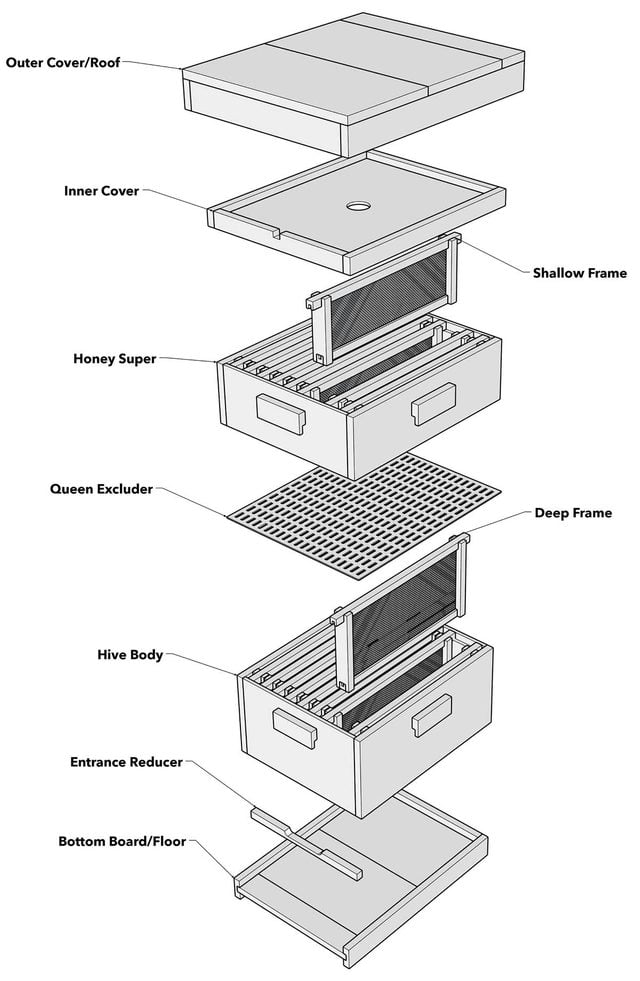
Choosing The Right Bee Box
Creating a DIY bee box can be a rewarding experience, bringing you closer to nature and helping the environment. However, choosing the right bee box is crucial for the health and productivity of your bees. In this section, we will delve into the different types of bee boxes available and guide you on how to select the best option for your beekeeping needs.
Types Of Bee Boxes
When it comes to bee boxes, there are several types to choose from. Each type has its unique features and benefits, catering to different beekeeping styles and goals. Here are some common types:
- Langstroth Hive: The most popular choice among beekeepers, known for its modular design and ease of use.
- Top-Bar Hive: An excellent option for natural beekeeping, allowing bees to build comb in a more organic manner.
- Warre Hive: Designed to mimic a tree hollow, providing a more natural habitat for bees.
- Flow Hive: A modern innovation that allows honey harvesting without disturbing the bees.
Selecting The Best Option
Now that you know the types of bee boxes, how do you choose the best one? Here are a few factors to consider:
- Experience Level: If you’re a beginner, a Langstroth hive might be the easiest to start with. It’s user-friendly and widely supported.
- Beekeeping Goals: If you’re aiming for a hands-off approach, a Top-Bar or Warre hive could be ideal. For those looking to maximize honey production, the Flow Hive is a game-changer.
- Climate: Consider your local climate. Some hives, like the Warre, offer better insulation, which can be beneficial in colder regions.
- Space: Ensure you have enough space for the type of hive you choose. Langstroth hives, for instance, can grow vertically, requiring less ground space.
Remember, the perfect bee box for you is one that aligns with your beekeeping style and environmental conditions. Take your time, do a bit of research, and perhaps even visit a local beekeeper to see different hives in action. Happy beekeeping!
Essential Tools And Materials
Creating a bee box can be a rewarding and enjoyable experience. Not only do you get to create a cozy home for these little pollinators, but you also get to flex your DIY muscles. Before diving into the project, it’s crucial to gather all the necessary tools and materials. This section will guide you through everything you need to get started.
Tool List
Having the right tools can make or break your DIY bee box project. Trust me, you don’t want to get halfway through and realize you’re missing something important. Here’s a list of essential tools:
- Hammer: A basic but indispensable tool for nailing parts together.
- Hand Saw: Useful for cutting wood to the required dimensions.
- Measuring Tape: Ensures your cuts are precise. Remember, precision is key!
- Wood Glue: Offers extra stability to your bee box structure.
- Screwdriver: For driving screws into the wood. A power screwdriver can save you time.
- Clamps: To hold pieces together while the glue dries. Think of it as a third hand.
- Safety Gear: Safety glasses and gloves. Better safe than sorry!
Material List
Once you’ve got your tools sorted, it’s time to gather your materials. A bee box needs to be made from durable, non-toxic materials to ensure it’s a safe environment for the bees. Here’s what you’ll need:
- Wood: Pine or cedar are excellent choices as they are durable and bee-friendly.
- Nails: Go for galvanized nails to prevent rusting over time.
- Screws: For added strength where nails alone won’t suffice.
- Wire Mesh: To keep predators out while allowing ventilation.
- Paint: Non-toxic paint or varnish to protect the wood from weather conditions.
- Bee Frames: These will hold the honeycombs. Pre-made frames can save you a lot of time.
- Foundation Sheets: These provide a base for the bees to start building their comb.
Equipped with these tools and materials, you’re well on your way to building a sturdy and inviting bee box. Just imagine the buzz of activity you’ll soon have in your backyard! Ready to get started? Let’s dive in!

Credit: www.youtube.com
Step-by-step Bee Box Construction
Building your own bee box is an enjoyable and rewarding project. It allows you to create a safe haven for bees to thrive. Plus, it’s a great way to support the environment. Whether you’re a seasoned beekeeper or a beginner, this step-by-step guide will help you through the process of constructing your very own bee box. Let’s dive into the exciting world of bee box construction!
Preparing The Wood
The first step in building your bee box is preparing the wood. You’ll need to gather all the necessary materials and tools. Here’s what you’ll need:
- Wood: Pine or cedar is recommended because they are durable and weather-resistant.
- Measuring Tape: To ensure precise measurements.
- Saw: A hand saw or circular saw will do the trick.
- Sandpaper: To smooth out the edges.
- Wood Glue: For strong joints.
- Nails or Screws: To assemble the box.
Start by measuring and cutting your wood pieces according to the dimensions of the bee box you want to build. Typically, a standard Langstroth hive box measures 19 7/8″ long, 16 1/4″ wide, and 9 5/8″ high. Once you’ve cut the wood, sand the edges to remove any splinters.
Assembling The Box
Now that you have all your wood pieces ready, it’s time to assemble the box. Here’s how to do it:
- Base: Begin with the base of the box. Apply wood glue to the edges and join the pieces together. Use clamps to hold them in place and secure with nails or screws.
- Sides: Next, attach the side panels to the base. Ensure they are aligned properly before securing them with nails or screws.
- Top Frame: Attach the top frame to the sides. This will provide stability and support for the box.
- Entrance: Cut a small entrance at the bottom front of the box. This will allow bees to enter and exit easily.
Once the box is assembled, give it a final sanding to smooth out any rough edges. You can also paint or varnish the exterior to protect it from the elements.
And there you have it! Your very own bee box, ready to house a thriving colony of bees. Remember, a well-constructed bee box not only provides a safe home for bees but also contributes to the health of our environment. Happy beekeeping!
Setting Up Your Bee Box
So, you’ve decided to embark on the rewarding journey of beekeeping. Congratulations! Setting up your bee box is the first step towards nurturing your buzzing friends and harvesting sweet honey. This guide will walk you through the essential steps to get your bee box ready for its new inhabitants. Let’s dive in!
Choosing The Location
Location, location, location! It’s not just a mantra for real estate but also for beekeeping. The spot you pick for your bee box can make a huge difference in the health and productivity of your bees.
- Sunny Spot: Bees love the sun. Find a location that gets plenty of sunlight, especially in the morning. This helps warm up the hive early, getting your bees out and about.
- Wind Protection: While bees enjoy the sun, they’re not fans of strong winds. Place your bee box in an area sheltered from strong winds, such as near a fence or a row of bushes.
- Water Source: Bees need water, just like any other living creature. Ensure there’s a water source nearby, like a pond or a shallow dish with stones for the bees to perch on.
- Accessibility: You’ll need to check on your bees regularly. Make sure the location is easy for you to access without disturbing the bees too much.
Installing The Bees
Now that you’ve found the perfect spot, it’s time to introduce the bees to their new home. This might sound a bit daunting, but with a little preparation, it can be a smooth process.
- Prepare the Box: Ensure your bee box is clean and ready. Check that the frames are in place and everything is secure.
- Calm Weather: Choose a calm day with mild weather for installing the bees. Bees are more relaxed and easier to handle when it’s not too hot or windy.
- Wear Protective Gear: Safety first! Don your beekeeping suit, gloves, and veil to protect yourself from stings.
- Introduce the Bees: Gently open the package of bees and slowly pour them into the box. It helps to spray them lightly with sugar water first to keep them calm and occupied.
- Place the Queen: The queen bee usually comes in a separate small cage. Place her in the box, ensuring she’s safe and secure. The workers will soon release her, and she’ll start laying eggs.
- Close and Observe: Close the box and give your bees some time to settle in. Observe from a distance to see how they’re adjusting to their new home.
Setting up your bee box can be a delightful experience. Remember, patience is key. Bees need some time to adapt to their new environment. Give them a warm welcome, and soon enough, you’ll have a thriving colony buzzing with activity!
Maintaining Your Bee Box
So, you’ve built your bee box and welcomed your buzzing friends. Great job! But, like any good host, you need to ensure their home stays in top shape. Regular maintenance of your bee box is essential for healthy bees and honey production. Let’s dive into some easy steps to keep your bee box in perfect condition.
Regular Inspections
Conducting regular inspections is crucial. Here’s a simple guide:
- Check for Damage: Look for any cracks or broken parts in the box. Bees need a safe, secure home.
- Monitor Bee Health: Pay attention to the behavior of the bees. Are they active? Do they look healthy? If not, there might be an issue.
- Hive Cleanliness: Ensure the hive is clean. Remove any debris that could harm the bees.
Seasonal Maintenance
Each season brings new challenges and needs for your bee box:
| Season | Maintenance Tips |
|---|---|
| Spring | Check for queen bee activity. Clean the hive and add new frames if needed. |
| Summer | Ensure enough space for honey storage. Protect the hive from overheating. |
| Fall | Prepare for winter. Reduce hive entrance size to keep out pests. |
| Winter | Ensure the hive is insulated. Check for moisture buildup. |
Remember, maintaining a bee box is like tending a garden. A little care goes a long way. By staying attentive and proactive, you’ll ensure your bees are happy and productive. Happy beekeeping!
Protecting Your Bees
Keeping bees safe is crucial for a thriving hive. Bees face many threats. These include pests and harsh weather. By taking steps to protect your bees, you ensure their health and productivity. Here’s how you can safeguard your bee box from common dangers.
Pest Control
Pests can harm your bees. Varroa mites and wax moths are common threats. Regular inspections help you spot these pests early. Use screened bottom boards to reduce mite infestations. Placing traps around the hive can catch wax moths. Keep the area around your bee box clean. This reduces the chances of attracting pests.
Weather Protection
Weather can affect bee health. Too much rain or extreme temperatures can be harmful. Place your bee box in a sheltered spot. This protects it from strong winds and heavy rain. Consider adding a roof to your bee box. It helps keep the hive dry. Insulating the hive in winter keeps bees warm. Ventilation prevents moisture buildup inside the hive. This keeps bees dry and healthy.
Harvesting Honey
So, you’ve built your bee box and your bees have been busy. Now, it’s time for the sweet reward – harvesting honey. This process might seem daunting at first, but with the right guidance, you’ll find it to be an enjoyable and fruitful experience. Let’s dive into the details of when and how to harvest honey from your DIY bee box.
When To Harvest
Knowing the right time to harvest honey is crucial. If you harvest too early, the honey might not be fully ripened, and if you wait too long, you risk the honey getting too thick or even crystallizing.
- Check the frames: Look for capped honey. When bees cap the honey, it means the moisture level is just right.
- Season: Late summer to early fall is usually the best time to harvest.
- Weather: Choose a warm, dry day for harvesting. Bees are less active and less aggressive in such conditions.
Remember, patience is key. It’s better to wait a bit longer than to rush the process and end up with subpar honey.
Honey Extraction Process
Once you’ve determined it’s the right time to harvest, the actual extraction process begins. Here’s a step-by-step guide to help you through it:
- Gather your tools: You’ll need a bee suit, smoker, uncapping knife, honey extractor, and clean jars or containers.
- Calm your bees: Use the smoker to gently calm the bees. This makes the process smoother and safer.
- Remove the frames: Carefully take out the frames with capped honey.
- Uncap the honey: Use the uncapping knife to remove the wax caps from the honeycomb cells.
- Extract the honey: Place the frames in the honey extractor and spin to release the honey. This can be done manually or with an electric extractor.
- Filter the honey: Pour the extracted honey through a fine mesh or cheesecloth to remove impurities.
- Store the honey: Transfer the filtered honey into clean jars. Seal them tightly and store in a cool, dry place.
And there you have it – your very own homemade honey! The entire process might take some time and effort, but the end result is more than worth it. Plus, there’s nothing quite like the satisfaction of enjoying honey produced by your own bees.
So, are you ready to start harvesting? With these tips in mind, you’ll be well on your way to becoming a honey-harvesting pro. Just remember to take it one step at a time and enjoy the journey. After all, beekeeping is as much about the process as it is about the product.
Troubleshooting Common Issues
Creating a DIY bee box can be a rewarding project. But, it comes with its challenges. Keeping your bees healthy and your box in good shape is crucial. Let’s explore some common problems and how to fix them.
Bee Health Problems
Bees can face many health issues. Parasites like varroa mites are common threats. Check your bees regularly for mites. Use treatments recommended by beekeeping experts.
Disease is another concern. American foulbrood and European foulbrood are two common diseases. Look for discolored or sunken brood cells. If you find any, act quickly. Contact local beekeeping associations for advice.
Nutrition is key to bee health. Ensure your bees have access to diverse plants. This provides the nutrients they need. Consider planting a variety of flowers around your bee box.
Box Repair Tips
Wear and tear on your bee box is normal. Check for cracks or holes in the wood. Small cracks can be sealed with wood filler. Larger holes may need wood patches.
Inspect the joints of your bee box. Loose joints can let in pests or weather. Tighten screws or nails as needed. If joints are damaged, consider re-gluing them.
Paint or varnish helps protect your bee box. Check for peeling or faded areas. Reapply a fresh coat every few years. This keeps the wood strong and weather-resistant.
Mice and other pests can damage your bee box. Use metal guards or mesh to keep them out. Regularly inspect for signs of pests and take action if needed.
Frequently Asked Questions
Is It Cheaper To Build Your Own Beehive?
Yes, building your own beehive can be cheaper. DIY materials often cost less than pre-made hives.
What Is The 7/10 Rule For Beekeeping?
The 7/10 rule in beekeeping advises inspecting hives every 7 to 10 days. This helps monitor hive health and prevent swarming.
How Do You Make A Simple Bee Box?
To make a simple bee box, assemble a wooden box with removable frames, a bottom board, and a cover. Ensure proper ventilation and space for bees. Paint the exterior with non-toxic paint. Place the box in a sunny, sheltered location.
What Is The 3 Feet 3 Mile Rule For Bees?
The 3 feet 3 mile rule for bees suggests moving hives either less than 3 feet or more than 3 miles. This helps bees easily find their new location.
Conclusion
Creating a DIY bee box can be both fun and rewarding. Bees play a vital role in our environment. Your homemade bee box provides them with a safe place. It’s a simple project that benefits nature greatly. Start today and watch your garden thrive.
Happy building and enjoy the buzzing life!