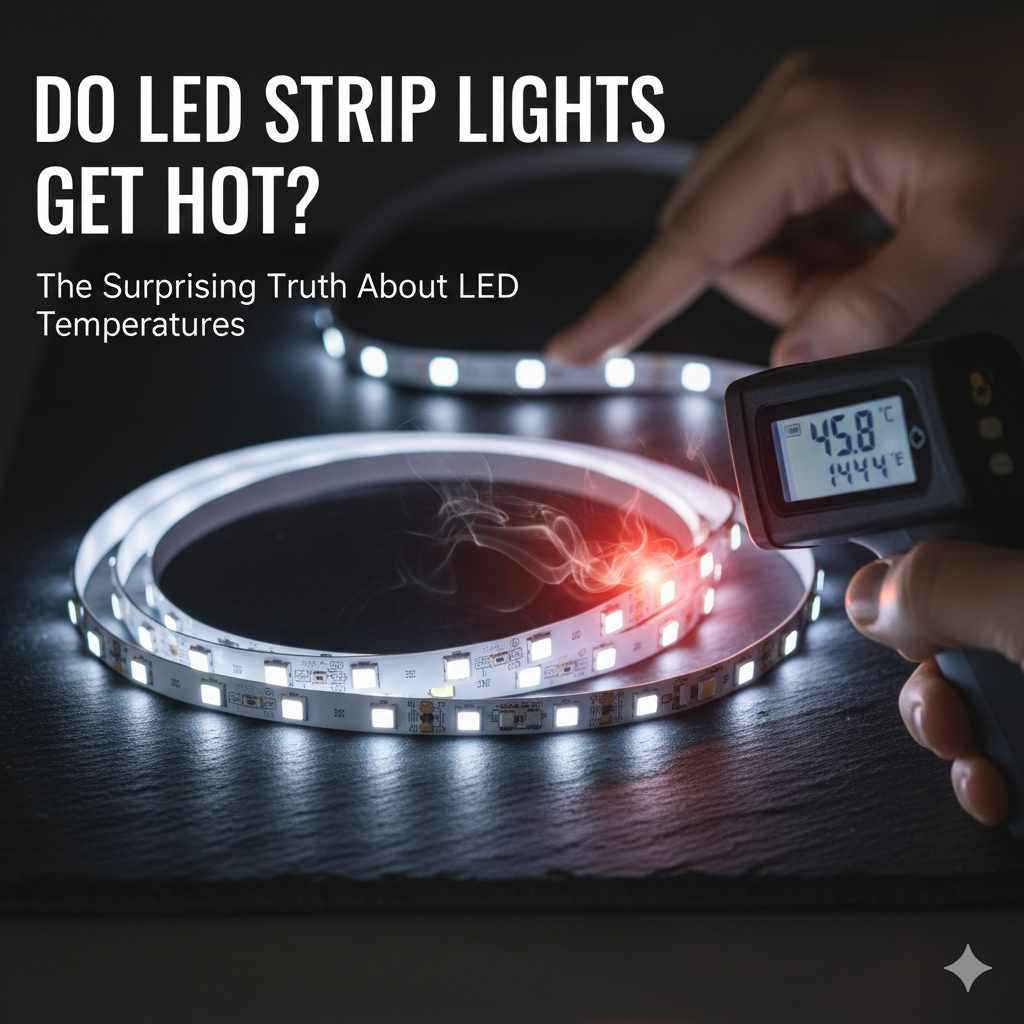
Do LED Strip Lights Get Hot? Essential Guide
Do LED strip lights get hot? Yes, they can, but usually not dangerously so. Most LED strips produce minimal heat, dissipating it effectively. However, factors like power, installation, and quality can influence temperature. This guide explains why and how to keep your LED strips cool and safe.
Hey there, DIY enthusiasts! Md Meraj here. You’ve probably seen those vibrant LED strip lights transforming spaces, adding ambiance to kitchens, bedrooms, and workshops. They’re fantastic for DIY projects, offering a modern glow without the hassle of traditional lighting. But a common question pops up as you get ready to install them: “Do LED strip lights get hot?” It’s a good question, especially when you’re working with electricity and want your projects to be safe and long-lasting. You might worry about them overheating, causing damage, or even becoming a fire hazard. Don’t sweat it! We’re going to break down exactly why this happens, how much heat is normal, and what you can do to ensure your LED strips stay cool and perform beautifully. We’ll cover everything from understanding the heat they produce to simple installation tips that make a big difference. Let’s get your lights shining bright and cool!
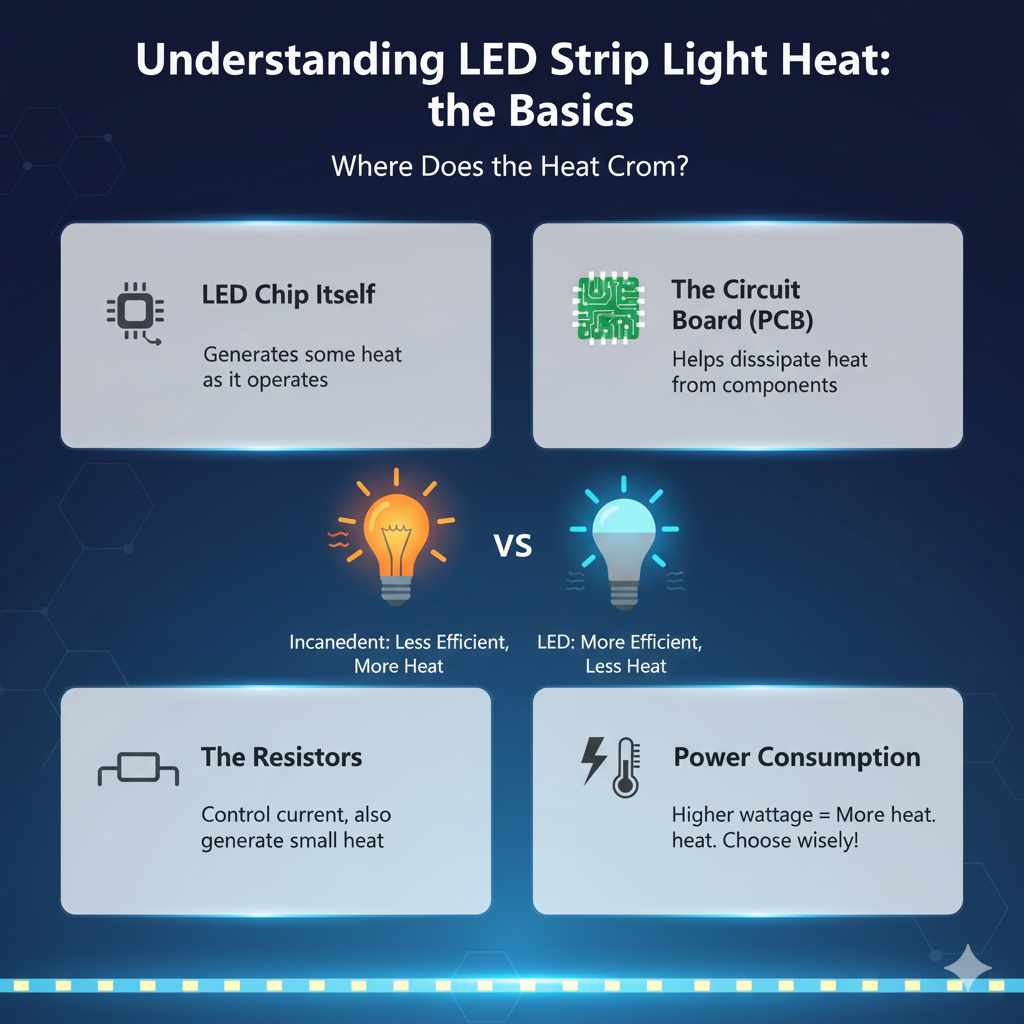
Understanding LED Strip Light Heat: The Basics
When we talk about heat from LED strip lights, it’s important to understand that LEDs, by nature, are much more energy-efficient than older lighting technologies like incandescent bulbs. Incandescent bulbs waste a lot of energy as heat; LEDs convert most of their energy into light. This means they inherently produce less heat. However, “less heat” doesn’t mean “no heat.”
The heat generated by an LED strip comes from a few key areas:
- The LED Chip Itself: While efficient, the semiconductor material in the LED chip still generates some heat as it operates.
- The Resistors: Many LED strips have resistors to control the current flowing to the LEDs. These components can also generate a small amount of heat.
- The Circuit Board (PCB): The strip’s printed circuit board (PCB) helps to dissipate the heat from the LEDs and resistors.
The amount of heat produced is directly related to the power consumption of the LED strip. Higher wattage strips will naturally generate more heat than lower wattage ones. This is why it’s crucial to choose the right type of LED strip for your project and ensure it’s installed correctly.
Factors Influencing LED Strip Temperature
Several factors can influence how hot your LED strip lights get. Understanding these will help you make informed decisions during installation and troubleshooting.
1. Power Consumption (Wattage)
This is perhaps the most significant factor. A strip that uses more power will generate more heat. Look for the wattage per meter (or foot) on the product packaging. For example, a 10W/meter strip will get warmer than a 5W/meter strip when both are running at full brightness.
Why it matters: Overpowering an LED strip or using a strip that’s too powerful for its intended application can lead to excessive heat. This can shorten the lifespan of the LEDs and, in extreme cases, cause damage.
2. Quality of Components
Not all LED strips are created equal. The quality of the LED chips, resistors, and the PCB itself plays a huge role in heat management. Higher-quality components are designed to be more efficient and better at dissipating heat.
Why it matters: Cheaper, low-quality strips might use less efficient components that generate more heat and don’t have adequate heat sinking. This can lead to premature failure.
3. Installation Environment
Where and how you install your LED strips can significantly impact their temperature. Enclosed spaces, poor ventilation, and direct sunlight can all contribute to higher temperatures.
- Enclosed Spaces: Installing strips inside a tightly sealed cabinet or behind a thick diffuser without airflow can trap heat.
- Direct Sunlight: While LEDs are efficient, direct sunlight adds external heat, further increasing the strip’s temperature.
- Proximity to Heat Sources: Placing LED strips near other heat-generating appliances can also raise their operating temperature.
4. Proper Power Supply and Connection
The power supply (driver or adapter) and the connectors used are critical. An undersized power supply can overheat, and poor connections can create resistance, leading to localized hot spots.
Why it matters: Using the correct voltage and amperage for your LED strip is non-negotiable. A power supply that’s struggling to keep up will not only perform poorly but can also become a safety concern.
5. LED Density and Type
The number of LEDs per meter and the type of LED chip (e.g., SMD 3528, 5050, 2835) can also affect heat. Strips with higher LED density or larger LED chips might generate more heat in a concentrated area.
Why it matters: Understanding the specifications of your strip helps you gauge potential heat output. For instance, a strip with 120 LEDs/meter will likely get warmer than one with 60 LEDs/meter if they are of similar wattage.
How to Tell if Your LED Strip Lights Are Too Hot
It’s important to be able to identify when your LED strips are running hotter than they should. Here are a few signs to look out for:
- Touch Test: Carefully touch the LED strip (or the surface it’s attached to) after it’s been on for a while. If it’s too hot to comfortably touch for more than a few seconds, it’s likely running too hot.
- Discoloration: Look for any yellowing or browning of the PCB or the silicone coating on the strip. This is a clear sign of overheating.
- Flickering or Dimming: If the lights start flickering or dimming over time, it can be an indication that the LEDs are being stressed by excessive heat.
- Reduced Lifespan: Prematurely failing LEDs or entire sections of the strip going out can be a symptom of chronic overheating.
- Smell: In severe cases, overheating can produce a burning smell. This is a critical safety issue and requires immediate attention.
Remember, a warm-to-the-touch LED strip is often normal. The key is to differentiate between a comfortable warmth and a concerning heat that could lead to damage or a safety hazard.
Measuring LED Strip Temperature: Tools and Techniques
For those who like to be precise, or if you’re concerned about a specific installation, you can measure the temperature of your LED strips. Here are a couple of simple methods:
Infrared (IR) Thermometer
This is the easiest and safest way to measure surface temperature without direct contact. You simply point the IR thermometer at the strip or the surface it’s mounted on, and it gives you an instant reading.
- How to use: Aim the laser dot at the area you want to measure and press the trigger.
- What to look for: Compare the readings to the ambient room temperature. A difference of 10-20°C (18-36°F) above ambient might be acceptable for some strips, but anything significantly higher warrants investigation.
Contact Thermometer/Thermocouple
If you have a multimeter with a temperature probe, you can get a more direct reading by touching the probe to the surface of the LED strip or PCB. Be cautious when doing this with powered-on lights.
Safety First: Always use caution when measuring temperatures of electrical components. If you’re unsure, stick to non-contact methods like an IR thermometer.
Keeping Your LED Strip Lights Cool: Essential Tips
Now that we understand why LED strips might get hot and how to spot it, let’s focus on the most important part: how to keep them cool and running efficiently. These are practical tips you can use for any DIY project.
1. Choose the Right Wattage Strip
Always match the wattage of the LED strip to your needs. For accent lighting or areas with minimal use, lower wattage strips (e.g., 5-7W/meter) are usually sufficient and will produce less heat. For task lighting or areas requiring brighter illumination, you might need higher wattage (e.g., 10-15W/meter), but be sure to plan for heat dissipation.
2. Use a Heat Sink or Aluminum Channel
This is one of the most effective ways to manage heat. Mounting your LED strip lights onto an aluminum profile or heat sink is highly recommended, especially for higher-power strips or those installed in enclosed spaces.
- Aluminum Channels: These are U-shaped channels, often made of aluminum, that the LED strip adheres to. The aluminum acts as a heatsink, drawing heat away from the strip and dissipating it into the surrounding air. Many come with frosted or clear diffusers to give a more even light. You can find these at most electronics or lighting supply stores.
- Purpose-Built Heatsinks: For very high-power applications, you might consider more substantial heatsink profiles.
Why it works: Metal is an excellent conductor of heat. By attaching the strip to an aluminum surface, you’re essentially giving the heat a path to escape the strip and spread out.
3. Ensure Adequate Ventilation
Never install LED strips in completely sealed, unventilated enclosures if they are generating noticeable heat. Allow for air circulation around the strip and its power supply.
- Open-Ended Cabinets: If installing under cabinets, ensure there’s a gap at the back or sides for air to flow.
- Diffusers: While diffusers provide a softer light, ensure they aren’t so tight that they trap heat.
4. Use the Correct Power Supply (Driver)
Always use a power supply that is rated for the correct voltage (usually 12V or 24V) and has sufficient wattage capacity for your LED strip. It’s good practice to choose a power supply with at least 20% more wattage than your strip requires to avoid overloading it.
Example: If your total LED strip length requires 50W, choose a power supply rated for at least 60W (50W + 20%).
You can find reliable power supply guides and calculators on reputable electronics retail websites or manufacturer documentation. For instance, Digi-Key, a well-known electronics distributor, offers detailed guides on selecting the right power supplies for LED applications.
5. Proper Wiring and Connections
Ensure all connections are secure and properly insulated. Loose connections can cause resistance, leading to localized heat and potential failure. Use appropriate connectors or solder connections for a reliable setup.
- Solder vs. Connectors: Soldering offers the most robust connection, but good quality clip-on connectors are also effective for most DIY applications.
- Wire Gauge: Use wire of the appropriate gauge for the current being carried. Thicker wires have less resistance.
6. Avoid Direct Sunlight and Heat Sources
Install your LED strips away from direct sunlight and other heat-generating appliances like ovens, radiators, or heat vents. This simple placement can make a significant difference in operating temperature.
7. Consider Dimmable LED Strips
If you don’t need full brightness all the time, using a dimmer can help. Running LED strips at lower brightness levels reduces their power consumption and, consequently, the heat they produce.
8. Choose High-Quality LED Strips
Invest in reputable brands and higher-quality LED strips. These are more likely to use better components, have superior PCB construction for heat dissipation, and adhere to safety standards. While they might cost a bit more upfront, their longevity and reliability are usually worth it.
LED Strip Heat Management in Different Applications
The best approach to managing heat can vary depending on where you’re using your LED strips. Here’s a look at some common DIY scenarios:
Kitchen Under-Cabinet Lighting
This is a very popular use. Heat can build up if the strips are fully enclosed behind a cabinet lip or a tight diffuser. Mounting them in aluminum channels attached to the underside of the cabinet is ideal. Ensure there’s a small gap for airflow behind the cabinet.
Living Room/Bedroom Accent Lighting
Often used for cove lighting or behind TVs. If installed in open spaces, heat dissipation is usually less of an issue. However, if tucked into tight recesses, aluminum channels are still a good idea. Avoid covering them with flammable materials.
Workshop or Garage Lighting
Workshops can get warm, and higher-power LED strips might be used for better task lighting. Here, robust heat sinking (aluminum channels) and good ventilation are crucial. Ensure power supplies are also in well-ventilated areas.
Outdoor Lighting
Outdoor-rated LED strips are designed to withstand various temperatures. However, direct sunlight in hot climates can still cause them to run hotter. Using waterproof aluminum channels can provide both protection and heat dissipation.
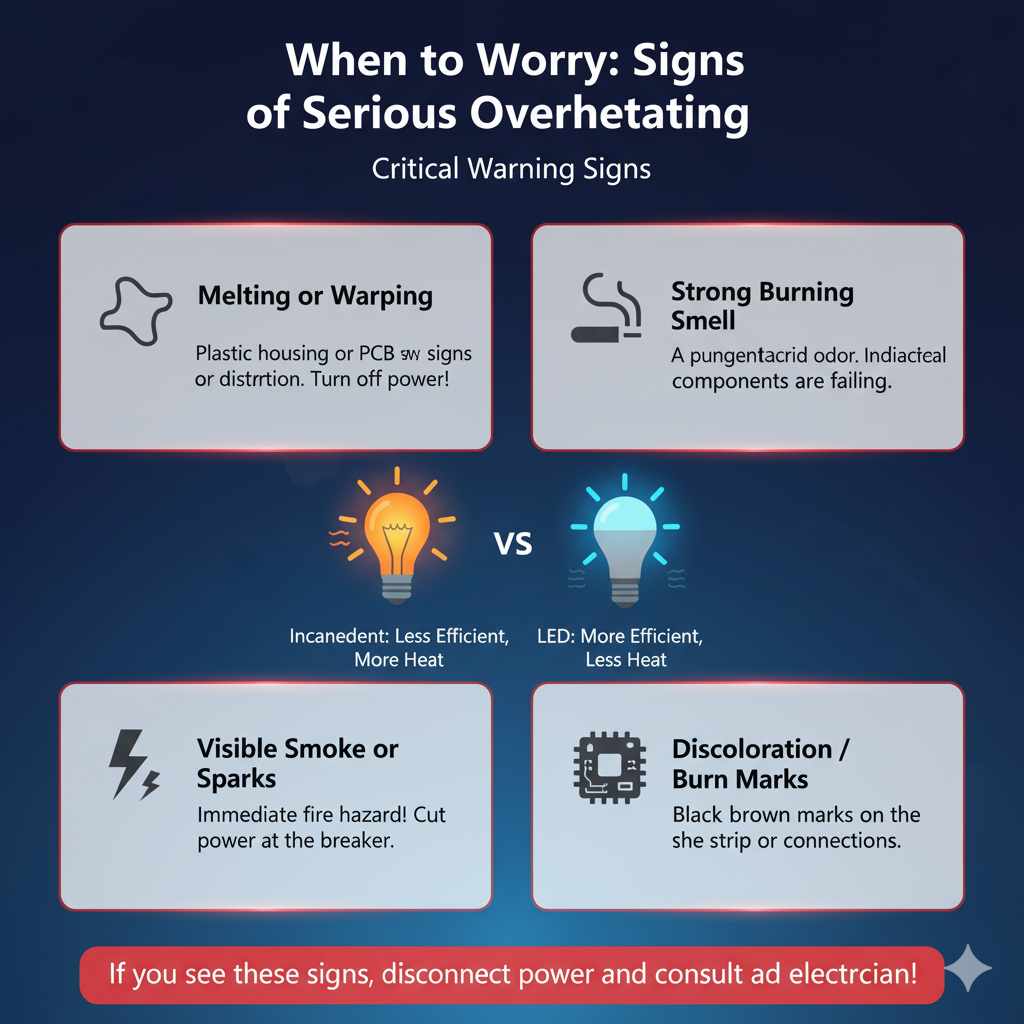
When to Worry: Signs of Serious Overheating
While most heat issues with LED strips are manageable, there are times when overheating indicates a more serious problem that needs immediate attention. You should be concerned if you observe any of the following:
- Melting or Warping: If the plastic housing of the strip, the PCB, or any nearby materials show signs of melting or warping, turn off the power immediately.
- Strong Burning Smell: This is a critical warning sign of electrical components overheating. Do not ignore it.
- Visible Smoke or Sparks: If you see smoke or sparks coming from the strip, power supply, or connections, cut the power at the breaker and do not use the lighting system.
- Discoloration Indicating Burn Marks: Beyond slight yellowing, if you see black or brown burn marks on the strip or connections, it’s a sign of significant heat stress.
If you encounter any of these severe issues, it’s best to disconnect the entire lighting system and consult with a qualified electrician or the lighting manufacturer. Do not attempt to fix severe electrical issues yourself unless you have the proper training and safety equipment.
Troubleshooting Common Heat-Related Issues
Even with the best practices, you might encounter minor heat-related problems. Here’s how to troubleshoot:
| Symptom | Possible Cause | Solution |
|---|---|---|
| LED strip feels too hot to touch comfortably. | High wattage strip, insufficient heat sinking, poor ventilation, undersized power supply. | Install in aluminum channel, ensure ventilation, check power supply wattage, consider lower wattage strip. |
| LEDs are dimming or flickering. | Overheating LEDs, voltage drop, failing power supply. | Improve heat dissipation, use thicker wires for longer runs, check power supply output. |
| Section of the strip is not working or looks discolored. | Burned-out LED due to heat stress, damaged connection. | Replace the affected section or the entire strip if quality is suspect. Check connections. |
| Power supply is unusually warm or hot. | Undersized power supply, insufficient ventilation for the PSU. | Ensure PSU is adequately rated (at least 20% overhead), place PSU in a ventilated area. |
Remember, a good DIY project involves planning and problem-solving. Don’t be discouraged if you run into a small hiccup; troubleshooting is part of the learning process!
FAQ: Your LED Strip Heat Questions Answered
Q1: Are LED strip lights a fire hazard because they get hot?
A1: Generally, no. High-quality LED strips operate at temperatures that are safe for most materials. However, like any electrical device, if they are installed improperly, are of poor quality, or are overloaded, they can overheat and pose a risk. Always follow installation best practices and safety guidelines.
Q2: How warm is too warm for an LED strip?
A2: If you can’t comfortably keep your finger on the strip for more than 5-10 seconds, it’s likely too hot. A good rule of thumb is that the surface temperature should ideally not exceed 50-60°C (122-140°F). Higher temperatures can degrade the LEDs and their adhesive backing.
Q3: Do LED strip lights need special mounting?
A3: For lower-wattage strips and general accent lighting, adhesive backing might be sufficient. However, for better longevity, heat dissipation, and a more secure installation, mounting them on an aluminum channel or heat sink is highly recommended, especially for higher-wattage strips or in enclosed spaces.
Q4: Can I put LED strips inside a sealed plastic box?
A4: It’s not recommended without proper ventilation. LEDs generate heat, and a sealed box will trap that heat, causing the strip to run much hotter, reducing its lifespan and potentially becoming a safety issue. Ensure there’s airflow.
Q5: My LED strip is getting hot on the adhesive side. What should I do?
A5: This is common as heat transfers through the strip. The best solution is to mount the strip onto an aluminum channel or heat sink. This will draw the heat away from the strip and dissipate it more effectively, protecting both the strip and the surface it’s mounted on.
Q6: Do RGB LED strips get hotter than single-color ones?
A6: Generally, RGB strips can get slightly warmer than single-color strips of the same wattage because they contain four chips (Red, Green, Blue, and a combined white/extra LED) in a more concentrated area. However, the principles of heat management remain the same: good quality, proper installation, and heat sinking are key.
Q7: Is it safe to cover LED strips with tape or other materials?
A7: It’s generally not advisable to cover LED strips with materials that can trap heat, especially if the strip is warm. This includes certain types of tape, foam, or insulation. Always ensure adequate airflow and use materials designed for lighting applications if covering is necessary.
Conclusion: Shining Bright, Staying Cool
So, to wrap things up: do LED strip lights get hot? Yes, they do produce some heat, but with proper understanding and installation, it’s rarely a cause for concern. By choosing the right wattage, utilizing heat sinks like aluminum channels, ensuring good ventilation, and using appropriate power supplies, you can keep your LED strips operating efficiently and safely for years to come.
Remember, the goal is to create beautiful, functional lighting that enhances your home without any worries. Think of heat management as just another step in building something well, like ensuring a solid joint in woodworking. It’s about taking a little extra care to guarantee a great, lasting result. Whether you’re adding a subtle glow under your kitchen cabinets or creating a dramatic effect in your living room, following these simple guidelines will give you the confidence to tackle your next DIY lighting project.
Enjoy the ambiance and the satisfaction of a job well done! If you ever have doubts about a specific installation or notice signs of serious overheating, don’t hesitate to consult professional resources or experts. Happy lighting!