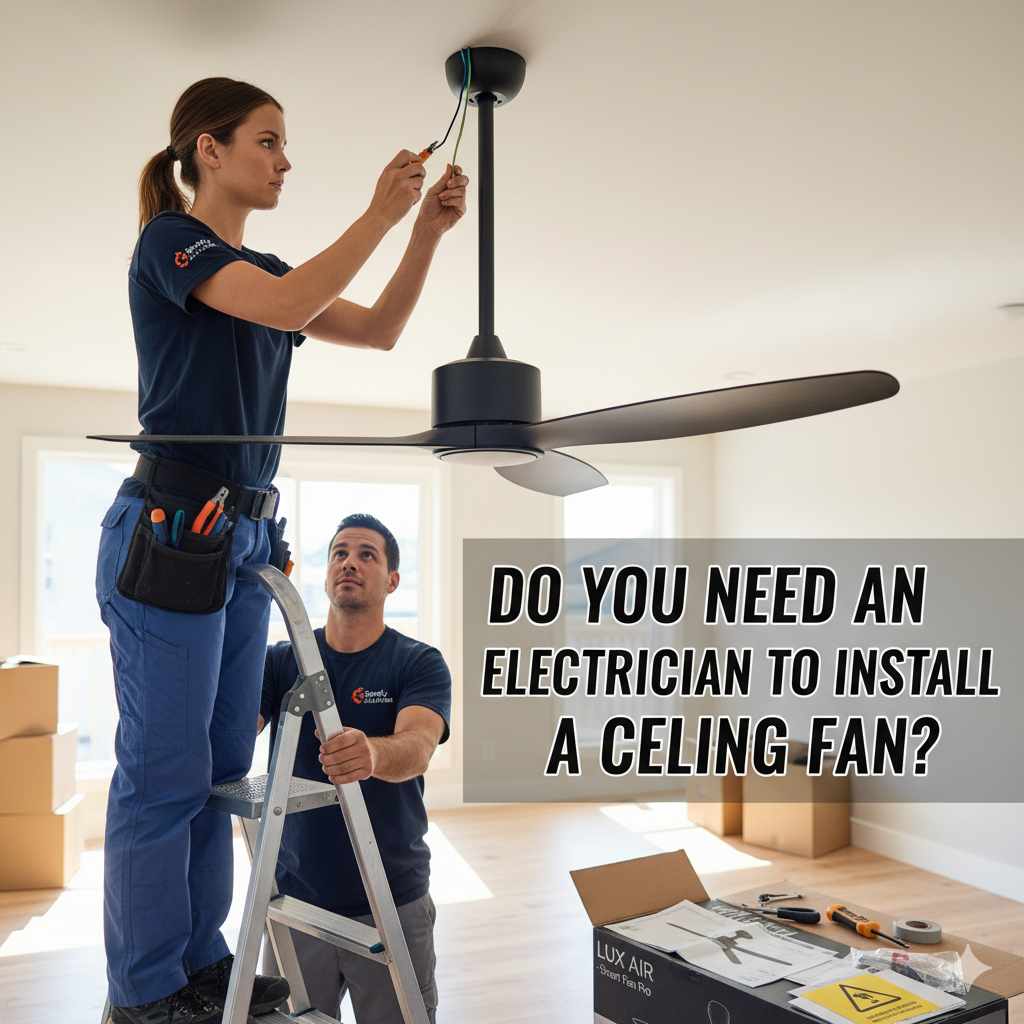
Do You Need An Electrician To Install A Ceiling Fan? Essential Guide
Yes, in many cases, you do need an electrician to install a ceiling fan, especially if you’re not comfortable with electrical wiring or if the existing junction box isn’t fan-rated. While some simple replacements might be DIY-friendly, safety is paramount when dealing with electricity. This guide will help you understand when to call a pro and what you can potentially handle yourself.
Ever stared up at that empty ceiling spot, dreaming of a cool breeze and a stylish new ceiling fan? It’s a common home improvement dream! But then the question pops up: can I really do this myself, or do I need to call in an electrician? Dealing with electrical work can feel a bit daunting, and you want to make sure it’s done safely and correctly. Don’t worry, we’ll break down exactly what you need to know to make the right decision for your home and your peace of mind. Let’s figure out if a ceiling fan installation is a DIY project for you or a job for a professional!
When You Might NOT Need an Electrician
Sometimes, replacing an existing light fixture with a new ceiling fan can be a straightforward DIY project. If you’re comfortable with basic electrical work and the situation is simple, you might be able to handle it. Here’s when it’s more likely to be a DIY-friendly task:
- Replacing an Existing Fixture: If you’re swapping out an old ceiling light that already has a properly installed, fan-rated electrical box and the wiring is standard (usually black for hot, white for neutral, and green or bare copper for ground), you might be able to do it yourself.
- Familiarity with Wiring: You understand basic electrical safety, can identify wires (hot, neutral, ground), and know how to turn off power at the breaker box.
- Simple Fan Models: Some basic ceiling fans come with very straightforward wiring instructions that don’t involve complex controls or multiple switches.
However, even in these scenarios, it’s crucial to double-check that the electrical box in your ceiling is rated to support the weight and vibration of a ceiling fan. Standard light fixture boxes are often not strong enough. You can usually find this information printed on the box itself.
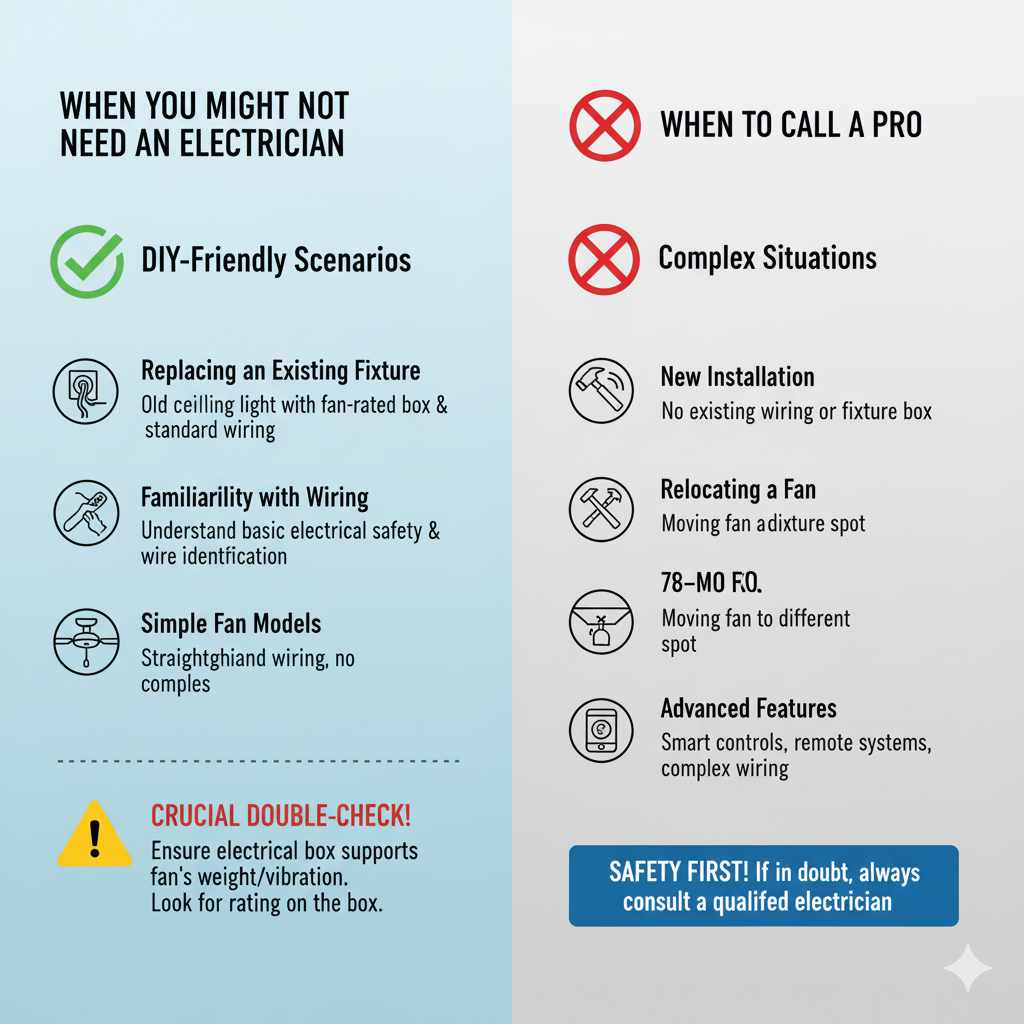
When You ABSOLUTELY Need an Electrician
There are several situations where calling a qualified electrician is not just recommended, it’s essential for your safety and the proper functioning of your fan. Electricity can be dangerous if handled incorrectly, and it’s always better to be safe than sorry.
1. No Existing Fixture or Wiring
If you want to install a ceiling fan where there’s currently no light fixture or wiring, this is a job for a professional. Running new electrical wires through walls and ceilings requires specialized knowledge, tools, and adherence to electrical codes. An electrician knows how to safely route wires, connect them to your home’s electrical system, and ensure everything meets safety standards.
2. The Electrical Box Isn’t Fan-Rated
This is a big one! Most ceiling fans are heavier than standard light fixtures and vibrate when in operation. The electrical box in your ceiling must be specifically designed and rated to support this weight and vibration. A standard light fixture box can fail, leading to the fan falling and causing damage or injury. Electricians will know how to identify a fan-rated box and install one if needed. You can learn more about junction box requirements from the Consumer Product Safety Commission (CPSC).
3. Complex Wiring or New Circuits
If your fan has features like remote controls, multiple speed settings that require separate wiring, or you want to install a new circuit dedicated to the fan (which is often recommended for heavier loads), an electrician is needed. They can properly install the necessary components and ensure your home’s electrical system can handle the load.
4. Unfamiliar Wiring or Old Homes
Homes, especially older ones, can have outdated or non-standard wiring. If you encounter aluminum wiring, knob-and-tube wiring, or just seem to have a confusing mess of wires, do not attempt to connect a fan yourself. An electrician can assess the situation, make necessary upgrades, and ensure safe connections.
5. You’re Unsure or Uncomfortable
This is the most important reason. If at any point you feel unsure, uncomfortable, or overwhelmed by the process, stop and call an electrician. Your safety and the integrity of your home’s electrical system are worth the cost of professional installation.
Understanding Ceiling Fan Electrical Requirements
Ceiling fans, especially those with lights and multiple speeds, draw a certain amount of electrical power. Understanding these requirements helps you appreciate why proper installation is critical.
Power Consumption
Most ceiling fans use between 50-100 watts of electricity, depending on their size, motor, and whether they include a light kit. While this might seem small, it’s important that the wiring and circuit can handle this load safely.
Wiring Types
- Standard 2-Wire + Ground: This is the most common setup for a single-speed fan or a fan with a light controlled by the same switch. You’ll typically see a black (hot), white (neutral), and bare copper or green (ground) wire.
- 3-Wire + Ground: Some fans with separate controls for the fan and light, or multiple speeds, might require a 3-wire setup (plus ground). This often involves running an additional wire from the switch box to the fan, allowing for independent control.
- Smart Fans & Remote Controls: These can have more complex wiring, often involving a receiver unit that needs to be wired into the fan.
The Importance of a Fan-Rated Electrical Box
As mentioned, this is non-negotiable. A standard electrical box is designed to hold the weight of a light fixture (typically under 10 pounds). Ceiling fans can weigh anywhere from 15 to 50 pounds or more. A fan-rated box is specifically designed to be mounted directly to a ceiling joist or a fan brace, providing the necessary structural support. The National Electrical Code (NEC) requires that outlet boxes and their associated wiring systems be installed in a manner that supports the weight of the outlet box and the attached equipment, such as a ceiling fan. You can find detailed information on these requirements on industry sites like ECM Web.
DIY vs. Professional: A Cost and Safety Comparison
Deciding whether to DIY or hire an electrician often comes down to balancing cost, time, and safety. Let’s look at the factors involved:
DIY Installation
Pros:
- Cost Savings: You save on labor costs, which can be a significant portion of the total expense.
- Satisfaction: The pride and accomplishment of completing a project yourself.
- Learning Experience: Gaining new skills and understanding your home’s systems better.
Cons:
- Safety Risks: Electrical shock, fire hazards, or fan falling if not installed correctly.
- Potential for Errors: Incorrect wiring can damage the fan, your home’s electrical system, or lead to future problems.
- Time Investment: Researching, gathering tools, and performing the installation can take considerable time.
- Tool Costs: You might need to purchase or rent specific tools.
Professional Installation
Pros:
- Safety Assurance: Professionals are trained to work with electricity safely and know how to adhere to codes.
- Correct Installation: Ensures the fan is installed properly, operates efficiently, and is securely mounted.
- Warranty Protection: Many fan manufacturers require professional installation for their warranty to be valid.
- Time Savings: An electrician can typically install a fan much faster than a DIYer.
- Peace of Mind: Knowing the job is done right and safely.
Cons:
- Labor Costs: Hiring an electrician adds to the overall expense.
- Scheduling: You need to coordinate with the electrician’s availability.
Cost Breakdown (Estimates)
The cost of hiring an electrician to install a ceiling fan can vary widely based on your location, the complexity of the installation, and the electrician’s rates. Here’s a general idea:
| Service Type | Estimated Cost Range (USD) | Notes |
|---|---|---|
| Basic Ceiling Fan Replacement (Existing fan-rated box) | $150 – $300 | Assumes simple wiring and no structural changes. |
| New Fan Installation (No existing fixture/wiring) | $300 – $600+ | Includes running new wires, installing a fan-rated box, and connecting to power. |
| Adding a Switch or Remote Control Wiring | $200 – $400+ | On top of basic installation, if new switch wiring is needed. |
| Electrical Box Upgrade (If needed) | $100 – $250 | Cost for the box and labor to install it securely. |
These are just estimates. It’s always best to get quotes from a few local electricians to get an accurate price for your specific project. Remember, the cheapest option isn’t always the best when it comes to electrical safety.
DIY Ceiling Fan Installation: A Basic Overview (For Simple Replacements)
If you’ve assessed your situation and decided you’re comfortable proceeding with a simple replacement of an existing fixture with a fan-rated box, here’s a general outline of the steps. Remember, this is a simplified guide, and you should always consult your fan’s specific manual and prioritize safety.
Tools You Might Need:
- Screwdriver set (Phillips and flathead)
- Wire strippers
- Wire connectors (wire nuts)
- Voltage tester (non-contact or multimeter)
- Ladder
- Safety glasses
- Work gloves
- Pliers
- Possibly a drill and appropriate bits
General Steps for a Simple Replacement:
- Turn Off Power: This is the MOST IMPORTANT step. Go to your electrical panel and turn off the breaker that controls the light fixture in the room where you’ll be installing the fan. Use your voltage tester to confirm the power is OFF at the fixture location.
- Remove Old Fixture: Carefully remove the old light fixture. Disconnect the wires, noting how they were connected.
- Check the Electrical Box: Ensure the existing electrical box is securely mounted and is rated for ceiling fan support. If it’s not, you’ll need to replace it with a fan-rated one, which might require calling an electrician if it’s not easily accessible or properly supported.
- Assemble the Fan (Partial): Follow your new fan’s instructions to assemble the motor housing, downrod, and canopy.
- Mount the Bracket: Attach the fan’s mounting bracket to the electrical box.
- Hang the Fan: Carefully lift the fan motor assembly and hang it onto the mounting bracket according to the manufacturer’s instructions.
-
Wire the Fan: This is where you connect the wires from the ceiling to the fan. Typically, you’ll connect:
- Ground wire (green or bare copper) from the ceiling to the ground wire on the fan.
- Neutral wire (white) from the ceiling to the neutral wire on the fan.
- Hot wire (black) from the ceiling to the hot wire on the fan (and potentially a separate wire for the light if you have a dual switch setup). Use wire connectors (wire nuts) to secure the connections. Ensure no bare wire is exposed.
- Tuck Wires and Install Canopy: Carefully tuck the wired connections into the electrical box and attach the fan’s canopy to the mounting bracket.
- Attach Fan Blades: Once the motor is securely mounted, attach the fan blades.
- Install Light Kit (If applicable): Follow instructions to wire and attach the light kit.
- Restore Power and Test: Turn the breaker back on and test the fan and light using the pull chains or remote.
If you encounter any issues, feel unsure about any step, or the wiring looks different than expected, turn the power back off and call an electrician. It’s always better to be safe!
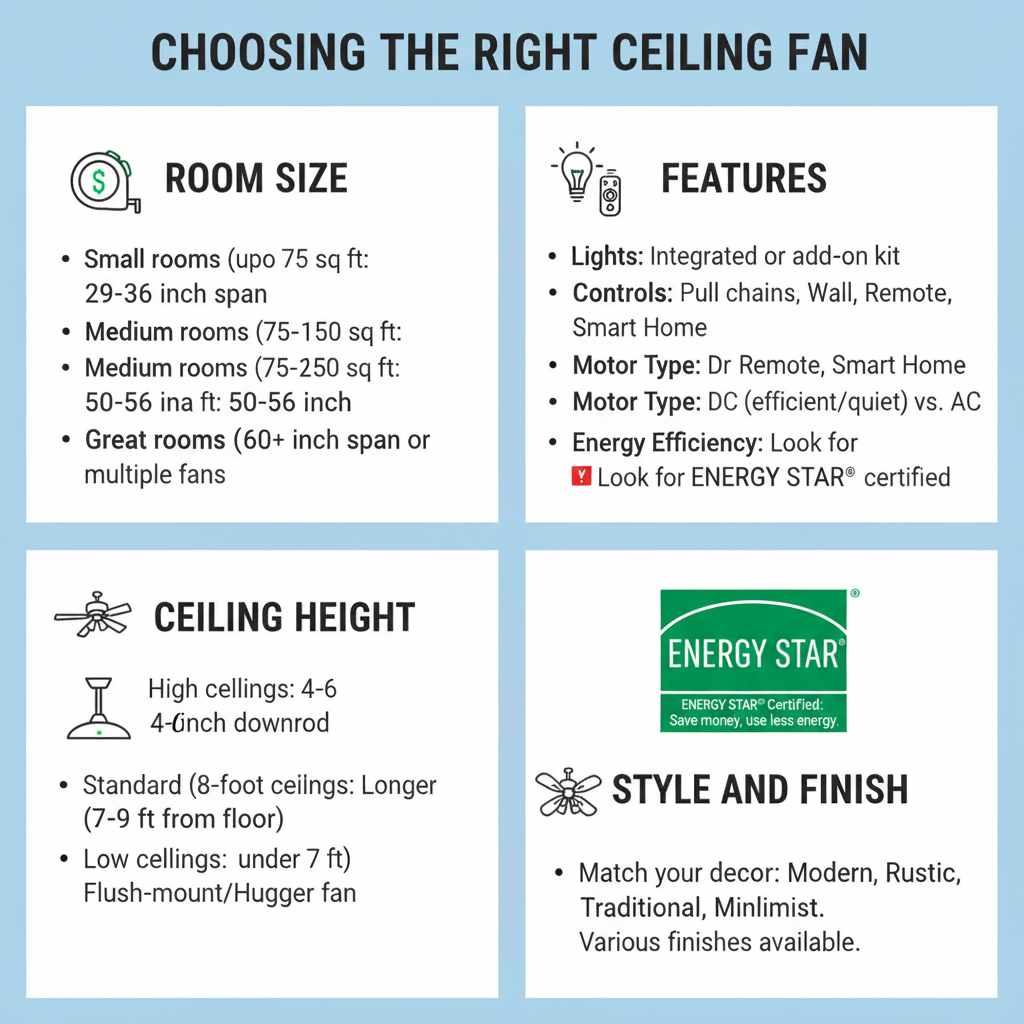
Choosing the Right Ceiling Fan
Beyond the installation, choosing the right fan for your space is important. Consider these factors:
Room Size
The size of your room dictates the fan’s blade span:
- Small rooms (up to 75 sq ft): 29-36 inch span
- Medium rooms (75-150 sq ft): 42-48 inch span
- Large rooms (150-250 sq ft): 50-56 inch span
- Great rooms (over 250 sq ft): 60+ inch span or multiple fans
Ceiling Height
Standard downrods are usually 4-6 inches, suitable for 8-foot ceilings. For higher ceilings, you’ll need a longer downrod to ensure the fan is at the optimal height (about 7-9 feet from the floor) for air circulation. For very low ceilings (under 7 feet), a flush-mount or “hugger” fan is necessary.
Features
- Lights: Many fans come with integrated lights, or you can add a light kit.
- Controls: Options range from pull chains and wall controls to remote controls and smart home integration.
- Motor Type: DC motors are generally more energy-efficient and quieter than AC motors.
- Energy Efficiency: Look for ENERGY STAR® certified fans, which use less energy and can save you money on electricity bills. Check out ENERGY STAR for certified models.
Style and Finish
Ceiling fans come in a vast array of styles, from modern and minimalist to rustic and traditional. Choose one that complements your room’s decor.
Frequently Asked Questions (FAQ)
Q1: How much does it cost to have an electrician install a ceiling fan?
A1: The cost can range from about $150 to $600 or more. Simple replacements where the wiring and box are already suitable might be on the lower end. Installing a fan where there’s no existing fixture, running new wires, or upgrading the electrical box will cost more.
Q2: Can I replace a light fixture with a ceiling fan myself?
A2: You might be able to if you’re comfortable with basic electrical wiring, the existing electrical box is fan-rated, and the wiring is standard. However, if you’re unsure about any step, especially checking the box’s rating, it’s safer to call a professional.
Q3: What is a “fan-rated” electrical box, and why is it important?
A3: A fan-rated electrical box is specifically designed and reinforced to safely support the weight and vibrations of a ceiling fan. Standard light fixture boxes are not strong enough and can fail, leading to the fan falling. An electrician will ensure the correct box is used.
Q4: What if my ceiling fan doesn’t come with a remote control? Can I add one later?
A4: Yes, you can often add a remote control kit to a fan that doesn’t come with one. However, this might involve additional wiring within the fan or canopy, and sometimes requires a specific type of fan or receiver. An electrician can advise on the best options and install it safely.
Q5: How do I know if my existing electrical box is fan-rated?
A5: Look for markings on the box itself. It should state “Acceptable for Fan Support” or have a weight rating specified. If you can’t find any markings, or if it looks like a standard plastic or thin metal box, it’s likely not fan-rated, and you’ll need to replace it. An electrician can confirm this for you.
Q6: My fan is making a humming noise. Is this a wiring issue?
A6: A humming noise can sometimes be caused by electrical interference or an imbalanced motor. Ensure all wire connections are tight and that the fan is properly balanced with its included balancing kit. If the noise persists or is very loud, it could indicate a motor issue or improper wiring, and it’s best to have an electrician inspect it.
Conclusion
Deciding whether to tackle a ceiling fan installation yourself or call an electrician is a significant choice for any homeowner. While the allure of saving money and the satisfaction of a DIY project are strong, safety must always come first. If you’re dealing with no existing wiring, an unrated electrical box, complex controls, or simply feel a pang of uncertainty, hiring a qualified electrician is the smartest and safest path forward.
Remember, a properly installed ceiling fan not only provides comfort and enhances your home’s ambiance but also operates safely and efficiently for years to come. Don’t hesitate to invest in professional help when needed. Your home, your safety, and your peace of mind are well worth it!