Downrods For Hunter Fans: Essential Guide
Quick Summary:
Choosing the right downrod for your Hunter fan ensures optimal performance and safety. This guide helps you measure ceiling height and select the perfect downrod length for a comfortable, stylish, and efficient ceiling fan installation.
Hey there, DIY enthusiasts! Md Meraj here, ready to tackle another home improvement project with you. Ever looked up at your ceiling fan and thought, “Is this really the best spot for it?” Or maybe you’ve just bought a new Hunter fan and are staring at a box full of parts, wondering which piece goes where. You’re not alone! Getting your ceiling fan at the perfect height is crucial for both its looks and how well it works. Too low, and it’s a head-bumping hazard. Too high, and you won’t feel that cooling breeze. But don’t worry, we’re going to break down exactly how to pick the right downrod for your Hunter fan. It’s simpler than you think, and with a little guidance, you’ll have your fan spinning perfectly in no time.
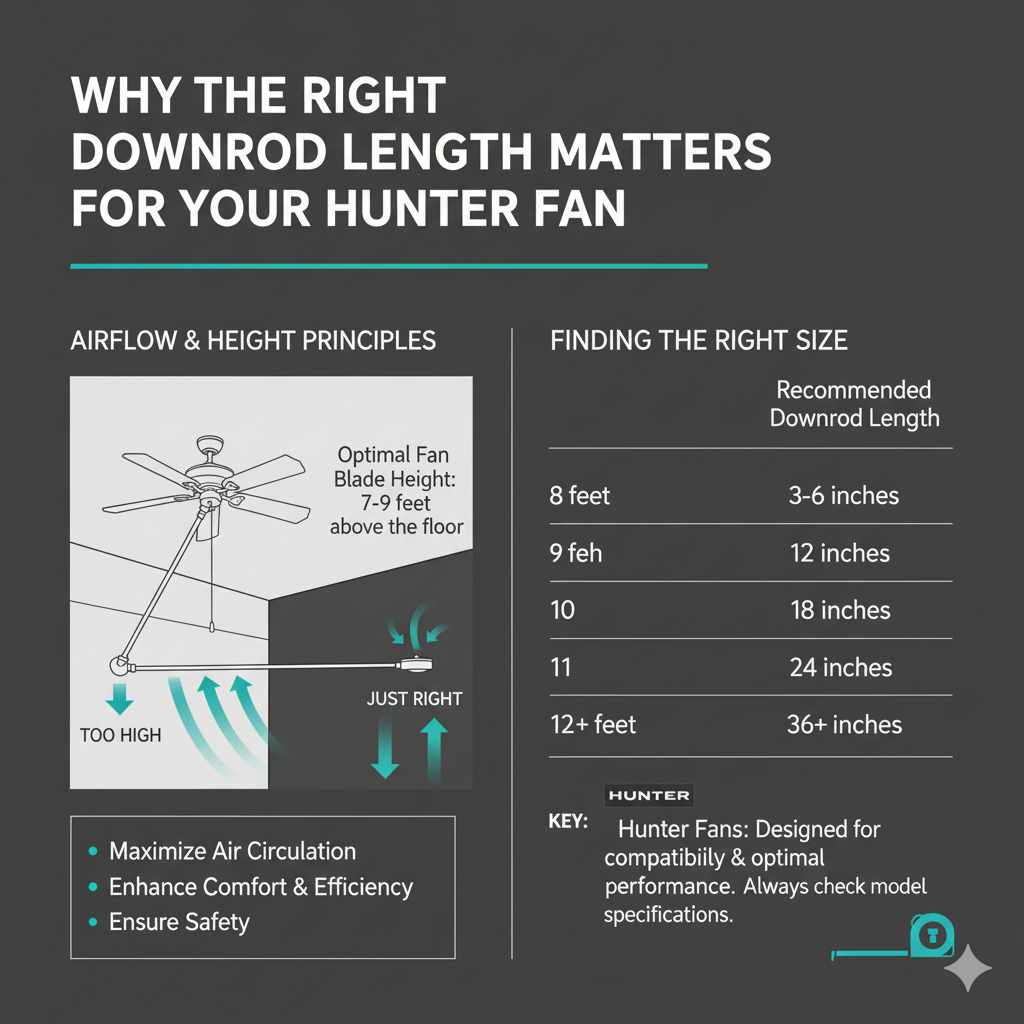
Why the Right Downrod Length Matters for Your Hunter Fan
Think of a downrod as the arm connecting your ceiling fan to its mount. Its length is super important. A properly sized downrod ensures your fan circulates air effectively throughout the room. For standard ceiling heights, a shorter downrod might be fine. But for rooms with higher ceilings, a longer downrod is essential to bring the fan down to an optimal height where it can really move the air. Hunter fans are designed to work with various downrod lengths, offering flexibility for different room dimensions. Using the correct downrod isn’t just about aesthetics; it’s about maximizing your fan’s performance and ensuring safety.
Understanding Ceiling Fan Airflow and Height
The general rule of thumb for optimal airflow is to have the ceiling fan blades positioned about 7 to 9 feet above the floor. This range is considered the sweet spot for effective air circulation in most living spaces. If your fan is too high, the air it pushes down won’t reach you effectively. If it’s too low, it can become a safety concern, especially in areas with high foot traffic or if you have tall members in your household.
Hunter fans, like most quality ceiling fans, are engineered to work best within these guidelines. They provide a range of downrod options to help you achieve this ideal placement. The manufacturer’s recommendations are always a great starting point, but understanding the principles behind airflow will give you the confidence to make the best choice for your specific room.
Measuring Your Ceiling Height: The First Crucial Step
Before you even think about downrod lengths, the very first step is accurately measuring your ceiling height. This is the foundation for choosing the correct downrod. Don’t guess! Grab a tape measure and get the precise measurement from the floor to the ceiling.
How to Measure Accurately
- Clear the Area: If possible, move any furniture that might be in the way of your measuring tape.
- Start at the Floor: Place the end of your tape measure flat on the floor.
- Extend to the Ceiling: Pull the tape measure straight up to the ceiling. Make sure the tape is taut and not sagging.
- Record the Measurement: Note down the exact measurement. It’s best to measure in feet and inches (e.g., 8 feet 6 inches).
- Check Multiple Spots: For older homes or rooms with uneven ceilings, it’s a good idea to measure in a couple of different spots to ensure consistency.
This simple measurement is your key to unlocking the right downrod. Once you have this number, you can start looking at the recommended downrod lengths for Hunter fans.
Hunter Fan Downrod Lengths: A Simple Guide
Hunter offers a variety of downrods to accommodate different ceiling heights. The general principle is that the higher your ceiling, the longer the downrod you’ll need. Here’s a breakdown of common ceiling heights and the typical downrod lengths that work best. Remember, these are guidelines, and always refer to your specific Hunter fan model’s manual for precise recommendations.
Standard Downrod Sizes for Common Ceiling Heights
Most standard ceilings are around 8 to 9 feet. For these heights, the downrod that comes with your Hunter fan (often 3 to 6 inches) is usually sufficient. However, as your ceiling height increases, so does the need for a longer downrod.
Here’s a table to help you visualize:
| Ceiling Height | Recommended Downrod Length | Notes |
|---|---|---|
| 8 feet | 3-6 inches (often included) | Ensures blades are 7-9 feet from the floor. |
| 9 feet | 12 inches | Brings the fan down to optimal height. |
| 10 feet | 18-24 inches | Crucial for good airflow in taller rooms. |
| 11 feet | 30-36 inches | Essential for very high ceilings. |
| 12 feet and above | 48 inches, 60 inches, or custom | May require longer, specialized downrods. |
It’s important to note that the downrod length is measured from the ceiling canopy (the part that attaches to the ceiling box) to the top of the fan motor housing. When you purchase a Hunter fan, it usually comes with a short downrod (often 3 or 4 inches). If your ceiling is higher than 8 feet, you will likely need to purchase an additional, longer downrod separately.
Calculating Your Needs
Let’s do a quick calculation to make sure you’re on the right track. The goal is to have the bottom of your fan blades at least 7 feet from the floor.
Formula:
Ceiling Height - Fan Motor Height - Desired Blade Clearance (7-9 ft) = Required Downrod Length
Example:
- Your ceiling height is 10 feet (120 inches).
- Your Hunter fan motor housing height is 12 inches.
- You want the blades to be 8 feet (96 inches) from the floor.
Calculation: 120 inches (ceiling height) – 12 inches (motor height) – 96 inches (desired clearance) = 12 inches.
In this case, a 12-inch downrod would be ideal.
Always double-check the dimensions of your specific Hunter fan model, as motor housing sizes can vary. You can usually find these specifications in the product manual or on the manufacturer’s website.
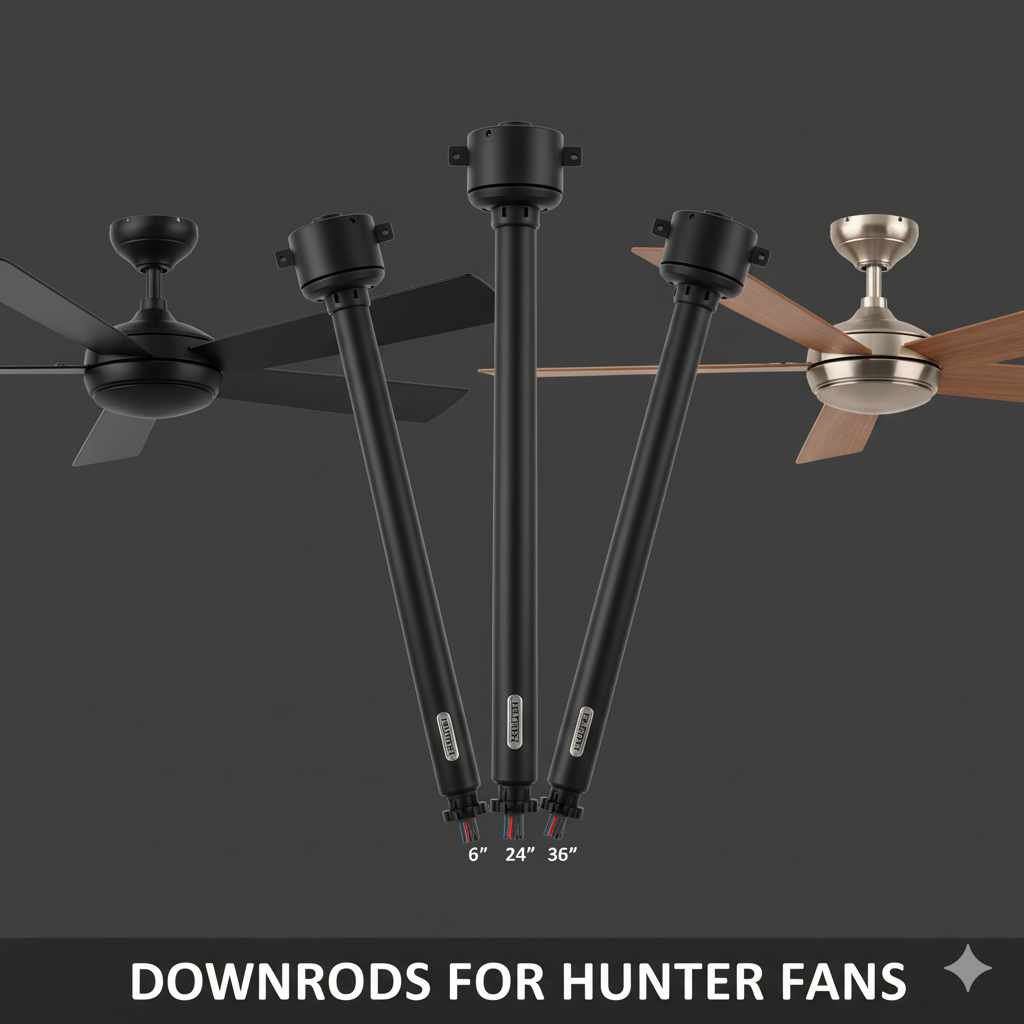
Types of Hunter Fan Downrods
Hunter fans are designed for easy installation and customization. Their downrods are typically made from sturdy metal and come in various finishes to match your fan and décor. The most common types are:
- Standard Downrods: These are the most common and come in lengths from 3 inches up to 60 inches or more. They are usually threaded at one end to screw into the fan motor and have a hole at the other end for a clevis pin and safety clip to secure them to the mounting bracket.
- Angled Mount Downrods: If you have a sloped or vaulted ceiling, you might need a special downrod designed for angled installations. These are often combined with an angled mounting bracket to ensure the fan hangs straight and operates safely. Hunter offers specific accessories for angled ceilings.
Materials and Finishes
Hunter downrods are typically constructed from steel or aluminum, ensuring durability and stability. They come in a range of finishes to complement your fan and room decor, such as:
- Brushed Nickel
- Polished Nickel
- Bronze (various shades)
- White
- Black
- Chrome
Choosing a finish that matches your fan and other hardware in the room will create a cohesive and polished look. It’s usually best to purchase Hunter-branded downrods, as they are specifically designed to fit their fan models securely.
How to Install a Hunter Fan Downrod
Installing a Hunter fan downrod is a straightforward process that’s part of the overall fan assembly. You’ll typically do this before you hang the fan motor from the ceiling bracket.
Step-by-Step Installation Guide
Here’s a general guide. Always refer to your specific Hunter fan’s instruction manual for the most accurate steps, as models can vary slightly.
- Prepare Your Workspace: Lay out all the parts for your Hunter fan. Ensure you have the downrod, the fan motor, the canopy (the decorative cover that hides the ceiling connection), and the necessary hardware (screws, pins, clips).
-
Attach Downrod to Motor:
- Locate the downrod. One end will have a threaded collar that screws into the top of the fan motor.
- Feed the fan’s electrical wires through the downrod before attaching it.
- Screw the downrod into the fan motor housing. Tighten it securely, but don’t overtighten.
-
Secure the Downrod:
- Most Hunter downrods have a hole near the top. You’ll insert a clevis pin through this hole and secure it with a cotter pin or clip. This prevents the downrod from unscrewing from the motor.
- Ensure the pin and clip are firmly in place.
-
Attach the Canopy:
- Slide the canopy cover over the downrod, resting it on top of the motor housing. This will be slid up later to cover the ceiling mount.
- Hang the Fan: Now, you’ll typically hang the assembled motor and downrod onto the ceiling mounting bracket. Most Hunter fans have a hook or ball-and-socket system that allows you to temporarily hang the fan so you can connect the wiring.
- Wire the Fan: Connect the house wiring to the fan wiring according to the instructions.
- Secure the Canopy: Once wiring is complete and the fan is stable, slide the canopy up to the ceiling and secure it to the mounting bracket with screws.
Safety First! Always turn off the power to the fan circuit at your breaker box before beginning any electrical work. If you are uncomfortable with electrical wiring, it’s best to consult a qualified electrician. For more detailed installation instructions and safety tips, the Hunter Fan support page is an excellent resource.
Choosing the Right Downrod for Sloped Ceilings
Many homes have rooms with sloped or vaulted ceilings. Installing a ceiling fan on an angle requires special attention to ensure it hangs correctly and operates safely. Hunter fans can often be adapted for these situations, but you’ll need the right accessories.
Special Considerations for Angled Installations
- Angled Mounting Bracket: Most standard ceiling fan mounting brackets are designed for flat ceilings. For sloped ceilings, you’ll need an angled mounting bracket. These brackets allow the fan to hang plumb (straight down) even when the ceiling is at an angle.
- Downrod Compatibility: While most standard Hunter downrods can be used with an angled mounting bracket, it’s crucial to ensure the fan itself is rated for angled installation. Many Hunter fans are, but check your model’s specifications.
- Maximum Angle: Be aware that there’s usually a maximum degree of angle at which a fan can be installed. Hunter fans typically have a limit, often around 20-30 degrees. If your ceiling is steeper than this, you may need a different solution or consult a professional.
- Downrod Length: The same principles for calculating downrod length based on ceiling height apply, but you’re measuring the vertical height from the mounting point to where the blades should be.
When installing on a sloped ceiling, it’s particularly important to ensure all connections are secure and the fan is balanced. A wobbly fan on a slope can be dangerous. If your ceiling slope is significant, consider purchasing a Hunter-specific angled mounting kit to ensure proper fit and function.
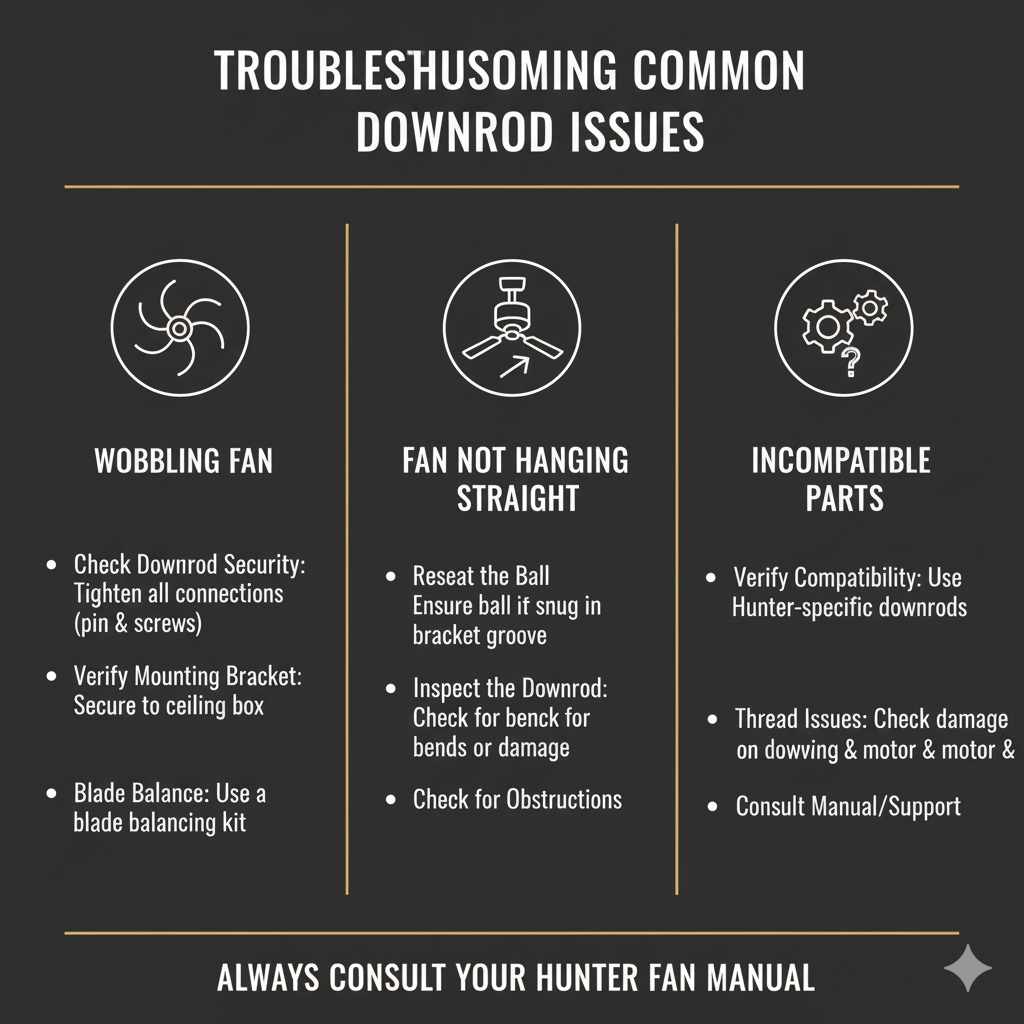
Troubleshooting Common Downrod Issues
Even with the best intentions, sometimes things don’t go perfectly. Here are a few common issues you might encounter with Hunter fan downrods and how to solve them.
Wobbling Fan
A wobbling ceiling fan is often a sign that something isn’t quite right. While it can be due to unbalanced blades or loose screws, the downrod connection can also be a culprit.
- Check Downrod Security: Ensure the downrod is tightly screwed into the motor housing and that the clevis pin and cotter pin are securely in place. A loose connection here can cause significant wobble.
- Verify Mounting Bracket: Make sure the ceiling mounting bracket is firmly attached to the ceiling electrical box and that the box itself is rated for ceiling fan support. A loose bracket will transfer movement to the entire fan assembly.
- Blade Balance: If the downrod seems secure, try a blade balancing kit. These kits come with small weights that you can attach to the blades to counteract any imbalance.
Fan Not Hanging Straight
If your fan seems to be hanging at an angle, especially on a standard ceiling, it could be an issue with how the downrod ball (if your fan uses one) is seated in the mounting bracket, or potentially a bent downrod.
- Reseat the Ball: If your fan has a ball-and-socket system, ensure the ball at the top of the downrod is properly seated in the groove of the mounting bracket.
- Inspect the Downrod: Visually inspect the downrod for any bends or damage. If it appears bent, it may need to be replaced.
- Check for Obstructions: Ensure nothing is preventing the fan from hanging straight.
Incompatible Parts
Sometimes, a downrod might not seem to fit correctly. This is usually because it’s not the correct size or type for the fan model.
- Verify Compatibility: Always confirm that the downrod you are using is designed for your specific Hunter fan model. While many downrods are universal within a brand, there can be subtle differences.
- Thread Issues: If the threads don’t seem to match, you might have the wrong downrod or the threads on the motor or downrod might be damaged.
When in doubt, consulting your Hunter fan’s manual or contacting Hunter customer support can provide specific solutions for your model. For more information on ceiling fan installation best practices, the U.S. Department of Energy’s Energy Saver website offers helpful tips on energy efficiency and installation.
Frequently Asked Questions (FAQ) about Hunter Fan Downrods
Q1: What is a downrod for a ceiling fan?
A downrod is a piece of pipe that connects the ceiling mount of a fan to the fan motor. Its length determines how far the fan hangs from the ceiling, which is crucial for proper air circulation and safety.
Q2: How do I know what length downrod I need for my Hunter fan?
Measure your ceiling height. For standard 8-foot ceilings, the included short downrod is usually fine. For higher ceilings, you’ll need a longer downrod to bring the fan blades to an optimal height of 7-9 feet from the floor. Consult the table in this guide for general recommendations.
Q3: Can I use a downrod from a different brand with my Hunter fan?
It’s strongly recommended to use Hunter-branded downrods with Hunter fans. While some downrods might appear similar, thread sizes and connection mechanisms can vary, and using an incompatible downrod can be unsafe and void your warranty.
Q4: Does my Hunter fan come with a downrod?
Yes, most Hunter ceiling fans come with a short downrod (typically 3-6 inches) for standard 8-foot ceilings. If you have higher ceilings, you will likely need to purchase a longer downrod separately.
Q5: What is the standard length for a Hunter fan downrod?
There isn’t one single “standard” length, as it depends on your ceiling height. However, the downrods that are commonly included with fans are 3 to 6 inches. Longer downrods are available in increments like 12, 18, 24, 36, 48, and 60 inches.
Q6: How do I install a downrod on my Hunter fan?
You typically attach the downrod to the fan motor housing by screwing it in and securing it with a clevis pin and cotter pin. Then, you slide the canopy over the downrod before hanging the fan assembly onto the ceiling mount. Always follow your specific model’s instruction manual.
Q7: What if I have a sloped ceiling?
For sloped ceilings, you’ll need an angled mounting bracket and potentially a downrod specifically designed for angled installations, though many standard downrods work with the correct bracket. Ensure your fan model is rated for angled installation and that the downrod length brings the fan to the correct height.
Conclusion: Enjoy Your Perfectly Placed Hunter Fan!
You’ve done it! By understanding your ceiling height and the simple principles behind downrod length, you’re well-equipped to choose and install the perfect downrod for your Hunter ceiling fan. Remember, the goal is always to position those blades between 7 and 9 feet from the floor for maximum comfort, efficiency, and safety. Whether you have standard, high, or even sloped ceilings, Hunter offers the flexibility to get it just right.
Taking the time to measure accurately and select the correct downrod is a small step that makes a big difference in how your fan performs. It ensures you get that refreshing breeze you’re looking for on a warm day and adds a touch of polished style to your room. Don’t hesitate to consult your fan’s manual or Hunter’s support resources if you have any specific questions. With this guide, you can confidently tackle this project and enjoy a perfectly functioning, beautifully placed ceiling fan for years to come. Happy installing!