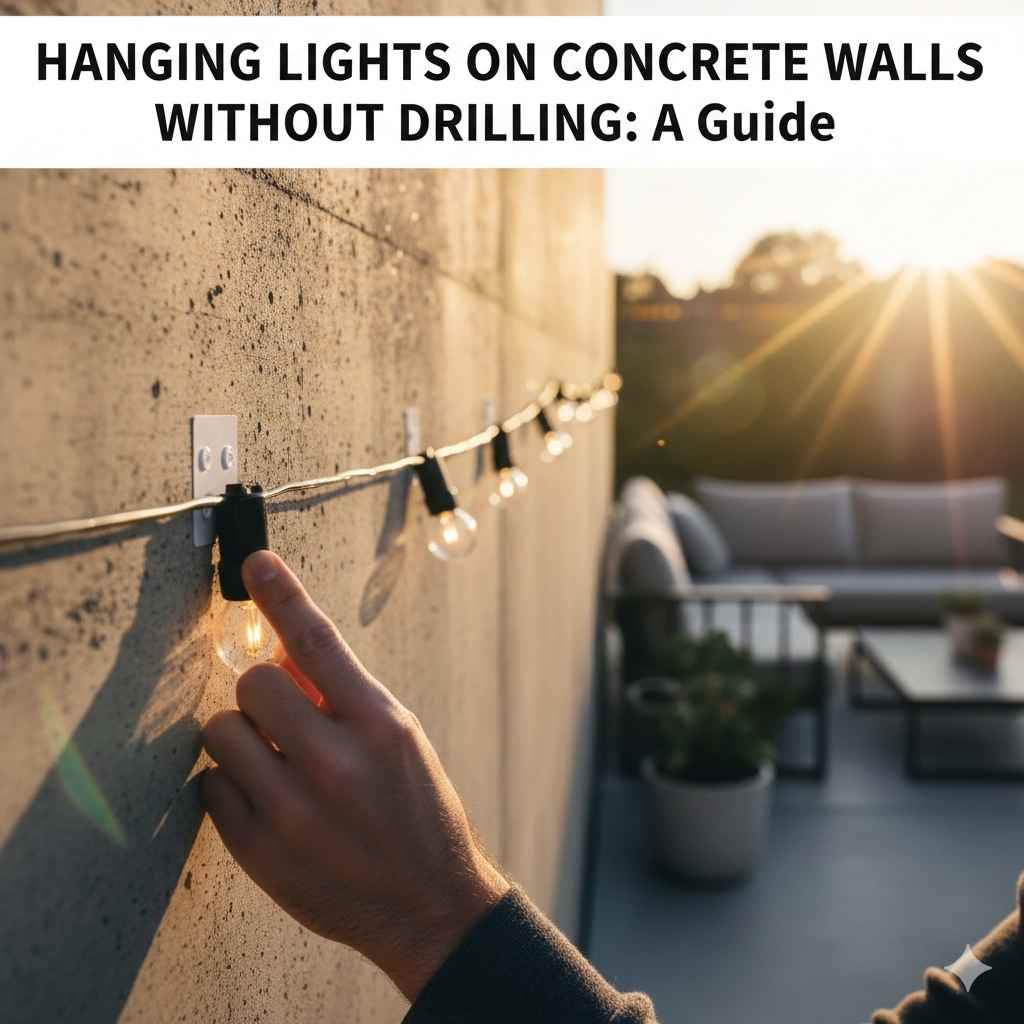
Hanging Lights on Concrete Walls Without Drilling: A Guide
Figuring out How to Hang Lights on a Concrete Wall Without Drilling can seem tricky when you first start. Concrete is tough, and you might think you need special tools or skills. Don’t worry, many people feel the same way! This guide will show you simple ways to get your lights up without damaging your walls. We’ll go step-by-step, making it super easy to follow. Ready to get started?
Choosing the Right Mounting Method
Before you even think about hanging your lights, the first step is choosing the best way to attach them. The right method depends on your lights, the type of concrete, and where you’re putting them. Some methods work better for certain light types. For example, heavier lights need a stronger hold than lighter ones. Also, consider if you want to be able to move or change the lights later. There are several options, from strong adhesives to specialized clips, all offering ways to avoid drilling.
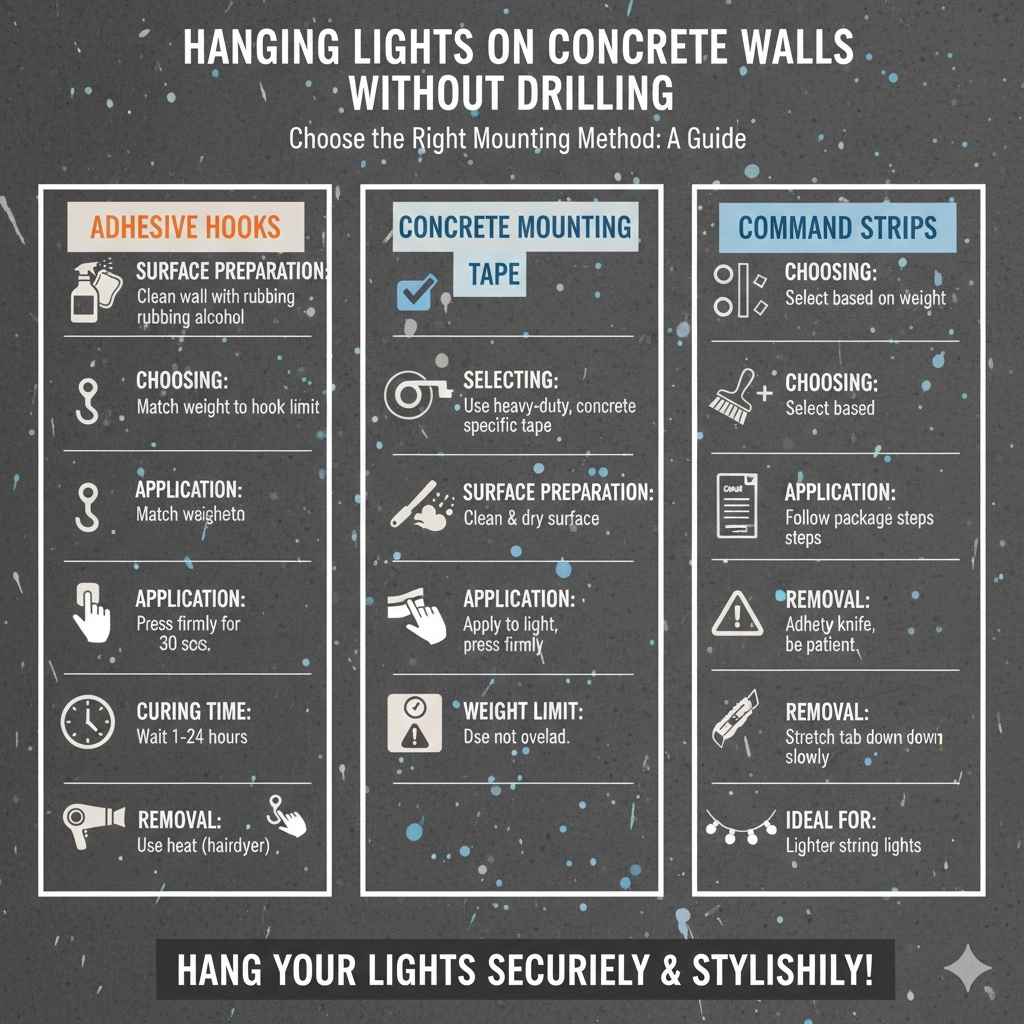
Using Adhesive Hooks
Adhesive hooks are a great starting point for hanging lights on concrete. These hooks have a strong adhesive back that sticks directly to the wall. They come in various sizes and weight capacities, so you can pick the right one for your lights. The key is to prep the surface. Clean the concrete with rubbing alcohol to remove dust and grease. This helps the adhesive stick properly. Once the surface is clean, peel off the backing and press the hook firmly onto the wall for about 30 seconds. Wait at least an hour before hanging anything on the hook, giving the adhesive time to cure. Remember to check the weight limit of the hooks to ensure they can hold your lights safely. The ease of use and the fact that they are not permanently attached makes them a very popular option.
- Surface Preparation: Before applying adhesive hooks, it’s essential to prep the concrete surface. Clean the area with rubbing alcohol or a mild cleaner to remove dust, dirt, or grease. This step helps the adhesive bond effectively.
- Choosing the Right Hook: Select adhesive hooks that are designed for the weight of your lights. Check the packaging for weight limits. Using the wrong hook could lead to your lights falling.
- Application: Carefully peel off the backing from the adhesive hook and press it firmly onto the concrete. Hold it in place for the recommended time (usually about 30 seconds) to ensure a good bond.
- Curing Time: Wait for the adhesive to cure completely before hanging your lights. This can take anywhere from an hour to a full day, depending on the hook’s instructions. Patience is key!
- Removing Adhesive Hooks: When it’s time to take down the lights, follow the manufacturer’s instructions for removing the hooks. Some may require heat (from a hairdryer) to loosen the adhesive.
Using Concrete-Specific Mounting Tape
Another strong option is concrete-specific mounting tape. This double-sided tape is made with a powerful adhesive that bonds to concrete. It’s designed to hold heavier items compared to regular adhesive tape. Before you use this tape, ensure the concrete wall is clean and dry. Cut the tape to the length you need and apply it to the back of your light fixture. Then, press the fixture firmly onto the wall for a good few seconds. Check the weight limit and the instructions on the tape packaging. This tape often works well for light strips or smaller, lightweight fixtures. The strength of the tape means it can carry a good amount of weight without needing drilling.
- Selecting the Right Tape: There are many types of double-sided tapes, but only a few are made for concrete. Look for tapes specifically designed for outdoor or heavy-duty use.
- Surface Preparation: Clean the concrete surface thoroughly before applying the tape. Remove any loose particles or dust, and make sure the surface is dry.
- Application: Apply the tape to the back of your lights or light fixture. Be sure to press firmly to make a good connection.
- Weight Limit: Be very careful of the weight limits of the tape. Overloading can lead to failure.
- Removal: Removing concrete tape can be tricky. You might need a putty knife or a similar tool. Go slowly, and be patient to avoid damaging the concrete.
Using Command Strips
Command strips are a popular choice for hanging many things, and they’re useful for lights too. These strips use a special adhesive that sticks securely but can be removed without leaving residue or damaging the wall. They’re excellent for lighter string lights or LED strips. You’ll stick one strip to the wall and one to your light fixture. Press them together firmly. To take them down, you gently pull the tab, and the strip stretches and releases from the wall. They work best on smooth surfaces, but with careful preparation, they can work on concrete. Ensure that the surface is clean and dry to allow the Command strips to bond.
- Choosing the Right Size: Command strips come in different sizes, so pick ones rated for the weight of your lights.
- Application Steps: Follow the steps on the Command strip package for the best results. The process includes cleaning the wall, attaching the strips, and waiting for the adhesive to set.
- Weight Limits Matter: Don’t overload the strips. Exceeding the weight limit can make the lights fall.
- Removal: To remove Command strips, slowly stretch the tab down. Avoid pulling the strip straight off the wall, as this could damage the concrete.
- Ideal for Lighter Lights: These are best for lighter fixtures. They might not be ideal for heavier lights.
Preparing the Concrete Wall for Lights
Before you start hanging anything, getting the wall ready is important. Concrete walls are often rough, so you need to make the surfaces as ready as possible for your lights. This will help your chosen method stick properly. Cleaning the concrete, filling any small holes, and making sure the wall is dry are all part of the job. These steps help create a good surface for the adhesive to hold onto. Ignoring these details can cause your lights to fall.
Cleaning the Concrete
Cleaning is essential. Dust, dirt, and grease can stop any adhesive from sticking properly. Use a brush or cloth to sweep away loose dirt and dust. Then, use rubbing alcohol or a mild cleaner to wipe down the area where you’ll be hanging your lights. Make sure the area is completely dry before moving on. This simple step can dramatically improve how well your lights stay on the wall. Avoid harsh chemicals that could damage the concrete.
- Dust Removal: Use a soft brush or a dry cloth to clear away any loose dust or debris. This initial step will create a cleaner surface for cleaning.
- Cleaning Solution: Rubbing alcohol is a great option as it evaporates quickly and leaves no residue. Alternatively, you can use a mild soap and water solution, but be sure to rinse well.
- Drying Time: Make sure the cleaned area is completely dry before applying anything. Let it air dry or use a clean cloth to make sure no moisture remains.
- Testing the Cleaner: If you’re using a cleaner other than rubbing alcohol, test it on a small, hidden part of the concrete first to ensure it doesn’t damage the wall.
- Avoid Strong Chemicals: Don’t use harsh chemicals, bleach, or anything that could potentially harm or stain the concrete.
Filling Small Holes or Imperfections
Sometimes, concrete walls have small holes or cracks. These can make it tough for adhesives to bond. If you find any, use a concrete patching compound to fill them. You can buy this at any hardware store. Apply the compound to the holes, making sure it’s level with the wall surface. Let it dry completely before attaching your lights. Doing this provides a smoother surface for your mounting method to grab onto. This step creates a cleaner and more even surface. This will also help your lights sit better against the wall.
- Choosing a Filler: Get a concrete patching compound from a hardware store. Make sure it’s designed for use on concrete.
- Application: Apply the compound using a putty knife or trowel. Fill the holes and level the surface.
- Drying Time: Give the compound time to dry, as per the product instructions. It could take a few hours or even a day.
- Sanding: Once dry, you might need to lightly sand the filled areas to make them flush with the wall.
- Avoid Overfilling: Don’t overfill the holes. Try to make the patched area level with the rest of the wall.
Testing the Surface for Dryness
Moisture is the enemy of adhesives. Before attaching your lights, make sure the concrete wall is completely dry. You can check this by pressing a dry cloth against the wall. If the cloth gets wet, the wall isn’t ready. This is particularly important after you’ve cleaned the wall or filled any holes. Give the wall plenty of time to dry naturally. Moisture can make the adhesive fail, and your lights may fall down. Proper preparation ensures that the adhesives can stick tightly. It also reduces the chances of problems later.
- Visual Inspection: Check the wall for any visible signs of moisture, like damp patches.
- Cloth Test: Press a dry cloth against the wall for a few moments. If the cloth becomes wet, the wall needs to dry longer.
- Air Drying: Allow the wall to air dry completely. Don’t rush the process by using a hairdryer, as this might not dry the wall evenly.
- Humidity Check: If it’s a humid day, the wall might take longer to dry. Make sure you’ve given it enough time.
- Addressing Moisture Issues: If you find persistent moisture problems, explore the root cause before attempting to hang lights.
Methods for Hanging Lights Without Damage
With your wall prepped and a method selected, it’s time to hang your lights! This includes various options, such as using clips or wire to hang your lights. Each method has its own steps. Choose the technique that fits your style and the type of lights you’re using. No matter which you select, the goal is always the same: to get your lights up safely and securely. Read on for several effective ways to decorate your concrete walls without any drilling or permanent changes.
Using Clips and Hooks for String Lights
Clips and hooks are a super way to hang string lights. They are designed to hold the light strands securely. There are different types of clips and hooks made especially for concrete. Some have strong adhesive backs, while others might use nails or screws that are designed for use with concrete. Make sure to pick hooks or clips that can handle the weight of your lights. You can space them out along the wall, placing them where the light strand will rest. Remember to follow the installation instructions on your clips or hooks. This will give you a neat and visually appealing look without damaging your wall.
- Choosing the Right Clips: Look for clips specifically made for outdoor use, to withstand weather.
- Spacing Clips: Space the clips evenly. This will make your lights look nice.
- Attaching Clips: Follow the instructions on the clip package.
- Hanging the Lights: Once the clips are in place, gently hook the light strands into the clips.
- Maintenance: Keep an eye on your clips to make sure they’re still holding well.
Hanging Lights Using Wire or Cord
You can also use wire or cord to hang lights. This is a bit different, but it gives your walls a unique look. You’ll need to create some anchor points on the concrete wall. You can use adhesive hooks, concrete-specific tape, or Command strips as anchor points. Then, run the wire or cord between the anchor points. You can then hang the lights from the wire or cord using small clips or by tying them on. Make sure the wire or cord can handle the weight of the lights. This approach can be very flexible. You can easily adjust the position of your lights. It also provides a cleaner look with less clutter. This is good if you have a lot of lights to hang.
- Choosing the Right Wire or Cord: Use strong wire or cord that can hold the weight of your lights.
- Creating Anchor Points: Use adhesive hooks, or concrete tape for your anchor points.
- Running the Wire: String the wire between the anchor points. Keep it taut for a neat look.
- Attaching Lights: Clip the lights onto the wire or tie them securely.
- Consider Style: Play around with how the lights hang on the wire for the perfect look.
Using Temporary Light Holders
Temporary light holders, like clips or hooks, are great. They’re designed to stick to surfaces like concrete. These tools allow you to change the lights easily. This is excellent for seasonal decorations or if you like to switch up your look. The key is to pick ones rated for concrete. They should also hold the weight of your lights. To use these, clean the wall, and stick the holders where you want your lights. You can then hang your lights without any drilling. You can get a flexible and stylish look that’s easy to change. Make sure they are designed to be used in the conditions your lights will be in.
- Choosing the Right Holders: Pick light holders designed for use on concrete.
- Preparing the Surface: Clean the wall before you put the holders on.
- Applying the Holders: Follow the instructions to attach the holders to the wall.
- Hanging the Lights: Place your lights on the holders.
- Changing Lights: You can take the lights off the holders and change them when you want.
Real-Life Examples and Scenarios
Seeing how this all works in practice can be helpful. Here are some real-life examples and some scenarios to give you a clear idea of how to hang lights on concrete walls without drilling.
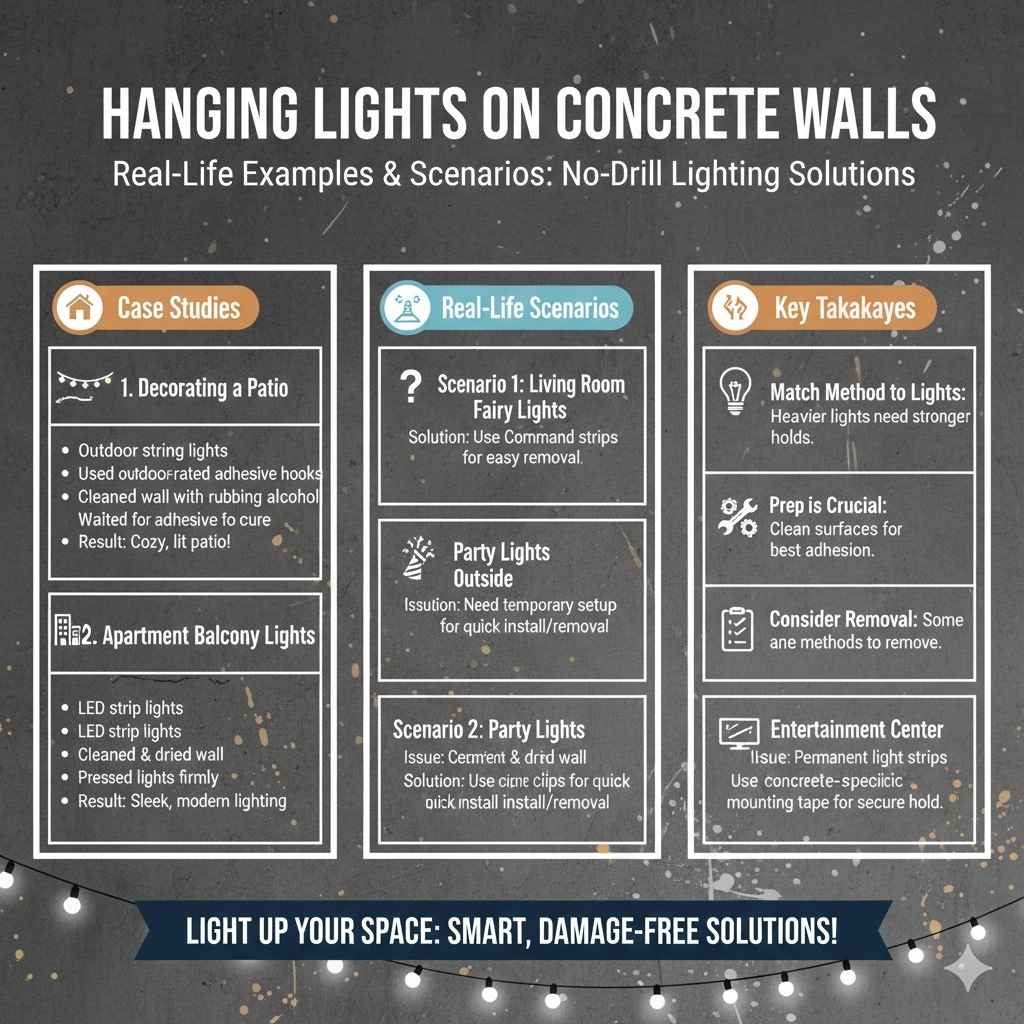
Example 1: Decorating a Patio
Consider a patio area, with a concrete wall. You want to add some string lights for a cozy atmosphere. The best method would be using outdoor-rated adhesive hooks. They’re designed to handle weather conditions and the weight of string lights. First, you clean the concrete wall with rubbing alcohol. Next, you let it dry. Then, you carefully stick the hooks onto the wall, spacing them about a foot or two apart. After waiting for the adhesive to set, you hang the string lights. The result is a beautifully lit patio. The lights stay securely on the wall without any drilling or damage. This is a simple and effective approach.
Example 2: Adding Lights to an Apartment Balcony
Imagine you have an apartment balcony with concrete walls. You wish to add some LED strip lights for a modern look. In this case, concrete-specific mounting tape is ideal. Clean and dry the concrete wall thoroughly. Cut the mounting tape to the required lengths and apply it to the back of the LED strip lights. Carefully press the lights onto the wall, making sure they stick well. The result is a sleek and contemporary lighting effect. The lights stay in place. This does not involve any drilling. The tape holds the lights securely. Also, it won’t damage the concrete. This offers a stylish lighting upgrade for your balcony.
- Scenario 1: You have a concrete wall in your living room and want to hang fairy lights for a warm glow. Use Command strips. They are ideal. You can remove them later.
- Scenario 2: You’re setting up lights for a party on a concrete wall outside. Use clips. They are quick to put up and take down.
- Scenario 3: You’re making an entertainment setup, needing to hang light strips on a concrete wall. Use concrete-specific mounting tape. This is great for keeping them in place.
Frequently Asked Questions
Question: Can I use nails to hang lights on a concrete wall?
Answer: Drilling into concrete for nails is tricky. It’s best to avoid it unless you have experience and the right tools. Instead, consider adhesive options or clips to protect the wall.
Question: How do I remove adhesive hooks from a concrete wall?
Answer: For adhesive hooks, follow the manufacturer’s directions. Some may require you to pull the tab slowly downward. Others might need gentle heat (like from a hairdryer) to weaken the adhesive before removal.
Question: Will adhesive hooks damage the concrete?
Answer: If you remove them correctly, adhesive hooks usually don’t damage concrete. However, rough removal can sometimes take off small bits of the wall. Using the proper method for removal helps prevent damage.
Question: Are there special types of adhesive tape for concrete?
Answer: Yes, there are types of double-sided tape designed specifically for concrete. They provide a stronger bond and can hold more weight compared to standard tape. Look for outdoor or heavy-duty versions.
Question: How can I hide the wires of my lights?
Answer: To hide wires, use wire clips or cable organizers that stick to the wall. You can also run the wires behind furniture or along baseboards. Painting the wires can help them blend with the wall.
Final Thoughts
How to Hang Lights on a Concrete Wall Without Drilling is achievable with the right techniques. You can select methods like adhesive hooks, mounting tape, and Command strips. Always clean the surface, and ensure it’s dry. This allows the adhesive to bond properly. Clips and cord give options to attach your lights securely. Real-life examples show how these methods work in different settings. By picking the best technique, you can easily light up any concrete wall without damage. So, go ahead and get creative with your lighting!