How Do You Take Down a Chandelier: Essential Guide
Quick Summary: Taking down a chandelier involves safely turning off power, carefully removing decorative elements, disconnecting wiring, and supporting the fixture’s weight. This guide provides clear, step-by-step instructions for homeowners to safely and successfully remove their chandelier.
That stunning chandelier you adore might be due for a change, or perhaps you’re moving to a new home. Whatever the reason, knowing how to take down a chandelier safely is a valuable skill. It can seem daunting, especially with all those crystals and wires, but with the right preparation and careful steps, you can handle this task confidently. We’ll walk you through everything you need to know, from gathering your tools to the final unhooking, making sure your beautiful fixture comes down in one piece.
This guide is designed to be simple and straightforward. We’ll break down each part of the process so you can feel prepared and secure. Let’s get started on safely removing your chandelier!
Why You Might Need to Take Down a Chandelier
There are several common reasons why a homeowner might need to remove a chandelier. Understanding these can help you prepare for the task ahead:
- Renovations or Redecorating: When you’re changing the look of a room, a chandelier might not fit the new style or might need to be removed to paint the ceiling or make structural changes.
- Moving Homes: If you’re taking your cherished chandelier with you to a new house, you’ll need to carefully detach it from its current location.
- Repairs or Cleaning: Sometimes, a chandelier needs to be taken down for in-depth cleaning or to repair a specific part that can’t be fixed while it’s hanging.
- Upgrading to a New Fixture: As styles evolve, you might want to replace your old chandelier with a newer, more modern, or different type of light fixture.
- Damage or Safety Concerns: If a chandelier appears loose, damaged, or is causing any electrical concerns, it’s best to have it professionally assessed and potentially removed.

Safety First: Essential Precautions
Before you even think about touching a screwdriver, safety is paramount. Working with electricity and heavy objects suspended overhead requires your full attention. We’ll cover the most critical safety steps to ensure you and your home remain protected throughout the process.
1. Turn Off the Power at the Source
This is the absolute MOST important step. You cannot safely remove a light fixture without cutting the power to it. Even if you think you know which switch controls the chandelier, it’s crucial to go to the main electrical panel (breaker box) for your home.
Locate the breaker that controls the circuit for your chandelier. If your breakers aren’t clearly labeled, you might need to test them. Turn off the breaker, and then go back to the room where the chandelier is located. Flip the light switch for the chandelier to ensure it does not turn on. If it doesn’t, you’ve successfully cut the power to that fixture.
Pro Tip: For extra peace of mind, especially if you’re unsure about your breaker box, consider using a non-contact voltage tester. Touch the tip of the tester near the wires inside the junction box (once you get there) to confirm there’s no electricity flowing. You can find these testers at any hardware store and they are very user-friendly.
2. Gather Your Tools and Materials
Having the right tools ready before you start will make the job go much smoother and safer. Here’s a list of what you’ll likely need:
- Ladder or Sturdy Step Stool: Ensure it’s tall enough to comfortably reach the chandelier and is stable.
- Screwdrivers: A Phillips head and a flathead screwdriver are usually necessary. A set with various sizes is best.
- Wire Strippers/Cutters: For safely disconnecting the electrical wires.
- Pliers: Needle-nose pliers can be helpful for manipulating wires.
- Adjustable Wrench or Socket Set: For any nuts or bolts holding the chandelier’s mounting bracket or chain.
- Work Gloves: To protect your hands from sharp edges or debris.
- Safety Glasses: Essential for protecting your eyes from dust or falling pieces.
- Painter’s Tape and Pen: To label wires if necessary.
- A Helper: Especially for larger or heavier chandeliers, having someone to help support the weight is highly recommended.
- Drop Cloth or Old Sheets: To protect the floor below from dust, debris, or accidental drips.
- Sturdy Box or Container: To place any removed crystals or smaller parts in.
- Electrical Tape: For safely capping off wires.
- Non-Contact Voltage Tester (Recommended): To double-check that the power is off.
3. Prepare the Area
Clear the space directly beneath the chandelier. Move any furniture, rugs, or fragile items that could be in the way or get damaged. Lay down a drop cloth or old sheets to catch dust and debris that will inevitably fall. This will make cleanup much easier.
Step-by-Step: How to Take Down a Chandelier
Now that you’re prepared and have prioritized safety, let’s get to the actual process of removing the chandelier. We’ll break it down into manageable steps.
Step 1: Remove Decorative Elements
Most chandeliers have decorative elements like crystals, glass shades, or other ornaments. These are often the most fragile parts and can get in the way as you try to access the main fixture and wiring. Carefully remove each piece, one by one.
- Crystals: These are typically attached with small hooks or loops. Gently unhook them. It’s a good idea to have a box or container ready to place them in as you remove them.
- Glass Shades: These might be held in place by screws, clips, or simply rest in a socket. Loosen any screws or gently wiggle the shades to see if they lift out.
Tip: If you have a particularly ornate chandelier, take a few photos as you remove these pieces. This can be a helpful reference if you plan to reassemble it later or if you need to remember how it was put together.
Step 2: Access the Mounting Hardware and Wiring
With the decorative elements removed, you’ll be able to see the main body of the chandelier and the canopy – the decorative cover that hides the electrical box and mounting hardware on the ceiling.
The canopy is usually attached to the ceiling with screws or a threaded ring. Locate these fasteners and carefully loosen them. You may need to gently pull the canopy away from the ceiling. Be prepared for dust and cobwebs to fall out from behind it!
Once the canopy is loose, you’ll see the electrical box in the ceiling and the chandelier’s wiring emerging from it. You’ll also see how the chandelier is physically attached to the ceiling box – this could be a mounting bracket, a threaded rod, or a chain.
Step 3: Support the Chandelier’s Weight
This is where a helper is invaluable. Chandeliers can be surprisingly heavy, and you don’t want the entire weight to be on the wires or the mounting bracket as you disconnect them. If you have a helper, they can stand on the ladder and support the chandelier from underneath.
If you don’t have a helper, you can use a sturdy rope or an adjustable scaffolding support to take some of the weight. Secure the rope to a strong point on the chandelier’s frame and loop the other end over a ceiling joist (if accessible) or use a temporary support system. The goal is to have the chandelier held securely so that when you disconnect the wiring and mounting, it doesn’t drop.
Step 4: Disconnect the Wiring
Now it’s time to tackle the electrical connections. Remember, you’ve already turned off the power at the breaker, but it’s still wise to be cautious. You should see several wires coming from the chandelier’s junction box into the ceiling box.
Typically, you’ll find three types of wires:
- Hot Wire (usually black or red): This carries the power.
- Neutral Wire (usually white): This completes the circuit.
- Ground Wire (usually green or bare copper): This is a safety wire.
The wires will be connected using wire nuts. Unscrew the wire nuts to expose the ends of the wires. If the wires are too short to work with, you may need to use wire strippers to expose a bit more copper. You might also have a fixture-specific wire for dimming or smart features.
Important: If you are unsure about identifying the wires or if there are more than the standard three, it’s best to stop and consult a qualified electrician. Making incorrect connections can be dangerous.
Once the wire nuts are removed, gently separate the wires from the chandelier from the wires coming from the ceiling. You can use electrical tape to wrap the ends of the wires coming from the ceiling box to ensure they are safely insulated and cannot touch anything else.
For easier identification later, you can label the wires coming from the ceiling box with painter’s tape (e.g., “L” for hot, “N” for neutral, “G” for ground).
Step 5: Detach the Mounting Bracket/Chain
With the electrical connections made, the final step is to physically detach the chandelier from the ceiling.
This will vary depending on how your chandelier was installed:
- Mounting Bracket: If it’s attached via a mounting bracket, you’ll likely need to unscrew this bracket from the electrical box in the ceiling. Keep track of these screws, as you might need them if you’re installing a new fixture.
- Threaded Rod: Some chandeliers hang from a threaded rod that screws into the ceiling box. You’ll need to unscrew the rod from the box.
- Chain: If your chandelier is hung by a chain, you’ll need to disconnect the chain from its ceiling hook or mounting point. You may also need to detach the chain from the chandelier’s arm.
As you unscrew the last fastener or disconnect the final link, your helper should be ready to take the full weight of the chandelier, or your temporary support system should hold it steady. Slowly and carefully guide the chandelier downwards.
Step 6: Lower and Remove the Chandelier
Once the chandelier is completely detached from the ceiling, carefully lower it. If you have a helper, they can guide it down. If you’re working alone and using a temporary support, slowly release the support or rope as you guide the chandelier down.
Place the chandelier gently on your drop cloth. Now is a good time to inspect it for any damage that might have occurred during removal.
Step 7: Cap Off the Ceiling Wires and Install a Cover Plate
Before you leave the ceiling, ensure the electrical wires coming from the ceiling box are safely capped off with wire nuts and ideally taped. This is a crucial safety step to prevent accidental contact with live wires.
It’s also a good idea to install a temporary cover plate over the electrical box. This protects the box and wires from dust and accidental damage while the ceiling is exposed. You can purchase a simple blank cover plate at any hardware store.
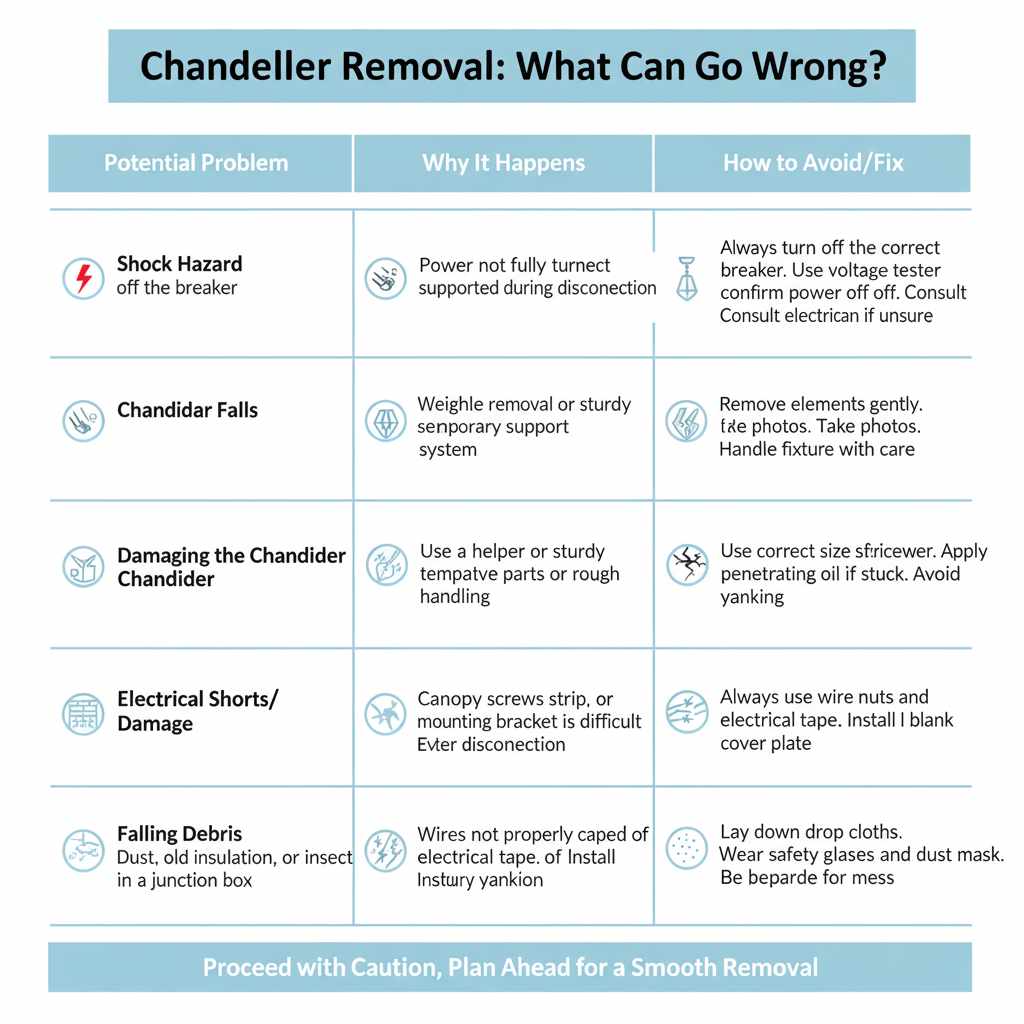
Chandelier Removal: What Can Go Wrong?
Even with the best intentions, things can sometimes go awry. Being aware of potential pitfalls can help you avoid them.
| Potential Problem | Why It Happens | How to Avoid/Fix |
|---|---|---|
| Shock Hazard | Power not fully turned off at the breaker. | Always turn off the correct breaker. Use a voltage tester to confirm power is off before touching wires. Have a qualified electrician check if unsure. |
| Chandelier Falls | Weight not adequately supported during disconnection. | Use a helper or a sturdy temporary support system. Ensure the support is stable and can handle the chandelier’s weight. |
| Damaging the Chandelier | Forceful removal of decorative parts or rough handling. | Remove decorative elements gently. Take photos for reference. Handle the main fixture with care. |
| Damaging the Ceiling | Canopy screws strip, or mounting bracket is difficult to remove. | Use the correct size screwdriver. If screws are stuck, try a bit of penetrating oil. Avoid yanking. |
| Electrical Shorts/Damage | Wires not properly capped off after disconnection. | Always use wire nuts and electrical tape on exposed wires from the ceiling box. Install a blank cover plate. |
| Falling Debris | Dust, old insulation, or insect nests in the junction box. | Lay down drop cloths. Wear safety glasses and a dust mask. Be prepared for mess. |
Frequently Asked Questions (FAQ)
Q1: How much weight can a standard ceiling electrical box hold for a chandelier?
A1: Standard electrical boxes are typically rated to support up to 50 pounds. However, for fixtures heavier than 50 pounds, or if you’re unsure, it’s crucial to use a fan-rated or heavy-duty ceiling brace that attaches directly to the joists. Always check the box’s rating or consult an electrician if you have a very heavy chandelier.
Q2: What if my chandelier has a lot of wires or complex connections?
A2: If your chandelier has more than the standard three wires (hot, neutral, ground), or if the wiring seems unusually complex (e.g., for dimming, multiple circuits, or smart features), it’s highly recommended to consult a qualified electrician. They can safely identify and disconnect the wires without damaging the fixture or causing electrical issues.
Q3: Can I remove a chandelier by myself?
A3: For smaller, lighter chandeliers, it might be possible for one person to manage. However, most chandeliers have significant weight and can be awkward to handle. Having a second person to help support the fixture as you disconnect it is strongly advised for safety and to prevent damage to the chandelier or your ceiling.
Q4: What should I do if I can’t find the right breaker to turn off the power?
A4: If your breaker box is not clearly labeled, you can identify the correct breaker by systematically turning them off one by one and checking if the chandelier light turns off. Alternatively, you can turn off the main breaker to your entire house, but this is usually overkill. If you are still unsure, it’s safest to call a licensed electrician to identify and disable the correct circuit.
Q5: How do I store a chandelier after taking it down?
A5: Once removed, carefully place the chandelier on a soft surface like a drop cloth or in its original box if you still have it. Wrap delicate parts like crystals in bubble wrap or packing paper. Store it in a safe, dry place where it won’t be bumped or damaged. If the chandelier is particularly valuable or antique, consider professional packing and storage.
Q6: What if the mounting bracket is stuck or won’t come off?
A6: If the mounting bracket screws are stripped or the bracket itself is difficult to remove, avoid using excessive force. You can try using a screw extractor tool designed for stripped screws. If it’s a matter of the bracket being fused or rusted, a small amount of penetrating oil applied to the screws might help loosen them. If all else fails, it may be time to call in a professional.
Conclusion
Taking down a chandelier might seem like a big job, but by following these detailed steps, you can accomplish it safely and effectively. Remember to always prioritize safety by turning off the power at the source and ensuring the chandelier is properly supported. With the right tools, a bit of patience, and this guide, you’re well-equipped to handle the removal of your chandelier. Whether it’s for a fresh new look, a move, or a repair, you’ve now got the confidence and knowledge to get the job done right.
Don’t hesitate to tackle your home improvement projects. With careful planning and execution, you can achieve professional-looking results and build valuable skills. Happy DIYing!