How To Clean Kitchen Cabinet Doors Before Painting Pro Tip
To clean kitchen cabinet doors before painting, first remove them and all hardware. Use a strong degreaser like Trisodium Phosphate (TSP) or a simple vinegar solution to scrub away all grease and grime. Rinse the doors thoroughly with clean water, let them dry completely, and then wipe with a tack cloth right before priming. This ensures your new paint will stick perfectly.
Hello there! I’m Md Meraj, and I’m so glad you’re here. Giving your kitchen cabinets a fresh coat of paint is one of the best ways to transform your space. It’s an exciting project! But before you dip that brush in paint, there’s one step that makes all the difference: cleaning the cabinet doors. It might sound boring, but I promise it’s the secret to a professional-looking finish that lasts for years. So many people skip this step and end up with peeling paint. Don’t worry, I’ll walk you through how to do it right. It’s simple, and we’ll do it together.
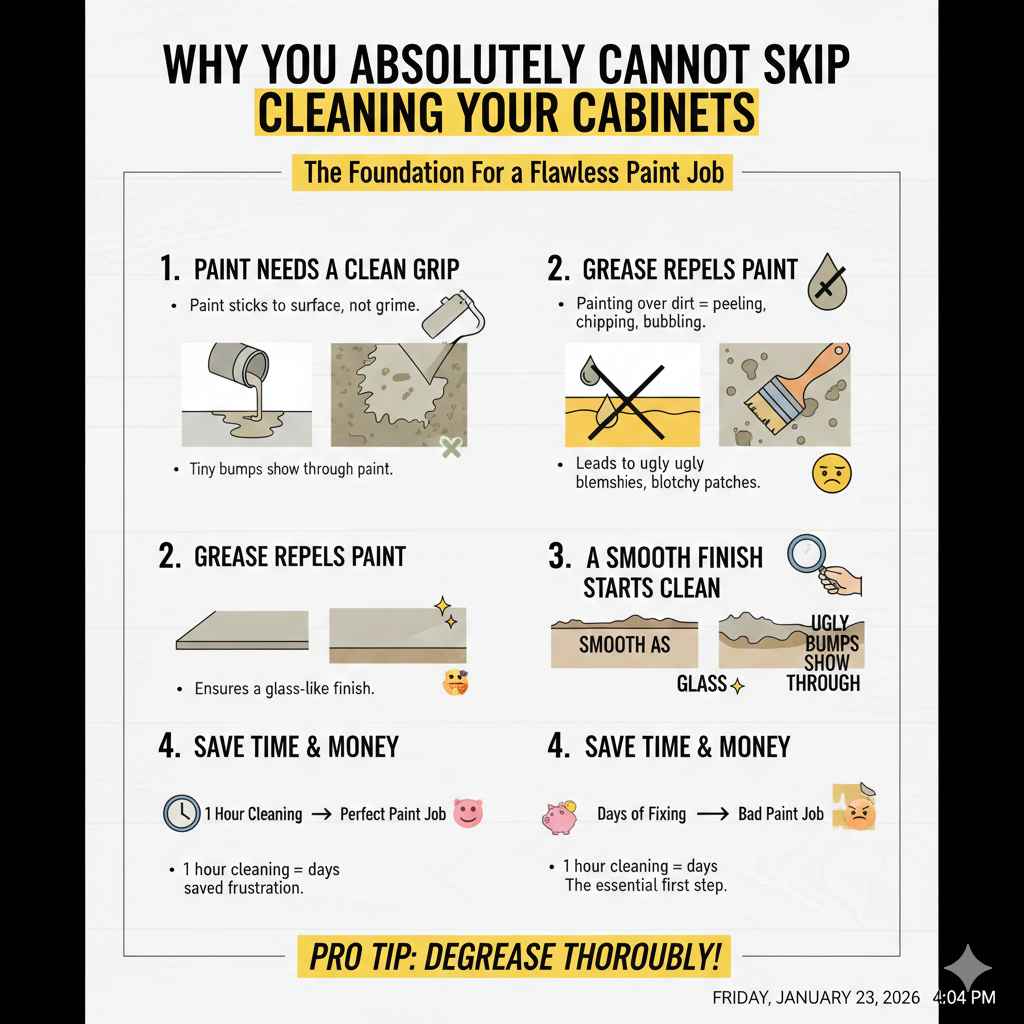
Why You Absolutely Cannot Skip Cleaning Your Cabinets
Think of it this way: you wouldn’t paint a wall without dusting it first, right? Kitchen cabinets are even trickier. Over years of cooking, they collect a thin, often invisible, layer of grease, food splatters, and dust. This grime is the number one enemy of a good paint job.
Here’s why cleaning is so critical:
- Paint Needs a Clean Grip: Paint and primer are designed to stick to a surface, not to a layer of grease. If you paint over grime, the paint is just clinging to the dirt, not the wood. Sooner or later, it will peel, chip, or bubble.
- Grease Repels Paint: Just like oil and water don’t mix, paint and kitchen grease don’t either. Painting over a greasy spot will lead to ugly blemishes, blotchy patches, and a finish that never quite looks right.
- A Smooth Finish Starts with a Clean Surface: Tiny bumps from dried food or dust might seem small, but they will show through your new paint. Cleaning ensures your final finish is as smooth as glass.
Taking an hour to clean properly will save you days of frustration trying to fix a bad paint job later. It’s the foundation of your entire project, so let’s build a strong one!
Your Essential Toolkit: Gathering Your Cleaning Supplies
The good news is you don’t need a lot of fancy equipment to get your cabinets sparkling clean. Most of these items are probably already in your home or easily found at a local hardware store. Here’s your checklist:
- Screwdriver or Drill: To remove cabinet doors and all hardware (hinges, knobs, pulls).
- Labeled Bags: Small plastic bags to store hardware for each door. Label them so you know exactly where everything goes!
- Two Buckets: One for your cleaning solution and one for clean rinse water.
- Degreasing Cleaner: We’ll talk more about options in a moment, but this could be Trisodium Phosphate (TSP), a simple dish soap solution, or a vinegar mix.
- Scrub Sponges or Nylon Brushes: Get ones with a non-abrasive scouring side for stubborn spots. An old toothbrush is great for detailed areas.
- Clean Rags or Microfiber Cloths: You’ll need several for cleaning, rinsing, and drying.
- Protective Gloves: Rubber gloves are a must to protect your hands from cleaners and hot water.
- Drop Cloths or Old Sheets: To protect your floors and countertops while you work.
- Tack Cloth: A special sticky cloth for the final wipe-down to remove all dust before priming.
Choosing the Right Cleaner for Your Cabinets
The cleaner you choose depends on how grimy your cabinets are. A kitchen that sees a lot of frying will need a stronger degreaser than one that’s rarely used. Here’s a simple breakdown of the most common options to help you decide.
| Cleaner | Best For | Pros | Cons |
|---|---|---|---|
| Trisodium Phosphate (TSP) | Very greasy or old cabinets. | Extremely effective at cutting grease. Also lightly “etches” the surface, which helps primer adhere. | Harsh chemical. Requires gloves, eye protection, and good ventilation. Must be rinsed very thoroughly. |
| Dish Soap & Warm Water | Lightly soiled cabinets. | Gentle, safe, and inexpensive. You already have it at home! Effective on light grease. | May not be strong enough for heavy-duty grease buildup near a stove. |
| Vinegar & Warm Water | Light to moderate grime. | Natural, affordable, and a good degreaser. The smell disappears when it dries. | Can be slightly acidic, so use a 50/50 mix with water. Not as powerful as TSP. |
| Commercial Degreasers | All levels of grime, depending on the product. | Formulated specifically for kitchen grease. Often comes in a convenient spray bottle. | Can be more expensive. Read the label carefully to ensure it’s safe for wood and won’t leave a residue. |
My pro tip? Start with the mildest cleaner first. Try a small, hidden spot with dish soap. If the grime comes right off, great! If not, you can move up to a stronger solution like TSP.
Step-by-Step: How to Clean Kitchen Cabinet Doors for a Flawless Finish
Alright, let’s get to work! Follow these steps carefully, and you’ll have perfectly prepped cabinets ready for a beautiful new look.
Step 1: Remove Doors and Hardware
This is the most important first step. Do not try to paint your cabinets with the doors still on! You’ll never get clean lines, and you’ll end up with paint on your hinges. Use your screwdriver or drill to carefully remove each door. As you remove the hinges and handles, place them in a labeled plastic bag (e.g., “Top Left Door,” “Under Sink”). This will save you a huge headache when it’s time to put everything back together.
Step 2: Set Up a Smart Workspace
Find a good spot to work, like a garage, basement, or even an outdoor area on a calm day. Lay down drop cloths to protect the floor. Set up a pair of sawhorses or a sturdy table where you can lay the doors flat. Working on a flat surface is much easier than trying to clean them while they are standing up. Arrange your two buckets, sponges, and rags so everything is within easy reach.
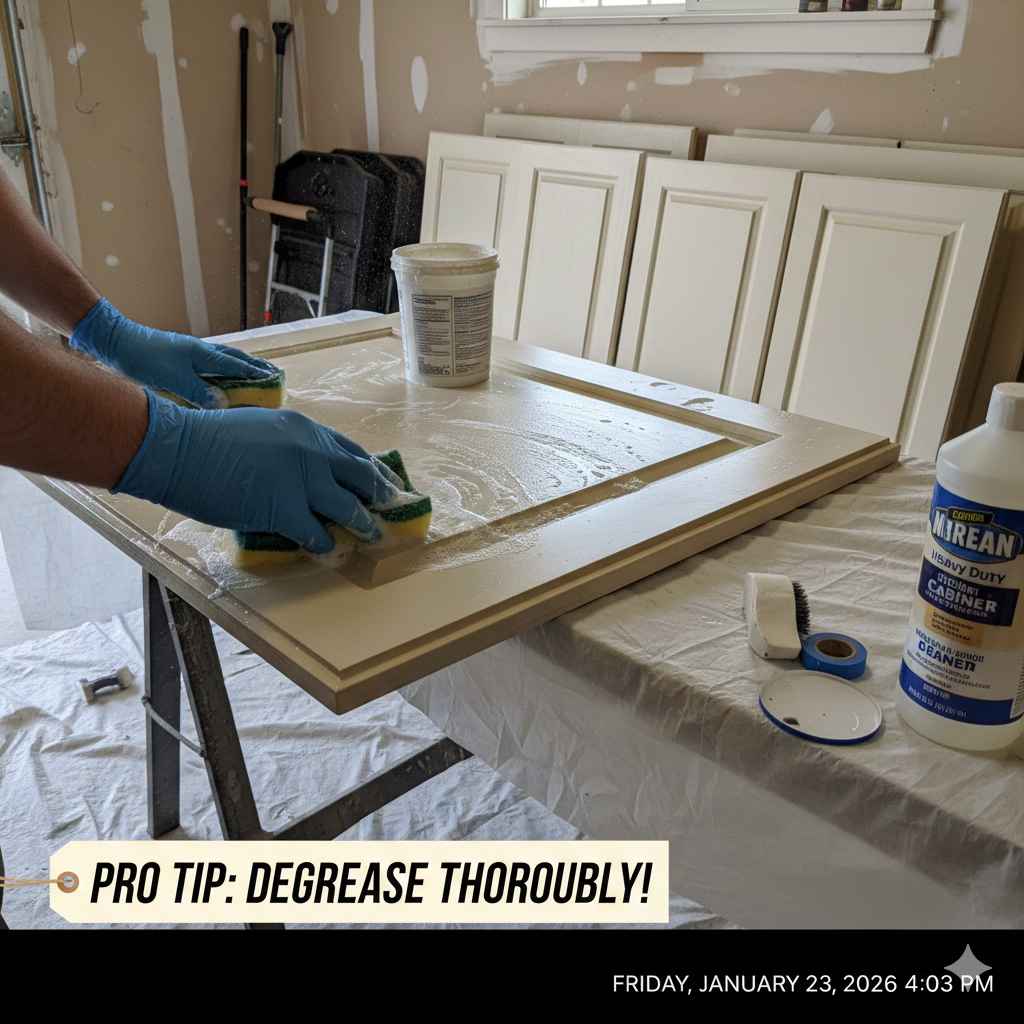
Step 3: The First Pass – Degreasing
Now for the fun part! Fill one bucket with your chosen cleaning solution, following the package directions. Fill the second bucket with clean, warm water for rinsing.
Dip your sponge or brush into the cleaning solution and start scrubbing one door at a time. Work in small, circular motions. Pay special attention to the areas around the knobs and handles, as well as the corners and detailed trim where grease loves to hide. You should see the grime starting to lift off. Don’t be afraid to put a little muscle into it, but use a non-scratch sponge to avoid damaging the wood. Keep your cleaning solution fresh; if the water gets too dirty, mix a new batch.
Step 4: The Rinse Cycle – Leaving No Residue Behind
This step is just as important as the cleaning step. Any leftover cleaning residue can prevent the primer from sticking properly. Take a clean cloth, dip it in your bucket of clean rinse water, and wring it out. Wipe down the entire cabinet door, removing all traces of the degreaser. You may need to rinse your cloth and repeat this two or three times to be sure it’s completely clean. When you’re done, the surface should feel squeaky clean, not slick or soapy.
Step 5: Let Them Dry Completely
Patience is key here. Your cabinet doors must be 100% dry before you move on to the next step. Stand them up against a wall or use drying racks to allow air to circulate around them. Depending on the humidity, this could take a few hours or even overnight. Trapping moisture under your primer or paint will cause it to bubble and peel, so don’t rush this!
Step 6: A Quick Scuff Sand (Optional but Recommended)
Once the doors are bone dry, it’s a great idea to do a “scuff sand.” This isn’t about removing the old finish; it’s about giving the surface a little “tooth” for the primer to grab onto. Use a fine-grit sandpaper (180 or 220-grit is perfect) and lightly sand the entire surface. You’re just trying to dull the old shine. It should only take a minute or two per door. The goal is a smooth, matte feel.
Step 7: The Final Wipe-Down with a Tack Cloth
Sanding creates fine dust, which is another enemy of a smooth paint finish. This is where a tack cloth comes in. A tack cloth is a slightly sticky piece of cheesecloth that picks up every last speck of dust. Gently wipe down the entire surface of each door with the tack cloth right before you are ready to apply your primer. Now your doors are perfectly clean, prepped, and ready for their transformation!
Pro Tips for Tackling Tough Stains and Greasy Buildup
Sometimes, you run into extra-stubborn spots. Here are a few tricks I’ve learned over the years:
- For Extra-Greasy Areas: For the cabinets right above your stove, you might need extra power. Try making a paste of baking soda and water. Apply it to the greasy spot, let it sit for 5-10 minutes, and then scrub it off with your sponge. The baking soda provides gentle abrasion to lift the gunk.
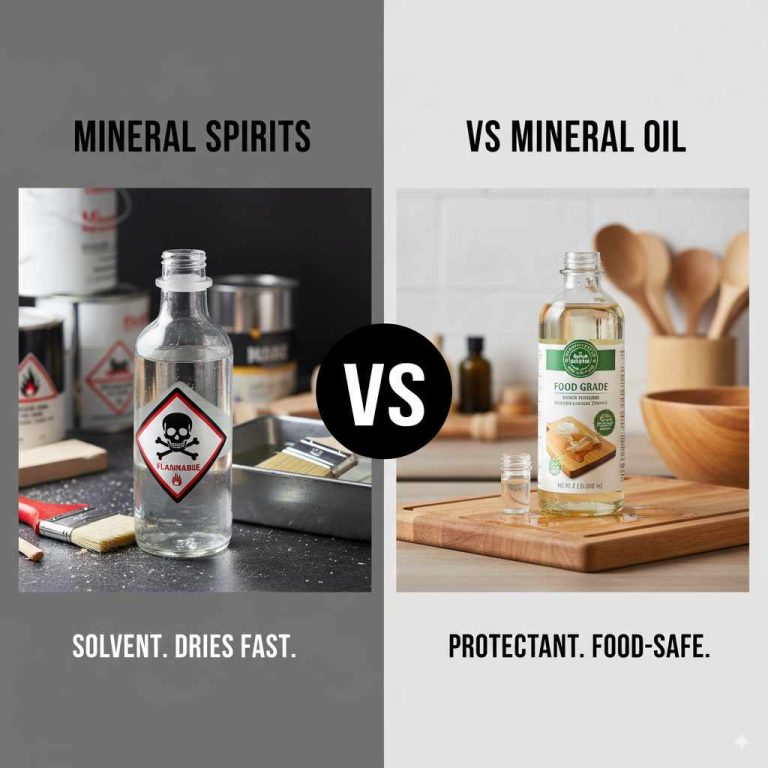
- Dealing with Sticky Residue: If you find sticky spots from old food or tape, a little mineral spirits on a clean rag can help dissolve the residue. Be sure to clean the area again with your degreaser afterward to remove any oily film left by the mineral spirits.
- Use a Plastic Scraper: For thick, caked-on grime, you can gently use a plastic putty knife or an old credit card to scrape it off before you start scrubbing. This saves you a lot of effort and avoids scratching the wood.
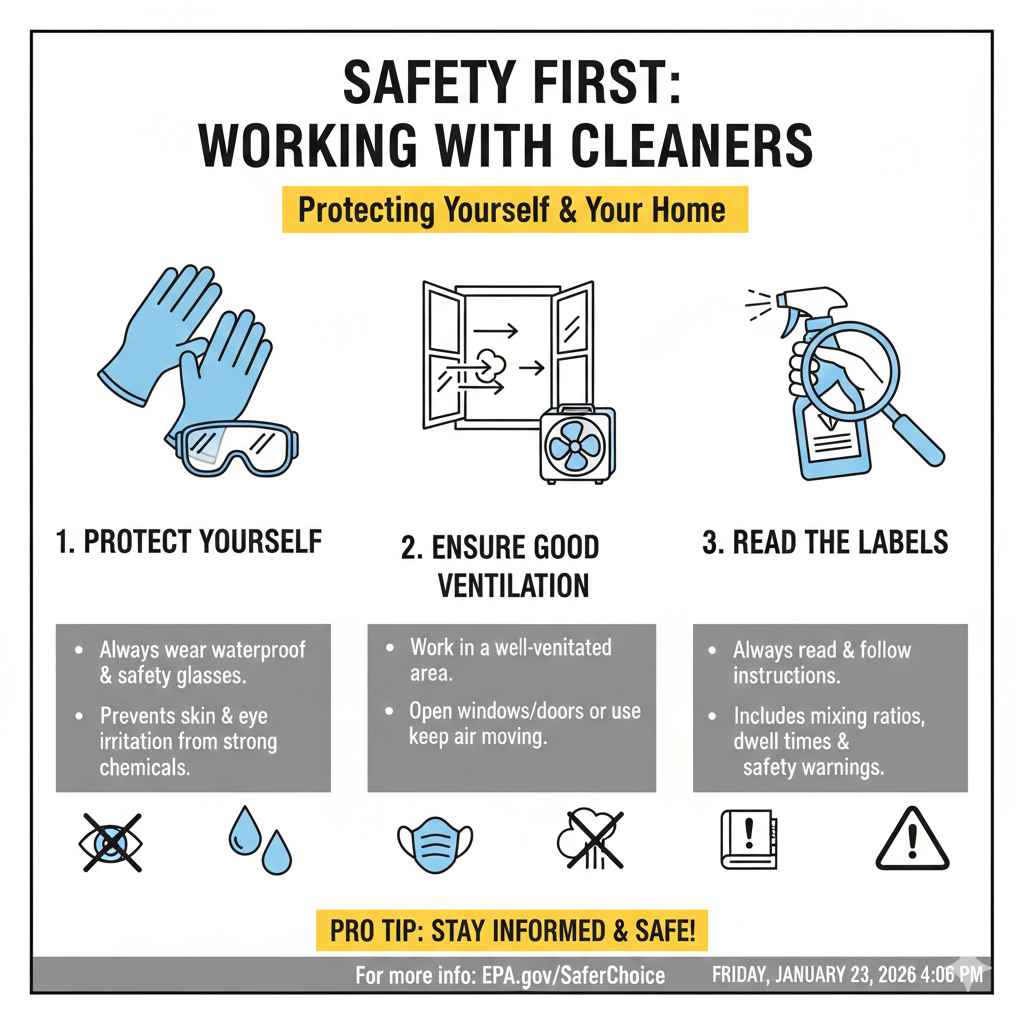
Safety First: Working with Cleaners
Even simple home projects require a little safety awareness. When you’re working with cleaning products, especially something strong like TSP, please keep these points in mind:
- Protect Your Skin and Eyes: Always wear waterproof gloves and safety glasses. Splashing strong cleaners in your eyes can be very dangerous.
- Ensure Good Ventilation: Work in a well-ventilated area. Open windows and doors, or set up a fan to keep fresh air moving. The fumes from some cleaners can be harmful to breathe.
- Read the Labels: Always read and follow the manufacturer’s instructions on the cleaning product’s label. This includes mixing ratios and safety warnings. For more information on safe cleaning practices at home, you can visit resources like the U.S. Environmental Protection Agency’s Safer Choice program.
FAQ: Your Cabinet Cleaning Questions Answered
1. Can I just wipe my cabinets with water before painting?
Unfortunately, no. Water alone is not strong enough to cut through the years of built-up kitchen grease. Grease repels water (and paint!), so you need a degreasing agent like TSP, dish soap, or vinegar to break it down and properly clean the surface for painting.
2. What is TSP, and is it safe to use?
TSP (Trisodium Phosphate) is a powerful, heavy-duty cleaner that is excellent for prepping surfaces for paint. It is safe to use as long as you take precautions. Always wear gloves and eye protection, ensure you have good ventilation, and rinse it off the cabinets completely. There are also TSP substitutes available that are less harsh but still effective.
3. Do I really have to remove the cabinet doors to clean them?
Yes, I highly recommend it. Removing the doors allows you to lay them flat, making them much easier to scrub, rinse, and sand thoroughly. It also prevents you from getting cleaner and paint on your hinges and ensures you can clean and paint every edge for a truly professional finish.
4. How long should I wait for the doors to dry?
Let them dry until they are completely dry to the touch, with no damp spots. This can take anywhere from a few hours to overnight, depending on the temperature and humidity in your workspace. Do not rush this step; painting over a damp surface will ruin your project.
5. Can I use my electric sander for the scuff sanding step?
I would advise against it for this step. A powerful electric sander can easily remove too much of the finish or even damage the wood. A light “scuff sand” is all you need, and this is best done by hand with a fine-grit sanding sponge or sandpaper to control the pressure.
6. Do I need to clean new, unfinished cabinet doors before painting?
Yes! Even brand-new, raw wood cabinets can have a light film of dust or oil from the manufacturing and shipping process. A quick wipe-down with a 50/50 mix of denatured alcohol and water is perfect for cleaning raw wood before you prime.
Conclusion: You’re Ready to Paint!
And there you have it! You’ve put in the most important prep work, and now your kitchen cabinet doors are perfectly clean and ready for their big transformation. Taking the time to do this step right is something you will thank yourself for every time you look at your beautiful, durable, professionally finished cabinets.
Remember, a great paint job is 90% preparation and 10% application. You’ve just completed the most critical part of that preparation. You should feel proud and confident moving on to the next steps of priming and painting. I know you can do it, and the results are going to be amazing. Happy painting!