How To Do Clean Catch Urine: Essential Guide
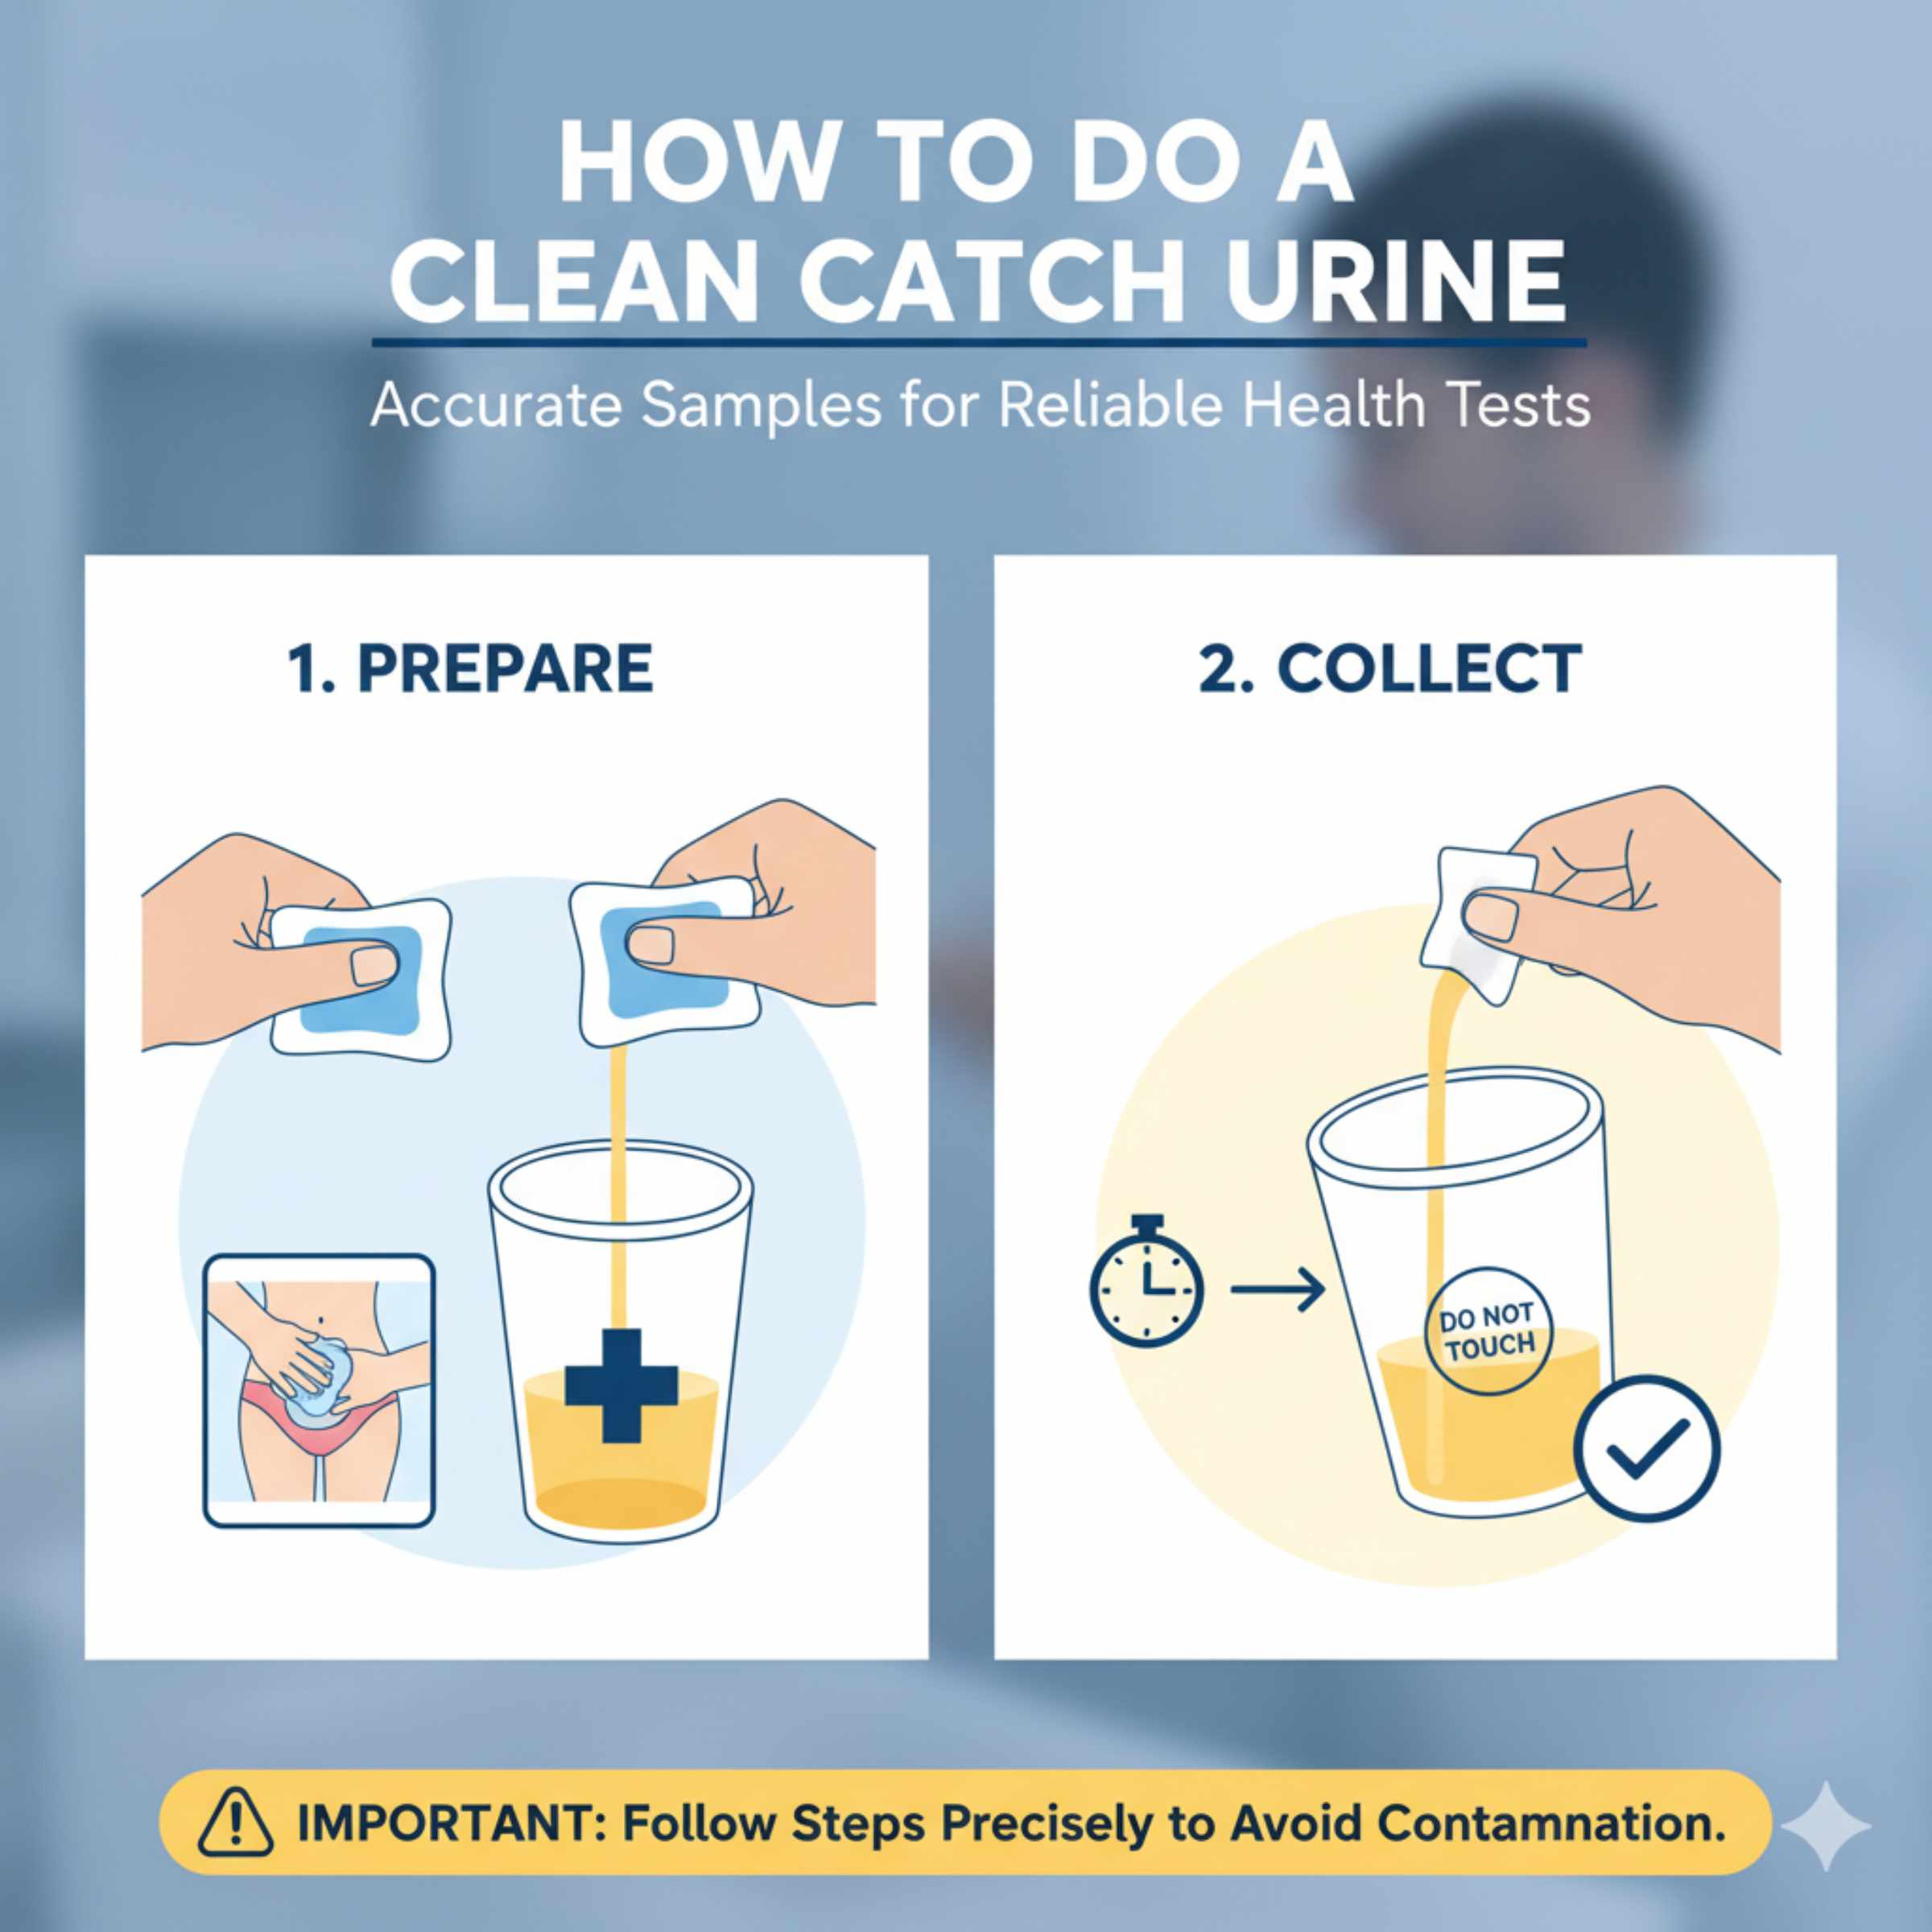
To get a clean catch urine sample, follow three simple steps: wash your hands and genitals thoroughly, collect the midstream urine into a sterile container, and seal it immediately. This technique prevents skin bacteria or genital secretions from contaminating the sample, ensuring accurate lab results for reliable health testing.
Have you ever needed a urine sample for the doctor, only to be told it wasn’t “clean” enough? It can be frustrating! Collecting a urine sample seems simple, but getting a genuinely clean catch—one free from outside germs—is crucial for accurate medical tests. If the sample is contaminated, your doctor might miss important findings or ask you to repeat the whole process. Don’t worry! As your home improvement guide, I believe in tackling any task with the right preparation, and this is no different. We will break down the clean catch method into simple, easy-to-follow steps. By the end of this guide, you’ll feel confident collecting a perfect sample every time. Let’s get this done right the first time!
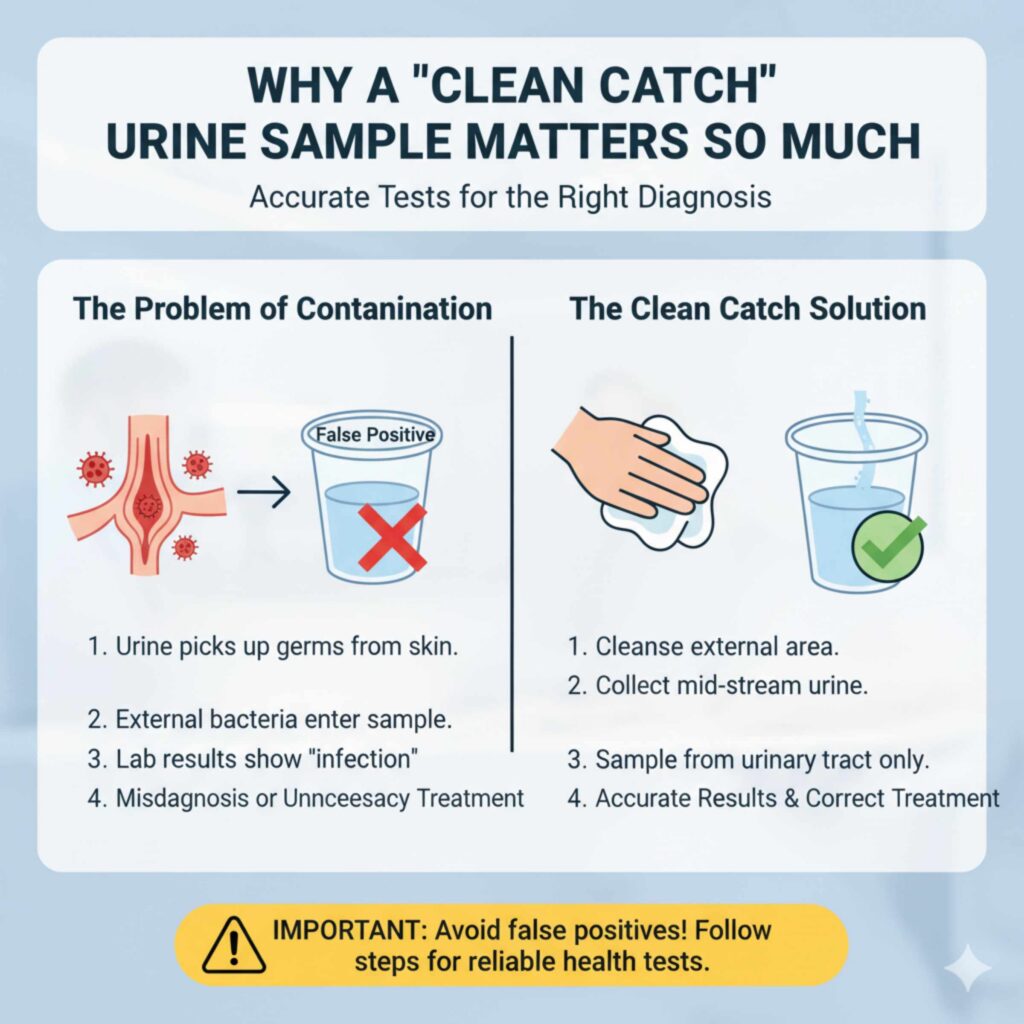
Why a “Clean Catch” Urine Sample Matters So Much
When a doctor orders a urinalysis, they are looking for tiny clues about your health. They might check for signs of infection, kidney issues, or diabetes. Urine naturally leaves your body, but as it passes out, it can pick up bacteria or cells from the skin around the urethra (where urine exits).
If these external germs get into the sample cup, the lab results might show an infection that isn’t actually in your bladder or kidneys. This is called a false positive. Getting a clean catch means we are testing only what came from inside your urinary tract. It’s like making sure the paint sample you bring home matches the wall color, not the dust on the can!
Tools You Need Before You Start
Preparation is key, just like getting your tools organized before starting a carpentry project. Having everything ready beforehand makes the actual collection smooth and quick. You won’t need any fancy equipment, but precision matters here.
Essential Supplies Checklist
- Sterile Specimen Cup: This usually comes with a peel-off label and a tight-fitting lid. Make sure it is factory-sealed and hasn’t been opened.
- Soap and Water or Antiseptic Wipes: You need a way to clean the area. Doctors usually provide special cleansing towelettes, but mild, unscented soap works well too.
- A Clean Surface: A counter or table where you can safely place the sterile cup lid without touching the inside.
- Gloves (Optional but Recommended): If you have them, wearing disposable gloves helps keep your hands clean from the cleaning solution and ensures you don’t accidentally touch the inside of the cup.
Step-by-Step Guide: How to Do Clean Catch Urine Collection
This process is slightly different for men and women due to anatomy. We will cover both, but the core principle—cleaning first, midstream second—remains the same. Always follow the specific instructions given by your healthcare provider, as sometimes they need a first-void sample instead.
Section 1: Preparation – Setting Up for Success
The goal here is to minimize the number of bacteria waiting on the skin surface near the opening of the urethra.
- Wash Your Hands: This is non-negotiable. Scrub your hands thoroughly with soap and water for at least 20 seconds. Dry them with a clean towel or air dry.
- Open the Collection Cup: Carefully unwrap or open the sterile cup container. Place the lid upside down on your clean surface. Crucially, do not touch the inside of the cup or the underside of the lid.
- Prepare the Cleansing Area: If you are using wipes provided by the doctor, have them ready. If using soap, wet a clean washcloth.
Section 2: The Cleaning Process (The Most Important Part)
This cleansing step is what makes the sample “clean catch.” Take your time here.
For Females Collecting a Sample:
This requires slightly more effort because the urethra is closer to the vagina.
- Position Yourself: Sit down on the toilet as you normally would. You can also stand with one foot propped up on a low stool or bathtub edge to gain better access.
- Spread the Labia: Using one hand (keep this hand clean and don’t let it touch anything else after this point!), gently spread the folds of skin (the labia) apart. You must keep them spread wide open until you start urinating.
- Wipe from Front to Back: Using the antiseptic wipe or clean cloth, wipe the area around the urinary opening (urethra) from front to back. If using multiple wipes, use a new one for each swipe. Generally, this means wiping the area around the opening two or three times.
- Discard the Wipe: Throw the used wipe away immediately.
For Males Collecting a Sample:
While often easier, proper cleaning still prevents skin flora contamination.
- Retract the Foreskin (If Uncircumcised): Gently pull the foreskin back completely to expose the head of the penis. Hold it back throughout the entire process until you finish urinating.
- Clean the Tip: Using the provided wipe or a clean cloth moistened with mild soap, wipe the tip of the penis (the glans) in a circular motion, moving outward from the urethral opening.
- Discard the Wipe: Throw the used wipe away.
Section 3: Collecting the Midstream Sample
This is where the “catch” happens. We want the middle portion of the flow, not the first few drops.
- Start Urinating: Begin urinating into the toilet bowl. These first few seconds of urine wash away any remaining surface bacteria that the cleaning might have missed.
- Position the Cup: Without stopping the flow, quickly bring the sterile cup into the stream. Aim to catch the urine in the center of the cup.
- Fill the Cup: Collect the required amount. Most labs only need about 1 to 2 ounces (30 to 60 mL), but check your container instructions. Do not let the cup touch your skin or genitals.
- Finish Urinating: Once you have enough, move the cup away from the stream and finish urinating the rest into the toilet.
Section 4: Sealing and Storing
You’re almost done! The final steps ensure the sample remains stable until it reaches the lab.
- Secure the Lid: Immediately place the sterile lid back onto the cup. Screw it on tightly—it must be leak-proof.
- Labeling: Fill out the label with your name, date, and the time of collection. Accuracy here is just as important as the catch itself.
- Refrigeration (If Necessary): Check with your doctor’s office or the lab. Most samples should be delivered within one hour. If you cannot deliver it right away, store it in the refrigerator. For example, the Centers for Disease Control and Prevention (CDC) often advises that samples needing culture testing should not be refrigerated for long periods as it can slow down bacterial growth. Always prioritize delivering the sample ASAP.
Special Considerations for Different Scenarios
While the basic clean catch is standard, sometimes you might need a specific type of sample, or the collection might be happening in a less ideal environment.
Collecting Urine for Culture vs Routine Urinalysis
The degree of cleanliness required can change based on the test.
| Test Type | Primary Goal | Contamination Risk | Clean Catch Rigor |
|---|---|---|---|
| Routine Urinalysis (Screening) | Checking chemical balance, pH, presence of proteins/sugar. | Low to Moderate | Standard midstream clean catch is usually sufficient. |
| Urine Culture (Infection Test) | Growing bacteria to identify the exact infection type. | High | Requires the most stringent cleaning steps; every precaution matters. |
| First Void Morning Sample | Detecting specific substances that concentrate overnight. | Varies | Often requires collecting the very first urine upon waking, even if it means a slightly different collection technique. |
Collecting Samples in Young Children or Infants
This is often where DIY confidence gets tested! Young children cannot follow instructions for a midstream catch. Doctors typically use specialized collection bags or tubes attached to the genital area. If using a bag, ensure the skin is cleaned well first to prevent the adhesive from pulling off skin cells.
Collecting While Menstruating
If a woman is menstruating, she must use a tampon (not a pad) to absorb menstrual blood before attempting the clean catch. Blood contamination can interfere with various chemical markers in the urine test.
Common Mistakes to Avoid (And How to Fix Them)
Even with clear instructions, beginners often make a few common stumbles. Think of these as troubleshooting tips, just like when a joint isn’t fitting perfectly in woodworking—you pause and reassess.
Mistake 1: Touching the Inside of the Cup or Lid
This is the fastest way to contaminate the sample. If your fingers accidentally brush the inside rim or the sterile underside of the lid, you must discard the cup and start over with a new sterile kit.
Mistake 2: Not Cleaning Enough
Rushing the washing/wiping step leaves behind surface bacteria. Remember, the goal is to physically move those germs away from the target area. Be thorough with the front-to-back wiping for women and retracting/cleaning for men.
Mistake 3: Collecting the Wrong Part of the Stream
If you start urinating directly into the cup, you collect the first part, which carries the most surface bacteria. If you stop too soon, you might not have enough volume. Aim for that smooth, steady middle flow.
Mistake 4: Not Sealing the Container Properly
A loose lid can lead to leakage, which might cause you to lose part of the sample or allow airborne bacteria to enter. Always check that the seal is tight and that the outside of the cup is clean before labeling.
Tips for Maximizing Comfort and Cooperation
Let’s face it, this isn’t the most glamorous task. Feeling awkward or rushed can lead to mistakes. Here are a few tips to make the process smoother:
- Hydrate Ahead of Time: If you aren’t feeling the urge to go, you’ll feel rushed when you finally do. Drink a glass or two of water about 30–60 minutes before you plan to collect the sample (unless your doctor advised against drinking beforehand).
- Use Good Lighting: If you are collecting in a less-than-ideal restroom, take a moment to ensure you can clearly see what you are doing, especially during the cleansing phase.
- Practice the Motion (Mentally): Before you start, visualize the steps: clean, start stream, catch midstream, stop stream. This mental rehearsal can reduce fumbling.
- If You Mess Up, Don’t Panic: If you accidentally drop the lid or spill some urine, it happens! Calmly get a new sterile kit (if available) or call the doctor’s office. It is always better to get a reliable sample than to submit a questionable one.
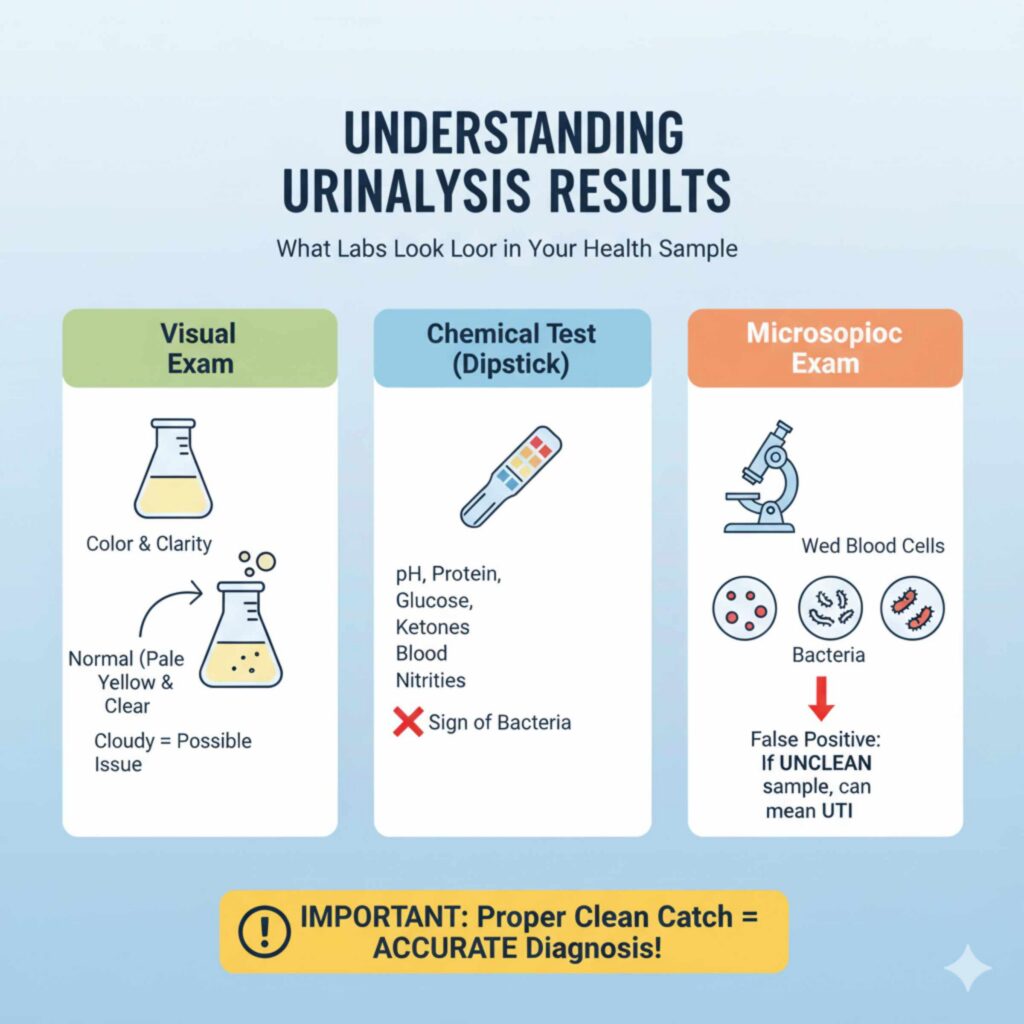
Understanding Urinalysis Results
While this guide focuses on collection, understanding why we collect carefully adds context. The clean catch method is critical because the lab technicians look for specific things in the sediment of the urine.
What Labs Look For (The Basics)
The analysis typically involves three parts:
- Visual Exam: Checking color (pale yellow is normal) and clarity (should be clear, not cloudy).
- Chemical Test (Dipstick): Using a test strip to check pH, protein, glucose (sugar), ketones, and signs of blood or nitrites (a sign of bacterial presence).
- Microscopic Exam: A technician looks at the urine under a microscope for red blood cells, white blood cells, epithelial cells (skin cells), and bacteria.
If a large number of white blood cells or bacteria show up in a sample that wasn’t properly cleaned, the results can point toward a urinary tract infection (UTI) when none exists, leading to unnecessary worry or treatment. According to the CDC guidelines, proper specimen handling is vital for diagnostic accuracy across many types of testing.
FAQ: Quick Answers for Collection Confidence
Q1: Do I have to use the wipes provided, or can I use regular soap?
It is always best to use the wipes provided by the clinic or lab, as they contain specific antiseptic agents ideal for this test. If none are provided, use mild, unscented soap and water, ensuring you rinse any residue off thoroughly.
Q2: What should I do if I sneeze or cough while holding the lid?
If you sneeze or cough while holding the lid, and you suspect any moisture or air turbulence might have contaminated the underside, treat it as contaminated. Place the lid down safely, discard it, and use a fresh lid if you have one, or restart the entire process.
Q3: How long can the urine sit at room temperature?
For most standard tests, urine should be delivered to the lab within one hour of collection. If you must wait longer, refrigeration (around 4°C or 39°F) is usually acceptable for up to 24 hours, but always confirm with the testing facility first.
Q4: If I collect too much urine, can I pour some out?
No. Once the sterile cup is open and collecting urine, you must not tamper with the contents. If you collected too much, you must discard the entire sample and recollect using a new sterile container.
Q5: Do I need to be anxious about the cleaning part?
Not at all! Think of the cleaning phase like prepping your workbench—a little extra sanding and wiping ensures a smooth finish later. It’s just a quick, necessary step for accurate health results. Be gentle but thorough.
Q6: What if I cannot urinate immediately after cleaning?
If you clean yourself but cannot produce a stream within a few minutes, the cleansing agents might start irritating the area, and you risk contaminating the area again by wiping again. If you cannot produce urine within about five minutes of cleaning, you should call the clinic for advice, as re-cleaning might introduce new contaminants.
Conclusion: Mastering the Clean Catch Technique
You’ve got the blueprint now! Doing a clean catch urine collection is less about complicated procedures and more about methodical preparation and careful execution. Remember the three pillars: Wash hands, clean the area thoroughly (front to back for women, retract and wipe for men), and capture that steady midstream flow.
This process, while maybe slightly awkward the first time, becomes second nature with practice. By taking these few extra minutes to ensure your sample is uncontaminated, you are doing a huge favor for your healthcare provider, leading to clearer, more reliable results on the first try. Feel good about being proactive with your health management. Now you have the confidence and the steps needed to handle this task like a pro! Go ahead and tackle that next appointment with ease.