How to Drill a Door Knob Hole: A Step-by-Step Guide
Hey there, friend! If you’re sitting here wondering, “How do I drill a door knob hole?” you’re in the right place. I remember the first time I tackled this project—it felt like a big deal, but once I got the hang of it, it was so satisfying to see that perfect hole ready for a shiny new door knob.
Whether you’re installing a new door, replacing an old knob, or just diving into a DIY home project, drilling a door knob hole is totally doable with the right tools and a little know-how. I’ve been through this process a few times, made some mistakes, and learned what works best. So, grab a cup of coffee, sit back, and let me walk you through everything you need to know to drill a door knob hole like a pro. This guide is packed with tips, tricks, and practical advice to make your project smooth and stress-free.
Why Would You Need to Drill a Door Knob Hole?
Let’s start with the basics. You might need to drill a door knob hole for a few reasons. Maybe you’re installing a brand-new door that doesn’t have any pre-drilled holes. Or perhaps you’re upgrading your home’s hardware and the new knob needs a different size or placement. I’ve also seen folks replace a damaged door or switch out an old knob that just wasn’t cutting it anymore. Whatever your reason, drilling the hole yourself saves money and gives you that proud DIY moment. I still grin thinking about the first door I prepped all on my own—it’s like a badge of honor!
The standard door knob hole is usually 2-1/8 inches in diameter, but some knobs or locks might need a slightly different size. You’ll also need a smaller hole for the latch, which connects the knob to the door frame. Don’t worry if this sounds complicated—I’ll break it down step by step.
Tools and Materials You’ll Need
Before you start drilling, you need the right tools. Trust me, I learned the hard way that trying to wing it with the wrong equipment leads to frustration. Here’s what I always have on hand for this job:
- Hole Saw Kit: A 2-1/8-inch hole saw is standard for most door knobs. Make sure it’s designed for wood or metal, depending on your door.
- Drill: A corded or cordless power drill with enough juice to handle the job. I prefer cordless for ease of movement.
- Spade Bit: A 1-inch spade bit works for the latch hole.
- Tape Measure and Pencil: For marking where to drill.
- Door Knob Installation Kit: Some kits come with templates to guide your drilling—super handy if you’re a beginner.
- Screws and Screwdriver: For securing the knob and latch after drilling.
- Safety Gear: Safety glasses and gloves keep you protected from wood chips or metal shavings.
- Sandpaper: To smooth out rough edges after drilling.
- Clamp or Door Holder: To keep the door steady while you work.
I keep all these in a toolbox so I’m ready to go. If you don’t have a hole saw or spade bit, you can find them at any hardware store for a reasonable price. My first time, I borrowed a friend’s drill kit, which saved me a few bucks.
Preparing Your Door for Drilling
Okay, let’s get to the prep work. This part is crucial because a little planning goes a long way. When I first tried drilling a door knob hole, I skipped some prep and ended up with a crooked hole—not fun. Here’s how to set yourself up for success:
First, decide where the knob will go. Standard door knob height is about 36 inches from the bottom of the door, but you can adjust based on what feels right for your home. I measure from the floor up and mark the spot with a pencil. If your door is already hung, make sure it’s secure in the frame. If it’s not, place it on a stable surface like sawhorses or clamp it to keep it steady.
Next, check your door knob’s instructions. Most come with a template that shows exactly where to drill the main hole and the latch hole. Tape the template to the door, lining it up with your pencil mark. If you don’t have a template, measure 2-3/8 inches or 2-3/4 inches from the edge of the door (this is the backset, or the distance from the edge to the center of the knob hole). Mark the center of the knob hole on both sides of the door and the latch hole on the edge.
Double-check your measurements. I can’t stress this enough—measure twice, drill once. A misaligned hole is a headache to fix.
How to Drill the Door Knob Hole
Now, let’s get to the drilling. This is where the magic happens, and I’ll admit, it’s kind of fun once you get going. Here’s how I do it:
Step 1: Drill a Pilot Hole
Grab your drill and a small drill bit (1/8-inch works great). On one side of the door, drill a pilot hole straight through the center of your marked knob spot. This hole guides your hole saw and keeps it from slipping. I like to drill from one side until I see the bit poke through the other side, then switch to the other side to finish. This keeps the hole clean and prevents splintering.
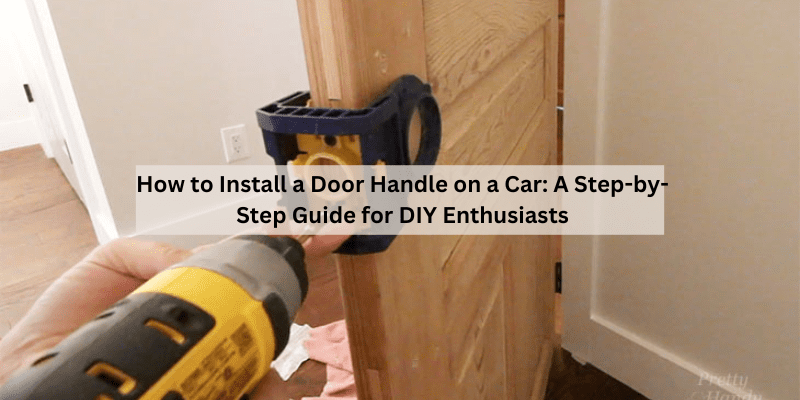
Step 2: Use the Hole Saw
Attach your 2-1/8-inch hole saw to the drill. Line it up with the pilot hole and start drilling slowly. Apply steady pressure, but don’t force it—let the saw do the work. I learned to keep the drill level to avoid an angled hole. Drill about halfway through one side, then flip the door and drill from the other side to meet in the middle. This prevents tearing the wood or metal on the opposite side. You’ll end up with a nice, clean circle.
Step 3: Drill the Latch Hole
Now, move to the edge of the door where you marked the latch hole. Use a 1-inch spade bit and drill straight into the edge until you hit the knob hole you just made. This creates a path for the latch mechanism. I found that going slow with the spade bit helps avoid splintering the door’s edge.
Step 4: Clean Up
Once your holes are drilled, remove the wood or metal plug from the hole saw. Use sandpaper to smooth any rough edges around the holes. I like to run my finger around the edges (carefully!) to make sure it’s nice and smooth before installing the knob.
Installing the Door Knob and Latch
With the holes drilled, you’re ready to install the knob. This part feels like the reward for all your hard work. Here’s what I do:
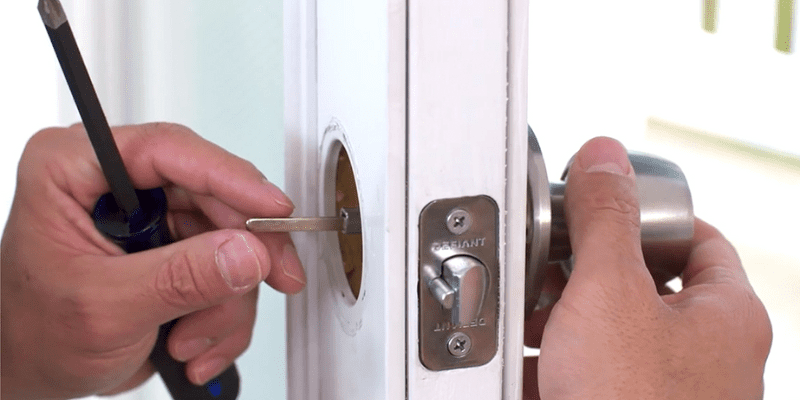
- Insert the Latch: Slide the latch mechanism into the 1-inch hole on the door’s edge. Make sure the beveled side faces the direction the door closes. Secure it with the screws provided, using a screwdriver.
- Attach the Knob: Place one half of the knob assembly through the 2-1/8-inch hole, aligning it with the latch. Then, attach the other half from the opposite side. Screw them together using the bolts in the kit. I always tighten them just enough to feel secure without stripping the screws.
- Test It Out: Turn the knob and make sure the latch moves smoothly. If it sticks, double-check that everything’s aligned properly.
When I installed my first knob, I was amazed at how simple it was once the holes were done right. It’s like putting together a puzzle.
Tips to Avoid Common Mistakes
I’ve made my fair share of mistakes, so let me save you some trouble. Here are tips I wish I knew starting:
- Don’t Rush the Drilling: Going too fast can cause the hole saw to bind or the door to splinter. Take your time.
- Check Your Door Type: Wood doors are easier to drill than metal or fiberglass ones. For metal, use a hole saw rated for metal and go slow to avoid overheating.
- Use a Template: If your knob kit includes a template, use it. It’s a lifesaver for getting the holes in the right spot.
- Keep the Drill Steady: A wobbly drill can make an uneven hole. I sometimes ask a friend to hold the door steady while I focus on drilling.
- Test Fit Before Finalizing: Before screwing everything in, make sure the latch and knob fit smoothly in the holes.
Safety First
Drilling can be safe if you’re careful, but it’s easy to get hurt if you’re not paying attention. I always wear safety glasses to protect my eyes from flying debris. Gloves are great for handling sharp tools or metal doors. Make sure your work area is clear, and keep kids or pets away while you’re drilling. I once got distracted and nearly dropped my drill—lesson learned!
If you’re using a corded drill, watch the cord to avoid tripping or pulling it out. For cordless drills, check that the battery is charged so you don’t get stuck mid-project.
What to Do If Things Go Wrong
Sometimes, despite your best efforts, things don’t go perfectly. I’ve been there. If your hole is slightly off, you might be able to adjust the latch or knob to fit. For bigger mistakes, like a hole that’s too large, you can use wood filler for wooden doors or a metal patch for metal ones, then redrill. If the door gets damaged beyond repair, you might need a new one, but that’s rare if you follow the steps.
I once drilled a hole a bit too low, but I was able to use a slightly larger backset knob to fix it. If you’re stuck, don’t be afraid to call a professional—sometimes it’s worth it to save the door.
Here’s a quick table to summarize the process:
| Step | Tool Needed | Tips |
|---|---|---|
| Mark the Hole | Tape Measure, Pencil | Measure twice, use a template if available |
| Drill Pilot Hole | Drill, 1/8-inch Bit | Go slow to avoid splintering |
| Drill Knob Hole | 2-1/8-inch Hole Saw | Drill halfway from each side |
| Drill Latch Hole | 1-inch Spade Bit | Align with knob hole, keep steady |
| Install Knob and Latch | Screwdriver, Screws | Test alignment before tightening |
Maintaining Your New Door Knob
Once your knob is installed, a little care keeps it working smoothly. I check the screws every few months to make sure they’re tight. A drop of lubricant on the latch keeps it moving freely. If you notice the knob sticking or the latch not catching, it might be a sign the holes weren’t perfectly aligned—check and adjust as needed.
For exterior doors, make sure the knob is weather-resistant. I learned this after a cheap knob rusted on my back door. Investing in a quality knob saves headaches down the road.
Why DIY This Project?
You might be wondering if it’s worth doing this yourself instead of hiring a pro. For me, the answer’s a big yes. Drilling a door knob hole saved me about $100 compared to calling a locksmith. Plus, there’s something so rewarding about tackling a home project and seeing it through. Every time I open that door, I think, “I did that!” It’s a small win that boosts your confidence for the next DIY adventure.
Wrapping It Up with Confidence
Friend, you’re now armed with everything you need to drill a door knob hole like a seasoned DIYer. From gathering your tools to making those perfect holes, you’ve got this. I remember the nerves I felt before my first try, but once I followed the steps and took my time, it was smoother than I expected. You don’t need to be a pro to get professional results—just a bit of patience and the right approach. So, grab your drill, double-check your measurements, and get ready to transform that door. You’ll be amazed at how good it feels to open it with a knob you installed yourself. Here’s to your next DIY victory!
FAQ: Your Questions Answered
What size hole do I need for a door knob?
Most door knobs need a 2-1/8-inch hole for the knob and a 1-inch hole for the latch. Check your knob’s instructions to be sure.
Can I drill a door knob hole without a hole saw?
It’s tough without a hole saw. A hole saw makes a clean, precise cut. If you don’t have one, borrow or buy one—it’s worth it.
What if my door is metal instead of wood?
Use a hole saw rated for metal and go slow to avoid overheating. Metal doors are trickier, but the process is the same.
How long does it take to drill a door knob hole?
If you’re prepped, it takes about 15-20 minutes to drill and install. Take your time to avoid mistakes.
Can I reuse an old door knob hole?
If the new knob matches the old hole’s size and backset, yes. If not, you might need to fill the hole and redrill.
What if I drill the hole in the wrong spot?
Small errors can sometimes be fixed by adjusting the knob or latch. For big mistakes, use wood filler or a patch and try again.
Do I need a professional to drill a door knob hole?
Not usually! With the right tools and this guide, most people can do it. If you’re unsure or the door is expensive, a pro can help.