How to Fix a Toilet Flapper: Quick and Easy Guide
Is your toilet constantly running or not flushing properly? You might be dealing with a faulty toilet flapper.
This small but essential component plays a crucial role in the functionality of your toilet. Imagine the relief of not having to listen to the annoying sound of running water or the frustration of a weak flush. Fixing a toilet flapper is simpler than you might think, and you don’t need to be a plumbing expert to get the job done.
In this guide, you’ll discover straightforward steps to restore your toilet to its optimal performance. Say goodbye to water wastage and hello to a more efficient bathroom. Let’s dive into how you can fix a toilet flapper and reclaim peace in your home.
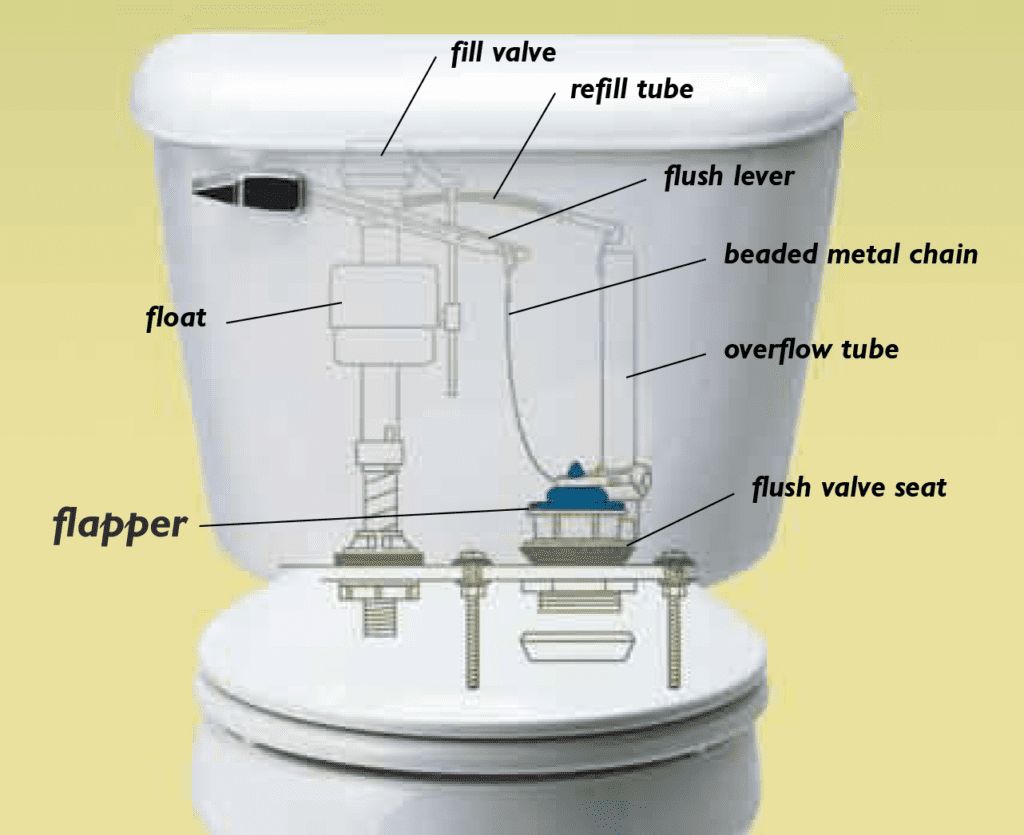
Identify Common Toilet Flapper Issues
Leaking toilets can waste lots of water. High water bills are a sign. Old flappers often cause leaks. They lose their seal over time. Dirty flappers might not close. Mineral build-up can affect them. Check for cracks or tears in the flapper. Replace if needed. Water running constantly is another issue. It can be due to loose chains. Chains get tangled sometimes. They stop the flapper from closing. Adjust the chain length. Secure it properly.
Flappers may not close well. Worn-out flappers can cause this. They need to be replaced. Heavy flappers close slowly. Light flappers close quickly. Adjust the water level. Check the float valve. It might need adjustment. Float valves control water flow. Improper settings can affect flapper closure. Ensure flapper fits the flush valve. It should be the right size. Correct installation is crucial.
Gather Necessary Tools And Materials
A pair of pliersis important. It helps in removing old parts. You also need a sponge. This will soak up water in the tank. A bucketis useful. Use it to catch dripping water. A towelis good to keep the area dry. Don’t forget a screwdriver. It helps with loosening screws.
Get a new flapper. It is the main part to replace. A chainis also needed. It connects the handle to the flapper. Buy a rubber gasket. It ensures a good seal. Some toilets need a flush valve. Check your toilet first. Always have some extra washers. They can prevent leaks.
Prepare The Toilet For Repair
First, find the water supply valve near the toilet. Turn it off by twisting it clockwise. This stops the water from filling the tank. Next, remove the tank lid carefully. Place it aside to avoid any damage.
Hold the toilet handle down until the tank is empty. This will drain the tank. If water remains, use a sponge or towel to soak it up. Make sure the tank is completely dry before moving on.
Remove The Old Flapper
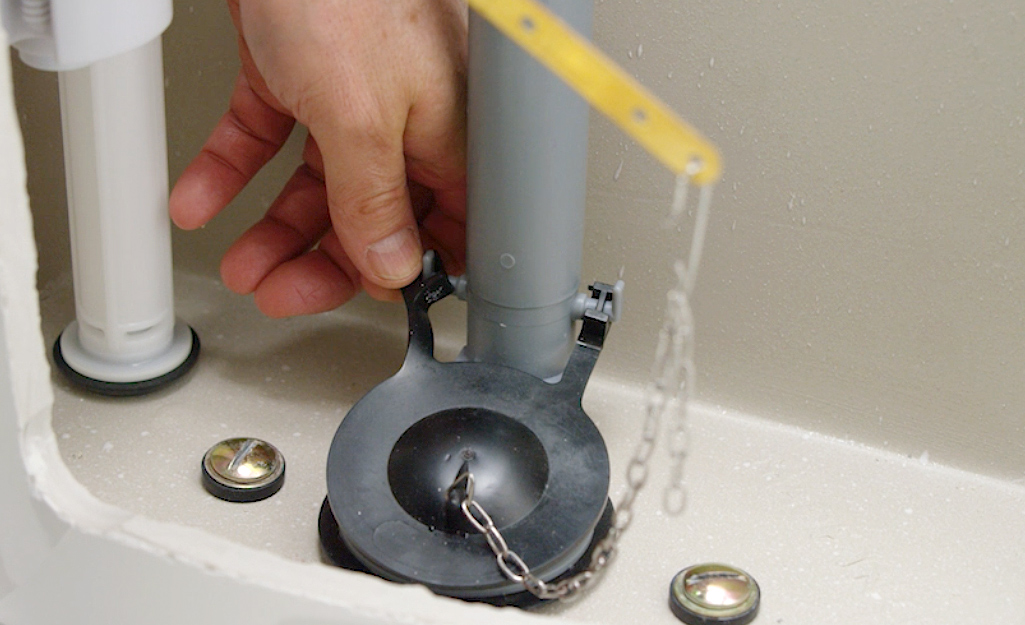
Detach the chainfrom the flapper. First, locate the chain inside the toilet tank. The chain connects the flapper to the flush handle. Carefully unhook the chain from the flush lever. Make sure to remember its position. This helps with attaching the new flapper later.
Remove flapper from hooks. Look for the hooks holding the flapper. Usually, they are on the sides of the valve opening. Gently slide the flapper off the hooks. Pull it out slowly to avoid damage. Check the hooks for any wear or tear. Replace if necessary. This ensures a proper fit for the new flapper.
Install The New Flapper
Toilet flappers come in different sizes. Measure the old flapper. Check for any markings. Most common sizes are two and three inches. Pick a flapper that matches the old one. A wrong size may cause leaks. Leaks waste water and money.
Find the hooks in the toilet tank. These hold the flapper. Attach the flapper to the hooks. Make sure it fits snugly. A secure fit prevents leaks. Some flappers have adjustable chains. Adjust the chain length. It should allow the flapper to close properly. Test the flapper by flushing the toilet. Ensure it seals the drain completely.
/how-to-replace-a-toilet-flapper-2719040-shema-6c3a8e70a8b24f15886a3993cd833d02.jpeg)
Credit: www.thespruce.com
Adjust Flapper Chain
The flapper chain should not be too loose or tight. Check its length first. The chain must be slack-free. It should have a little slack. But not too much. Adjust it by removing extra links. This helps the toilet flapper to seal well.
Push the flush handle. Watch how the flapper moves. It should lift easily. And close fast too. If it sticks, adjust the chain again. Make sure no parts are tangled. A smooth movement means a well-fixed flapper. Test several times for assurance.
Test The Repair
Identifying a faulty toilet flapper requires a keen eye. Begin by observing water levels and listening for running water sounds. Adjust or replace the flapper to ensure a snug fit, preventing leaks and conserving water.
Turn On Water Supply
Turn the water supply back on slowly. Watch the tank fill with water. Check for any strange noises. Ensure the flapper closes properly. Water should not keep running. If it does, adjust the chain length. Make sure the flapper sits well on the flush valve. This stops leaks.
Check For Leaks
Look around the toilet base. Ensure there’s no water. Check the tank for leaks too. Use a dry cloth to wipe around. If it stays dry, you’re good. A wet cloth means leaks. Fix any leaks immediately. Tighten any loose bolts. Ensure the flapper seals the valve tightly. Adjust it if needed. A good seal prevents water waste.
Credit: www.homedepot.com
Maintenance Tips
Fixing a toilet flapper involves simple steps. First, turn off the water supply. Then, remove the old flapper and replace it with a new one. Finally, adjust the chain length to ensure proper sealing. This easy maintenance can prevent leaks and save water.
Regular Inspection
Check the toilet flapper every month. Make sure it fits tightly. Look for rust or cracks. A tight flapper prevents leaks. Ensure the flapper chain is not tangled. Adjust the chain if needed. A tangled chain stops the flapper from closing.
Signs Of Wear And Tear
See if the flapper is old or cracked. An old flapper may cause water wastage. Look for discoloration or bending. A bent flapper might not seal correctly. Feel the rubber for smoothness. Rough rubber can mean it’s time to replace it.

Credit: www.youtube.com
Frequently Asked Questions
Why Is My Toilet Flapper Not Sealing?
A toilet flapper may not seal due to debris or warping. Clean the flapper and check for damage. If it’s warped, replace it. Ensuring a tight fit will prevent leaks, saving water and reducing bills.
How Do I Replace A Toilet Flapper?
To replace a toilet flapper, first turn off the water supply. Remove the old flapper by detaching its hooks. Install the new flapper by attaching it to the overflow tube. Ensure it seals correctly and re-enable the water supply.
What Causes A Toilet Flapper To Wear Out?
Toilet flappers wear out due to mineral buildup or age. Hard water minerals can degrade the rubber material. Frequent use may also cause wear. Regularly inspect your flapper for signs of damage or deterioration.
How Can I Tell If My Flapper Is Leaking?
Listen for constant running water or check for unexplained water bills. Test by adding food coloring to the tank. If the color appears in the bowl without flushing, the flapper is leaking and needs attention.
Conclusion
Fixing a toilet flapper is simple and rewarding. Start by turning off the water supply. Then, remove the old flapper carefully. Ensure you buy the correct replacement. Attach the new flapper securely. Turn the water back on and test it.
No more leaks. You save water and money. Regular checks prevent future issues. Feel confident in your plumbing skills now. A functional toilet enhances your home’s comfort. Share this guide with friends who might need help. Remember, small fixes make a big difference.
Enjoy your smoothly running toilet!