How to Frame a Closet for Bifold Doors: Step-by-Step Guide
Framing a closet for bifold doors isn’t as hard as it sounds. With some basic tools and guidance, you can do it yourself.
Bifold doors are popular for saving space and enhancing room aesthetics. They fold neatly, making closets accessible and stylish. But the key to their success lies in proper framing. A well-framed closet ensures smooth door operation and long-lasting performance. You will learn about measuring, choosing materials, and assembling the frame.
This introduction sets the stage for a detailed guide. It will help you understand the steps involved. Whether you’re a DIY enthusiast or a beginner, this guide will be useful. Let’s dive into the world of bifold doors and discover how to frame a closet like a pro.
Credit: www.familyhandyman.com
Planning Your Closet Space
Measure the height and width of the closet space. Use a tape measure. Keep the numbers handy. Bifold doors need room to move. Ensure there is enough space. Check the ceiling height. It should not be too low. Doors need space to swing. Also, measure the depth of the closet. This helps in planning. Make sure the doors fit right.
Pick a spot for the closet. This is important. Look for a place with enough space. Avoid tight corners. The location should be easy to reach. Consider the flow of the room. Doors should not block paths. Choose a spot near the bedroom or hallway. This is convenient. Make sure the walls are strong. They need to hold the doors firmly.
Selecting Materials And Tools
A good project starts with the right tools. Hammer and screwdriver are must-haves. You’ll also need a measuring tape for accuracy. A level helps keep things straight. Saw and drill are useful for cutting and fixing. Safety glasses protect your eyes. A pencil is handy for marking. Keep a toolbox close for all these items.
Strong materials make a sturdy closet. Wood is a popular choice. It is strong and easy to work with. Metal hinges last long and work smoothly. Use screws instead of nails for better hold. Paint or varnish protects the wood. Sandpaper smoothens the edges. Pick materials that match your home’s style.
Preparing The Area
Clear the space where the doors will go. Remove any furniture or items. Make sure the area is safe and clean. You need room to work. Check the floor for uneven spots. Level it if needed.
Use a tape measure to find the dimensions. Mark where the doors will sit. Check the walls. Make sure they are straight. Use a level to test. Mark the exact spots for the frame. This helps keep the doors even.
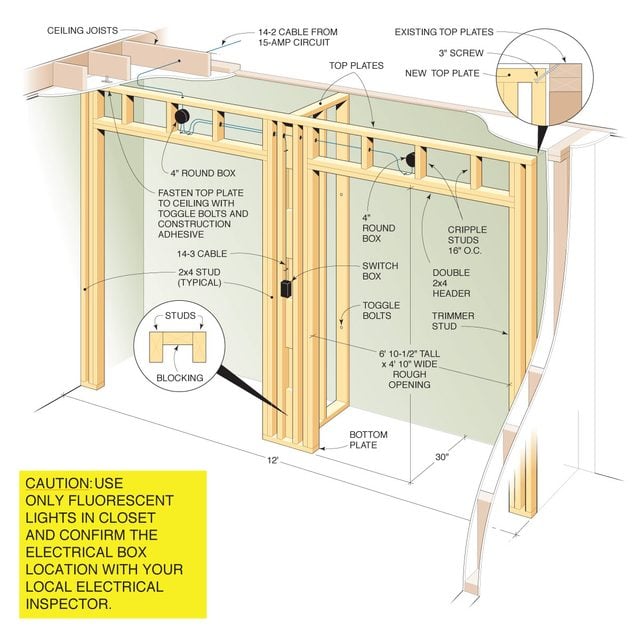
Building The Frame
Start with the base of the frame. Measure the closet width and depth. Cut the wood to fit these measurements. Use a level to ensure the base is straight. Secure the wood with screws or nails. Make sure it’s firm and stable. This base supports the whole structure.
Side walls are crucial. Cut two pieces of wood. Each should match the height of the closet. Attach these pieces to the ends of the base. Use a level to check they are vertical. Secure them tightly. Use screws for strength. These walls will hold the doors.
Installing The Header
First, measure the width of the closet. This tells where the header goes. Hold the header piece at the top. It needs to be level and straight. Use a spirit level to check. Adjust the header until it is perfect. This step is key for smooth door movement later.
Once the header is in position, use screws to attach it. Make sure you screw into the studs. This gives the header strength. Check the screws are tight. The header must not move. If it wiggles, the doors will not work well.

Credit: www.youtube.com
Setting Up Bifold Door Tracks
Start by measuring the width of your closet. Make sure the track fits well. Use a level to check alignment. Drill holes where the screws will go. This makes things easier. Use strong screws to hold the track. Make sure the track is steady. Tighten the screws firmly.
Check if the track is straight. Use a level for this. Adjust if needed. Place the track in the right spot. Keep it aligned. This helps the doors slide smoothly. Test the doors after setup. Make sure they open and close well. A well-aligned track is key for smooth operation.
Hanging The Bifold Doors
Framing a closet for bifold doors starts with measuring the opening. Ensure the header and jambs are level. Secure the track hardware firmly to support smooth operation.
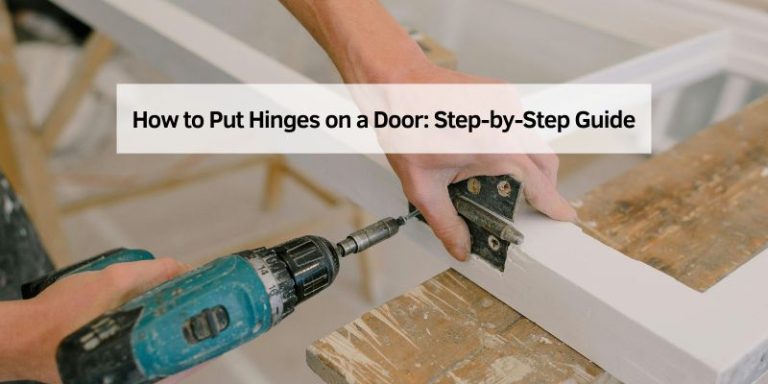
Attaching Hinges
The hinges connect the doors to the frame. Ensure the hinges align with the door’s edge. Use a screwdriver to secure the screws tightly. Make sure the hinges sit flush. Tighten all screws for a firm hold. Check the movement of the doors. Smooth movement means the hinges are correctly attached. Adjust if necessary for easy swinging.
Balancing And Adjusting Doors
Each door needs to be balanced. Open and close the door to test balance. If it swings unevenly, adjust the screws. Loosen or tighten screws for perfect balance. Keep doors aligned for smooth operation. Check the alignment with the frame. Adjust the screws if doors don’t fit properly. Properly balanced doors glide easily. Ensure they don’t wobble or stick.
:strip_icc()/SDW_160_02-793448c0f43641e3a2e339398c91477e.jpg)
Credit: www.bhg.com
Finishing Touches
Painting and sealing the closet frame adds beauty. It also gives protection. First, choose a color that you like. Use a brush or a roller for even strokes. Apply a primer before painting. This helps the paint stick better. Wait for the paint to dry fully. Then, apply a sealant. The sealant keeps the paint safe from scratches.
For decorative elements, think about knobs or handles. They can make the doors look special. You can also add a mirror to the door. Mirrors make the room look bigger. Stickers or decals are fun too. They add color and patterns. Choose items that match the room’s style.
Frequently Asked Questions
What Is The Rough Opening For A Bifold Closet Door?
The rough opening for a bifold closet door is typically 80 inches high and 24 to 36 inches wide. Measure accurately for proper fit, ensuring adequate space for the door tracks and panels. Always check the manufacturer’s specifications for precise measurements.
Do Bifold Doors Need A Frame?
Yes, bifold doors need a frame for proper installation and support. Frames ensure stability, functionality, and security. They help align the doors and provide a smooth operation. Using a frame also enhances energy efficiency by sealing gaps. Proper framing is crucial for the longevity and performance of bifold doors.
How Much Bigger Should A Bifold Door Frame Be Than The Door?
A bifold door frame should be 10-12 mm wider and 5-7 mm taller than the door. This ensures smooth operation and proper fit, accounting for necessary clearances. Accurate measurements are crucial for installation, preventing any issues with door movement and functionality.
How Wide To Frame A Bifold Door?
To frame a bifold door, measure the door width and add 1. 5 inches for clearance. Ensure the rough opening height is 2 inches taller than the door. These dimensions allow for proper installation and operation of the door. Always check manufacturer guidelines for specific requirements.
Conclusion
Completing a closet frame for bifold doors feels rewarding. You now have a functional and stylish space. Remember to measure accurately and select quality materials. This ensures your doors fit perfectly. With these steps, your home gains efficiency and charm.
Always prioritize safety while working. Use proper tools and follow guidelines. Enjoy the enhanced look and feel of your new closet. Feel free to share your experience with others. Happy building!