How to Install Canvas Snap Fasteners
Hey there! If you’re looking to secure a canvas cover, repair a boat tarp, or spruce up some outdoor gear, learning how to install canvas snap fasteners is a game-changer. I’ve spent plenty of time tinkering with these handy little gadgets for my own projects—think boat covers, patio furniture, and even a DIY awning for my backyard. There’s something satisfying about snapping that canvas into place with a clean click.
In this guide, I’m sharing everything I’ve learned to help you install canvas snap fasteners like a pro. Whether you’re a seasoned DIYer or just starting out, I’ve got you covered with step-by-step tips, tools, and tricks to make the process smooth and stress-free. Let’s dive in!
Why Canvas Snap Fasteners Are a Must for Home Projects
Canvas snap fasteners are small but mighty. These metal or plastic snaps are designed to hold canvas, fabric, or other materials securely in place. I first came across them when I needed to replace a worn-out boat cover. The snaps kept everything tight and weatherproof, even during windy lake days. They’re perfect for projects like awnings, tarps, upholstery, or even custom car covers.
What I love most is their durability. Unlike zippers or Velcro, snaps don’t jam or wear out quickly. They’re also super versatile—you can use them on canvas, leather, or heavy fabrics. Plus, they give your project a polished, professional look. Before we get to the how-to, let’s talk about the types of snap fasteners and what you’ll need to install them.
Types of Canvas Snap Fasteners
When I started, I was surprised by how many snap fastener options there are. Knowing the types helps you pick the right one for your project. Here’s what I’ve learned:
- Screw Snaps: These have a threaded base that screws into wood, fiberglass, or metal. I used these for my boat cover because they grip surfaces tightly.
- Pull-the-Dot Snaps: These are heavy-duty and lock in one direction, making them great for high-stress areas like truck tarps. They’re a bit trickier to install but worth it for rugged projects.
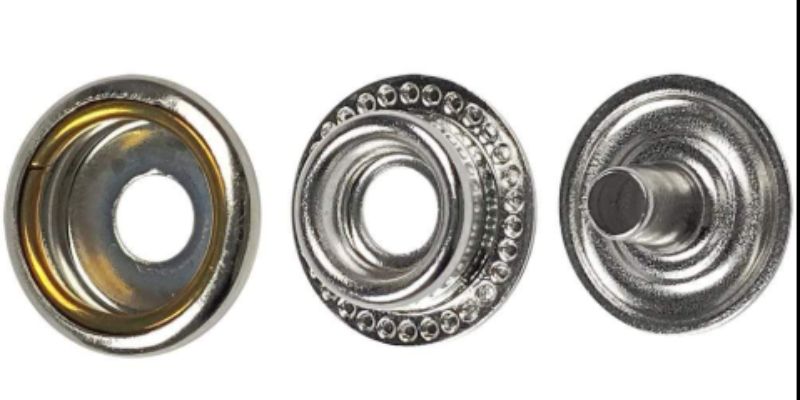
- Socket and Stud Snaps: The most common type, with a socket (female) and stud (male) that snap together. These are my go-to for canvas projects like patio cushions.
- Lift-the-Dot Snaps: These require lifting a tab to release, adding extra security. I’ve seen them on vintage car covers, and they’re a pain to undo without practice!
Each type has its own vibe, so think about your project’s needs. For example, screw snaps are awesome for fixed surfaces, while socket and stud snaps work better for fabric-to-fabric connections.
Tools and Materials You’ll Need
Before I installed my first snap fastener, I made the mistake of diving in without the right tools. Trust me, having the proper gear makes all the difference. Here’s what I keep in my toolbox for this job:
| Tool/Material | Purpose |
|---|---|
| Snap Fastener Kit | Includes snaps, sockets, studs, and sometimes a setting tool. I grab mine from marine supply stores or online. |
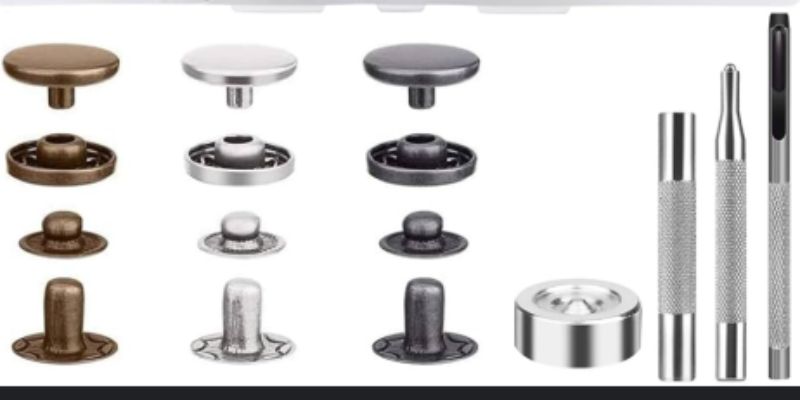
| Snap Setting Tool | A metal tool that sets the snap into the fabric. Some kits include a cheap plastic one, but I prefer a sturdy metal version. |
| Hammer or Mallet | For pounding the snap into place. A rubber mallet works best to avoid damaging the snap. |
| Hole Punch | To cut clean holes in the canvas for the snap. I use a leather punch for precision. |
| Measuring Tape | To mark snap placement accurately. A ruler works in a pinch. |
| Marker or Chalk | For marking where the snaps go. I use a fabric marker for dark canvas and chalk for light ones. |
| Drill (Optional) | For screw snaps, you’ll need a drill to make pilot holes in wood or fiberglass. |
| Scissors or Utility Knife | To trim excess fabric or clean up edges. |
| Canvas or Fabric | The material you’re working with. Make sure it’s heavy-duty for outdoor use. |
Pro tip: Double-check that your snap kit matches your project. Marine-grade stainless steel snaps are my favorite for outdoor stuff because they resist rust.
Preparing Your Canvas for Snap Installation
Okay, let’s get to the fun part—prepping the canvas. I’ve learned the hard way that preparation is everything. A sloppy setup leads to crooked snaps or loose connections, and nobody wants that.
First, lay your canvas flat on a clean surface. I usually work on my garage floor with a piece of cardboard underneath to protect the fabric. Smooth out any wrinkles—this makes measuring easier. Next, decide where your snaps will go. For my boat cover, I spaced snaps about 6 inches apart along the edges to ensure a tight fit. Use your measuring tape and marker to mark each spot. If you’re attaching the canvas to a surface like wood or metal, mark corresponding spots on that surface too.
If your canvas is thick, like the heavy-duty stuff I used for an outdoor awning, reinforce the snap areas. I add a small patch of extra canvas or leather behind each snap spot for strength. You can sew or glue it in place—I’ve had good luck with fabric adhesive for quick fixes. Finally, use your hole punch to cut a small, clean hole at each marked spot. The hole should be just big enough for the snap’s base to fit through. Too big, and the snap might wiggle loose; too small, and it won’t set properly.
Step-by-Step Guide to Installing Canvas Snap Fasteners
Now, let’s walk through the installation process. I’m focusing on socket and stud snaps since they’re the most common, but I’ll toss in tips for screw snaps too. Here’s how I do it:
Step 1: Set Up Your Workspace
Find a sturdy, flat surface like a workbench. I’ve made the mistake of trying this on a wobbly table, and it’s a nightmare. Keep your tools within reach, and make sure your canvas is clean and ready.
Step 2: Position the Snap Components
Each snap has two main parts: the socket (the “female” part that clicks) and the stud (the “male” part that snaps into it). For fabric-to-fabric connections, you’ll put a socket on one piece of canvas and a stud on the other. For fabric-to-surface connections (like a boat frame), the stud usually goes on the surface. Check your kit’s instructions, as some snaps have specific top and bottom pieces.
Step 3: Punch Holes in the Canvas
Using your hole punch, make a hole at each marked spot. I aim for a hole about 1/8 inch wide for standard snaps. Test one snap to make sure the base fits snugly through the hole without tearing the fabric.
Step 4: Set the Socket
Place the socket’s base through the hole from the underside of the canvas. The flange (the flat part) should rest against the fabric. Lay the canvas on a hard surface, then place the socket’s top piece (the part that clicks) on the base’s protruding end. Grab your snap setting tool—it looks like a metal rod with a divot on one end. Position the tool’s divot over the socket and give it a firm tap with your hammer. I usually need 2-3 solid hits to crimp the pieces together. Don’t go Hulk-mode, though—too much force can bend the snap.
Step 5: Set the Stud
Repeat the process for the stud side. If you’re attaching to another piece of canvas, punch a hole and set the stud the same way. If you’re using screw snaps for a surface like wood, drill a small pilot hole first. I used a 1/16-inch bit for my boat’s fiberglass frame. Then, screw the stud into the surface using a screwdriver or drill. Make sure it’s tight but not stripped.
Step 6: Test the Snap
This is the satisfying part! Line up the socket and stud, then press them together. You should hear a crisp snap. Tug gently to ensure it’s secure. If it feels loose, you might need to re-crimp the snap or check for a misaligned hole. I’ve had to redo a couple when I rushed the process.
Step 7: Repeat for All Snaps
Work your way through all your marked spots. I like to double-check spacing as I go to keep everything even. For large projects like a tarp, I install snaps in small batches to avoid getting overwhelmed.
Tips for a Professional Finish
Over time, I’ve picked up a few tricks to make my snap installations look sharp and last longer:
- Use Marine-Grade Snaps for Outdoor Projects: I learned this after cheap snaps rusted on my patio cover. Stainless steel or brass snaps hold up against rain and sun.
- Practice on Scrap Fabric: If you’re new to this, test a few snaps on leftover canvas. It helps you get the hang of the setting tool without ruining your project.
- Keep Snaps Aligned: Uneven snaps look sloppy and can weaken the hold. I use a ruler to check alignment before punching holes.
- Clean Up Edges: If your canvas frays after punching holes, dab a bit of fray-check liquid or fabric glue around the edges. It keeps things neat.
- Lubricate Snaps: For snaps that feel stiff, I add a tiny drop of silicone lubricant to make them snap smoothly.
Common Mistakes to Avoid
I’ve made plenty of blunders installing snaps, so let me save you some headaches. First, don’t skip the hole punch—trying to force a snap through uncut fabric can tear it. Second, don’t hammer too hard; it can crush the snap and make it unusable. Third, avoid cheap snap kits. I bought a bargain set once, and half the snaps were duds. Stick with reputable brands like Dritz or YKK. Finally, double-check your measurements before punching holes. I once misaligned a whole row of snaps on a tarp, and fixing it was a pain.
Maintaining Your Canvas Snap Fasteners
Once your snaps are installed, a little TLC keeps them working like new. I rinse my boat cover snaps with fresh water after every trip to prevent corrosion, especially in salty air. For stiff snaps, a quick spray of WD-40 or silicone lubricant does wonders. If a snap gets loose, you might need to replace it. Keep extra snaps in your kit for quick fixes—I’ve had to swap out a couple during camping trips when a tarp snap failed.
Creative Ways to Use Canvas Snap Fasteners
After mastering snap installation, I got creative with them. I’ve used snaps to make removable cushion covers for my patio furniture, so I can swap them out for washing. They’re also great for custom car covers, letting you secure the cover tightly without fuss. One of my favorite projects was a DIY dog bed with a snap-on cover—easy to clean and super sturdy. You can even use snaps for home decor, like detachable curtain panels or a canvas wall organizer.
Conclusion
Installing canvas snap fasteners might seem intimidating at first, but trust me—it’s a skill worth learning. I’ve transformed my outdoor gear, from boat covers to patio awnings, with these trusty snaps. They’re durable, versatile, and give your projects that professional touch. By following the steps I’ve shared—prepping your canvas, using the right tools, and avoiding common mistakes—you’ll be snapping like a pro in no time. The best part? That satisfying click when everything locks into place. So grab your tools, pick a project, and get snapping. Your next DIY masterpiece is waiting!
FAQs
What’s the Difference Between Canvas Snap Fasteners and Regular Snaps?
Canvas snap fasteners are heavier-duty than regular snaps, designed for thick materials like canvas or leather. I’ve used regular snaps for light clothing, but they’d never hold up on a boat cover. Canvas snaps are also often corrosion-resistant, which is key for outdoor projects.
Can I Install Snap Fasteners Without a Setting Tool?
It’s tough but possible. I’ve used a flathead screwdriver and hammer in a pinch, but it’s risky—you might damage the snap or fabric. A proper setting tool is worth the investment for clean, secure snaps.
How Do I Remove a Canvas Snap Fastener?
Removing snaps is tricky. I use a flathead screwdriver to gently pry the snap apart, but you might damage the fabric. If it’s a screw snap, just unscrew it. For stubborn snaps, cut them out carefully and patch the hole.
Are Canvas Snap Fasteners Waterproof?
Most canvas snaps, especially marine-grade ones, are water-resistant but not fully waterproof. I’ve found stainless steel snaps hold up best against rain and humidity. Seal the fabric edges with waterproofing spray for extra protection.
Can I Use Snap Fasteners on Thin Fabrics?
Yes, but be careful. Thin fabrics can tear if the snap is too heavy. I reinforce thin material with a patch of canvas or interfacing before installing snaps to add strength.