How to Install Floating Shelves Without Bracket
Many people love the clean look of floating shelves but get a bit nervous about installing them. It can seem tricky, especially when you don’t see any obvious brackets holding them up. This often makes beginners wonder if it’s even possible.
Don’t worry, it’s totally doable! We’ll walk you through how to install floating shelves without brackets in a way that’s super simple to follow, step by step. Get ready to add stylish storage to your walls!
Installing Floating Shelves Without Visible Supports
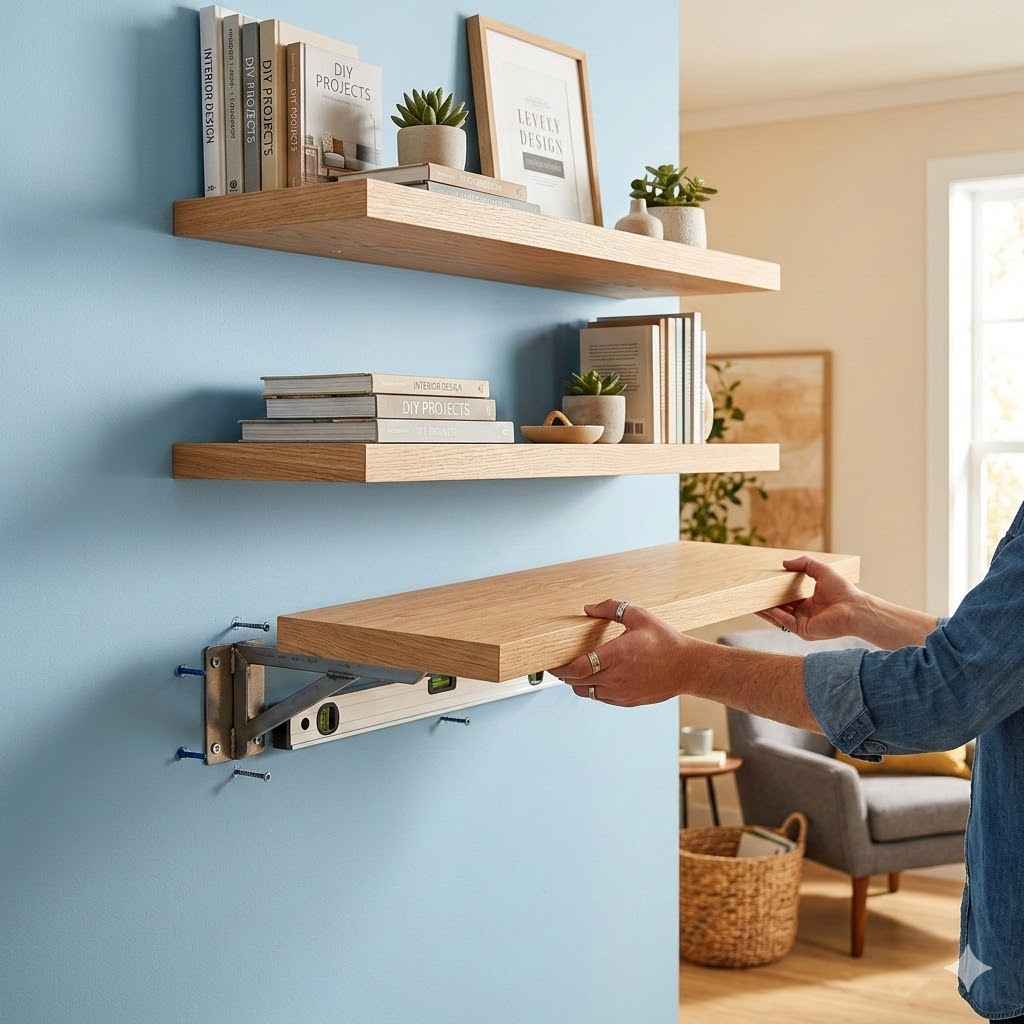
Floating shelves offer a sleek, modern look for any room. They appear to magically float on the wall without any visible hardware, creating a clean and minimalist aesthetic. This illusion is achieved through a cleverly hidden support system.
For many DIY enthusiasts, the challenge lies in figuring out this hidden support mechanism. The idea of a shelf sticking out from the wall with nothing showing can seem daunting, but it’s actually a well-established method using a sturdy internal bracket or mounting system. This guide will break down the entire process into easy-to-understand steps, making it accessible even for those new to home improvement projects.
Choosing the Right Floating Shelves
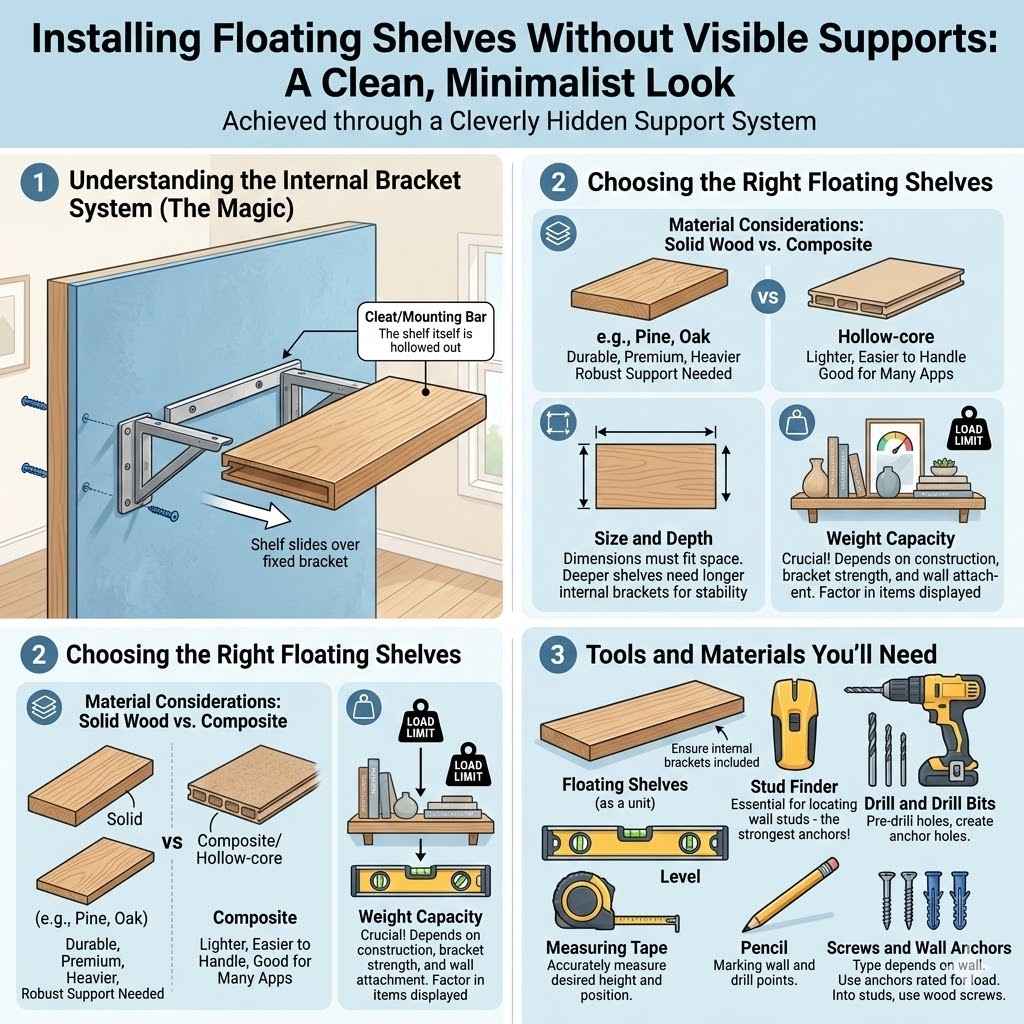
Not all floating shelves are created equal, and selecting the right type is key to a successful installation. The most common style features a hollow core design with an internal mounting bracket. This bracket is securely fastened to the wall, and then the shelf slides over it.
When choosing your shelves, consider the material, size, and weight capacity. Solid wood shelves will be heavier and require stronger wall anchors than hollow MDF or composite shelves. Ensure the shelf you choose comes with its specific mounting hardware.
Some higher-end options may have proprietary systems, while others use universal internal brackets.
Material Considerations: Shelves made from solid wood like pine or oak offer durability and a premium look. However, they are heavier and might require more robust wall support. Composite materials or hollow-core shelves are lighter and easier to handle, making them a good choice for many applications.
Always check the manufacturer’s recommended weight limit for the shelf and the associated hardware.
Size and Depth: The dimensions of your floating shelf should complement the space where it will be installed. A deeper shelf can hold more items, but it also requires a longer internal bracket for stability. Measure your wall space carefully to ensure the shelf fits both aesthetically and practically.
Consider how much weight the shelf will need to bear.
Weight Capacity: This is a crucial factor often overlooked by beginners. Each floating shelf has a maximum weight it can safely support. This capacity depends on the shelf’s construction, the strength of the internal bracket, and how securely the bracket is attached to the wall.
Always factor in the weight of the items you plan to display on the shelf when making your selection.
Understanding the Internal Bracket System
The magic behind floating shelves is the internal bracket, often referred to as a cleat or a mounting bar. This system is typically made of metal and is designed to be robust and stable. It consists of two main parts: the part that attaches firmly to the wall and the part that extends outwards to support the shelf.
The shelf itself is hollowed out on the back to accommodate this protruding bracket. When you slide the shelf onto the mounted bracket, it creates the illusion of a shelf floating on the wall, as all the support hardware is hidden from view. The strength of the entire system relies heavily on how well this bracket is secured to the wall.
Tools and Materials You’ll Need
Before you begin, gather all the necessary tools and materials. This preparation will make the installation process much smoother. Having everything at hand ensures you don’t have to stop midway to search for something.
Basic DIY skills and a few common tools are all that’s required.
The Floating Shelves: Ensure they come with their internal mounting brackets and necessary screws. Check the package contents carefully.
Stud Finder: Essential for locating wall studs, which provide the strongest anchor points for your bracket. Using only drywall anchors can lead to shelves falling. A reliable stud finder is a game-changer for secure installations.
Drill and Drill Bits: You’ll need a drill to pre-drill holes for screws and potentially to create larger holes if using toggle bolts or specific wall anchors. The size of the drill bit will depend on the screws and anchors you use.
Level: A spirit level is critical for ensuring your shelf is perfectly horizontal. An unlevel shelf looks unprofessional and can be a safety hazard. You’ll use it when marking and when attaching the bracket.
Measuring Tape: To accurately measure the desired height and position of your shelf on the wall. Double-checking measurements prevents mistakes.
Pencil: For marking the wall where the bracket will be installed and for marking drill points. Marks should be clear but easy to erase later.
Screws and Wall Anchors: The type of screws and anchors will depend on your wall construction and the weight the shelf needs to hold. Always use anchors rated for the expected load. If mounting into studs, you can often use wood screws directly.
Step-by-Step Guide How to Install Floating Shelves Without Brackets
Now that you have your tools and shelves ready, let’s get to the core of how to install floating shelves without brackets. This process is designed for clarity, guiding you from initial measurement to the final reveal of your beautifully installed shelves. We’ll cover marking, drilling, securing, and finally, sliding the shelf into place.
Follow these steps carefully for a secure and aesthetically pleasing result.
Marking the Wall for the Bracket
Accuracy here is crucial for a perfect installation. Start by deciding on the exact height and location for your shelf. Use your measuring tape to mark this desired height on the wall.
Then, hold the internal mounting bracket against the wall at this mark, ensuring it’s perfectly level using your spirit level. Once you are satisfied with the position and levelness, use your pencil to mark the locations of the screw holes onto the wall. These marks represent where you will drill.
Double-check all your marks before proceeding to the next step to avoid any errors.
-
Determine the desired height for your shelf. Use a measuring tape to mark this point lightly on the wall with a pencil.
-
Hold the internal mounting bracket against the wall, aligning its top edge with your height mark. Ensure the bracket is perfectly level using your spirit level.
-
With the bracket held firmly in place and level, use your pencil to mark the center of each screw hole onto the wall.
Locating Wall Studs
Finding wall studs is perhaps the most critical step for a secure floating shelf installation. Wall studs are the vertical wooden beams inside your walls that provide structural support. Attaching your mounting bracket directly into studs is the strongest method and can support significantly more weight than relying solely on drywall anchors.
A stud finder is an invaluable tool for this. If you cannot locate studs in the desired area, you will need to use heavy-duty drywall anchors specifically designed for floating shelves, but stud mounting is always preferred.
Using a Stud Finder: Electronic stud finders are the easiest to use. Simply turn the device on and slide it horizontally across the wall where you plan to mount the bracket. The device will indicate when it detects a stud, usually with an audible beep or a visual light.
Mark the edges of the stud as you find it. Most studs are spaced 16 or 24 inches apart.
Manual Stud Detection: If you don’t have a stud finder, you can try tapping the wall. A hollow sound indicates drywall, while a solid thud suggests you’ve found a stud. Another method is to look for existing nail or screw heads in the wall, which often indicate stud locations, or check electrical outlet and switch box locations, as these are typically attached to studs.
Importance of Studs: Drywall alone is not strong enough to support the weight of shelves and items placed on them. Without proper support from studs or very strong specialized anchors, shelves can pull away from the wall, causing damage and potential injury. Aim to have at least one or two screw holes for your bracket align with a wall stud.
Drilling Pilot Holes
Once your stud locations are marked and your bracket screw hole positions are confirmed, it’s time to drill. You’ll need to drill pilot holes for the screws. The size of the drill bit for the pilot hole should be slightly smaller than the diameter of the screws you plan to use.
This makes it easier to drive the screws in and prevents the wood (if screwing into a stud) from splitting. If you are using drywall anchors, follow the anchor manufacturer’s instructions for the correct drill bit size. Always drill straight into the wall to ensure the screws go in correctly and the bracket is flush.
For example, if you are using #8 wood screws, a 3/32-inch drill bit is usually a good pilot hole size. If you are attaching to a stud, this pilot hole will go into the wood. If you are using drywall anchors, the anchor’s packaging will specify the required drill bit size.
It is vital to drill these holes at the exact points you marked earlier to ensure the bracket sits flush and secure against the wall.
Securing the Mounting Bracket
This is where the stability of your shelf is determined. Align the mounting bracket with your drilled pilot holes. If you were able to locate studs, ensure that at least one or two of the bracket’s screw holes align with the studs.
Use appropriate screws to attach the bracket firmly to the wall. If you are screwing into studs, use long wood screws that are long enough to penetrate well into the stud. If you are using drywall anchors, insert them into the wall first, following the manufacturer’s instructions, and then screw the bracket into the anchors.
The goal is for the bracket to be completely immobile and securely fastened to the wall. Wiggle the bracket after screwing it in. If there’s any movement, tighten the screws further or consider adding more support.
For particularly heavy shelves or if you couldn’t hit studs, consider using heavy-duty toggle bolts or Molly bolts, which expand behind the drywall to provide a secure grip. For example, a shelf intended to hold books will need a much more secure bracket attachment than a shelf for light decorative items.
A case study from a DIY forum detailed a common issue where a shelf owner, Sarah, initially relied only on drywall anchors. After loading a few books, the shelf started to sag significantly. She then re-installed the bracket, ensuring it was screwed directly into two wall studs.
This made a world of difference; the shelf became rock solid and could hold far more weight without any issue.
Sliding the Shelf Onto the Bracket
With the mounting bracket securely fastened to the wall, the final step is to slide the shelf onto it. Most floating shelves have a hollow cavity on the back designed to fit snugly over the protruding arms of the internal bracket. Carefully align the opening of the shelf with the bracket.
Gently push the shelf onto the bracket until it is fully seated and flush against the wall. Some shelves may have small set screws on the underside that you can tighten to further secure the shelf to the bracket and prevent it from accidentally sliding off.
It’s important to do this step with some care. If the shelf feels too tight, don’t force it. Check if there’s any obstruction or if the bracket is perfectly aligned.
If it slides on too easily, it might mean the bracket isn’t fully engaged, or the shelf opening is too large. Once the shelf is on, give it a gentle push to ensure it feels stable and secure. You should not see any gaps between the shelf and the wall.
Maintaining and Decorating Your Floating Shelves
Once your floating shelves are installed, the real fun begins: decorating them! However, it’s also important to maintain them to ensure they continue to look great and stay secure. Proper care will extend their lifespan and keep your walls looking tidy and stylish.
Think about both the aesthetic and the practical aspects of living with your new shelves.
Weight Distribution and Loading
While the internal bracket system is strong, proper weight distribution is essential for the longevity and safety of your floating shelves. Avoid placing all the weight on one end of the shelf. Instead, distribute heavier items evenly across the entire length of the shelf, especially over the internal bracket.
Heavier items should be placed closer to the wall where the support is strongest. This helps prevent sagging over time, which can happen even with well-installed shelves if they are consistently overloaded in one area.
Even Loading: Spread items out as much as possible. Don’t stack a tall tower of books on one side while leaving the other side empty. Aim for a balanced arrangement that spreads the load across the entire shelf.
Prioritize Heavier Items: Place your heaviest items, such as large books or decorative vases, directly over the internal mounting bracket. This ensures they are supported by the strongest point of the installation.
Avoid Overloading: Always be mindful of the shelf’s weight capacity. It’s better to be safe than sorry. If you’re unsure, err on the side of caution and don’t place excessively heavy items on the shelf.
Check the manufacturer’s specifications.
Cleaning and Care
Keeping your floating shelves clean is simple and helps maintain their appearance. For wooden shelves, a soft, dry cloth is usually sufficient for dusting. If there are any smudges or spills, use a slightly damp cloth, but avoid soaking the wood.
For shelves with a painted or laminate finish, a mild household cleaner can be used sparingly. Always wipe down any moisture immediately to prevent damage. Regularly inspect the shelves and their connection to the wall to ensure they remain secure and show no signs of wear or instability.
A common scenario is a spill of coffee or juice on a shelf. Instead of letting it sit, quickly wipe it up with a dry cloth. If a stain remains, use a damp cloth with a drop of mild soap, then wipe clean with a dry cloth.
This quick action prevents the liquid from seeping into the material and causing lasting damage.
Decorating Ideas for Floating Shelves
Floating shelves are incredibly versatile for displaying decorative items. They work wonderfully in living rooms, bedrooms, kitchens, and even bathrooms. Consider creating a gallery wall effect by arranging several shelves at different heights and lengths.
They are perfect for showcasing cherished photographs, small plants, books, candles, or art pieces. In the kitchen, they can serve as stylish open shelving for plates, mugs, or spices.
For a living room, arrange a few decorative items and a small potted plant on a shelf above a sofa. In a bedroom, a shelf can hold bedside essentials or decorative trinkets. Kitchen shelves might display cookbooks and your favorite ceramic dishes.
The minimalist design ensures your displayed items become the focal point, adding personality and style to your home without clutter.
Common Challenges and Solutions
Even with a clear guide, some common issues can arise during the installation of floating shelves. Being aware of these potential problems and knowing how to solve them will save you time and frustration.
Uneven Walls or Floors
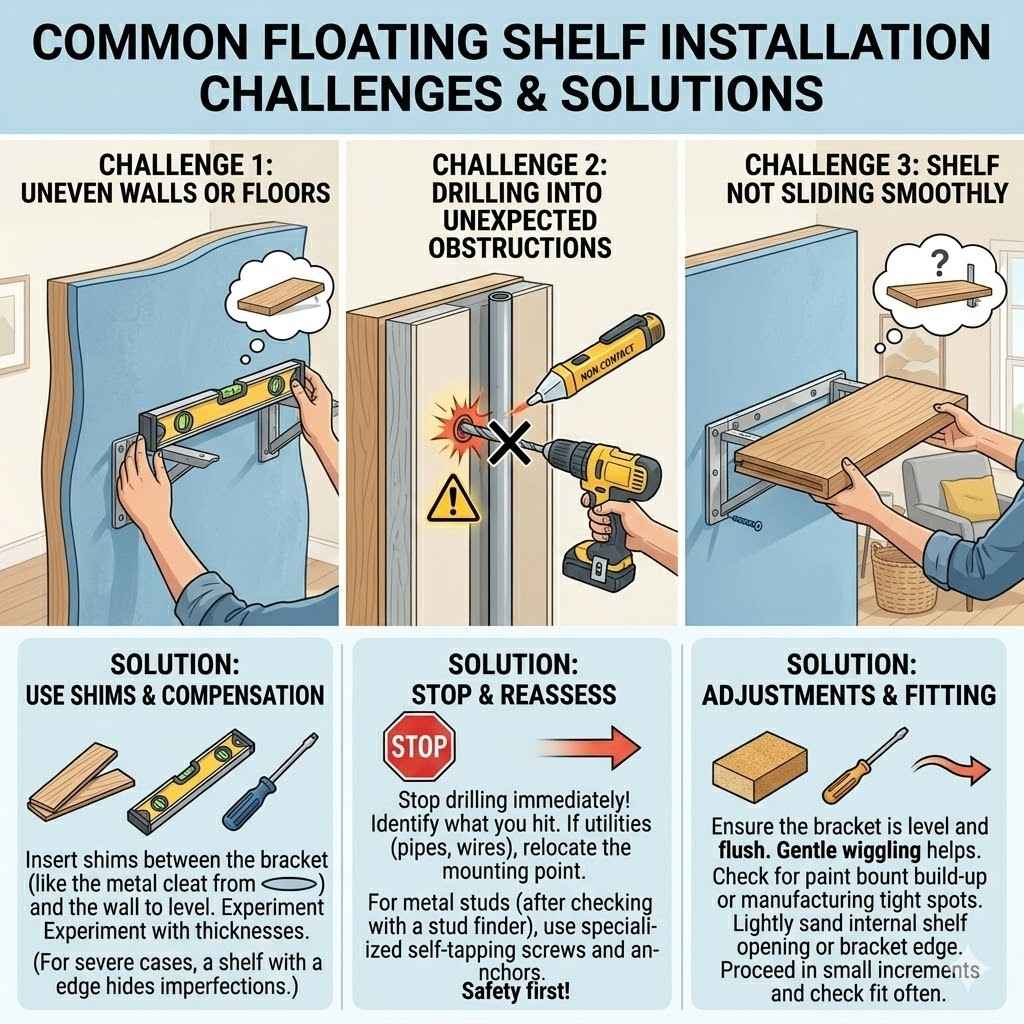
Walls are rarely perfectly flat, and sometimes floors are uneven, which can make it difficult to get a bracket perfectly level. If your wall has a slight curve or bump, you might need to use shims behind the mounting bracket to compensate. Shims are thin pieces of wood or plastic that can be inserted between the bracket and the wall to make it sit flush and level.
You’ll need to experiment with different shim thicknesses until the bracket is perfectly straight. This is a common fix in older homes or those with less-than-perfect construction.
If the wall is severely uneven, it might be challenging to get a truly flush mount. In such cases, consider a shelf with a thicker back edge that can conceal minor imperfections. However, for most standard installations, careful use of shims and ensuring the bracket itself is level on its own plane is usually sufficient.
Drilling into Unexpected Obstructions
Sometimes, when drilling pilot holes, you might hit something unexpected inside the wall. This could be electrical wiring, plumbing pipes, or metal studs. If you encounter resistance that isn’t a wood stud or a typical anchor, stop drilling immediately.
Identify what you’ve hit by carefully looking into the hole or using a non-contact voltage tester for wires. If you hit pipes or wiring, it’s best to move the mounting location entirely. Safety is paramount, and damaging utilities can be dangerous and expensive to repair.
If you are certain you are in a stud but encounter metal instead of wood, you may have hit a metal stud. Metal studs require different types of screws and often self-tapping screws or specialized anchors designed for metal framing. Always proceed with caution when drilling into walls, and if you are unsure, consult a professional.
For instance, if your stud finder indicates a stud but your drill bit grinds to a halt on metal, that’s your sign to reassess.
Shelf Not Sliding Smoothly
If the shelf doesn’t slide onto the bracket easily, there are a few reasons. The bracket might not be perfectly straight, or the hollow cavity on the back of the shelf might be slightly misaligned. Ensure the bracket is absolutely level and flush with the wall.
Sometimes, a bit of gentle wiggling while sliding the shelf can help it seat properly. If the opening of the shelf feels too tight, it could be due to paint build-up or a slight manufacturing inconsistency. You might need to very carefully sand down the inside edges of the shelf’s opening or the bracket itself if it’s slightly too wide.
Always do this in small increments and check the fit often.
Another reason could be that the bracket itself is slightly bent. Carefully inspect the bracket before installation. If it appears warped, try to gently straighten it or contact the manufacturer for a
Frequently Asked Questions
Question: Can I install floating shelves on any type of wall
Answer: Yes, you can install floating shelves on most wall types, including drywall, plaster, and even concrete. The key is using the correct mounting hardware and anchors for your specific wall material. For drywall and plaster, finding wall studs is highly recommended for the strongest support.
For concrete, you’ll need masonry drill bits and appropriate concrete anchors.
Question: How much weight can a floating shelf hold
Answer: The weight capacity of a floating shelf varies greatly depending on its construction, the size and strength of the internal bracket, and how securely it is mounted to the wall. Most manufacturers provide a weight limit. Typically, a well-installed shelf into studs can hold anywhere from 10 to 50 pounds or more, but always check the product specifications.
Question: Do I need special tools to install floating shelves
Answer: You’ll need a few basic tools, including a drill, drill bits, a level, a measuring tape, and a pencil. A stud finder is highly recommended for drywall installations. Specialized tools are usually not required for standard installations.
Question: What is the difference between a floating shelf and a regular shelf
Answer: The main difference is the visible hardware. Regular shelves typically use visible brackets or supports. Floating shelves have a hidden internal mounting system, making them appear to float on the wall without any visible means of support.
Question: Can I install floating shelves on a textured wall
Answer: Yes, you can install floating shelves on a textured wall. The installation process is the same, but you’ll need to ensure your level readings are accurate, as texture can sometimes make it harder to get a precise reading. You may need to use slightly longer screws or shims to ensure the bracket sits flush against the wall surface.
Summary
Installing floating shelves without visible brackets is achievable with careful planning and execution. By selecting the right shelves, understanding the internal bracket system, and following the step-by-step process of marking, drilling, securing the bracket into studs, and sliding on the shelf, you can create a stylish and functional display. Proper weight distribution and regular checks ensure their longevity and safety.