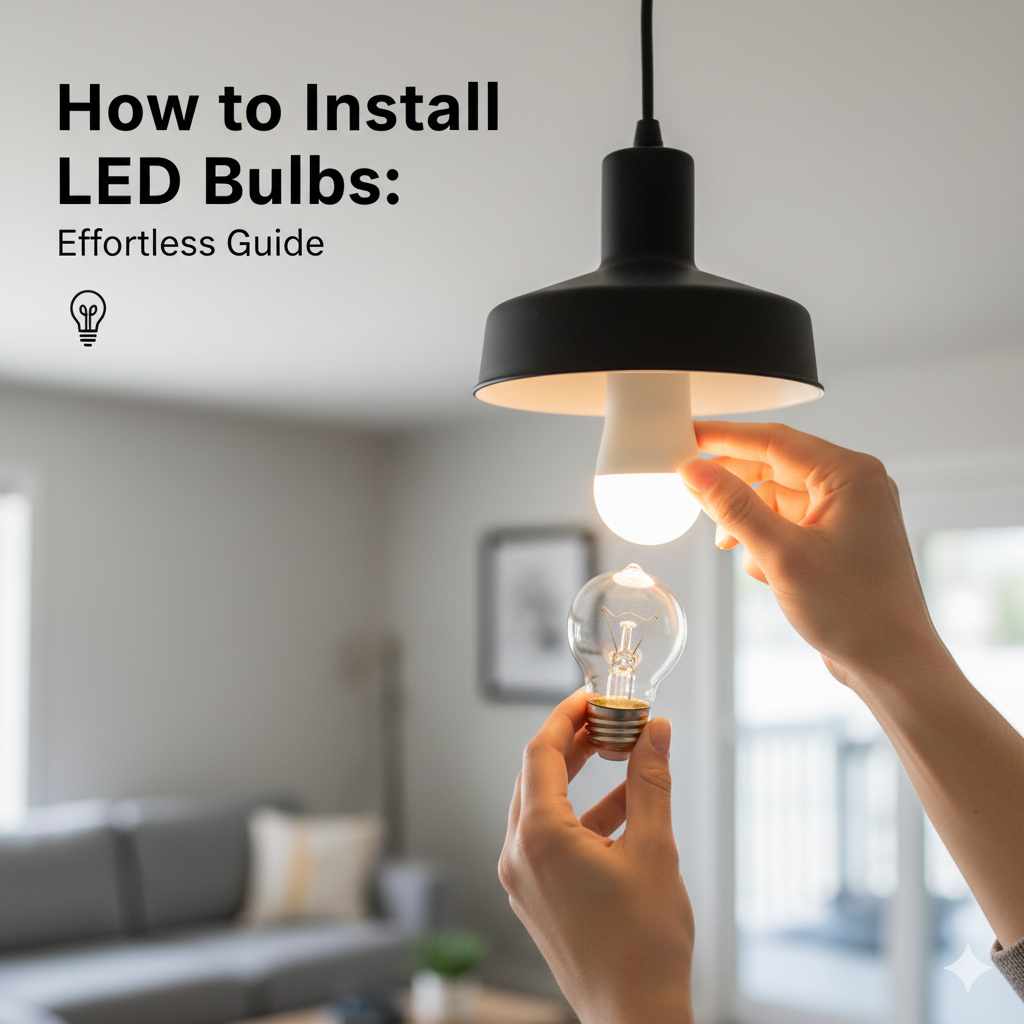
How to Install LED Bulbs: Effortless Guide
Quick Summary:
Installing LED bulbs is a straightforward DIY task. Simply turn off the power, unscrew the old bulb, screw in the new LED, and turn the power back on. This guide provides easy, step-by-step instructions and safety tips to help you effortlessly upgrade your home lighting.
Hello there, fellow home improvers! Are you looking to brighten up your home and maybe save a little on your energy bills? Switching to LED bulbs is a fantastic way to do just that. Many folks think it’s a complicated job, but I’m here to tell you it’s one of the simplest upgrades you can make. With just a few easy steps, you can transform your living space. We’ll walk through everything, from making sure you have the right bulb to safely swapping out the old for the new. Get ready to light up your home with confidence!
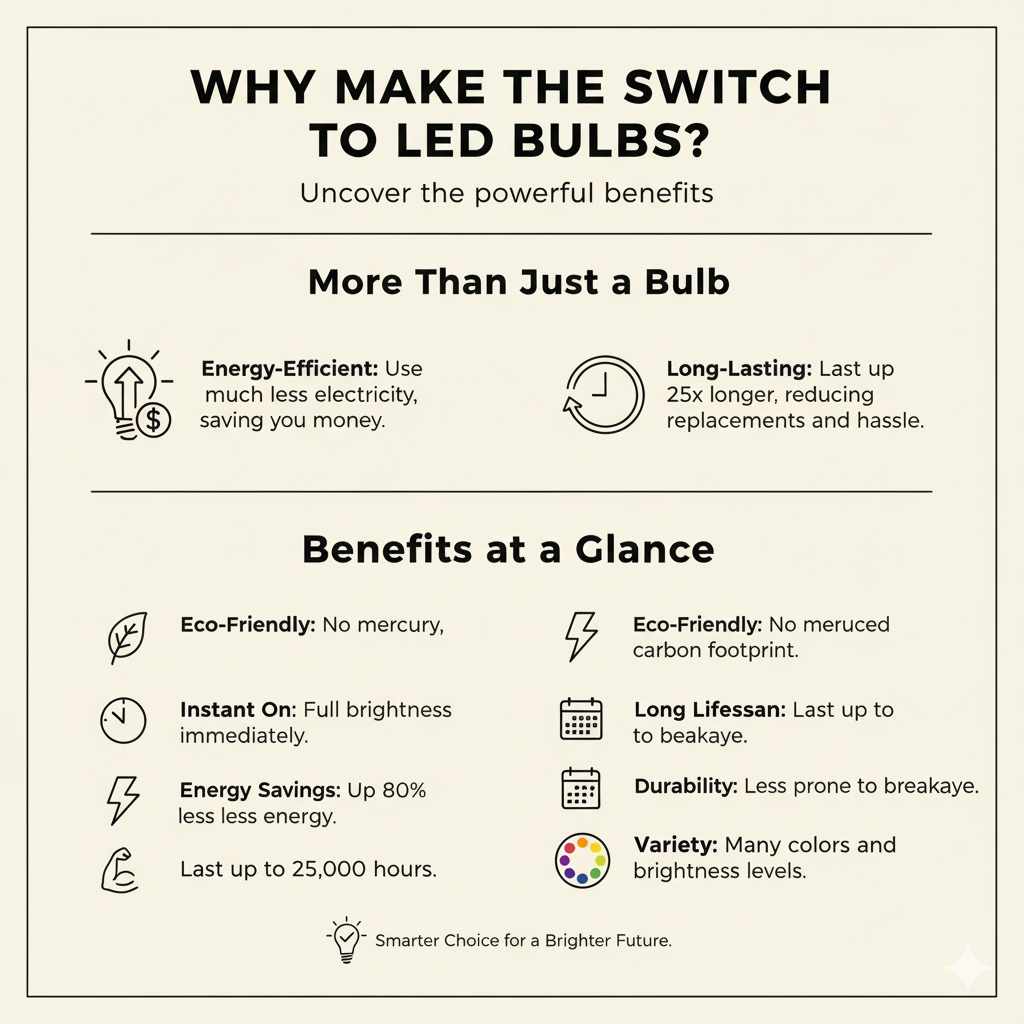
Why Make the Switch to LED Bulbs?
You might be wondering why everyone is talking about LED bulbs. Well, there are some really good reasons! For starters, they are incredibly energy-efficient. This means they use much less electricity than traditional incandescent or even CFL bulbs. Over time, this can lead to noticeable savings on your electricity bill. Think about it – lighting is something we use every day, all day in some rooms. Using less energy for it really adds up!
Beyond the energy savings, LED bulbs are also built to last. They have a much longer lifespan than older types of bulbs. This means you’ll be replacing them far less often, saving you money on replacement bulbs and the hassle of climbing ladders to change them. Plus, they provide excellent quality light, often with a wider range of color temperatures to suit any mood or task. They also turn on instantly, with no warm-up time, and are more durable as they don’t have fragile filaments.
Benefits at a Glance
- Energy Savings: Use up to 80% less energy than incandescent bulbs.
- Long Lifespan: Last up to 25 times longer.
- Instant On: Full brightness immediately.
- Durability: Less prone to breakage.
- Variety: Available in many colors and brightness levels.
- Eco-Friendly: Contain no mercury and reduce carbon footprint.
What You’ll Need: Simple Tools for a Simple Job
The great thing about installing LED bulbs is that you usually don’t need a toolbox full of specialized equipment. Most of the time, your own two hands and a bit of common sense will do the trick! However, having a couple of basic items on hand can make the process even smoother and safer.
Essential Items:
- New LED Bulb(s): Make sure you choose the right type and size for your fixture. We’ll cover how to do this in the next section.
- A Stable Step Stool or Ladder: If the fixture is out of reach, a sturdy stool or ladder is crucial for safety. Always ensure it’s placed on a level surface.
- A Dry Cloth or Paper Towel: Sometimes, the old bulb can be a bit dusty. A cloth helps keep your hands clean.
- Safety Glasses (Optional but Recommended): While rare, a bulb could potentially shatter. Wearing glasses adds an extra layer of protection.
That’s pretty much it! For most standard light fixtures, these items are all you’ll need. If you’re working with a more complex fixture, like a recessed light or a chandelier, we’ll touch on those specifics later, but the core process remains the same.
Choosing the Right LED Bulb: Size, Shape, and Specs
This is a really important step, and it’s easier than you might think! Buying the wrong bulb can mean it won’t fit, won’t work correctly, or won’t look the way you intended. Let’s break down what you need to look for.
1. The Base Type: What Screws In
Most household bulbs use what’s called a “medium screw base,” often referred to as E26 in North America or E27 in Europe. You’ll see this on standard lamps and ceiling fixtures. However, there are other types:
- Edison Screw (E26/E27): The most common type for general lighting.
- Bayonet Cap (B22): Found more often in the UK and some other regions.
- Gu10: These have two pins and are often used in spotlight fixtures, especially in kitchens and bathrooms. You twist and push to lock them in.
- MR16/GU5.3: Similar to GU10 but use a different pin system, common in low-voltage track lighting.
- Candelabra (E12): Smaller screw-in base, often found in decorative fixtures or chandeliers.
- Specialty Bases: Like bi-pin (G4, G9) for under-cabinet lighting or some decorative lamps.
Look at the old bulb you’re replacing. The base is the metal part that screws or pushes into the socket. The label on the fixture or the old bulb packaging will usually tell you the base type.
2. The Shape: What it Looks Like
Bulbs come in all sorts of shapes and sizes, but for general home lighting, you’ll most often see:
- A-Shape (A19, A60): This is the classic light bulb shape we all recognize. It’s perfect for table lamps, floor lamps, and most ceiling fixtures.
- BR Shape (BR30, BR40): These have a wider, more parabolic reflector shape, often used in recessed ceiling lights (can lights) because they direct light downwards.
- G-Shape (G25, G30): Globe-shaped bulbs, often used in vanity lights or decorative fixtures where the bulb is visible.
- Candelabra (C7, C9): Small, often flame-shaped, used in chandeliers and decorative sconces.
Measure the space where the bulb will go if you’re unsure, or check the fixture’s manual. You want to make sure the new LED bulb will physically fit without touching the sides of the fixture or shade.
3. Brightness (Lumens): How Much Light
Don’t confuse this with wattage! Wattage used to be the standard for brightness, but with LEDs, it’s all about lumens (lm). Higher lumens mean more light. Here’s a rough guide:
| Desired Brightness (Incandescent Equivalent) | Lumens (LED) |
|---|---|
| 40W | 450 lm |
| 60W | 800 lm |
| 75W | 1100 lm |
| 100W | 1600 lm |
Think about where the light is going. A living room might need 800-1100 lumens per bulb, while a task area like a kitchen counter might need brighter task lighting (e.g., 1100-1600 lumens), and a bedroom might be comfortable with 450-800 lumens.
4. Color Temperature (Kelvin): The Mood of the Light
This is measured in Kelvin (K) and describes the color of the light itself, from warm to cool.
- Warm White (2700K – 3000K): This is similar to the light from traditional incandescent bulbs. It’s cozy and inviting, perfect for living rooms, bedrooms, and dining areas.
- Cool White / Bright White (3500K – 4100K): A more neutral light, good for kitchens, bathrooms, and workspaces where you need clear visibility.
- Daylight (5000K – 6500K): This mimics natural daylight. It’s very bright and crisp, excellent for task lighting, garages, or areas where you need maximum visibility and focus.
Most LED bulbs will clearly state their Kelvin rating. Choose based on the ambiance you want for each room. For most general household replacements, Warm White (2700K-3000K) is a safe bet to maintain a comfortable feel.
5. Dimmable vs. Non-Dimmable
If your light fixture is connected to a dimmer switch, you MUST buy dimmable LED bulbs. Regular non-dimmable LEDs can flicker, buzz, or even get damaged if used with a dimmer. Check the bulb packaging for the “dimmable” indicator. If you don’t have a dimmer switch, you can use either type.
By considering these factors, you’ll be sure to pick the perfect LED bulb for your needs. Don’t hesitate to ask a store associate for help if you’re unsure!
Step-by-Step Guide: How to Install LED Bulbs Safely
Alright, let’s get to the hands-on part! Installing an LED bulb is a simple process, but safety is always our top priority. Follow these steps, and you’ll have your new lights up and running in no time.
Step 1: Turn Off the Power! (The Most Important Step)
This is non-negotiable. Before you do anything else, you need to ensure there’s no electricity flowing to the light fixture. There are two main ways to do this:
- At the Switch: Flip the light switch for the fixture OFF. This is usually sufficient for most standard installations.
- At the Breaker Box: For extra safety, or if you’re unsure if the switch is wired correctly, you can turn off the corresponding circuit breaker in your home’s electrical panel. If you’re not familiar with your breaker box, it’s worth asking someone who is to help you identify the correct breaker. You can learn more about home electrical safety from resources like the Consumer Product Safety Commission (CPSC).
Pro Tip: To be absolutely sure the power is off, you can try flipping the light switch ON after you’ve turned off the breaker. If the light doesn’t come on, you’re good to go!
Step 2: Access the Light Fixture
If the bulb is out of reach, use your stable step stool or ladder. Make sure it’s positioned firmly on the floor and that you have a secure footing. Avoid overreaching; it’s better to move the stool or ladder than to risk a fall.
If your light fixture has a glass cover or shade, you may need to remove it first. These are often held in place by screws, clips, or a threaded ring. Be gentle, especially with glass, and place the cover somewhere safe while you work.
Step 3: Remove the Old Bulb
Once the power is off and you have access, gently grip the old bulb. For screw-in bulbs, turn it counter-clockwise (lefty-loosey). It should unscrew relatively easily. If it feels stuck, don’t force it too hard, as it could break. Sometimes, a gentle wiggle or using a rubber glove for better grip can help. If the bulb is broken and the base is still in the socket, you might need pliers to grip the edge of the metal base and carefully twist it out. If you’re uncomfortable with this, it’s best to call an electrician.
For bulbs with pins (like GU10 or MR16), they usually pull straight out or require a slight twist and pull. Check the fixture for any retaining clips or mechanisms.
Step 4: Install the New LED Bulb
Take your new LED bulb. If it’s a screw-in type, align the base with the socket and turn it clockwise (righty-tighty). Screw it in until it’s snug. Don’t overtighten it; just screw it in until it feels secure. Over-tightening can damage the bulb or the socket.
For pin-type bulbs, align the pins with the holes in the socket and push or twist as required by the fixture type until it’s firmly seated.
Step 5: Reassemble the Fixture (If Necessary)
If you removed a glass cover or shade, carefully put it back in place. Make sure any screws or rings are tightened securely but not so much that they crack the glass.
Step 6: Restore Power and Test
Now for the moment of truth! Go back to your switch or breaker box and turn the power back ON.
- If you turned off the breaker, flip it back ON.
- Then, flip the light switch ON.
Your new LED bulb should illuminate! If it doesn’t, don’t panic. Double-check that the power is fully restored, the bulb is screwed in correctly, and that you purchased the correct type of bulb (especially checking if it needed to be dimmable for your switch). If it still doesn’t work, the bulb itself might be faulty, or there could be an issue with the fixture or wiring, in which case it’s best to consult a qualified electrician.
Congratulations! You’ve successfully installed your new LED bulb. Enjoy the brighter, more efficient light!
Special Considerations for Different Fixtures
While the basic steps apply to most lights, some fixtures have unique requirements. Here are a few common ones:
Recessed Lighting (Can Lights)
These are the lights installed directly into the ceiling. Often, they use BR30 or PAR bulbs. Some newer recessed fixtures have integrated LED panels, meaning you can’t replace just the bulb; you’d need to replace the entire unit if the LEDs fail.
How to Install:
- Turn off power at the switch and/or breaker.
- If there’s a trim ring, it might twist off or be held by spring clips. Gently pull the trim down (it might hang by wires).
- The bulb is usually a GU10 or MR16 type. For GU10, you’ll typically twist the bulb about a quarter turn counter-clockwise and pull it down. For MR16, you pull it straight out.
- Install the new LED bulb by reversing the process. Ensure it clicks or locks into place.
- Push the trim ring back up into the ceiling.
- Restore power and test.
Chandeliers and Sconces
These decorative fixtures often use smaller candelabra bases (E12) or sometimes even European E14 bases. They might also have unique glass shades.
How to Install:
- Turn off power at the switch and/or breaker.
- Carefully remove any glass shades or decorative elements.
- Unscrew the old bulbs by turning them counter-clockwise.
- Screw in the new LED bulbs (ensure you have the correct candelabra base and shape).
- Reassemble shades and decorative parts.
- Restore power and test.
Important Note: Some chandeliers have complex wiring or internal transformers. If you have a very old or intricate chandelier, and you’re replacing bulbs that look unusual, it might be worth consulting a professional to ensure compatibility.
Outdoor and Wet-Location Fixtures
If you’re replacing a bulb in a porch light, garage fixture, or other outdoor light, ensure your new LED bulb is rated for “wet locations” or “damp locations” as appropriate. These bulbs have better seals to protect them from moisture and the elements. The fixture itself should also be rated for outdoor use.
How to Install:
- Turn off power at the switch and/or breaker.
- Remove any protective covers or shades.
- Unscrew the old bulb.
- Screw in the new LED bulb, ensuring it’s the correct type and rated for outdoor use.
- Replace any covers or shades, ensuring a good seal.
- Restore power and test.
Dimmers and LED Compatibility
As mentioned, if you have a dimmer switch, you MUST use dimmable LED bulbs. However, not all dimmers are created equal, and not all dimmable LEDs work perfectly with all dimmers. Older dimmer switches designed for incandescent bulbs may not perform well with LEDs, leading to flickering or buzzing even with dimmable LEDs. For the best results, consider upgrading to an LED-compatible dimmer switch. You can find lists of compatible dimmers and bulbs from LED manufacturers or on sites like DesignLights Consortium, which provides resources on lighting quality and performance.
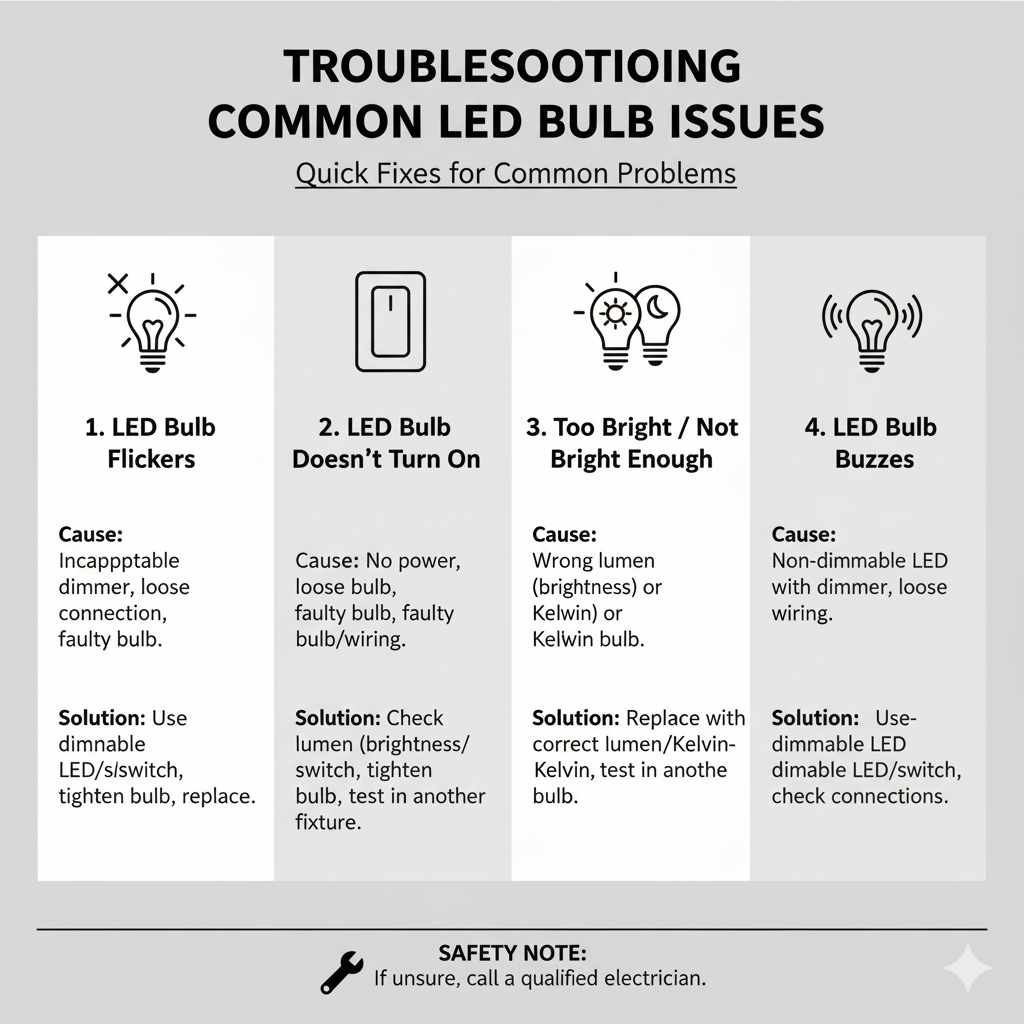
Troubleshooting Common LED Bulb Issues
Even with simple tasks, things can sometimes go a bit sideways. Here are a few common problems and how to solve them:
Issue: LED Bulb Flickers
- Cause: Not using a dimmable bulb with a dimmer switch, incompatible dimmer switch, loose connection, or faulty bulb.
- Solution: Ensure you’re using dimmable LEDs with a dimmer. If you are, try a different brand of dimmable LED or consider upgrading your dimmer switch to one specifically designed for LEDs. Check that the bulb is screwed in tightly. If the flickering persists, the bulb may be defective.
Issue: LED Bulb Doesn’t Turn On
- Cause: Power not fully restored, bulb not screwed in properly, faulty bulb, or issue with the fixture/wiring.
- Solution: Double-check that the breaker is ON and the wall switch is ON. Ensure the bulb is screwed in firmly. Try the bulb in a different lamp or fixture to see if it works elsewhere. If it still doesn’t turn on, the bulb might be dead on arrival, or there’s a problem with the socket or wiring.
Issue: LED Bulb is Too Bright or Not Bright Enough
This is usually a matter of choosing the wrong lumen output or color temperature.
- Solution: Replace the bulb with one that has a different lumen (brightness) or Kelvin (color temperature) rating. Refer back to the “Choosing the Right LED Bulb” section for guidance.
Issue: LED Bulb Buzzes
- Cause: Often related to using non-dimmable LEDs with a dimmer, or an incompatible dimmer/LED combination.
- Solution: Ensure you are using dimmable LEDs. If you are, try a different brand of LED or a different type of dimmer switch. Sometimes, a loose connection in the fixture can also cause buzzing.
Remember, if you’re ever unsure or uncomfortable, especially when dealing with electrical issues, it’s always best to err on the side of caution and call a qualified electrician.
Frequently Asked Questions (FAQ)
Q1: How long do LED bulbs typically last?
A1: LED bulbs are known for their longevity. On average, they can last anywhere from 15,000 to 50,000 hours, which translates to many years of use depending on how many hours a day they are on. This is significantly longer than incandescent bulbs.
Q2: Can I put an LED bulb in any light fixture?
A2: In most cases, yes, as long as the base type and shape of the LED bulb match the socket and there is enough space in the fixture. However, always check if the fixture is rated for the LED’s wattage and if it’s compatible with dimmers if your switch is a dimmer. Some older fixtures or specialized lighting might have specific requirements.
Q3: Do I need to turn off the power to change a light bulb?
A3: Absolutely! Safety is paramount. Always turn off the light switch and, for extra caution, consider turning off the corresponding circuit breaker before removing or installing any light bulb to prevent electric shock.
Q4: What does “dimmable” mean for LED bulbs?
A4: “Dimmable” LED bulbs are specifically designed to work with dimmer switches. If you have a dimmer switch and use a non-dimmable LED bulb, it can cause flickering, buzzing, premature failure of the bulb, or damage to the dimmer itself.
Q5: How do I know if my existing dimmer switch will work with LED bulbs?
A5: Older dimmer switches are often designed for incandescent bulbs and may not be compatible with LEDs. Look for dimmers that are labeled as “LED compatible” or “ELV” (Electronic Low Voltage) or “MLV” (Magnetic Low Voltage) depending on the LED driver. If your dimmer is old and not specifically marked for LED use, it’s best to replace it with an LED-compatible model for optimal performance.
Q6: What’s the difference between lumens and watts?
A6: Watts measure the amount of energy a bulb uses, while lumens measure the amount of light it produces (brightness). With LED bulbs, you’ll see much lower wattage for the same or higher lumen output compared to older bulbs, indicating their energy efficiency.
Q7: Can I use LED bulbs outdoors?
A7: Yes, but you must use LED bulbs specifically rated for outdoor or “wet/damp locations.” These bulbs are designed to withstand moisture, temperature fluctuations, and other environmental factors. Ensure your outdoor fixture is also rated for its intended use.
Conclusion: Brighten Your Home with Confidence!
See? Installing LED bulbs is a truly effortless home improvement that offers significant benefits. By following these straightforward steps, you’ve not only upgraded your home’s lighting but also made a smart choice for energy efficiency and long-term savings. Remember the golden rule: always turn off the power before you start!
We’ve covered choosing the right bulb – from base type and shape to lumens and color temperature – and walked through the safe installation process, including considerations for different fixtures and troubleshooting common issues. You now have the knowledge and confidence to tackle this project yourself.
So go ahead, experiment with different color temperatures to create the perfect ambiance in each room, and enjoy the crisp, bright, and energy-saving light that LEDs provide. Your home will feel more vibrant, and your wallet will thank you for the reduced energy costs. Happy lighting!