How to Install Plywood on Windows for Hurricanes
When hurricane season comes around, making sure your home is safe is super important. One big worry for many people is protecting their windows from strong winds and flying debris. This is where learning How to Install Plywood on Windows for Hurricanes becomes a real need.
It might seem tricky if you haven’t done it before, but it’s actually a straightforward process with the right steps. We’ll walk you through everything you need to know so you can feel confident and prepared for any storm.
Preparing Your Windows for Hurricane Plywood
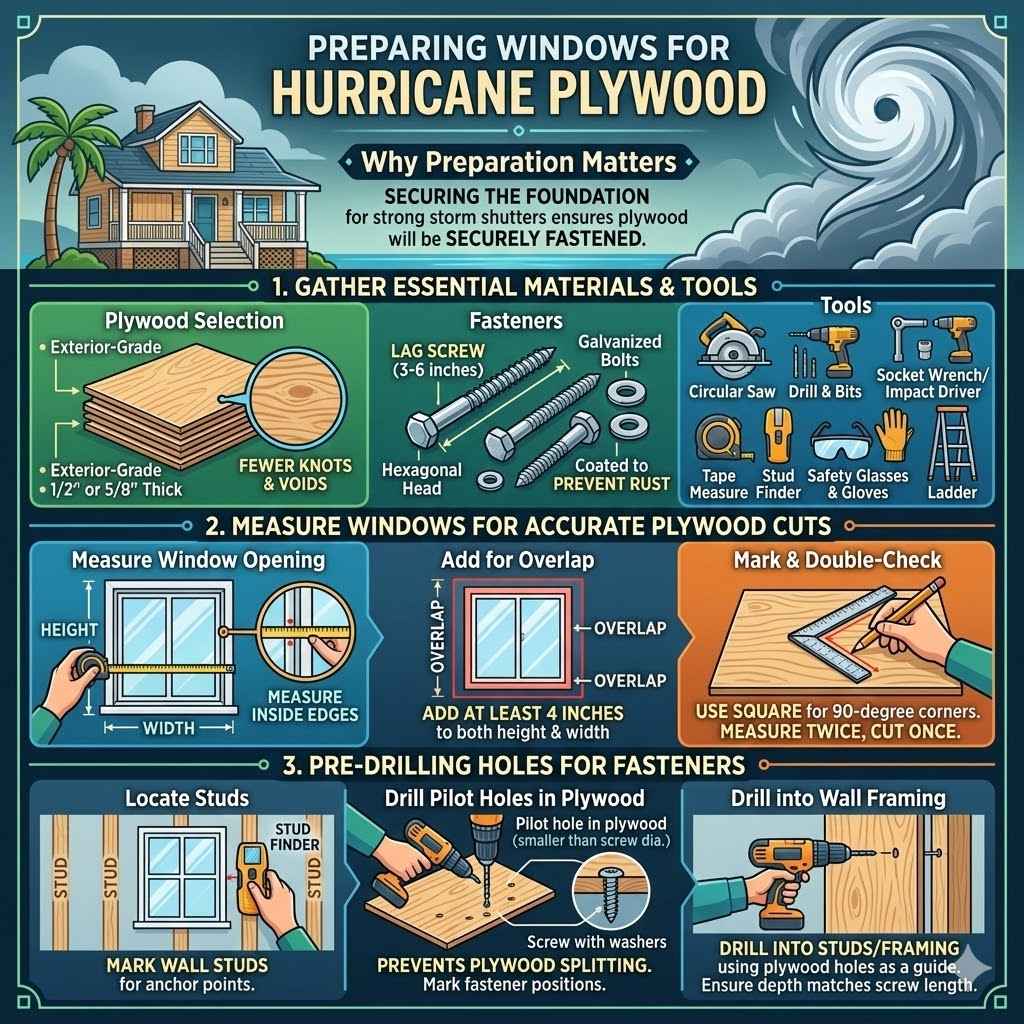
Getting your windows ready for plywood is the first and most important step in preparing your home against hurricane-force winds. This part of the process ensures that the plywood will be securely fastened and offer the best possible protection. It’s about making sure the foundation for your storm shutters is solid.
We will cover what materials you need, how to measure your windows accurately, and the different types of fasteners that work best. Taking your time here makes the actual installation much easier and more effective.
Gathering Essential Materials and Tools
To properly install plywood on your windows for hurricane protection, you’ll need a specific set of tools and materials. Having everything ready before you start will save you time and prevent interruptions during potentially bad weather. It’s like packing for a trip; you want to ensure you have all your essentials before you leave.
This includes the plywood itself, which needs to be the right thickness and type. You’ll also need strong fasteners that can withstand immense pressure.
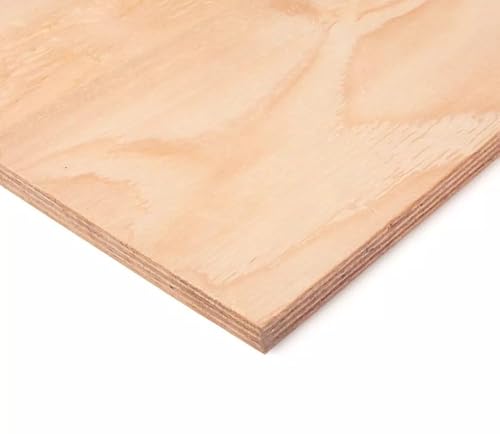
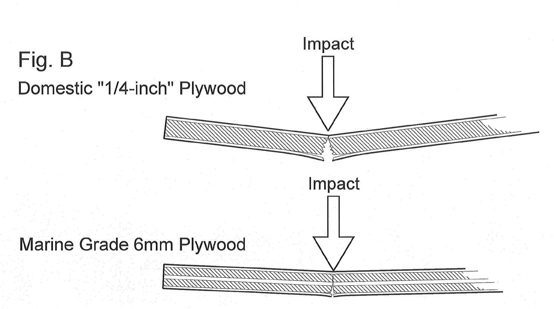
Plywood Selection: Choose exterior-grade plywood. For most areas, 1/2-inch or 5/8-inch thick plywood is recommended. This thickness provides a good balance of strength and weight. It’s important that the plywood is rated for exterior use because it needs to resist moisture and weathering. The grade of plywood matters, too; look for one with fewer knots and voids, as these can be weak points. You want a strong, solid piece that can take a beating.
Fasteners: You will need heavy-duty screws or bolts for attaching the plywood. Lag screws, typically 3 to 6 inches long, are a popular choice. These screws have a hexagonal head that can be driven with a wrench or socket. They are designed to bite deeply into the wall studs or framing around your window, creating a very secure connection. Make sure the screws are galvanized or coated to prevent rust, especially in humid or coastal environments. The length of the screw is critical; it needs to penetrate the sheathing and securely anchor into the studs.
Tools: Essential tools include a circular saw or handsaw for cutting the plywood to size, a drill with appropriate drill bits for pre-drilling holes, a socket wrench or impact driver for driving screws, a tape measure, a pencil, safety glasses, and work gloves. A stud finder can also be very helpful to locate the wall studs accurately. If you are using bolts, you will also need washers. Having a sturdy ladder is important if your windows are on an upper floor.
Measuring Windows for Accurate Plywood Cuts
Accurate measurements are key to a snug and effective plywood installation. You don’t want gaps that allow wind or water to get through, nor do you want plywood that is too large to handle easily. Measuring correctly ensures that the plywood will fit perfectly over the window frame, providing complete coverage.
This step is crucial for maximizing the protective benefits of your storm shutters.
Measure the Window Opening: Use your tape measure to get the exact height and width of the window opening itself. Measure from the inside edge of the window frame to the inside edge on all sides. Take several measurements for both height and width to ensure consistency, as frames can sometimes be slightly uneven.
Add for Overlap: Once you have the exact window opening dimensions, you need to add extra material to create an overlap. This overlap allows the plywood to be securely fastened to the wall around the window. A common recommendation is to add at least 4 inches to both the height and width. This means if your window opening is 36 inches wide by 48 inches tall, you would cut your plywood to 40 inches wide by 52 inches tall. This extra material provides a solid surface to attach your fasteners.
Mark and Double-Check: Carefully transfer your final measurements onto the plywood sheet using a pencil. Use a carpenter’s square to ensure your lines are straight and your corners are at 90-degree angles. Before making any cuts, double-check all your measurements against the window and your addition for overlap. It’s better to measure twice and cut once, especially when dealing with materials like plywood.
Pre-Drilling Holes for Fasteners
Pre-drilling holes is a vital step that prevents the plywood from splitting and makes it much easier to drive the fasteners straight and securely. When you’re dealing with the force of a hurricane, you need every fastener to be as strong and well-placed as possible. This simple action significantly improves the integrity of your plywood storm shutters.
Locate Studs: Use a stud finder to mark the location of the wall studs around the window frame. These studs are the solid structural members of your wall and are where you will anchor your plywood. You should aim to place fasteners into studs whenever possible for maximum strength. If you cannot reach a stud with every fastener, ensure your fasteners are long enough to pass through the sheathing and into the framing.
Drill Pilot Holes in Plywood: On your cut plywood piece, mark where you will place your fasteners. Start by drilling pilot holes through the plywood where you plan to drive your screws or bolts. The diameter of these pilot holes should be slightly smaller than the diameter of your screws. For example, if you are using 3/8-inch lag screws, drill pilot holes of about 1/4-inch. This allows the screw threads to grip the wood firmly.
Drill into Wall Framing: Once the pilot holes are in the plywood, hold the plywood up to the window and use the holes as a guide to mark the wall. Then, take out the plywood and drill pilot holes into the wall framing. The depth of these holes should be at least the length of the screw you are using, minus the thickness of the plywood itself. This ensures that when you put the plywood back up and drive the screws, they will go in straight and secure into the studs or framing.
Installing Plywood Shutters Safely and Effectively
With your plywood cut and your pre-drilling done, it’s time to install the shutters. This section focuses on the actual mounting process, ensuring that the plywood is firmly attached and provides the best possible defense against high winds and flying debris. Proper installation means the plywood will stay put when it’s needed most.
We will cover the best ways to secure the plywood and what to do in different scenarios.
Attaching Plywood to Window Frames and Walls
The way you attach the plywood to your home is critical for its performance during a storm. You want to create a barrier that the wind cannot easily break through or dislodge. This means using the right fasteners and placing them strategically to distribute the force across the plywood and the underlying structure.
Position the Plywood: Carefully place the pre-cut plywood over the window opening. Align the pre-drilled holes in the plywood with the pre-drilled holes in the wall framing. Ensure the plywood covers the entire window and extends onto the wall around it by the planned overlap.
Drive Fasteners: Begin driving your lag screws or bolts through the plywood and into the wall studs. Start with a few fasteners in key locations to hold the plywood in place. Once it’s secure, drive the remaining fasteners. Space your fasteners about 4 to 6 inches apart along the edges of the plywood, focusing on areas that align with studs. For very large windows, consider adding fasteners in the center of the plywood as well, especially if there’s any indication of bowing.
Tighten Securely: Ensure all fasteners are tightened down firmly but do not overtighten, which could strip the threads or damage the wood. The goal is a snug fit where the plywood is pressed tightly against the wall, creating a solid seal. A socket wrench or impact driver makes this process faster and more efficient.
Securing Plywood for Different Window Types
Not all windows are created equal, and sometimes you need to adjust your installation method based on the window’s type and construction. This includes different types of frames and materials. Understanding these variations helps you achieve a secure fit for any window in your home.
Standard Double-Hung Windows: For typical double-hung windows, the method described above works well. The plywood should cover the entire sash and extend onto the surrounding wall. Make sure the fasteners go into studs if possible. If your window has a wide frame, you might be able to attach some fasteners directly to the frame itself, but studs offer the strongest anchoring point.
Casement Windows: Casement windows crank outwards and often have a more complex frame. The plywood should still cover the entire opening and overlap the wall. You may need to be more precise with your measurements and pre-drilling to ensure the plywood doesn’t interfere with the window mechanism if it remains closed. Some people prefer to remove the crank mechanism before installation if it protrudes significantly.
Large Picture Windows or Sliding Glass Doors: These larger openings require more robust support. Use thicker plywood if possible (e.g., 3/4-inch). You might need more fasteners, spaced closer together. Consider using specialized hardware or additional bracing for these large areas. For sliding glass doors, the plywood should extend the full width and height, secured into the wall framing on all sides.
Using Anchor Bolts for Extra Strength
In areas known for severe hurricanes or for added peace of mind, using anchor bolts can provide an even stronger connection than standard screws. Anchor bolts are designed to go directly into concrete or masonry walls, or can be used with special anchors in wood framing to create an exceptionally strong point of attachment.
Anchor Bolts for Concrete/Masonry: If your home has concrete or masonry walls, you will need specific types of anchor bolts, such as wedge anchors or sleeve anchors. You’ll need to drill larger holes into the concrete and then drive the anchor bolts into these holes. The plywood is then secured to the anchor bolts, often using nuts and washers. This method creates a very strong, permanent anchor point.
Through-Bolts for Wood Framing: For wood-framed homes, you can use through-bolts. This involves drilling a hole completely through the wall stud and the plywood. A bolt, typically with a washer and nut on the inside of the house, passes through both. This method provides immense holding power as the bolt goes through the entire structural member. It is crucial to have someone on the inside to help hold the washers and nuts while you tighten from the outside.
Pre-Installation of Anchor Points: For the quickest installation during a storm threat, some homeowners opt to pre-install the anchor bolt receivers or threaded inserts into their wall framing before hurricane season. This way, when a storm is approaching, they only need to screw the bolts through the plywood into these pre-installed anchors, saving valuable time.
Maintaining Your Hurricane Plywood Shutters
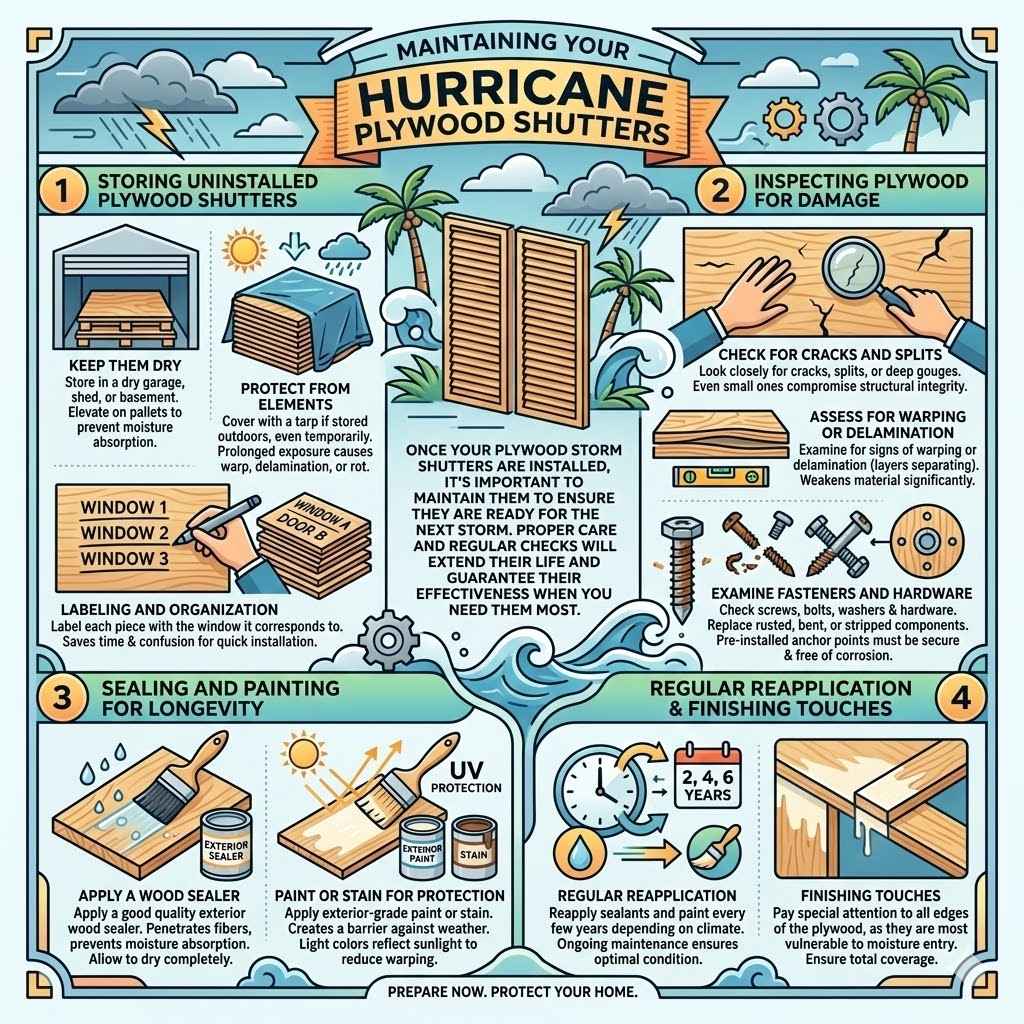
Once your plywood storm shutters are installed, it’s important to maintain them to ensure they are ready for the next storm. Proper care and regular checks will extend their life and guarantee their effectiveness when you need them most. This isn’t a one-and-done task; it requires some attention over time.
Storing Uninstalled Plywood Shutters
If you remove your plywood shutters after a storm or store them during the off-season, proper storage is essential to keep them in good condition. Storing them correctly prevents damage from weather, pests, or accidental impacts.
Keep Them Dry: Store the plywood sheets in a dry location, such as a garage, shed, or basement. Avoid storing them directly on the ground where they can absorb moisture. Elevating them on pallets or blocks is a good practice.
Protect from Elements: If stored outdoors, even temporarily, cover them with a tarp to protect them from rain and sun. Prolonged exposure to moisture can cause the plywood to warp, delaminate, or rot, weakening its protective capabilities.
Labeling and Organization: It’s a good idea to label each piece of plywood with the window it corresponds to. This will save you a lot of time and confusion when you need to install them quickly. You can write directly on the plywood with a permanent marker or attach a durable label. Organizing them in a way that allows easy access is also helpful.
Inspecting Plywood for Damage
Before each hurricane season, and after any significant weather event, it’s wise to inspect your plywood shutters for any signs of damage. Early detection of problems can prevent failures during a storm.
Check for Cracks and Splits: Look closely for any cracks, splits, or deep gouges in the plywood. Even small cracks can compromise the structural integrity of the shutter, making it more likely to break under pressure.
Assess for Warping or Delamination: Examine the plywood for any signs of warping or delamination, where the layers of wood begin to separate. This can happen due to moisture exposure or age and weakens the material significantly.
Examine Fasteners and Hardware: Check the screws, bolts, washers, and any other hardware used to attach the shutters. Ensure they are not rusted, bent, or stripped. If you are using pre-installed anchor points, make sure they are still secure and free of corrosion. Replace any damaged or worn components immediately.
Sealing and Painting for Longevity
Applying a protective coating to your plywood shutters can significantly extend their lifespan and improve their resistance to the elements. This simple step adds an extra layer of defense against moisture and UV damage.
Apply a Wood Sealer: Before installing or storing your plywood, apply a good quality exterior wood sealer. This will penetrate the wood fibers and help prevent moisture absorption, which is a major cause of deterioration. Allow the sealer to dry completely according to the product’s instructions.
Paint or Stain for Protection: After sealing, painting or staining the plywood provides an additional barrier against the weather. Use an exterior-grade paint or stain. Light colors can help reflect sunlight, keeping the plywood cooler and potentially reducing warping. Ensure you paint all edges of the plywood thoroughly, as these are often the most vulnerable areas for moisture entry.
Regular Reapplication: Depending on your climate and exposure, you may need to reapply sealants and paint every few years. This ongoing maintenance ensures that your plywood shutters remain in optimal condition and ready to protect your home.
Frequently Asked Questions
Question: How thick should plywood be for hurricane shutters
Answer: For most residential use, 1/2-inch or 5/8-inch thick exterior-grade plywood is recommended. For larger openings like picture windows or sliding glass doors, 3/4-inch thickness might offer better protection.
Question: What kind of screws are best for plywood hurricane shutters
Answer: Heavy-duty lag screws, typically 3 to 6 inches long, are recommended. They should be galvanized or coated to prevent rust and long enough to securely anchor into wall studs.
Question: How far apart should I place fasteners on plywood shutters
Answer: Fasteners should be spaced about 4 to 6 inches apart along the edges of the plywood, ensuring they are driven into wall studs whenever possible for maximum security.
Question: Can I leave plywood shutters on all the time
Answer: It is generally recommended to remove plywood shutters after a storm has passed to prevent moisture buildup, rot, and potential damage to your home’s exterior. They are meant for temporary protection during severe weather events.
Question: Do I need to pre-drill holes in the plywood
Answer: Yes, pre-drilling pilot holes in the plywood is essential. It prevents the wood from splitting when you drive fasteners and makes installation easier and more secure.
Final Thoughts
Learning How to Install Plywood on Windows for Hurricanes is a practical skill that boosts home safety. By carefully measuring, preparing, and securely fastening the plywood, you create a vital barrier against storm damage. Regular inspection and maintenance ensure your shutters are always ready for action, giving you peace of mind when severe weather threatens your home.