How to Install Trex Decking with Hidden Fasteners: A Step-by-Step Guide
Hey there! If you’re dreaming of a beautiful, low-maintenance deck that looks sleek and modern, you’re probably considering Trex decking. I sure was when I decided to transform my backyard a couple of years ago. One thing that sold me on Trex was the option to use hidden fasteners for a clean, screw-free look. Installing Trex decking with hidden fasteners might sound intimidating, but I’ve done it myself, and it’s totally doable with some planning and patience.
This guide is packed with everything I’ve learned, from prepping the frame to securing the final board. Whether you’re a DIY newbie or a seasoned builder, I’m here to walk you through each step like we’re working side by side. Let’s build that dream deck together!
Why Choose Trex Decking and Hidden Fasteners?
Let’s start with why Trex decking is so awesome. Trex is a composite material made from recycled wood and plastic. It’s durable, resists fading, and doesn’t need staining or sealing like wood. I love that my Trex deck still looks vibrant after years of sun and rain. Plus, it’s eco-friendly, which feels good.
Hidden fasteners take it to the next level. Unlike traditional screws that dot the surface, hidden fasteners clip boards together from the sides, leaving a smooth, clean look. When I first saw a deck with hidden fasteners, I was hooked—no visible screws, just pure elegance. They also make installation easier once you get the hang of it and allow boards to expand and contract naturally. Trust me, the extra effort is worth it for that polished finish.
Tools and Materials You’ll Need
Before we get our hands dirty, let’s gather everything you need. I’ve learned that having the right tools and materials ready saves so much time. Here’s what I used for my Trex deck:
| Item | Purpose |
|---|---|
| Trex decking boards | The main material for your deck surface. Measure your area to get enough. |
| Hidden fasteners (Trex Hideaway) | To ensure that cuts and board placement are straight. |
| Trex starter clips | For securing the first board to the frame. |
| Drill with driver bit | To drive screws into the frame and clips. |
| Circular saw or miter saw | For cutting boards to length or ripping for edges. |
| Tape measure | To measure boards and ensure accurate cuts. |
| Level | To check that the frame is flat and even. |
| Square | To ensure cuts and board placement are straight. |
| Chalk line | For marking straight lines across the frame or boards. |
| Safety gear (gloves, goggles) | To protect yourself while cutting and drilling. |
| Rubber mallet | To tap boards into place without damaging them. |
| Spacer tool or 1/8” spacers | To maintain consistent gaps between boards for drainage and expansion. |
| Screws for clips | Usually included with Trex fasteners, but double-check. |
| Joist tape (optional) | To protect the frame from moisture and extend its life. |
| Broom | For cleaning the deck surface after installation. |
Pro tip: I always buy 10% more Trex boards than I think I’ll need. It covers mistakes or damaged boards. Also, check that your hidden fasteners are Trex-approved—generic ones might not work as well. I grabbed my supplies at a local home center, but you can order online too.
Planning Your Deck Layout
A good deck starts with a solid plan. I spent a weekend sketching my deck before I even bought materials. Measure your space carefully to know how many boards you’ll need. Trex boards come in standard lengths like 12, 16, or 20 feet, so plan to minimize cuts and waste.
Decide which direction your boards will run. I chose to run mine perpendicular to my house for a classic look, but parallel can make a small deck feel wider. Check your local building codes too—some require specific joist spacing or permits. My town wanted 16-inch joist spacing for composite decking, so I double-checked that my frame matched that.
Think about where you’ll start laying boards. I started against my house for a clean edge, but you might begin at the outer edge if that’s more visible. Sketching this out helped me visualize the project and avoid surprises.
Preparing the Deck Frame
The frame is the backbone of your deck, so it needs to be solid. I used pressure-treated lumber for my frame, but steel works too. Make sure your joists are spaced no more than 16 inches on center for Trex decking—12 inches if you’re laying boards diagonally. Use a level to ensure the frame is flat. An uneven frame can cause boards to wobble or crack over time.
I added joist tape to the top of each joist. It’s a sticky, waterproof membrane that protects the wood from moisture. This step took an extra hour, but it’s saved me from worrying about rot. If your frame isn’t square, use a square to check corners and adjust before you start laying boards. A sturdy, level frame makes the rest of the job so much easier.
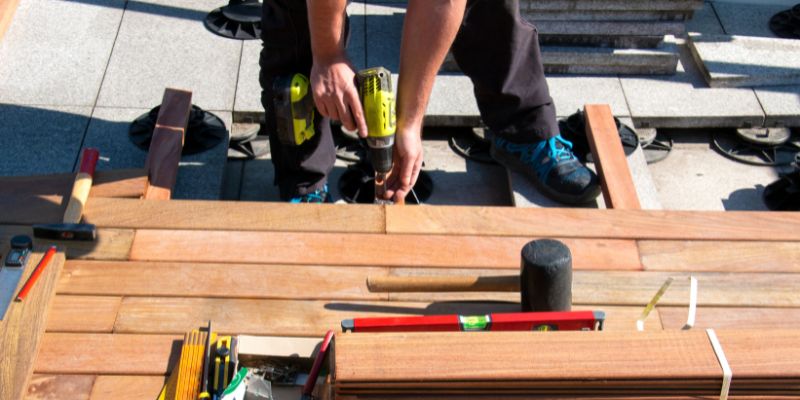
Cutting and Handling Trex Boards
Trex boards are heavy and flexible, so handle them carefully. I had a buddy help me carry longer boards to avoid bending or cracking them. Before cutting, measure twice—trust me, I learned this after miscutting a board and wasting $50! Use a circular saw with a carbide-tipped blade for clean cuts. I set my boards on sawhorses to keep them steady while cutting.
Trex recommends leaving a small gap between board ends for expansion—about 1/8 inch in warm weather, more if it’s cold. I used a spacer tool to keep gaps consistent. If you need to rip boards (cut lengthwise) for edges, measure carefully and use a chalk line for a straight cut. Always wear goggles when cutting—those composite bits can fly!
Installing the First Board with Starter Clips
Now, let’s get to the fun part—laying the first board! I started against my house for a clean look. Trex uses starter clips to secure the first board since hidden fasteners won’t work on the outer edge. Place a starter clip on each joist where the board will sit. I spaced mine evenly and screwed them into the joist with the provided screws.
Slide the grooved edge of your first Trex board into the clips. Make sure it’s straight by using a level or a chalk line. I tapped the board gently with a rubber mallet to snug it into the clips. Once it’s in place, check that it’s level and secure. This first board sets the tone for the rest, so take your time to get it right.
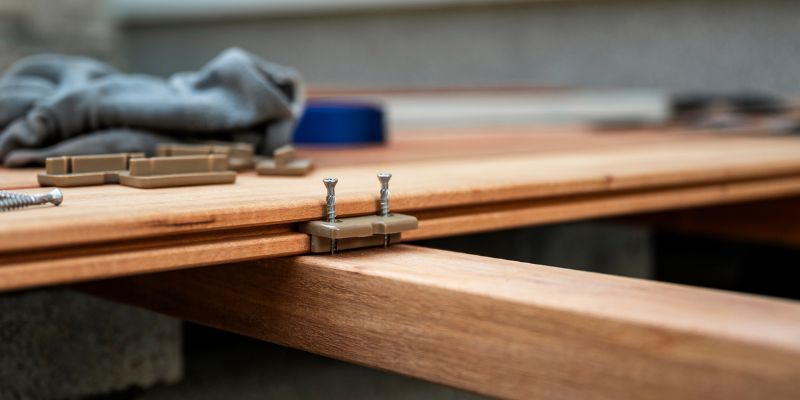
Using Hidden Fasteners for the Rest of the Boards
With the first board down, you’re ready to use hidden fasteners. This is where the magic happens! Trex Hideaway fasteners are small plastic or metal clips that fit into the grooves on the sides of the boards. Here’s how I did it:
- Place a hidden fastener in the groove of the installed board, centered over each joist.
- Screw the fastener into the joist at a slight angle. Don’t overtighten—it can crack the clip.
- Slide the next board’s groove onto the other side of the fasteners. Tap it with a rubber mallet to secure it.
- Use a spacer tool to ensure a 1/8-inch gap between boards for drainage and expansion.
- Repeat for each joist along the board.
I found a rhythm after a few boards—clip, screw, slide, tap. It’s satisfying to see the deck take shape without a single screw on the surface! Check every few boards with a level to make sure they’re staying even. If a board feels loose, double-check that the fasteners are screwed in properly.
Handling Corners and Edges
Corners and edges need extra care for a professional look. For my deck’s outer edge, I used a Trex fascia board to cover the exposed ends. If your deck has a curve or angle, you may need to cut boards to fit. I used a jigsaw for small curves and a miter saw for angled cuts. Measure carefully and test-fit before securing.
For stairs or railings, Trex offers specific fasteners and brackets. I installed stair treads with hidden fasteners too, but the risers needed face screws for stability. Check Trex’s website for guides on specialty areas—it saved me a lot of guesswork. If you’re unsure, take a picture and ask at your hardware store.
Securing the Final Board
The last board can be tricky because you can’t use hidden fasteners on the outer edge. I used Trex starter clips again, but you can also face-screw the board if needed. If you go with screws, Trex sells color-matched ones that blend in. I ripped my final board to fit the remaining space, then secured it with clips screwed into the joists.
Make sure the final board is parallel to the others and has the same 1/8-inch gap. I used a square to check alignment before screwing it down. Once it’s in place, step back and admire your work—it’s starting to look like a real deck!
Adding Fascia and Finishing Touches
Fascia boards give your deck a polished edge. I used Trex fascia to cover the rim joists and ends of the deck boards. Measure and cut the fascia to fit, then secure it with Trex-approved screws. I pre-drilled holes to prevent splitting and spaced screws about 12 inches apart.
After the fascia, sweep the deck to remove sawdust and debris. I hosed mine down for a final clean, but avoid power washing new Trex—it’s too harsh. If you’re adding railings, lights, or other features, follow Trex’s guides for those. I added solar lights to my posts, and they make the deck glow at night!
Common Mistakes to Avoid
I made a few slip-ups on my first deck, so let me save you some trouble. First, don’t skip the spacers—uneven gaps look sloppy and can trap water. Second, check your frame’s level before starting. I had to redo a section because my frame was off by half an inch. Also, don’t overtighten screws—it can damage the clips or boards. Finally, plan your board layout to avoid skinny pieces at the edges. A full-width board looks much better.
Maintenance Tips for Your Trex Deck
One reason I love Trex is how easy it is to maintain. Unlike wood, it doesn’t need sanding or staining. I clean mine twice a year with a broom and mild soap. For tough stains, like barbecue grease, I use a soft brush and Trex’s recommended cleaner. Avoid harsh chemicals—they can fade the color.
Check your fasteners annually to ensure they’re tight. I walk my deck every spring to look for loose boards or screws. Store outdoor furniture with pads to prevent scratches. With a little care, your Trex deck will look amazing for decades.
Why I Love This Project
Building a Trex deck with hidden fasteners was one of the most rewarding projects I’ve tackled. The clean, screw-free look makes my backyard feel like a resort. I love hosting barbecues and seeing my friends’ jaws drop when they see the deck. Plus, knowing I built it myself gives me a huge sense of pride. It’s not just a deck—it’s a space for memories.
Conclusion
There you have it—everything you need to know about installing Trex decking with hidden fasteners! From planning your layout to securing the final board, this project is a chance to create something beautiful and lasting. I remember how nervous I was starting out, but with each board I laid, I gained confidence. You will too. Take your time, measure twice, and enjoy the process. Soon, you’ll be sipping lemonade on a gorgeous deck you built yourself. So, grab your tools, crank up some music, and let’s make your backyard the envy of the neighborhood!
Frequently Asked Questions
Hidden fasteners give a clean, screw-free look and allow boards to expand and contract naturally. They’re also easier to install once you get the hang of it.
How many Trex boards do I need for my deck?
Measure your deck’s square footage and divide by the board’s width (usually 5.5 inches). Add 10% for waste and cuts.
Can I install Trex decking on an old frame?
Yes, if the frame is level, sturdy, and has joists spaced 16 inches or less on center. Check for rot and fix any issues first.
No, just a drill, saw, and basic tools. A rubber mallet and spacer tool make it easier, but they’re not required.
How long does it take to install a Trex deck?
For a 12×12-foot deck, expect 1-2 days for one person, less with help. My 16×20 deck took a weekend with a friend.
Starter clips secure the first and last boards to the frame. Hidden fasteners clip the boards together in between.
Can I cut Trex boards with a regular saw?
Yes, use a circular or miter saw with a carbide-tipped blade for clean cuts. Always wear goggles.
How do I clean my Trex deck after installation?
Sweep off debris and wash with mild soap and water. Use a soft brush for stains and avoid power washing new decks.