How To Install Wood Stove Chimney: Proven, Essential
Installing a wood stove chimney safely involves selecting the right parts—Class A insulated pipe for most installations—measuring clearances strictly, assembling the components from stove to roof penetration kit, and ensuring every joint is secured properly for safe, efficient heating. Always follow manufacturer guidelines and local fire codes.
Putting in a wood stove is a great way to keep warm and save on energy bills. But the chimney part? That can feel tricky. People often worry about getting the height right, keeping things far away from wood framing, or making sure the roof flashing seals perfectly. It sounds complicated, but with clear steps, you can do this job safely and confidently. I’m here to walk you through every essential step, just like we’re working on it together in the workshop. Let’s demystify the process of installing your wood stove chimney system so you can enjoy that cozy fire worry-free.
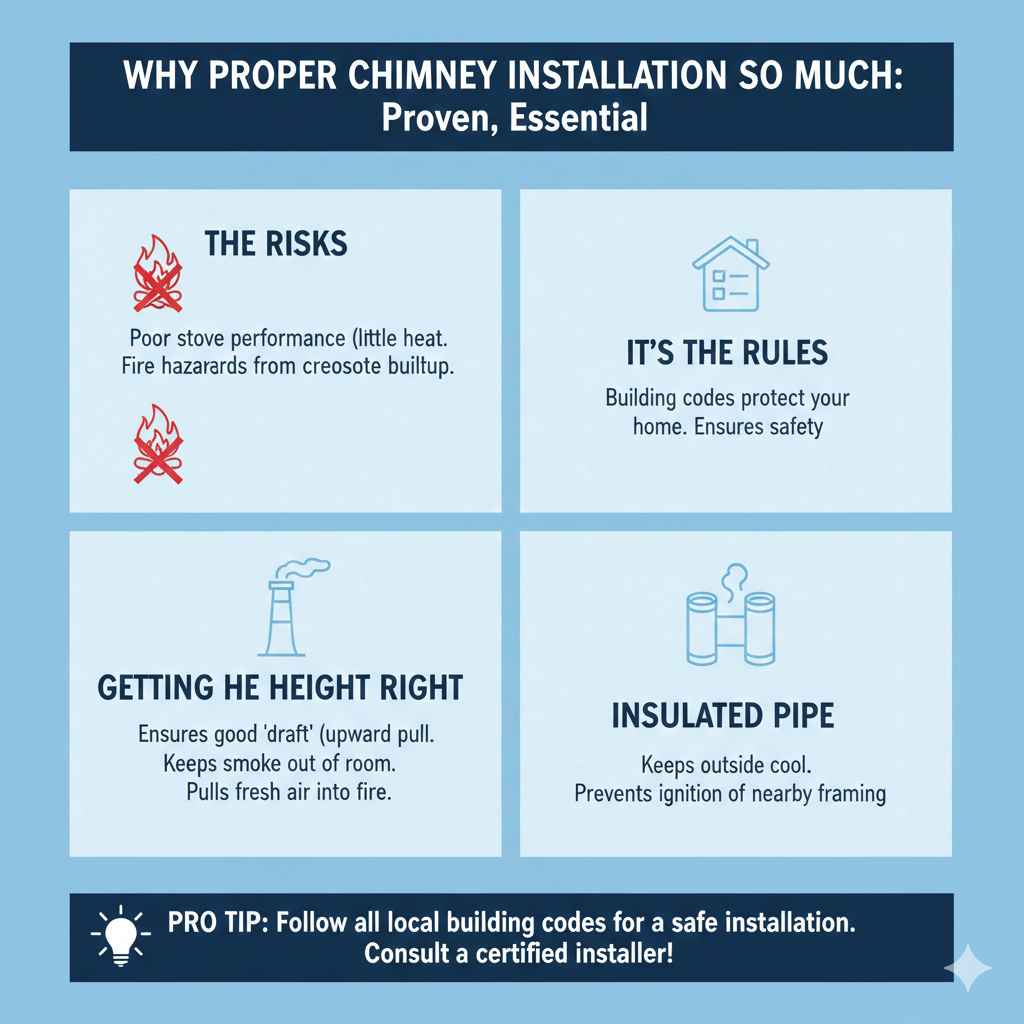
Why Proper Chimney Installation Matters So Much
A wood stove is only as safe and effective as its chimney. If the chimney isn’t installed correctly, you face two big risks: poor stove performance (lots of smoke, little heat) and, much more seriously, fire hazards. Creosote, a flammable byproduct of burning wood, builds up inside chimneys. If your chimney isn’t hot enough or doesn’t have the right components, this buildup becomes dangerous.
We need to follow the rules not just because the building inspector says so, but because these rules protect your home. Getting the height right ensures good “draft”—the upward pull that keeps smoke out of your room and pulls fresh air into the fire. Using the correct, insulated pipe keeps the outside of the chimney cool enough so it won’t ignite nearby framing materials.
Essential Pre-Installation Checklist: Tools and Components
Before we cut anything or drill any holes, we need our gear ready. Think of this like organizing your workbench before starting a big cut. Having everything on hand saves time and prevents frustrating mid-project trips to the hardware store.
Understanding the Key Chimney Components
Wood stove chimneys, especially for modern stoves vented through a wall or ceiling, must be specialized “Class A” insulated pipe, often called HT (High Temperature) chimney pipe. Never use single-wall stove pipe for passing through ceilings, walls, or running up the exterior of the home for more than a few feet.
Here are the must-have components for a safe installation:
- Stove Pipe (Double-Wall or Triple-Wall Interior Pipe): Connects the stove collar to the ceiling or wall pass-through. It must maintain minimum clearance to combustibles.
- Chimney Support Box or Ceiling Thimble: This is the component that secures the chimney system where it passes through the ceiling or attic space.
- Insulated Chimney Sections (Class A Pipe): These sections are required to run through unheated areas like attics, or outside the building envelope. They have an inner liner, insulation, and an outer casing.
- Chimney Cap and Rain Hood: Sits on top to keep rain and debris out while allowing smoke to escape.
- Roof Flashing and Storm Collar: The flashing seals the gap between the outer chimney pipe and the roof surface. The storm collar fits over the flashing to direct water away.
- Chimney Termination Height: The pipe must extend a specific distance above the roofline to ensure proper draft and safety.
Tools You Will Need
You don’t need an industrial toolkit, but you do need the right measuring and cutting tools for safety and precision.
- Tape Measure (A long one, ideally 25 feet)
- Pencil or Marker
- Safety Glasses and Work Gloves (Crucial!)
- Power Drill and appropriate bits
- Hole Saw or Reciprocating Saw (for cutting roof openings—use caution!)
- Screwdriver or Nut Driver (for securing pipe bands)
- Level
- Caulk Gun and High-Temperature Silicone Sealant (for roofing areas)
- Ladder rated for the job (Stable and secure!)
Step 1: Understanding Clearances and Local Codes
This is the most crucial, non-negotiable step. If you ignore clearances, you risk house fires. Clearance means the safe distance the hot chimney pipe must maintain from anything that can burn—like wooden studs, drywall, insulation, or furniture.
Rule of Thumb: Always check the manufacturer’s manual for your specific wood stove and chimney pipe system. They provide definitive clearance numbers. If you cannot find them, 36 inches is a common starting point, but you can often reduce this clearance (down to 6 inches or 12 inches) by installing listed heat shields, which create an air gap or use insulating materials.
Before you purchase anything, check with your local building department. They enforce the NFPA 211 standards (National Fire Protection Association) which govern chimney and venting systems. Getting permits ensures your work is inspected and safe.
Clearance Table Example (Always verify with your specific product manual)
This table gives a general idea of what clearances look like. Your product specifications may differ!
| Component | Standard Clearance to Combustibles (Wood/Drywall) | Reduced Clearance (With Approved Shielding) |
|---|---|---|
| Single-Wall Stove Pipe (Near Stove) | 36 inches | Typically 18 inches (Check Manual) |
| Double-Wall Pipe (Near Stove) | 24 inches | Typically 6 inches or 12 inches (Check Manual) |
| Class A Insulated Chimney (Through Attic/Roof) | 2 inches (Minimum required by code for triple-wall insulated pipe) | N/A (This is the minimum safe clearance) |
Step 2: Planning the Chimney Path (The Vertical Run)
The best chimney path is as straight and vertical as possible. Every bend (or “elbow”) slows the draft, creates turbulence, and can increase creosote buildup.
A. Ceiling Penetration (If Venting Vertically Through the Roof)
If your stove is placed centrally in the room, venting straight up is usually the easiest and most efficient route. This is often referred to as “running through the ceiling.”
- Mark the Center Point: Hold the stovepipe base in place where it exits the stove. Then, use a level to draw a straight vertical line straight up to the ceiling. This mark is your target center point.
- Determine Ceiling Thimble Size: Your chimney support box or ceiling thimble must match the required clearance from the stove pipe. For standard Class A insulated pipe, you will cut a hole that accommodates the outer jacket of the insulated pipe plus the required clearance (usually 2 inches on all sides of the pipe jacket).
- Trace the Cutout: Use the dimensions provided for your support box/thimble. Place the box template on the ceiling and carefully trace the required hole size. Remember, you are cutting through drywall, ceiling joists, and the roof structure.
- Cutting the Hole: Wearing your safety glasses, use a reciprocating saw or a large hole saw to carefully cut the marked hole. Support your weight if you are working on scaffolding or a secure ladder inside the attic.
- Install the Support Box: In the attic space, slide the chimney support box (which keeps the pipe centered and separated from insulation/rafters) up through the hole. Secure it firmly to the ceiling joists using heavy-duty structural screws. The flange of the support box should sit flat on the ceiling surface.
B. Wall Penetration (If Venting Horizontally Out the Wall)
If the stove is close to an exterior wall, venting horizontally requires a special “Wall Thimble” kit. This kit ensures that the pipe immediately turns upward after passing through the wall and maintains code-required clearances to the outside sheathing and siding.
- Identify Exterior Wall Location: Mark the spot on the inside wall where the pipe will exit. Ensure you are not hitting any major structural beams or plumbing stacks.
- Check Exterior Clearance: From the interior mark, find the corresponding spot outside. Ensure that the exterior exit point maintains the required distance from windows, doors, vents, and combustible building materials (usually 10 feet horizontally or per code).
- Install the Wall Thimble: Drill pilot holes according to the thimble instructions. Attach the outer part of the thimble to the exterior wall sheathing.
- Interior Cut: From the inside, cut the hole to match the inner dimensions of the thimble, often involving cutting through drywall and sheathing. Install the interior collar piece, ensuring the interior stove pipe connects securely to it.
- Insulate: Most wall thimble kits require you to pack the space between the inner and outer sleeves with an approved non-combustible material (like rock wool or cement board filler) to meet clearance requirements.
Step 3: Assembling the Chimney Pipe Above the Ceiling/Wall
Once the penetration point is secured, we move into the attic (for ceiling installs) or up the side of the house (for wall installs) to assemble the insulated Class A chimney sections.
Working in the Attic (Ceiling Install)
Safety first in the attic! Use stable footing, wear a dust mask if dealing with old insulation, and be mindful of brittle flooring surfaces.
- Attach the First Section: Take your first length of Class A insulated chimney pipe. It has a male end (the smaller one) and a female end (the wider one). The male end must always point down toward the stove, connecting to the support box you just installed.
- Secure Connections: Chimney pipes are designed to lock together easily. Slide the male end of the second section into the female end of the first. Twist until the locking bands click or align.
- Use Three Screws Per Joint: For every connection point between sections, you must drill and drive at least three equally spaced sheet metal screws through the overlapping rims of the two sections. This prevents the pipe from separating under high heat or strong winds.
- Maintain Attic Clearance: As you stack the pipe upward through the attic, continuously check the 2-inch clearance requirement from all surrounding wood framing (rafters, trusses) using your measuring tape. If you are too close, you must use approved support braces or shielding to extend the clearance.
Step 4: Calculating and Achieving Proper Chimney Height (The 3-2-10 Rule)
This is where we ensure the chimney works correctly. If the chimney isn’t tall enough, the smoke won’t pull correctly, leading to smoke spillage and dangerous creosote buildup.
The general rule used nationwide, which you must verify against your manufacturer’s specs and local code, is often called the “3-2-10 Rule”:
- The chimney termination must be at least 3 feet above the point where it passes through the roof or the highest part of the structure.
- The chimney must terminate at least 2 feet higher than any part of the structure (or any obstruction) within a 10-foot radius horizontally.
Imagine a horizontal line extending 10 feet out in all directions from the chimney exit point. The chimney top must stand 2 feet taller than anything within that 10-foot circle.
Measuring and Adding Sections
- Measure the Required Height: Determine where the top of the chimney needs to be based on the 3-2-10 rule relative to your roof peak.
- Calculate Needed Pipe: Measure the distance from the last secured joint in your attic/wall area up to the required termination height.
- Assemble the Top Sections: Assemble the remaining pipe lengths on the ground or a secure platform, locking and screwing them together.
- Raise and Secure: Carefully lift the assembled section(s) and connect them to the existing pipe running through the attic. This often requires two people and a very sturdy ladder system extending onto the roof surface. Lock and screw the final joint securely.
Step 5: Finishing the Roof Penetration (Flashing and Sealing)
A perfectly working chimney that leaks water will ruin your ceiling and cause rot inside your walls. Proper flashing is essential to keep the roof waterproof.
Required Components for Roof Penetration
For a standard pitched roof, you will need a specialized roofing support kit designed for your chimney diameter:
| Part Name | Function |
|---|---|
| Roof Jack Support Frame | Sits on top of the shingles; provides structural support. |
| Flashing Base Plate | Metal plate that slides underneath the upper shingles. |
| Storm Collar | A metal band that fits snugly around the outer pipe, sitting over the flashing to deflect water. |
The Flashing Procedure
- Prepare the Roof Opening: Ensure the 2-inch clearance is maintained all the way up to the roof deck. The chimney pipe should stick out several inches through the roof sheathing.
- Install the Support Frame: Place the roof jack support frame over the hole. Screw it securely into the roof decking (not just the shingles). If you are working on a sloped roof, the downhill side of the frame should be where the water naturally flows away.
- Install the Flashing Base: This metal piece is shaped like a cone or wide collar. Slide the chimney pipe through the hole in the flashing base. You want the lower edge of the flashing to sit under the shingles uphill from the chimney, and the uphill edge to sit over the shingles downhill from the chimney (this ensures water flows over, not under, the flashing).
- Seal the Penetration: Use a high-quality, high-temperature exterior silicone sealant or roofing cement to seal around the base of the flashing where it meets the shingles. Pay special attention to the uphill seam.
- Attach the Storm Collar: Slide the storm collar down the chimney pipe until it rests snuggly on top of the flashing base plate. Seal the interior edge where the storm collar meets the pipe with a small bead of silicone.
- Install the Chimney Cap: Attach the chimney cap to the very top of the pipe. This usually screws on or uses a tension clamp.
Step 6: Final Connection and System Check
We’ve built the entire vertical path; now we need to connect it to the stove.
Connecting to the Stove
You will use the appropriate single-wall or double-wall stove pipe (the one rated for interior use, maintaining its specific clearance) to bridge the distance between your stove collar and the bottom of the ceiling thimble/wall thimble.
- Measure and Cut: Measure the distance needed. Cut the interior pipe to length, ensuring it slides into the thimble collar without binding or exceeding the depth noted on the thimble instructions.
- Attach to Stove: Secure the pipe to the stove collar using a locking band or screws, following the manufacturer’s recommendation.
- Secure to Thimble: Ensure the other end slides securely into the ceiling or wall thimble. Lock this joint with screws as well.
The Inspection and Curing Process
You are almost done! But you cannot fire up the stove yet. Most manufacturers require a “curing” period for the stove’s paint, and crucially, for any sealants used on the exterior.
Do Not Skip the First Burn! The very first time you use the stove, you must keep the fire very small and cool for several hours. This process allows any residual manufacturing oils to burn off the stove paint and, more importantly, allows any silicone or roofing cement used around the roof flashing to cure completely without being subjected to high heat or sudden temperature shocks. Consult your stove manual for specific curing burn instructions.
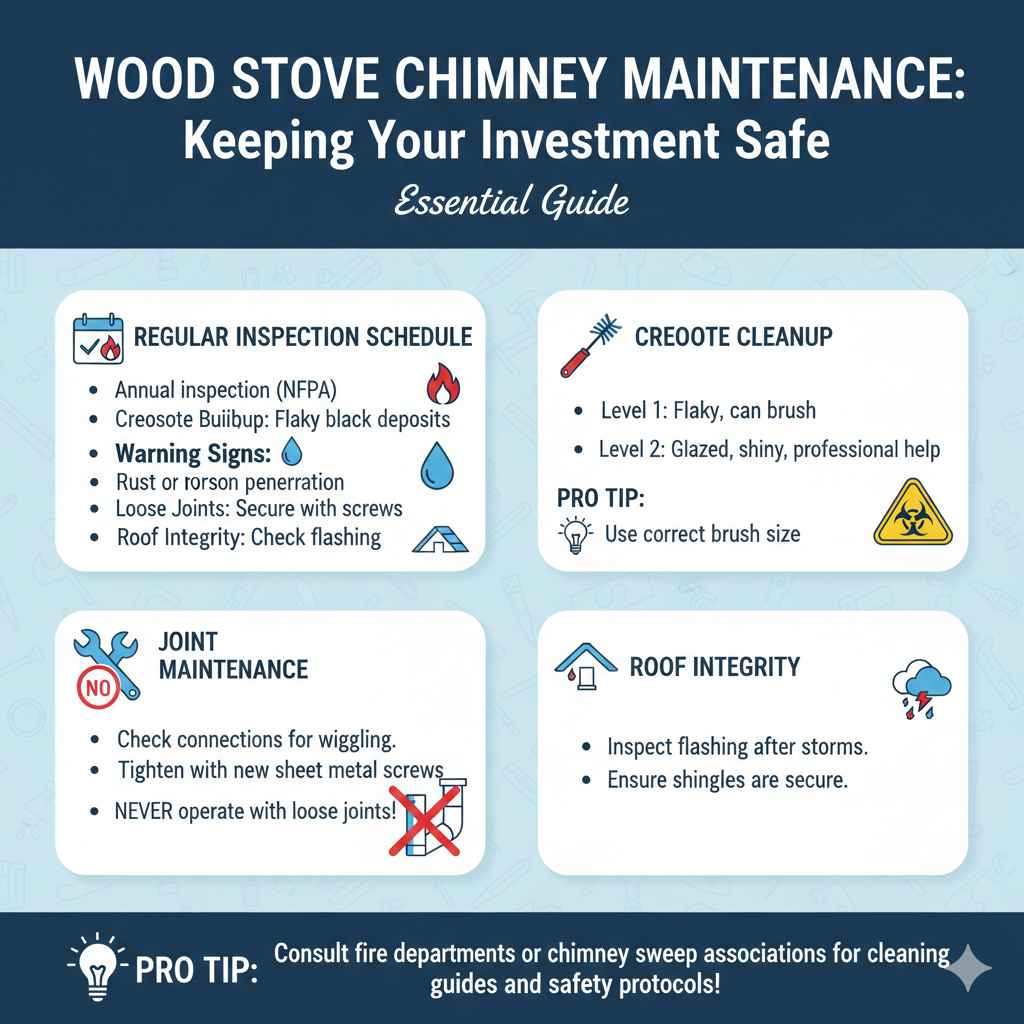
Wood Stove Chimney Maintenance: Keeping Your Investment Safe
Installing it right is half the battle; keeping it right is the rest. A well-maintained chimney resists creosote and performs efficiently year after year.
Regular Inspection Schedule
The National Fire Protection Association (NFPA) recommends that chimneys serving wood stoves be inspected annually. Look for these warning signs:
- Creosote Buildup: If you see flaky, black deposits inside the pipe (usually visible when opening the stove door), it needs cleaning. Level 1 creosote can often be cleaned with a brush. Level 2 (glazed, shiny deposits) often requires specialized chemical treatment or professional sweeping.
- Rust or Corrosion: Check all exterior components, especially the cap and flashing, for signs of rust, which indicates water penetration.
- Loose Joints: Gently check every pipe connection. If any screws are loose or the pipe wiggles, turn the stove off immediately, let it cool completely, and secure those joints with new sheet metal screws.
- Roof Integrity: After a heavy storm, visually check the flashing area from the ground if possible to ensure shingles weren’t lifted.
For a comprehensive guide on cleaning, you can often find helpful guides published by local fire departments or reputable chimney sweep associations, which detail the proper size of chimney brushes needed for your specific diameter pipe.
FAQ: Beginner Wood Stove Chimney Installation Questions
Q1: Can I use the cheaper single-wall pipe for the section running through my attic?
A: Absolutely not. Single-wall pipe gets extremely hot and requires large clearances (36 inches) from combustibles. Any section passing through an unheated space like an attic, crawlspace, or outside the main heated area of the home must be listed Class A (often called triple-wall insulated) pipe to maintain safe, minimal clearances (usually 2 inches).
Q2: How far above the roofline must my chimney terminate?
A: You must follow the 3-2-10 rule. Generally, this means the top of the chimney cap must be at least 3 feet above the roof penetration point, and 2 feet higher than any roof surface or obstruction within a 10-foot radius.
Q3: Do I need a permit to install a wood stove chimney?
A: In almost every jurisdiction, yes. Installing a new solid-fuel heating appliance and venting system requires a permit and inspection to ensure compliance with local building and fire codes. Check with your city or county building department first.
Q4: What is the purpose of the storm collar on the roof?
A: The storm collar is a crucial metal band that slides over the chimney pipe and sits on top of the flashing. Its job is to ensure that rainwater running down the chimney pipe is forced outward onto the roof flashing and sheds away from the penetration hole, preventing leaks into your home.
Q5: If my existing masonry chimney is sound, can I vent my new wood stove into it?
A: You can, but you must install a proper stainless steel liner that runs the full height of the masonry chimney, connecting directly to the stove. This liner ensures the chimney is sized correctly for the stove and protects the masonry from corrosive smoke and condensation. Never just vent a new stove into an unlined, oversized masonry chimney.
Q6: How tightly should I screw the sections of the stove pipe together?
A: For the interior pipe connecting to the stove, screws are used mainly to keep the pieces from falling apart. For the exterior Class A insulated pipe, you must use three screws at every joint to prevent sections from separating due to wind uplift or thermal expansion/contraction, which is a major safety requirement.
Conclusion: Enjoying Your Safe and Warm New System
You’ve done the hard part: planning the clearances, cutting the necessary holes safely, assembling the high-temperature pipe system, and securing the roof flashing. Remember, installing a wood stove chimney isn’t just about putting metal together; it’s about building a safe, continuous, vertical exhaust pathway for heat and smoke.
Take pride in checking every connection point twice. Re-read your manufacturer’s instructions one last time, especially concerning that initial curing burn. By sticking to these proven steps—prioritizing clearances, using the correct insulated components, and achieving the required chimney height—you have created a reliable, efficient, and beautiful heating source for your home. Enjoy the warmth you earned by doing this job right!