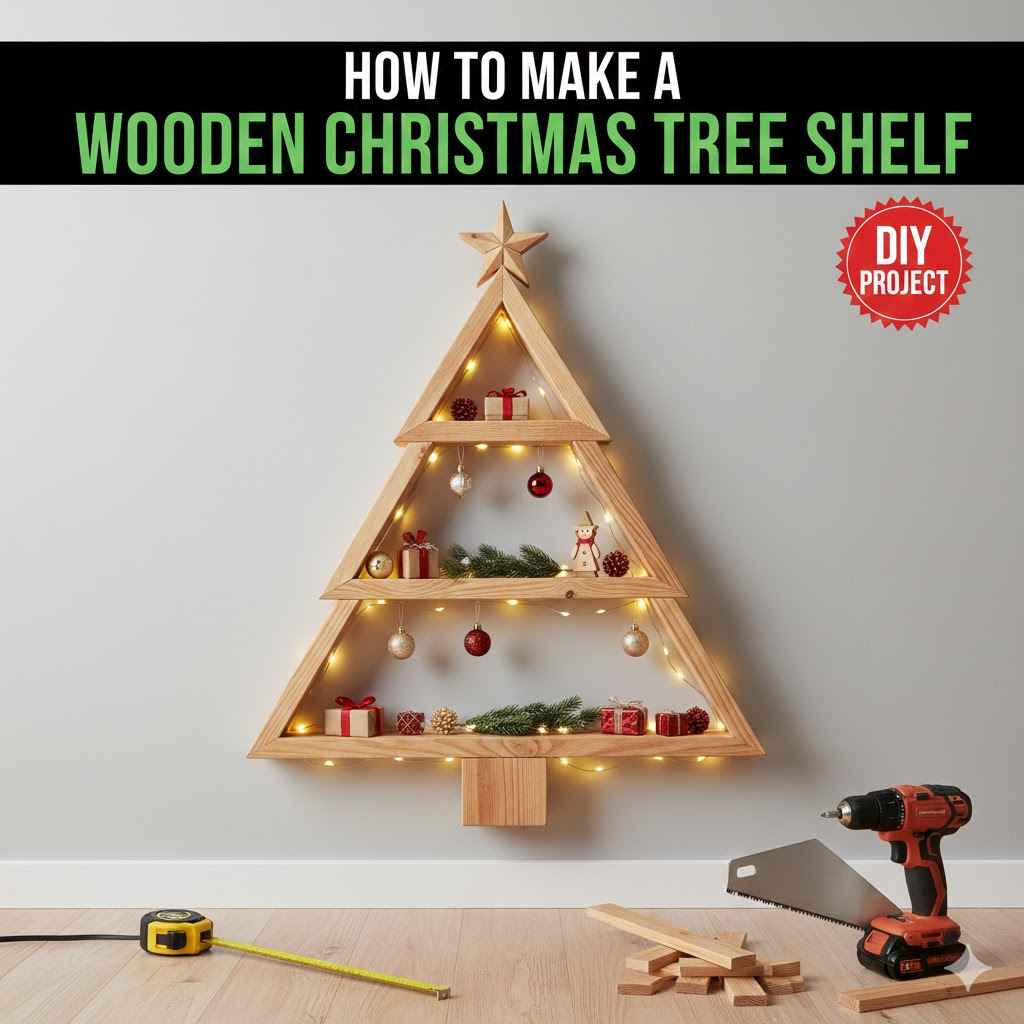
How to Make a Wooden Christmas Tree Shelf
Many people love the idea of a wooden Christmas tree shelf display, but sometimes it seems a little tricky to build. You might think you need special tools or lots of experience. Good news though!
It’s actually quite simple. This guide will show you exactly how to make a beautiful wooden Christmas tree shelf display step by step. Get ready to create something special for your home.
Craft Your Own Wooden Christmas Tree Shelf
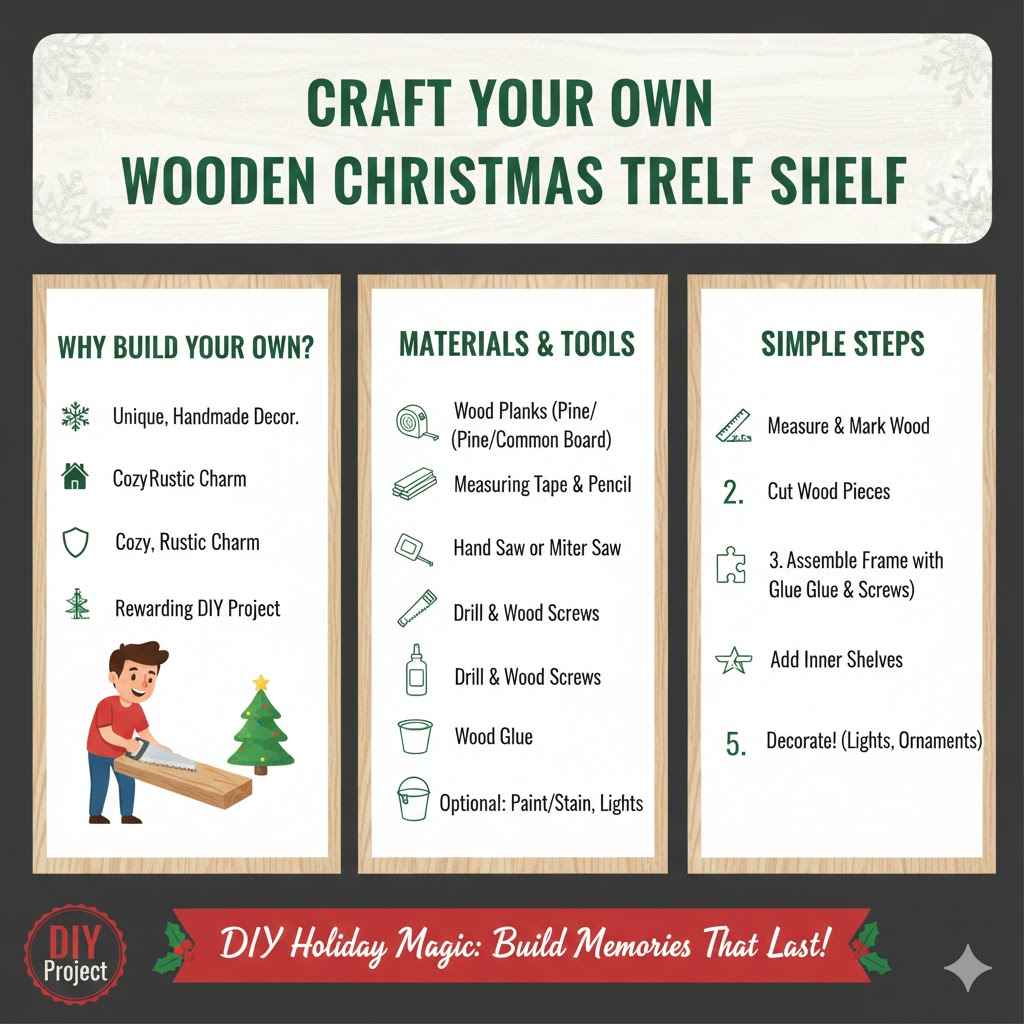
Creating a wooden Christmas tree shelf display is a fun project that adds a unique, handmade touch to your holiday decorations. These shelves are perfect for showcasing small ornaments, festive figurines, or even battery-operated fairy lights. They bring a cozy, rustic charm to any room.
Many beginners worry about cutting wood or putting pieces together. However, this project is designed to be straightforward, even if you’re new to DIY. With simple tools and clear steps, you can build a beautiful display shelf that will be a treasured part of your Christmas decor for years to come.
The appeal of a DIY project like this is immense. It allows you to customize the size, color, and style to perfectly match your existing decor. Plus, the sense of accomplishment from building something with your own hands is incredibly rewarding.
This guide focuses on making the process easy to follow. We break down each stage into manageable parts. You’ll learn about the materials you need, the tools that will help, and the exact steps for assembly.
Let’s get started and make this holiday season extra special with your custom creation.
Planning Your Wooden Christmas Tree Shelf
Before you grab your tools, a little planning goes a long way. Think about where you want to put your tree shelf and how big it should be. This will help you decide on the dimensions.
You can make it tall and narrow, or short and wide, depending on your space and what you want to display. Consider the weight of the items you plan to put on it. A sturdier design might be needed for heavier decorations.
The style of your Christmas tree shelf is also important. Do you want a more modern look with clean lines, or a rustic feel with natural wood tones? You can paint it, stain it, or leave it natural.
All these choices will influence the look and feel of your final piece. Planning ahead makes the building process much smoother and ensures you get the exact result you envision. It’s about creating a functional piece of art.
Choosing Your Wood Type
The type of wood you choose will affect the look, durability, and cost of your project. For a Christmas tree shelf, you don’t need the most expensive wood. Pine is a popular choice because it’s affordable, lightweight, and easy to work with.
It takes paint and stain well. Plywood is another budget-friendly option. For a more premium look, you could consider poplar or even oak, but these will be more costly and harder to cut.
If you’re aiming for a rustic look, reclaimed wood can be a fantastic choice. It adds character and a unique history to your shelf. Just make sure it’s clean and free of nails or staples.
For a smooth, modern finish, opt for sanded plywood or a good quality pine board. Think about the grain of the wood too. Some woods have a more prominent grain that can add to the aesthetic, while others are smoother.
Gathering Your Tools and Materials
You don’t need a professional workshop to build a wooden Christmas tree shelf. Most of the tools are common household items. Here’s a basic list of what you’ll likely need:
- Wood for the shelf pieces (pine boards are a great start)
- Wood screws or nails
- Wood glue
- Measuring tape
- Pencil
- Saw (a hand saw or a power saw like a jigsaw or circular saw)
- Drill (with drill bits for pilot holes and driving screws)
- Sandpaper (medium and fine grit)
- Optional: Paint, stain, or sealant
- Optional: Safety glasses and gloves
Having all your supplies ready before you start cutting will make the process go much faster. It also helps prevent interruptions. Make sure your wood is cut to the right lengths according to your plan.
If you’re new to using power tools, it’s always a good idea to practice on scrap wood first.
Step-by-Step Building Process
Now for the fun part – building your Christmas tree shelf! This guide provides a simple design. You can adjust dimensions to suit your needs.
We will describe how to make a basic tiered tree shelf.
Cutting Your Wood Pieces
For a classic tiered Christmas tree shelf, you’ll typically need several pieces for the shelves and some for the supports. A common design uses two long vertical pieces for the sides and several shorter horizontal pieces for the shelves, all cut at an angle to create the tree shape. Let’s assume you are making a shelf with three tiers.
You will need:
- Two side pieces: These will be the height of your tree shelf. For example, cut two pieces of 1×2 lumber to 30 inches long.
- Three shelf pieces: These will get shorter as they go up. For a 30-inch tall tree, you might cut shelves of 12 inches, 10 inches, and 8 inches. You can adjust the length based on how wide you want each tier.
- Optional: A base piece for stability. This could be a square piece of plywood or two pieces of wood forming an X shape at the bottom.
When cutting, accuracy is important. Measure twice, cut once. If you are using a hand saw, clamp the wood securely before cutting.
If using a power saw, ensure you have a stable surface and follow all safety instructions. For a nice finish, consider cutting the ends of your shelves at a slight angle (like 5-10 degrees) so they look like they’re getting narrower at the top, adding to the tree shape. However, straight cuts work perfectly fine too if you prefer simplicity.
Assembling the Tree Shape
This is where your shelf starts to take form. You will attach the shelf pieces to the side pieces. The key is to position them so they appear as tiers of a tree.
Let’s plan the placement for our three-tier shelf:
- Start with your two long side pieces. Lay them flat on your work surface, parallel to each other.
- Mark where each shelf will attach. For a tree shape, the shelves should be higher up on one side and lower down on the other, creating an offset. Imagine a diagonal line from the top of one side to the bottom of the other – this is roughly where the shelves will sit.
- For the bottom shelf, measure up a certain height from the bottom of both side pieces (e.g., 4 inches).
- For the middle shelf, measure higher (e.g., 12 inches up from the bottom).
- For the top shelf, measure even higher (e.g., 20 inches up from the bottom).
- Ensure your marks are level across both side pieces for each shelf.
Now, you’ll attach the shelves. Apply wood glue to the ends of one shelf piece. Position it against your marks on one of the side pieces.
Drill pilot holes through the side piece into the end of the shelf. Then, secure it with wood screws. Repeat this for the other end of the shelf, attaching it to the second side piece.
Make sure the shelf is level. Do this for all three shelves. This creates the basic structure of your tree shelf.
Adding Stability and Finishing Touches
Once the main shelves are attached, you might want to add a base for extra stability, especially if it will hold heavier items or if you have young children or pets. A simple base could be an X-shape made from two pieces of wood, or a solid square at the bottom. Attach this securely to the bottom of the side pieces.
Next, it’s time for sanding. Go over all the surfaces with medium-grit sandpaper to smooth out any rough edges or imperfections. Then, use fine-grit sandpaper for a really smooth finish.
This step is important for safety and for how your paint or stain will look. If you plan to paint or stain, do it now. Apply your chosen finish evenly.
You might need two coats for good coverage. Once it’s dry, you can apply a sealant to protect the wood and make it more durable. This is how to make a wooden Christmas tree shelf display that is ready for decorating!
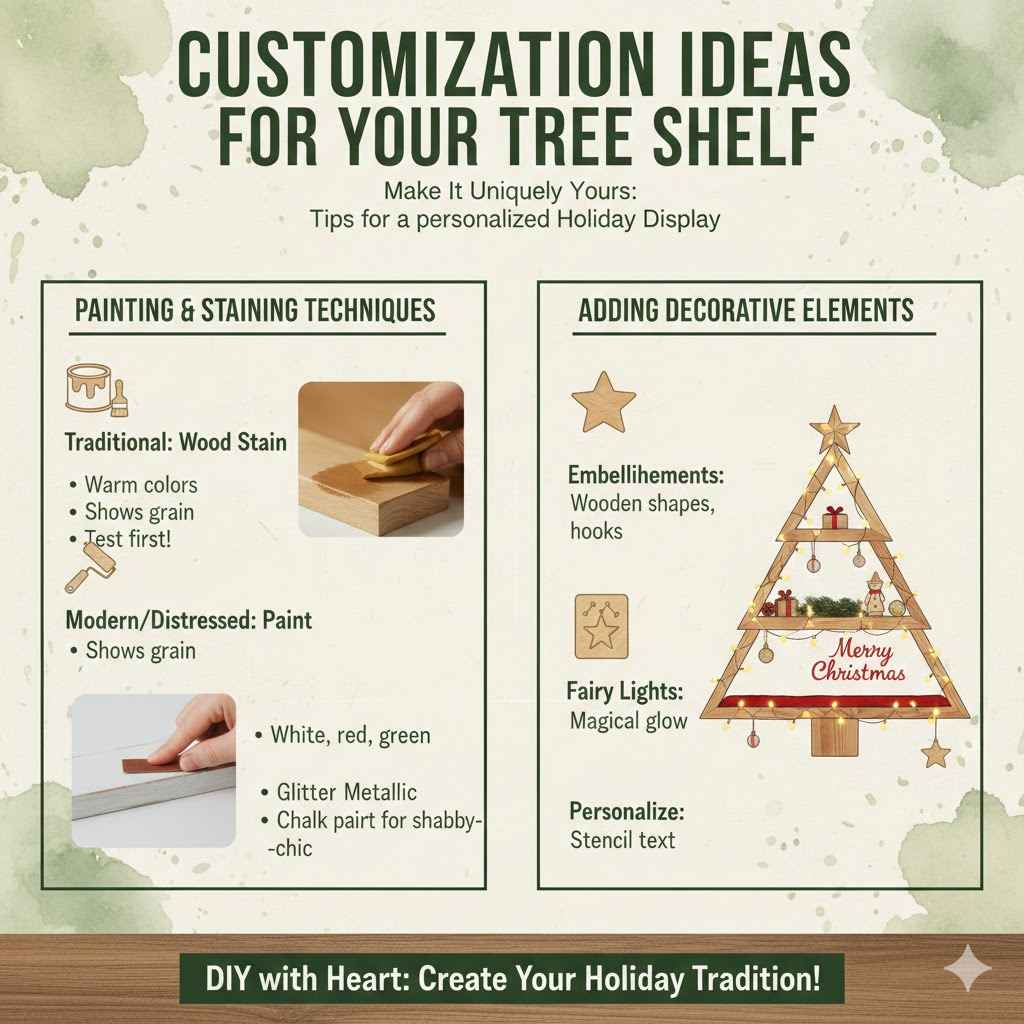
Customization Ideas for Your Tree Shelf
The beauty of making your own wooden Christmas tree shelf is that you can make it exactly how you like it. The basic design is very adaptable. You can change the number of tiers, the width of each shelf, and the overall height to fit your specific needs and style.
For instance, if you have a lot of small ornaments, you might want more shelves or wider shelves. If you only have a few special pieces, a smaller, more compact design might be better.
Painting and Staining Techniques
The finish you choose can dramatically change the look of your wooden Christmas tree shelf. For a traditional look, a warm wood stain can highlight the natural beauty of the wood grain. You can choose light oak, rich walnut, or even a festive cherry color.
Applying stain is usually as simple as wiping it on with a cloth and then wiping off the excess. Always test your stain on a scrap piece of wood first to see how it looks.
If you prefer a bolder look, paint is a great option. White is a classic Christmas color that makes ornaments pop. You could also go with festive red, green, or even a glittery silver or gold.
For a distressed or shabby-chic look, paint your shelf and then lightly sand some edges to reveal the wood underneath. Chalk paint is excellent for this. Make sure to seal your paint job with a clear coat for durability.
Adding Decorative Elements
Once your shelf is built and finished, you can add extra decorative touches to make it even more special. Consider adding small embellishments like wooden stars, snowflakes, or even tiny painted Christmas trees to the sides or shelves. You could also attach small hooks to the sides for hanging lightweight ornaments.
Another idea is to wrap battery-operated fairy lights around the entire shelf for a magical glow during the evening.
If you have any lettering skills, you could stencil “Merry Christmas” or “Happy Holidays” onto one of the shelves or the base. For a very simple yet effective touch, consider lining the shelves with festive fabric or felt before placing your items. These small additions can transform a simple wooden shelf into a unique and personalized holiday centerpiece.
Frequently Asked Questions
Question: What is the easiest wood to use for a beginner DIYer
Answer: Pine wood is generally considered the easiest and most budget-friendly option for beginners. It’s lightweight, soft, and easy to cut, drill, and sand.
Question: Do I need a lot of tools to make this shelf
Answer: No, you can make a basic wooden Christmas tree shelf with common household tools like a saw, drill, measuring tape, and sandpaper. Power tools can make it faster but are not always essential.
Question: How can I make the shelf more stable
Answer: You can add a wider base, a sturdier base design like an X-shape, or ensure all screws are securely fastened. For very heavy items, consider using thicker wood or adding support brackets.
Question: Can I paint the shelf if I don’t like the wood color
Answer: Absolutely. Painting is a great way to customize your shelf. Make sure to sand the wood first for the paint to adhere well.
You can use acrylic paints, chalk paints, or even spray paints.
Question: How do I attach the shelves to the sides
Answer: The most common method is to use wood glue for adhesion and wood screws for strength. Drill pilot holes first to prevent the wood from splitting, then drive the screws through the side pieces into the ends of the shelf pieces.
Final Thoughts
You have now learned how to make a wooden Christmas tree shelf display. This project is simple and rewarding for any skill level. You can customize its size and appearance easily.
Remember to choose your wood, gather your tools, and follow the steps carefully. The process involves cutting your wood pieces, assembling them into a tree shape, and adding finishing touches like sanding and decorating. Your handmade shelf will add a special charm to your holiday decor this year and for many years to come.