How To Open Outdoor Light Fixture: Essential Guide
Quick Summary:
Opening an outdoor light fixture to change a bulb is a straightforward DIY task. This guide provides simple, safe steps for accessing the bulb, covering common fixture types and essential tools, ensuring you can easily maintain your outdoor lighting with confidence.
Hello there, fellow home improvers! Md Meraj here. Ever find yourself staring at a dark outdoor light, needing to swap out a bulb, but feeling a bit stuck on how to actually get into the fixture? You’re not alone! Many of us have been there, wondering if we need special tools or if we might break something. It can be a little frustrating when a simple task like changing a light bulb feels like a puzzle.
But don’t worry! Today, we’re going to break down exactly how to open most common outdoor light fixtures. It’s much simpler than you might think, and with a few basic tools and these easy-to-follow steps, you’ll be changing bulbs like a pro in no time. We’ll cover safety first, then walk through the process, so you can keep your porch, patio, and pathways beautifully lit.
Let’s get your outdoor lights shining bright again!
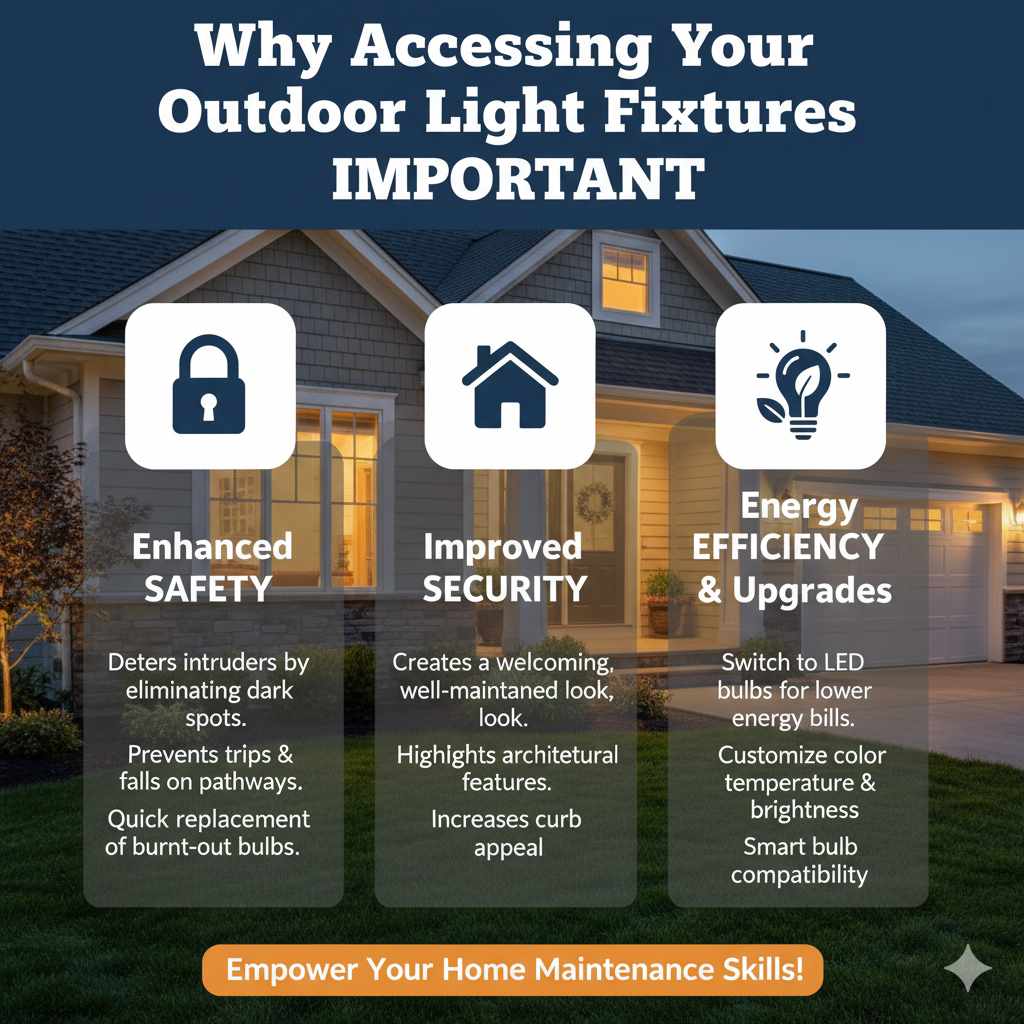
Why Accessing Your Outdoor Light Fixtures is Important
Keeping your outdoor lights in good working order is more than just about aesthetics; it’s about safety, security, and even energy efficiency. When a bulb burns out, it leaves a dark spot that can feel unwelcoming and potentially reduce the security of your home. Being able to easily access your fixtures means you can replace bulbs promptly, ensuring your property is well-lit and inviting.
Furthermore, sometimes you might want to upgrade to a more energy-efficient bulb, like an LED, or perhaps a bulb with a different color temperature. Knowing how to open your fixtures allows you to make these simple upgrades yourself, saving you the cost of a handyman and giving you the satisfaction of doing it yourself. It’s a small skill that adds a lot of value to your home maintenance toolkit.
Safety First: Essential Precautions Before You Start
Before we dive into opening any fixture, safety is our absolute top priority. Working with electricity, even in simple tasks like changing a bulb, requires respect and caution. Following these steps will ensure you stay safe and avoid any unwanted surprises.
- Turn Off the Power: This is the most critical step. Locate the light switch that controls the fixture and turn it OFF. For an extra layer of safety, you can also go to your home’s electrical panel (breaker box) and switch off the breaker that controls the outdoor lighting circuit. If you’re unsure which breaker it is, it’s best to turn off the main breaker, though this will cut power to your entire house.
- Let it Cool Down: Outdoor light bulbs, especially those that have been on recently, can get very hot. Give the bulb and the fixture ample time to cool down completely before you attempt to touch them. This usually takes about 15-20 minutes after turning off the power.
- Use a Sturdy Ladder or Step Stool: If your fixture is out of reach, use a stable ladder or step stool. Ensure it’s placed on a level surface and that you maintain three points of contact (two feet and one hand, or two hands and one foot) while working. Never overreach.
- Wear Protective Gear: Consider wearing safety glasses to protect your eyes from any dust or debris that might fall, and gloves can provide a better grip and protect your hands.
- Check for Damage: Before you start, quickly inspect the fixture and wiring for any obvious signs of damage, like frayed wires or cracked housing. If you see any damage, it’s best to stop and call a qualified electrician.
Essential Tools You’ll Need
For most outdoor light fixture tasks, you won’t need a complicated toolkit. Here are the common items that will make the job easier and safer:
- Screwdriver Set: A basic set with Phillips head and flathead screwdrivers is usually sufficient. Many fixtures use Phillips head screws.
- Pliers: Needle-nose pliers can be helpful for gripping small parts or wires if necessary.
- Gloves: For grip and protection.
- Safety Glasses: To protect your eyes.
- Sturdy Ladder or Step Stool: If the fixture is out of reach.
- Replacement Bulb: Make sure you have the correct type and wattage for your fixture. Check the old bulb or the fixture’s label for specifications.
- Soft Cloth or Paper Towels: For cleaning.
Common Outdoor Light Fixture Types and How to Open Them
Outdoor light fixtures come in various designs, but most can be opened using similar principles. The key is to identify how the glass or cover is secured to the fixture base.
1. Globe or Caged Fixtures
These are very common, often seen on porches and near doorways. They typically have a glass globe or a protective cage around the bulb.
How to Open:
- Identify Securing Screws/Knobs: Look for screws or thumbscrews around the base of the globe or cage, where it meets the main fixture body. There are usually three or four of these.
- Loosen and Remove: Using your screwdriver or by hand (if they are thumbscrews), carefully loosen these screws. You don’t usually need to remove them completely; just loosen them enough so the globe or cage can detach. Some designs might require you to unscrew a retaining ring at the very bottom of the fixture.
- Lower the Globe/Cage: Gently lower the globe or cage. It might be attached by a wire, so be careful not to let it hang too far and strain the connection.
- Replace Bulb: With the globe/cage lowered, you’ll have access to the bulb. Unscrew the old bulb counter-clockwise and screw in the new one clockwise until snug.
- Reassemble: Carefully lift the globe/cage back into place, align the screw holes, and tighten the screws or thumbscrews securely, but don’t overtighten.
2. Flush-Mount or Semi-Flush Fixtures
These fixtures are mounted directly to the ceiling or wall and often have a glass or plastic cover that’s held in place by a metal band or clips.
How to Open:
- Locate Retaining Clips or Screws: Examine the edge of the fixture cover. You might see small clips that press inward, or small screws along the rim.
- Release Clips or Loosen Screws: If there are clips, gently press them inward and the cover should drop slightly. If there are screws, loosen them with your screwdriver until the cover can be removed. Some designs have a central decorative nut or cap that needs to be unscrewed first.
- Carefully Remove Cover: Once the clips are released or screws are loosened, carefully pull the cover down and away from the fixture. It might be attached by a wire, so handle it gently.
- Change Bulb: Access the bulb socket and replace the bulb.
- Reattach Cover: Align the cover, secure it with the clips or screws, and ensure it’s firmly in place.
3. Wall Lanterns with a Removable Backplate
Some decorative wall lanterns have a glass enclosure that swings open or has a removable backplate for bulb access.
How to Open:
- Look for a Hinge or Latch: Many of these lanterns are designed to swing open. Look for a small latch or hinge mechanism, often at the top or side.
- Open the Door: Release the latch and gently swing the lantern door open.
- Alternative: Removable Back: If it doesn’t swing open, check if there are screws holding the entire glass assembly to a metal backplate that’s attached to the wall. In this case, you might need to unscrew the glass assembly from the backplate. This type is less common for simple bulb changes and might be more for full fixture replacement.
- Change Bulb: With the lantern open, you can easily access and change the bulb.
- Close and Secure: Close the lantern door and ensure the latch is secured.
4. Post Lights and Pathway Lights
These are typically found in gardens or along driveways. They often have a cap or housing that lifts off.
How to Open:
- Identify Securing Screws: Look for screws around the base of the light’s cap or housing, where it connects to the pole or the glass enclosure.
- Loosen Screws: Use your screwdriver to loosen these screws.
- Lift Off the Cap/Housing: Once loosened, you should be able to lift the cap or housing straight up and off.
- Replace Bulb: Access the bulb and swap it out.
- Reassemble: Place the cap/housing back on and tighten the screws.
Troubleshooting Common Issues
Sometimes, things don’t go as smoothly as planned. Here are a few common snags and how to handle them:
- Stuck Bulb: If a bulb is old and seems stuck, try gently wiggling it. A tiny bit of penetrating oil (applied carefully away from the electrical contacts) can sometimes help, but it’s often better to use a rubber glove for a better grip. Never force it aggressively, as it could break. If it’s really stuck, consider using a specialized broken bulb extractor tool.
- Corroded Screws: Outdoor fixtures can be exposed to the elements, leading to rusted or corroded screws. Apply a penetrating lubricant like WD-40 and let it sit for a while before trying to unscrew them. A wire brush can help clean around the screw head first.
- Loose Fixture Base: If the entire fixture feels loose on the wall or ceiling, check the mounting screws. If they are stripped, you might need to use slightly larger screws or fill the old screw holes with wood filler or epoxy before re-drilling.
- Water Intrusion: If you notice water inside the fixture, it means the seals are compromised. After changing the bulb, check for any gaps in the glass or housing. You can often use a silicone sealant designed for outdoor use to seal any cracks or gaps around the edges where water might enter. Ensure the fixture is designed for outdoor use and is properly rated for its location (e.g., damp-rated or wet-rated). For more on outdoor lighting ratings, check out resources from the U.S. Department of Energy.
When to Call a Professional
While most outdoor light fixture maintenance is DIY-friendly, there are times when it’s best to call in a qualified electrician:
- Signs of Electrical Damage: If you see sparks, smell burning, or notice frayed or damaged wiring, stop immediately and call a professional.
- Persistent Flickering: If the light flickers even after changing the bulb and ensuring it’s screwed in properly, there might be an issue with the socket, wiring, or even the circuit.
- Water in the Fixture (Severe): If water is pooling inside the fixture and you can’t identify or fix the source of the leak, it’s a safety concern.
- Complex Fixtures: Some high-end or integrated LED fixtures might have more complex wiring or components that are best left to experts.
- Uncertainty: If at any point you feel uncomfortable or unsure about what you’re doing, it’s always safer to call a professional. Your safety is paramount.
A Quick Guide to Outdoor Lighting Types and Durability
Understanding the different types of outdoor lighting and their typical durability can help you choose the right fixtures and know what to expect when performing maintenance. Here’s a simple table:
| Fixture Type | Common Locations | Typical Durability | Ease of Bulb Access |
|---|---|---|---|
| Wall Sconces/Lanterns | Porches, garages, entryways | Good to Excellent (depends on material) | High |
| Flush/Semi-Flush Mount | Covered patios, overhangs | Good (often plastic or metal) | Medium to High |
| Post Lights | Driveways, pathways, gardens | Good to Very Good (metal construction) | High |
| Pathway Lights | Garden paths, flower beds | Fair to Good (often plastic or aluminum) | Medium (some require removing the top) |
| Floodlights/Security Lights | Perimeter, large areas | Very Good (robust construction) | High (designed for frequent changes) |
When selecting outdoor fixtures, look for materials like solid brass, copper, aluminum, or high-quality steel, as these tend to withstand the elements better than plastic. Also, pay attention to the fixture’s rating for water and dust resistance (e.g., IP ratings). For more detailed information on lighting efficiency and types, the Energy Spark website offers great insights into IP ratings.
Maintaining Your Outdoor Light Fixtures for Longevity
To ensure your outdoor light fixtures last as long as possible and continue to look good, a little regular maintenance goes a long way. Think of it like caring for your favorite tools!
- Regular Cleaning: Periodically wipe down the fixtures with a damp cloth to remove dust, dirt, and cobwebs. For glass or plastic covers, a mild soap and water solution can help keep them clear and bright.
- Check Seals: Make sure any rubber or silicone seals around the glass covers are intact and not cracked or brittle. Damaged seals are a common entry point for moisture.
- Tighten Hardware: Once or twice a year, give all visible screws and mounting hardware a gentle check to ensure they are snug. Vibration or temperature changes can cause them to loosen over time.
- Inspect for Corrosion: Especially in coastal or high-humidity areas, keep an eye out for signs of corrosion on metal parts. Minor corrosion can sometimes be cleaned with a metal polish.
- Consider LED Bulbs: If you haven’t already, switching to LED bulbs is a fantastic upgrade. They use significantly less energy, last much longer (reducing how often you need to open the fixture!), and are more resistant to vibration and temperature fluctuations. Many are also designed to be more durable in outdoor conditions.

Frequently Asked Questions (FAQ)
Q1: How do I know if the power is truly off before I start?
A1: The best way is to flip the light switch to the OFF position and then try to turn the light on. If it doesn’t turn on, the switch is likely off. For absolute certainty, turn off the corresponding breaker in your electrical panel. If you’re unsure which breaker it is, you can turn off the main breaker, but remember this cuts power to your whole home.
Q2: My fixture has a glass globe that seems glued on. What do I do?
A2: Most outdoor fixture globes aren’t glued. They are usually held by screws, a retaining ring, or clips. Carefully examine the base and edges of the globe for any signs of these fasteners. Sometimes, the “glue” appearance might be dried-on debris or sealant that can be carefully chipped away with a plastic scraper, but always ensure the power is off and proceed with caution.
Q3: Can I use any bulb in my outdoor fixture?
A3: No, you should always check the fixture’s maximum wattage rating and the recommended bulb type (e.g., incandescent, LED, CFL). Using a bulb with too high a wattage can overheat the fixture and create a fire hazard. Also, ensure the bulb is suitable for outdoor use if it will be directly exposed to the elements.
Q4: What if the screws are really hard to turn or strip?
A4: If screws are stiff, a penetrating lubricant (like WD-40) can help. Let it soak in for a bit. If a screw head starts to strip, stop using the screwdriver and try a rubber band placed between the screwdriver tip and the screw head for better grip, or consider using a screw extractor tool designed for stripped screws. If all else fails, you might need to carefully drill out the screw, but this is a last resort and may require professional help.
Q5: How often should I change the bulbs in my outdoor lights?
A5: This depends heavily on the type of bulb. Incandescent bulbs might last 1,000-2,000 hours. Halogen bulbs are similar. CFLs can last 6,000-15,000 hours. LEDs are the longest-lasting, often rated for 25,000-50,000 hours or more. For most outdoor lights, you’ll likely change bulbs once every few years, or even less if you use LEDs.
Q6: Can I clean the inside of the fixture while the power is off?
A6: Yes, absolutely! Once the power is off and the fixture has cooled, it’s a great time to gently wipe down the inside of the fixture, the socket area, and the cover with a dry or slightly damp cloth to remove any dust or insect debris. Make sure everything is completely dry before reassembling and turning the power back on.
Conclusion
There you have it! Opening and maintaining your outdoor light fixtures is a perfectly achievable DIY task that can be done safely and efficiently with just a few common tools and a little patience. By following the safety precautions, understanding the different types of fixtures, and knowing how to access them, you can easily replace bulbs, perform routine cleaning, and keep your home’s exterior well-lit and secure.
Remember, safety always comes first. If you ever feel unsure or encounter a problem that seems beyond your comfort level, don’t hesitate to call a qualified electrician. But for most bulb changes and basic upkeep, you’ve now got the knowledge to tackle it yourself. Happy lighting!