How to Program LED Light Strips: Genius Guide
Quick Summary (Top of Article)
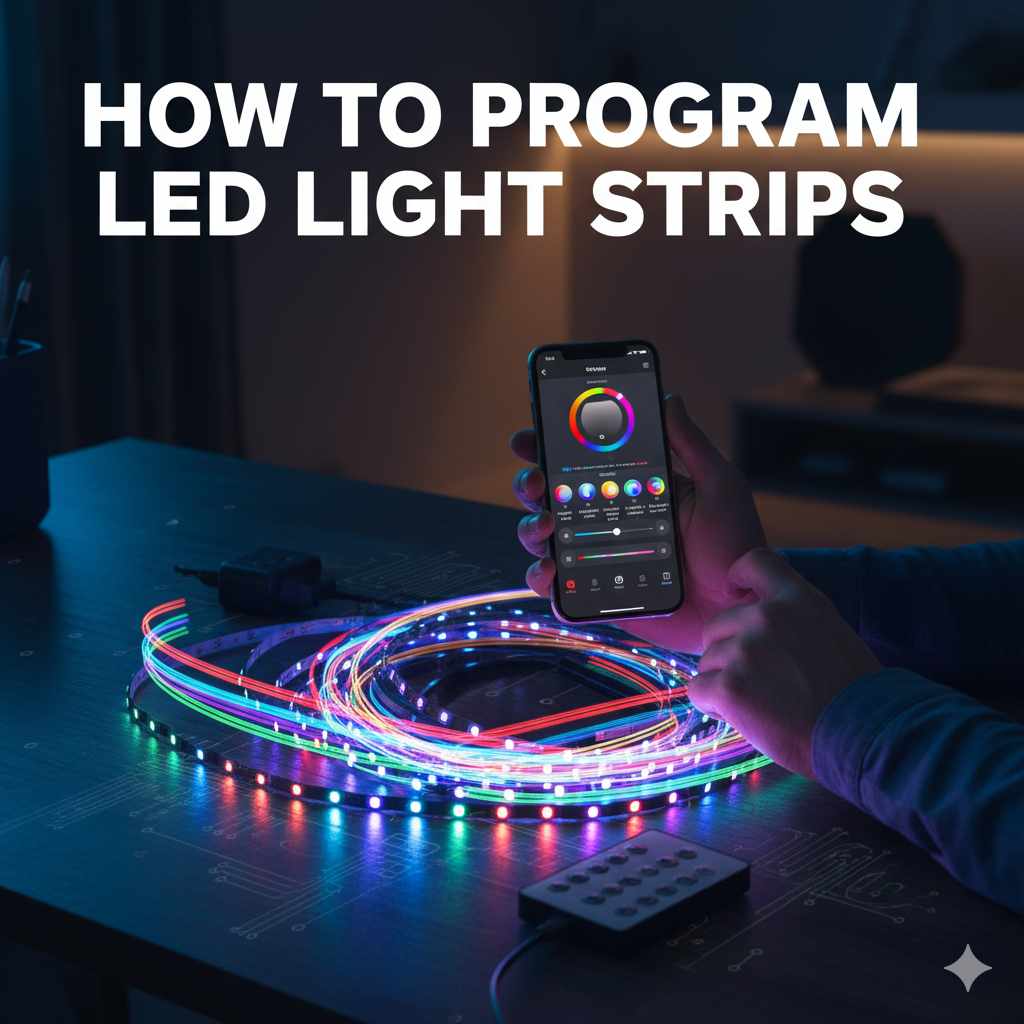
Programming LED light strips is surprisingly simple! With the right controller and a bit of guidance, you can create custom lighting effects, set schedules, and sync them to music. This guide breaks down the process into easy steps, making your LED lighting projects a breeze.
Ever look at those amazing, color-changing LED light strips and wonder how they do all those cool tricks? Maybe you’ve bought some yourself, only to find yourself staring at a tangle of wires and a remote with more buttons than you know what to do with. It’s a common feeling! But don’t worry, getting your LED light strips to do exactly what you want is totally achievable, even if you’re new to this. Think of it like learning to use a new tool; with a little patience and clear instructions, you’ll be creating stunning light displays in no time. We’re going to walk through this together, step by step, so you can bring your lighting ideas to life. Get ready to light up your space like never before!
Understanding Your LED Light Strip System
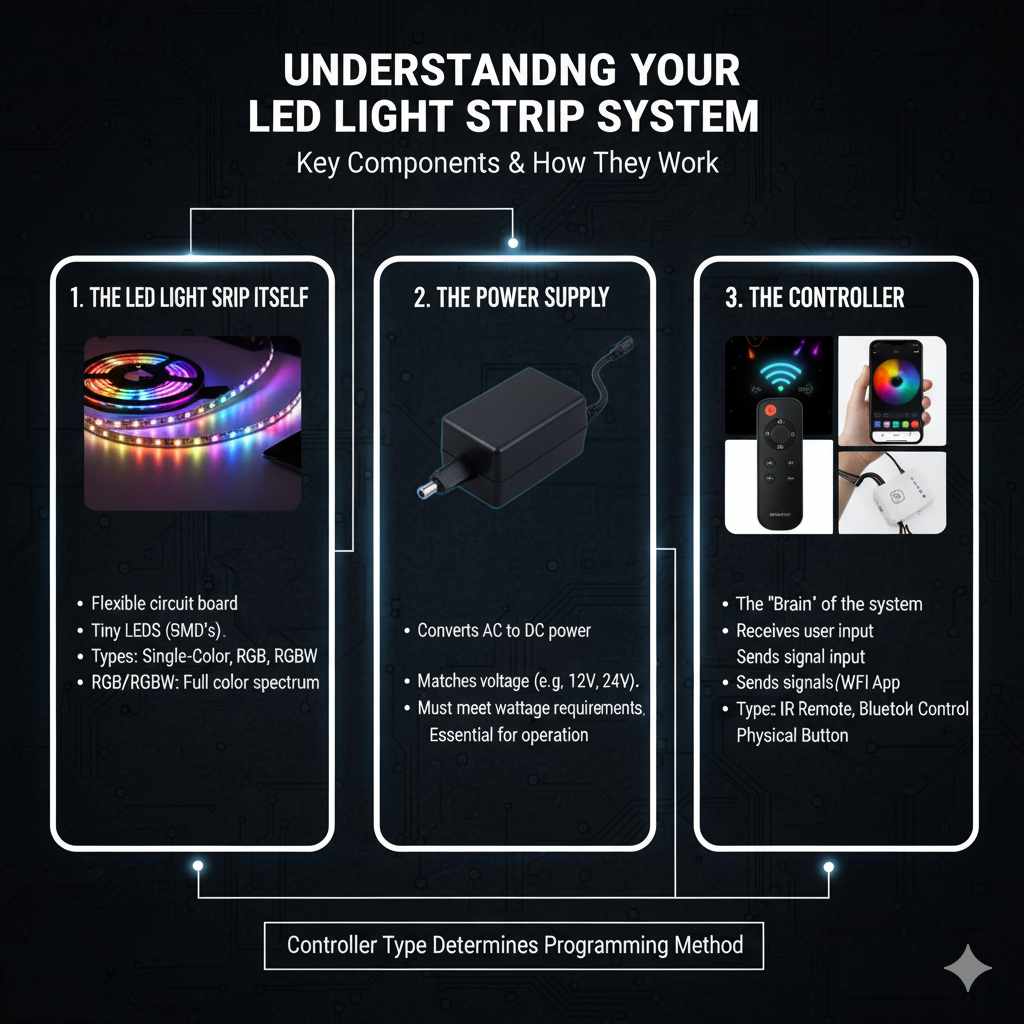
Before we dive into programming, let’s get a handle on the basic parts of your LED light strip setup. Most systems have three main components:
- The LED Light Strip Itself: These are the flexible strips with tiny LEDs on them. They come in different types, like single-color, RGB (Red, Green, Blue), and RGBW (Red, Green, Blue, White). RGB and RGBW offer a whole spectrum of colors, while single-color strips just change brightness.
- The Power Supply: This is what gives your light strips the juice they need to work. It converts your home’s electricity into the right voltage for the LEDs. Make sure it’s the correct wattage and voltage for your specific strip.
- The Controller: This is the “brain” of the operation! It tells the LEDs what color to be and how to change. Controllers vary a lot, from simple remotes to smart devices you can control with your phone or voice.
The type of controller you have will determine how you program your lights. We’ll cover the most common types.
Types of LED Light Strip Controllers
The way you program your lights depends heavily on the controller you’re using. Here’s a quick rundown of the most popular options:
1. Basic Infrared (IR) Remote Controllers
These are often the simplest and most affordable controllers. They usually come with a small remote that has buttons for colors, brightness, and pre-set effects like fading or flashing.
- How they work: You point the remote at a small sensor on the controller, and it sends infrared signals to change the light settings.
- Programming: Programming with these is mostly about selecting from pre-set options. You can usually adjust speed and brightness for these effects. True “programming” in the sense of creating your own sequences is limited, but they offer a great starting point for basic color changes and simple animations.
- Pros: Very easy to use, inexpensive, no Wi-Fi or app needed.
- Cons: Limited customization, requires line-of-sight to the sensor, effects are pre-programmed.
2. Radio Frequency (RF) Remote Controllers
Similar to IR remotes, but they use radio waves instead of infrared. This means you don’t need to point the remote directly at the sensor.
- How they work: The remote sends RF signals to the controller, which then adjusts the LEDs.
- Programming: Like IR remotes, programming is usually about selecting from a set of pre-programmed modes and colors. Some higher-end RF remotes might offer slightly more control over speed and transitions.
- Pros: No line-of-sight required, good range, still quite simple.
- Cons: Still limited in creating custom patterns, effects are pre-set.
3. Wi-Fi/Bluetooth Controllers with Smartphone Apps
This is where things get really interesting for programming! These controllers connect to your home Wi-Fi or your phone via Bluetooth, and you use a dedicated app to control them.
- How they work: The app on your smartphone communicates with the controller, allowing for a wide range of customization.
-
Programming: This is where you can truly program your lights. Most apps allow you to:
- Create custom color palettes.
- Design your own dynamic effects (e.g., a gentle wave of color, a pulsing effect, a rainbow cycle).
- Set schedules for your lights to turn on/off or change colors.
- Sync lights to music (many apps have built-in microphones or can use your phone’s mic).
- Group multiple light strips together for synchronized control.
- Pros: Extensive customization, remote control via phone, scheduling, music sync, often voice control compatible (e.g., with Alexa or Google Assistant).
- Cons: Requires a smartphone and Wi-Fi/Bluetooth connection, can be more complex to set up initially, app quality varies.
For this guide, we’ll focus on programming with the more advanced Wi-Fi/Bluetooth controllers, as they offer the most creative freedom.
Step-by-Step Guide: Programming Your LED Light Strips
Let’s get hands-on! We’ll assume you have a Wi-Fi or Bluetooth controllable LED light strip system. If you have a simpler IR or RF remote, you’ll mostly be experimenting with the buttons on the remote itself.
Step 1: Gather Your Supplies
Before you start, make sure you have everything ready:
- Your LED light strip kit (including the strip, power supply, and controller).
- Your smartphone or tablet.
- Your home Wi-Fi network name and password (if using a Wi-Fi controller).
- The manufacturer’s recommended app downloaded from your app store.
Step 2: Set Up Your Hardware
This is the physical setup part:
- Connect the LED strip to the controller: Ensure the arrow or pin on the LED strip lines up with the corresponding mark on the controller. This is crucial for the colors to display correctly.
- Connect the power supply to the controller: Plug the power adapter into the controller.
- Plug in the power supply: Connect it to a wall outlet. Your LED strip should light up, likely in a default color or mode.
- Position the controller: Place the controller within range of your Wi-Fi router (for Wi-Fi controllers) or within Bluetooth range of your phone. If it has an external antenna, make sure it’s positioned for optimal signal.
Step 3: Download and Install the App
Look for the app name on the product packaging or in the instruction manual. Search for it in the Apple App Store or Google Play Store and download it.
Step 4: Connect the Controller to Your App
This is where the programming magic begins. The exact steps can vary slightly between apps, but here’s a general process:
- Open the app: Launch the downloaded application on your smartphone or tablet.
- Create an account (if required): Some apps will ask you to create a user account.
- Add a new device: Look for an option like “Add Device,” “Add New Light,” or a “+” icon.
- Select your controller type: The app might show a list of compatible devices. Choose the one that matches your controller.
- Pairing mode: The app will guide you on how to put your controller into pairing mode. This often involves pressing a button on the controller or cycling the power.
- Connect to Wi-Fi (if applicable): If it’s a Wi-Fi controller, the app will prompt you to select your home Wi-Fi network and enter the password. Make sure your phone is connected to the same network.
- Bluetooth pairing: If it’s a Bluetooth controller, the app will scan for nearby devices. Select your controller from the list when it appears.
- Confirmation: Once connected, the app should confirm that your device is successfully added. You might be able to rename your light strip (e.g., “Living Room Accent Lights”).
Tip: If you’re having trouble connecting, try resetting the controller (often by holding a button for a few seconds) and restarting the app and your phone. Check the manufacturer’s troubleshooting guide.
Step 5: Exploring the App’s Features (Programming Your Lights!)
Now that your controller is connected, you can start programming! Most apps offer several key sections:
A. Color Selection
This is the most basic form of programming. You’ll typically find:
- Color Wheel/Palette: Tap on a color to set your lights to that specific hue.
- White Light Control: Adjust the brightness and color temperature of white light (from warm yellow to cool blue).
- Custom Color Saving: Many apps let you save your favorite custom colors or create color palettes for easy access.
B. Pre-set Scenes and Effects
Most apps come with a library of dynamic effects. These are pre-programmed animations that you can select and customize:
- Common Effects: Look for options like “Fade,” “Strobe,” “Jump,” “Rainbow,” “Candle,” “Fire,” etc.
- Speed and Brightness Adjustment: For each effect, you can usually adjust how fast it cycles through colors and how bright it is.
- Customizing Effects: Some advanced apps allow you to modify these pre-set effects or even create your own from scratch.
C. Creating Custom Dynamic Effects
This is where you get to be the designer! Many apps provide tools to build your own light shows:
- Segment Control: For addressable LED strips (like WS2812B or SK6812), you can often control individual segments or even individual LEDs. This allows for incredibly complex animations like chasing lights or flowing patterns.
- Color Sequencing: You might be able to define a sequence of colors and the transition between them. For example, you could set it to fade from red to blue, then jump to green, and hold for 3 seconds.
- Animation Tools: Some apps offer visual editors where you can draw or select animation types (like “scrolling,” “pulsing,” “sparkle”) and apply them to specific color sequences.
- Saving Your Creations: Be sure to save your custom effects so you can easily recall them later.
D. Scheduling and Timers
This feature allows your lights to operate automatically:
- Set On/Off Times: Program your lights to turn on at sunset or turn off at bedtime.
- Scheduled Color Changes: Have your lights change to a relaxing color in the evening or a bright color in the morning.
- Sunrise/Sunset Simulation: Some apps can simulate a sunrise by gradually increasing brightness and changing color temperature, helping you wake up more gently.
E. Music Synchronization
Get your lights grooving to the beat!
- Microphone Input: The app can use your phone’s microphone to detect sound and make the lights react.
- Audio Analysis: Some systems analyze the audio input to create more sophisticated light shows that sync with the rhythm and intensity of the music.
- Mode Selection: You can usually choose different reaction modes (e.g., flashing to the beat, changing colors with the music’s mood).
F. Voice Control Integration
If your controller supports it, you can often link it to smart home assistants like Amazon Alexa or Google Assistant.
- Linking Accounts: Follow the instructions in your smart assistant’s app to link your LED controller account.
- Voice Commands: Once linked, you can use commands like “Alexa, set the living room lights to blue” or “Hey Google, dim the bedroom LEDs to 50%.
Step 6: Testing and Refinement
As you experiment, test your creations. Does the color look right? Is the animation speed too fast or too slow? Does the music sync work well? Don’t be afraid to tweak settings until you achieve the exact look and feel you want. This iterative process is key to getting perfect results.
Advanced Programming Concepts (For the Enthusiast!)
Once you’ve mastered the basics, you might be interested in more advanced techniques. These often involve more specialized hardware or software.
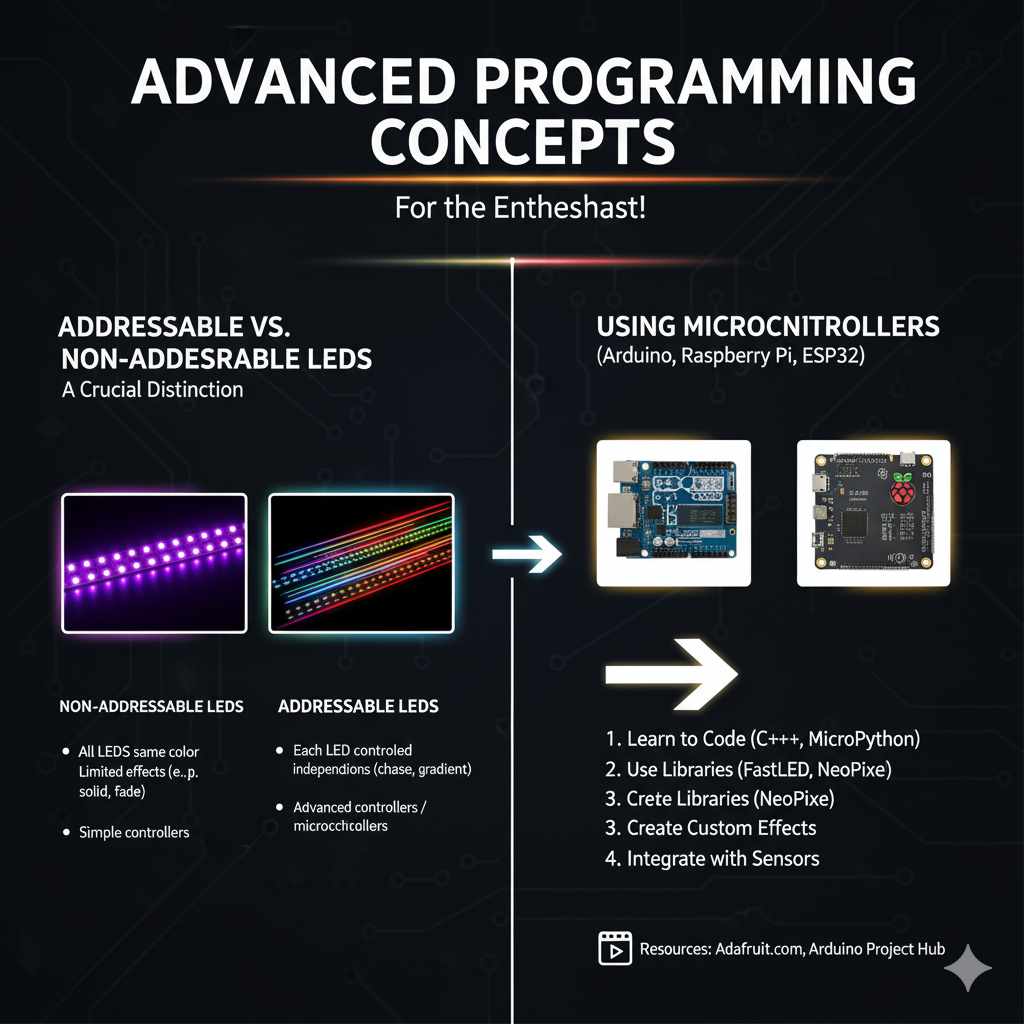
Addressable vs. Non-Addressable LEDs
This is a crucial distinction for advanced programming.
- Non-Addressable LEDs (e.g., RGB strips): All LEDs on the strip are the same color at any given time. You can change the overall color and brightness, but you can’t control individual LEDs.
- Addressable LEDs (e.g., WS2812B, SK6812, APA102): Each LED has its own tiny chip, allowing you to control the color and brightness of every single LED independently. This enables complex effects like chasing lights, gradients, and animations that flow along the strip.
Programming addressable LEDs typically requires a more powerful controller and often uses dedicated software or more advanced app features. For DIY enthusiasts, microcontrollers like Arduino or Raspberry Pi are popular for controlling addressable strips, offering ultimate flexibility. Resources like Adafruit (https://www.adafruit.com/category/129) offer excellent guides and compatible hardware.
Using Microcontrollers (Arduino, ESP32, Raspberry Pi)
For ultimate control, many hobbyists use microcontrollers. These small, programmable computers allow you to write custom code to control your LED strips.
- Learning to Code: You’ll need to learn a programming language, often C++ for Arduino or MicroPython/CircuitPython for ESP32/Raspberry Pi.
- Libraries: There are fantastic open-source libraries (like FastLED or NeoPixel) that simplify controlling addressable LEDs.
- Custom Effects: With coding, you can create virtually any effect imaginable, from complex visualizers to interactive light installations.
- Integration: You can integrate these systems with sensors, buttons, or other devices for even more dynamic control.
This path requires a steeper learning curve but offers unparalleled creative freedom. Websites like the Arduino Project Hub are great places to start learning.
Common Issues and Troubleshooting
Even with the best guide, you might run into a snag. Here are some common problems and how to fix them:
| Problem | Possible Cause | Solution |
|---|---|---|
| LED strip not lighting up. | No power, loose connection, wrong voltage/wattage power supply. | Check all connections. Ensure power supply is plugged in and working. Verify power supply matches LED strip requirements (voltage and wattage). |
| Colors are incorrect or mixed up (e.g., blue looks green). | Incorrect wiring (pinout mismatch), faulty controller, wrong LED type selected in app. | Double-check the arrow/pin alignment between strip and controller. Try a different color in the app to see if it’s consistent. Ensure you’ve selected the correct LED type (e.g., RGB vs. RGBW) in the app settings. |
| App can’t find or connect to the controller. | Controller not in pairing mode, Wi-Fi/Bluetooth issues, controller out of range, app permissions. | Ensure the controller is in pairing mode as per instructions. Restart controller, app, and phone. Make sure your phone is on the correct Wi-Fi band (2.4GHz is usually required). Check app permissions for location/Bluetooth. Try moving closer to the controller. |
| Lights flicker or behave erratically. | Poor power connection, insufficient power supply, faulty controller, interference. | Secure all connections. Ensure your power supply has enough wattage for the length of your strip. Try a different power outlet. If using addressable LEDs, check the data signal integrity. |
| Remote not working. | Battery dead, out of range, line-of-sight blocked (IR remotes). | Replace remote battery. Move closer to the controller. For IR, ensure a clear path. For RF, try moving around to find a better signal. |
If you’re still stuck, consult the manufacturer’s specific troubleshooting guide or their customer support. Reputable brands often have excellent online resources.
Frequently Asked Questions (FAQ)
Q1: Do I need to be an expert to program LED light strips?
A: Absolutely not! For most common Wi-Fi or Bluetooth controlled strips, the apps are designed to be user-friendly. You’ll find intuitive color pickers, pre-set modes, and simple scheduling options that require no technical background. It’s more about exploring what the app offers.
Q2: What’s the difference between RGB and RGBW LED strips?
A: RGB stands for Red, Green, and Blue. By mixing these three colors, you can create millions of other colors. RGBW strips have an additional dedicated White LED. This means you can achieve a purer white light and more nuanced pastel colors compared to RGB strips, which have to mix R, G, and B to create white (which often looks slightly bluish or off-white).
Q3: Can I control multiple LED light strips at once?
A: Yes! Most modern apps allow you to group multiple controllers or strips together. You can then control them all simultaneously, ensuring they all display the same color or effect. This is perfect for synchronizing lights across a room or even different areas of your home.
Q4: How do I make my LED lights react to music?
A: Many app-controlled systems have a music sync feature. You’ll typically find this in the app’s “Modes” or “Scenes” section. You can usually choose to use your phone’s microphone to “listen” to the music and have the lights flash, change color, or pulse in time with the beat.
Q5: Can I program LED strips for outdoor use?
A: Some LED strips are rated for outdoor use (look for an IP rating, like IP65 or higher, which indicates dust and water resistance). However, the controller and power supply are often not weather-proof. You’ll need to ensure these components are protected from the elements, perhaps by placing them in a waterproof junction box or an enclosed, dry area.
Q6: What is an addressable LED strip, and why is it good for programming?
A: An addressable LED strip has individual control over each LED or small segment of LEDs. This allows for complex animations, chasing effects, and custom patterns that are impossible with standard RGB strips where all LEDs are controlled as one unit. It gives you far more creative freedom for programming intricate light shows.
Conclusion
There you have it! Programming your LED light strips is a rewarding way to add personality and ambiance to your home. From simple color changes with a remote to intricate custom light shows controlled by your smartphone, the possibilities are vast. By understanding your system, following the setup steps, and exploring the features of your controller’s app, you’re well on your way to creating stunning lighting effects. Don’t be afraid to experiment – the best way to learn is by doing. So go ahead, get creative, and enjoy the brilliant glow of your newly programmed LED lights!