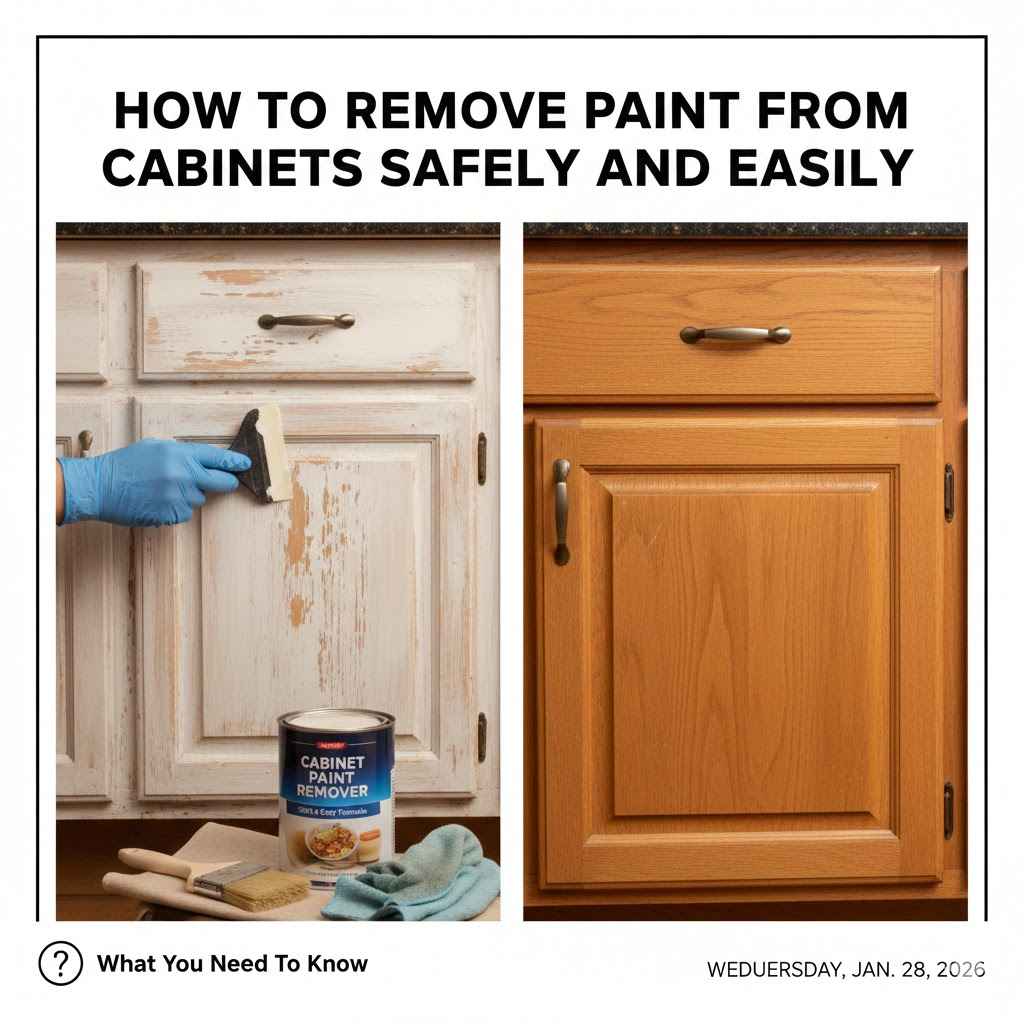
How to Remove Paint From Cabinets Safely and Easily
If you’re looking to refresh your kitchen or bathroom, you might be thinking about painting your cabinets. But, before you do, you need to strip off the old paint, right? Well, the thought of sanding can seem pretty tiring, and it can create a huge mess. Plus, it can be tough for beginners to get the job done without damaging their cabinets. Don’t worry, there’s a better way! This guide will show you How to Remove Paint From Cabinets Without Sanding. Get ready for a simple, step-by-step solution to make your cabinets look new again. Let’s get started!
Choosing the Right Paint Stripper
The first important step in learning How to Remove Paint From Cabinets Without Sanding is choosing the correct paint stripper. There are many options available, and each one works a little differently. Some are strong chemical strippers, while others are safer and more eco-friendly. Choosing the right one depends on your cabinets’ type of paint and the kind of wood. It’s also important to think about the space you’ll be working in, since some strippers have strong smells. Selecting the appropriate stripper will also impact your prep time.
Types of Paint Strippers
There are several types of paint strippers available, each with its own benefits and drawbacks. Knowing the different kinds will allow you to make the best decision for your project. Be sure to carefully read the labels and follow all safety instructions. Safety is key when working with chemicals.
Chemical Strippers: These strippers are typically very effective and are good at removing multiple layers of paint quickly. They often contain harsh chemicals like methylene chloride or N-methylpyrrolidone (NMP), so good ventilation and protective gear are very important when using these strippers. These chemicals can be hard on your skin and eyes, and some have strong fumes. They work by dissolving the bonds in the paint, so it can be scraped away.
To use, you’ll apply the stripper to the cabinet, let it sit for the recommended time (check the label!), and then scrape the softened paint off. You’ll need gloves, eye protection, and a mask to prevent irritation.
Citrus-Based Strippers: These strippers are a more eco-friendly choice. They work slowly but are still effective. Citrus strippers use natural solvents derived from citrus fruits. They are less harsh than chemical strippers and often have a pleasant smell. But they may take longer to work.
Citrus strippers are usually applied in the same way as chemical strippers, but they will require a longer dwell time. The upside is that they are much better for the environment, and they’re less likely to damage your skin or irritate your respiratory system. They are ideal for use indoors.
Soy-Based Strippers: This type of stripper is also environmentally friendly, similar to citrus-based strippers. They’re usually biodegradable and have a mild odor. Soy-based strippers are known for being effective on multiple layers of paint. They are usually easy to apply and can be used in a less ventilated space.
Like the other strippers, you’ll need to wear gloves and eye protection when you use them. Apply the stripper, wait the recommended time, and scrape away the softened paint. Since they are less strong than chemical strippers, they may require a longer dwell time or multiple applications for very old or stubborn paint.
Factors to Consider When Choosing a Stripper
The type of paint stripper you choose depends on several things. You’ll want to think about the type of paint, the cabinet material, and your workspace. This will impact both the effectiveness of the stripper and how safe it is to use. Choosing carefully will make the job much easier, safer, and cleaner.
Paint Type: Some strippers are better at removing certain kinds of paint. For example, some strippers are best for oil-based paints, while others work better on latex paints. Knowing what kind of paint is on your cabinets will help you select the most effective stripper. This also helps you avoid damaging the wood underneath.
Different paints have different chemical compositions. Oil-based paints, for example, have a different bond than latex paints, so they respond differently to the various chemicals in strippers. You may need to experiment on a small, hidden area of the cabinet to see which stripper works best. This will help you know if the stripper damages the cabinet or removes the paint easily.
Cabinet Material: The material of your cabinets matters, too. If your cabinets are made of real wood, you’ll want to choose a stripper that won’t damage the wood. Some strippers can be too harsh for certain types of wood, causing discoloration or even damage to the surface. For cabinets made of MDF or other composite materials, you need to make sure the stripper won’t dissolve the glue.
Some strippers are designed specifically for use on wood, while others are better for metal or other surfaces. If you are not sure what the cabinets are made of, try testing the stripper in a hidden area first. This will help you see how the material reacts to the stripper before you apply it to the whole cabinet.
Ventilation and Safety: Working with paint strippers can be dangerous if the correct safety procedures are not followed. You must think about the safety equipment you need and the kind of ventilation you have. Chemical strippers, in particular, can release harmful fumes. Therefore, good ventilation is extremely important.
Always work in a well-ventilated area. If you’re working indoors, open windows and doors, or use fans to circulate the air. You should also wear gloves, eye protection, and a respirator mask to protect yourself from the fumes and chemicals. When you work with a less toxic stripper, you’ll still need eye protection and gloves, but the need for heavy-duty ventilation may be less.
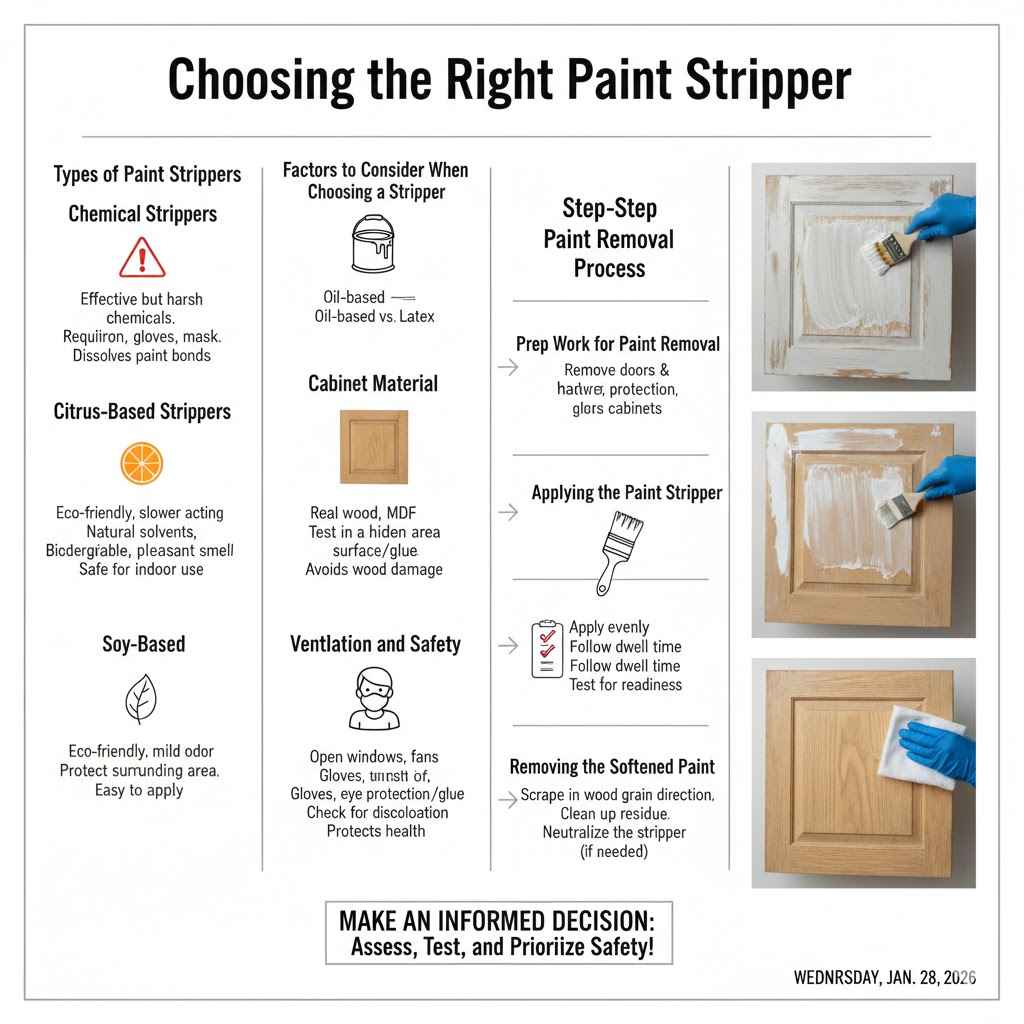
Paint Removal Process
Now that you’ve selected your stripper, let’s learn How to Remove Paint From Cabinets Without Sanding. This process needs care, but with the right steps, you can get great results. Be sure to have all your materials ready before you start.
Prep Work for Paint Removal
Before you begin applying the paint stripper, you need to prepare your cabinets and your workspace. Proper prep work will save you time and make the job easier, and it will also protect your surroundings. This part is vital to ensure that your paint removal job goes smoothly and effectively.
Remove Cabinet Doors and Hardware: Take off all the cabinet doors. This gives you more room to work and helps you to reach all the surfaces. Remove any knobs, handles, and hinges. Place them in a safe location until you’re ready to put them back on. Removing hardware avoids it from being damaged by the stripper.
Remember to label each door and its hardware to make reassembly easier. Consider using tape to label the doors and hardware so you can return them to their original location. You can also take photos before removing anything, so you can see where everything goes.
Protect the Surrounding Area: Lay drop cloths or old newspapers on the floor under your cabinets to protect your floors from paint drips and spills. Cover any nearby surfaces, like countertops, appliances, and walls, with plastic sheeting or painter’s tape to protect them from the stripper. Make sure your workspace is well-ventilated.
Paint stripper can damage surfaces, so protection is important. This step helps prevent damage to your work area and makes cleanup easier. Good ventilation is key to help dissipate any fumes from the stripper.
Clean the Cabinets: Before applying the stripper, clean the cabinet surfaces to remove any dirt, grease, or grime. Use a mild cleaner and warm water, then rinse the cabinets well. This helps the stripper bond to the paint.
Grease and dirt can prevent the stripper from working correctly, so cleaning is a necessary step. Cleaning also allows you to see the original paint layers. After cleaning, let the cabinets dry completely before applying the stripper. This will help you get the best results.
Applying the Paint Stripper
After your prep work is complete, you’re ready to apply the paint stripper. Carefully following the instructions will ensure that the stripper works correctly and your project is a success.
Apply the Stripper: Put on your safety gear: gloves, eye protection, and a mask (if needed). Apply the stripper evenly over the paint on your cabinets using a brush. Follow the manufacturer’s directions for the product, applying a thick enough coat.
Be sure to work in a well-ventilated area. Don’t apply too much, as this may cause the stripper to run or drip. The goal is to cover the entire painted surface. This ensures all the paint will be removed.
Allow the Stripper to Dwell: Let the stripper sit on the paint for the time suggested on the product label. This dwell time allows the stripper to do its job and soften the paint. It may take longer for multiple layers of paint.
This is where patience comes in! The dwell time can vary depending on the product and the type of paint. Don’t rush this process; otherwise, the stripper might not work correctly. Avoid letting the stripper dry out, as this will reduce its effectiveness.
Test for Readiness: After the dwell time, test a small area of the cabinet with a putty knife or scraper to see if the paint has softened. If the paint is bubbling or peeling easily, it’s ready to be removed. If it’s still hard, give the stripper more time to work.
Checking for readiness will save you time. This test area will show you if the paint has softened enough for easy removal. If the paint isn’t ready yet, waiting a bit longer can prevent you from scratching your cabinets and damaging the wood.
Removing the Softened Paint
Now comes the fun part: removing the paint! Take your time to be sure you don’t damage the cabinets. These tips will help you get the best results while keeping your cabinets in good shape.
Scrape Off the Paint: Use a plastic or wooden scraper to remove the softened paint. Start at the top and work your way down. Scrape in the direction of the wood grain to avoid scratches. Scrape carefully to prevent damaging the wood.
Avoid metal scrapers, as they can scratch the wood. If the paint is particularly stubborn, you might need to apply the stripper and repeat the process. Try to remove the paint in long, smooth strokes to avoid leaving any residue.
Clean Up Residue: After removing the bulk of the paint, use a scraper and a shop towel or rag to remove any leftover residue. You may also use a paint scraper for detail work in corners or crevices. Make sure all the paint has been removed before moving to the next step.
Leftover paint residue can interfere with your new paint job. Getting rid of all the residue will help create a smooth surface for painting or staining. This will also ensure a professional finish on your cabinets.
Neutralize the Stripper: Some strippers require a neutralizing agent to stop their action. If your stripper recommends this, apply the neutralizer according to the manufacturer’s instructions. This will prevent the stripper from affecting the new finish you apply.
Neutralizing the stripper is an important step that is often overlooked. This process helps stop the chemical reaction and ensures that your cabinets are ready for painting or staining. Skipping this step can lead to problems with the new finish, such as poor adhesion or bubbling.
Finishing and Painting Your Cabinets
After the paint has been removed, your cabinets will need some prep work before you can paint or stain them. This step ensures that your new finish looks its best and lasts for a long time. Here are some of the steps you can take to make sure your cabinets get a beautiful finish!
Sanding (Lightly!)
Although the goal is How to Remove Paint From Cabinets Without Sanding, a little light sanding can help prepare the surface for a new finish. This can also help to smooth out any imperfections. This also helps the new paint to adhere correctly.
Lightly Sand: If your cabinets are made of wood, a light sanding after removing the paint is key. This helps smooth out any rough patches or remnants of the old finish. Use fine-grit sandpaper (220-grit or higher) for this step. Sanding lightly also helps the new paint adhere better.
Sanding with fine-grit sandpaper won’t remove wood, but it will smooth the surface. Be careful not to sand through any veneer if your cabinets have it. This light sanding will improve the final appearance of your cabinets.
Clean the Surface: After sanding, wipe down the cabinet surfaces with a tack cloth or a damp cloth to remove any dust. A clean surface is very important for the new finish. Dust and debris can keep the paint from sticking to the surface.
A clean surface is necessary for the paint to adhere properly. If you don’t get rid of the dust, it will get in the way and interfere with your new finish. Wiping down the cabinets will help you get a professional look.
Priming, Painting, and Staining
Now that your cabinets are ready, you can start the final steps. Properly priming, painting, or staining your cabinets is essential for a beautiful and long-lasting finish.
Prime the Cabinets: If you’re going to paint your cabinets, priming is an important step. Primer helps the paint stick to the surface and creates a smooth base. Choose a primer that’s suited for your paint type and the cabinet material. Apply a thin, even coat of primer and let it dry completely.
Primer will help the paint adhere better and will seal the surface. This will also help to hide any imperfections and create a uniform finish. Make sure to choose a primer that’s suitable for the type of paint you’re using. Following these steps can help prevent any problems with the paint job.
Paint or Stain: Once the primer is dry, apply your chosen paint or stain. If you’re using paint, apply thin, even coats, letting each coat dry before adding the next one. For stains, apply the stain according to the manufacturer’s instructions, then wipe off the excess.
Thin coats will prevent drips and ensure a smooth, professional finish. Follow the instructions on the paint or stain can. This will ensure that the finish lasts for years to come. This also helps to ensure the best color and coverage.
Seal the Finish: After the paint or stain is dry, consider adding a protective topcoat to seal the finish. This will protect your cabinets from wear and tear. Choose a topcoat that’s suitable for your paint or stain type. Apply the topcoat according to the manufacturer’s instructions.
A topcoat provides an extra layer of protection, which can make your cabinets look great for years. The topcoat can also give your cabinets a beautiful shine. Consider using a clear sealant that will enhance your cabinets.
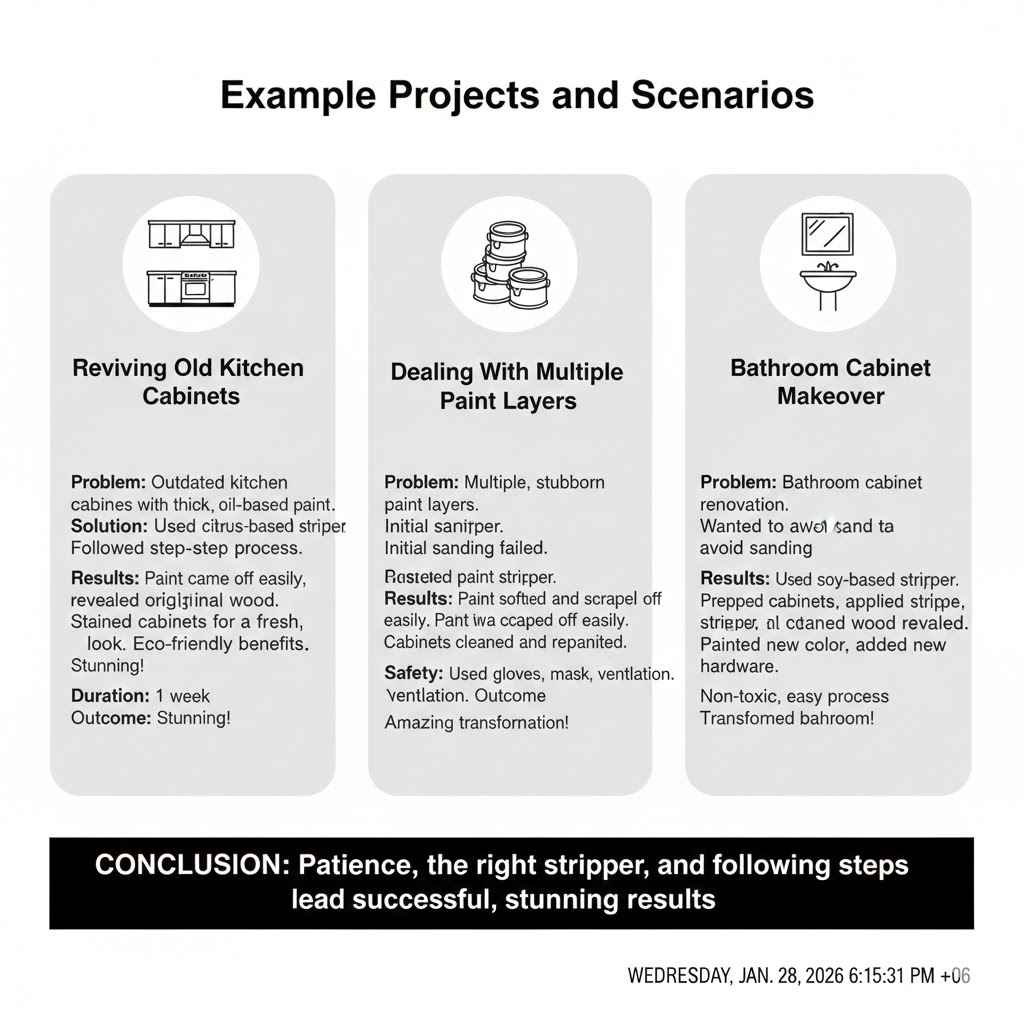
Example Projects and Scenarios
Here are a few real-life examples and scenarios where the steps from above have been used successfully.
Example: Reviving Old Kitchen Cabinets. A homeowner wanted to update their outdated kitchen cabinets. They found that the original paint was a thick, oil-based paint. After trying a few different methods, they decided to try a citrus-based stripper. They followed the steps from above and found that the paint came off easily, revealing the original wood. After cleaning and sanding lightly, they stained the cabinets, giving the kitchen a fresh, new look. The process took about a week, but the results were stunning!
This shows how patience and the right choice of stripper can transform old, tired cabinets. The homeowner also got the benefits of an eco-friendly paint stripper by using citrus-based products.
Scenario: Dealing With Multiple Paint Layers. A person had multiple layers of old paint on their cabinets. After trying to sand, they realized it would take forever. They decided to use a chemical paint stripper. They applied the stripper and waited a long time. The first application did not remove all the layers of paint. However, after a second application, the paint softened enough to be easily scraped off. After some cleaning and a new coat of paint, the cabinets looked amazing.
This shows how multiple applications of paint stripper can be needed, especially with multiple paint layers. It also shows the importance of safety when using chemical strippers.
Case Study: Bathroom Cabinet Makeover. A DIY enthusiast wanted to renovate their bathroom. They chose to learn How to Remove Paint From Cabinets Without Sanding. They selected a soy-based stripper and began the process. After prepping the cabinets and applying the stripper, they carefully scraped off the old paint, revealing the original wood. They then painted the cabinets a new color and added new hardware. The process was easy, and the bathroom was transformed.
This real-world result shows how successful the process can be when you take your time and follow the right steps. It also highlights the advantages of using a non-toxic paint stripper.
Frequently Asked Questions
Question: Can I use a heat gun instead of a paint stripper?
Answer: Yes, heat guns can also be used to remove paint. However, heat guns can be dangerous if not used correctly. They can also damage the wood if you apply too much heat, and they’re less effective on multiple layers of paint.
Question: What’s the best tool for removing paint after applying the stripper?
Answer: A plastic or wooden scraper is ideal for removing paint after using a paint stripper. These tools are gentler on the wood than metal scrapers, which can cause scratches. You can also use a putty knife.
Question: How can I tell if my cabinets have lead paint?
Answer: If your cabinets were painted before 1978, there’s a good chance they contain lead paint. You can use a lead test kit to be sure. These are readily available at most hardware stores. Always take precautions when dealing with lead paint.
Question: How long does it take to remove paint from cabinets without sanding?
Answer: The time it takes varies depending on the type of paint, the stripper used, and the number of layers of paint. The process can take anywhere from a few hours to several days, as you might need multiple applications of the stripper.
Question: What safety precautions should I take when using paint strippers?
Answer: Always wear gloves, eye protection, and a mask. Work in a well-ventilated area to avoid inhaling fumes. Read and follow the manufacturer’s safety instructions carefully. Be careful when scraping and disposing of the paint. Also, wear old clothes and cover your skin.
Final Thoughts
You can certainly achieve beautiful results when learning How to Remove Paint From Cabinets Without Sanding. Removing paint from your cabinets can seem like a tough task, but with the right methods, it can be a rewarding project. Choose the right paint stripper that matches the type of paint on your cabinets, follow the steps carefully, and remember to prepare your space
. From removing the old paint to prepping and finishing your cabinets, each step is necessary for a fresh look. Take your time, be patient, and you’ll find that you can give your cabinets a new lease on life. Go forth and transform your space; your kitchen or bathroom will thank you for it!