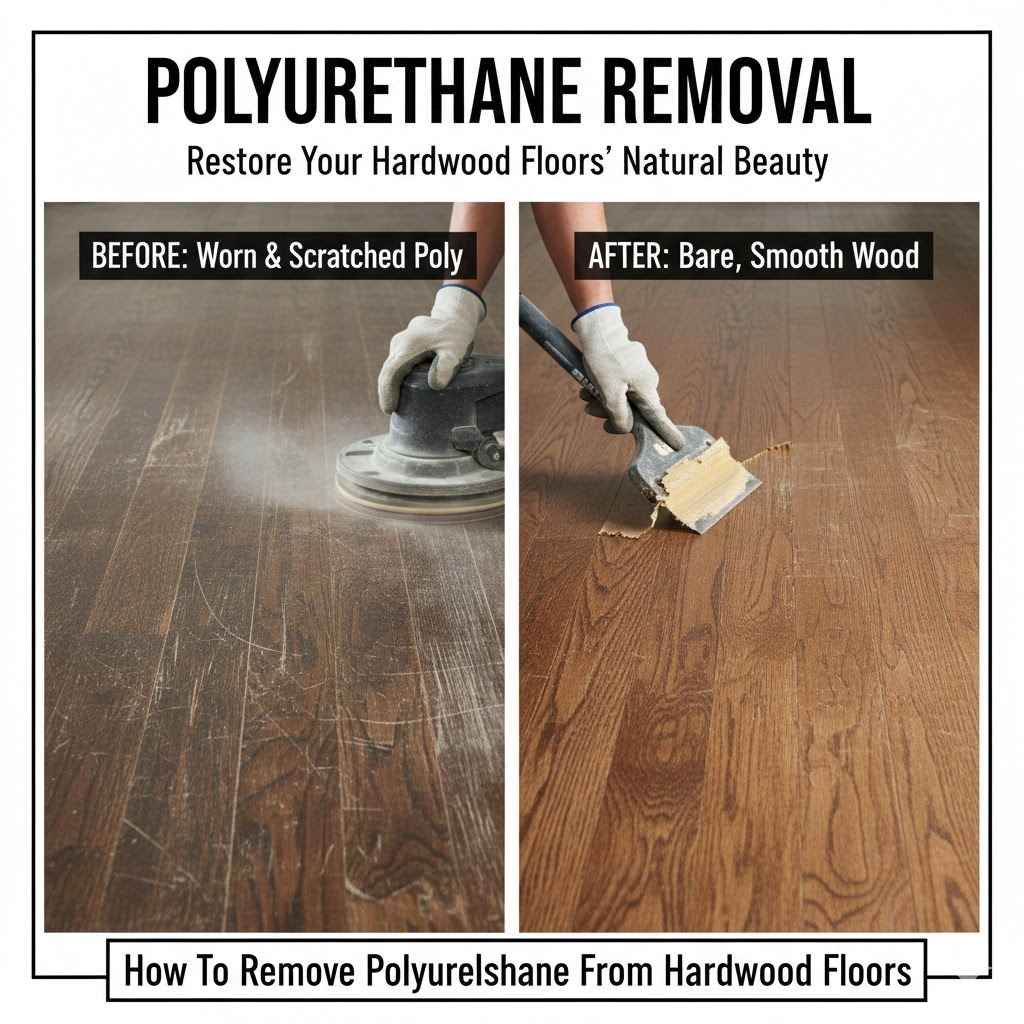
How To Remove Polyurethane From Hardwood Floors
Taking on a DIY project like refinishing your hardwood floors can seem a bit tricky, especially when you’re not sure where to start with removing old finishes. Many people find that figuring out How to Remove Polyurethane from Hardwood Floors is a common stumbling block. It’s a step that many beginners worry about, but don’t stress!
We’ll walk you through it with easy-to-follow steps that will have your floors looking great. Get ready to see how simple this process can be.
Removing Polyurethane From Hardwood Floors Safely
This section focuses on the safe and effective removal of polyurethane from your hardwood floors. It is a critical step before you can apply any new finish or recoat. We will explore different methods, keeping safety and the health of your floors as our top priorities.
Proper preparation here ensures a better final result and avoids damaging the wood.
Understanding Polyurethane Finishes
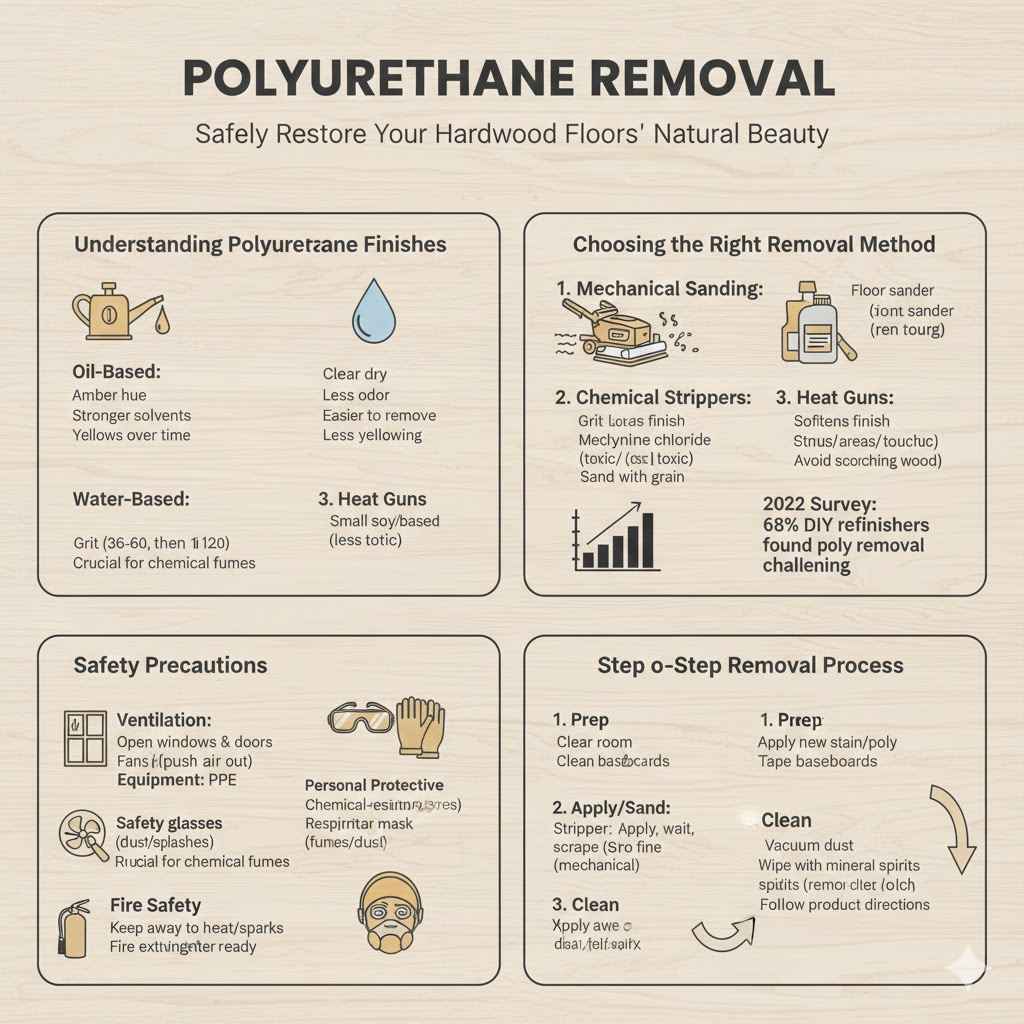
Polyurethane is a popular protective coating for wood floors. It’s known for its durability and resistance to scratches and moisture. There are two main types: oil-based and water-based.
Oil-based polyurethane is known for its amber hue and durability, while water-based polyurethane dries clear and has less odor. Understanding which type you have can help you choose the best removal method.
Oil-based polyurethane typically requires stronger solvents for removal because it is more resistant to chemical breakdown. Its amber color can also yellow over time, making removal necessary for a fresh look.
Water-based polyurethane dries clear and is generally easier to remove than its oil-based counterpart. It is also less prone to yellowing.
Choosing the Right Removal Method
The best method for removing polyurethane depends on the finish’s type and thickness, as well as your comfort level with different tools and chemicals. You can opt for chemical strippers, which dissolve the finish, or mechanical methods, which physically remove it. Sometimes, a combination of both is most effective.
- Mechanical SandingSanding is a very common and effective way to remove polyurethane. It uses abrasive materials to physically grind away the old finish. This method is thorough but can be messy and requires the right equipment.
You’ll need a floor sander, which you can rent from most hardware stores. Start with a coarser grit sandpaper (like 36-60 grit) to break through the polyurethane, then move to finer grits (like 100-120 grit) to smooth the wood surface. It’s important to sand in the direction of the wood grain.
- Chemical StrippersChemical strippers work by breaking down the polyurethane’s molecular structure, allowing it to be scraped or wiped away. These can be effective, especially for intricate areas or when you want to avoid excessive dust. There are various types, including methylene chloride-based strippers (very effective but also very toxic and require extreme caution) and newer, less toxic citrus-based or soy-based strippers.
Always follow the manufacturer’s instructions carefully and ensure good ventilation.
- Heat GunsA heat gun can soften polyurethane, making it easier to scrape off. This method is less common for entire floors but can be useful for small areas or touch-ups. The heat softens the finish, and then you use a putty knife or scraper to lift it.
Be careful not to scorch the wood.
A 2022 survey by HomeAdvisor found that 68% of homeowners who undertook floor refinishing projects did so themselves, with polyurethane removal being a key challenge.
Safety Precautions
Working with chemicals and power tools demands strict safety measures. Always wear protective gear to prevent injury or health issues. Proper ventilation is key when using chemical strippers or sanding to avoid inhaling dust or fumes.
- VentilationEnsure the room is well-ventilated. Open windows and doors. Use fans to push air out of the room and bring fresh air in.
This is especially important when using chemical strippers, as their fumes can be harmful.
- Personal Protective Equipment (PPE)Wear safety glasses or goggles to protect your eyes from dust and chemical splashes. Use chemical-resistant gloves to shield your skin. A respirator mask is essential to protect your lungs from fine dust particles and chemical vapors.
Choose a mask rated for organic vapors and particulates.
- Fire SafetySome chemical strippers are flammable. Keep them away from open flames, sparks, and heat sources. Have a fire extinguisher readily available.
Step-by-Step Guide How to Remove Polyurethane From Hardwood Floors
This section provides a clear, sequential method for removing polyurethane. We break down each step to ensure you can follow along easily, whether you are a seasoned DIYer or tackling this for the first time. The goal is a clean, smooth surface ready for the next stage of your flooring project.
Preparation Steps Before Removal
Before you start any removal process, proper preparation is crucial. This ensures your work area is safe and your floors are ready for the chosen method. Taking the time to prepare will save you a lot of trouble down the line.
- Clear the RoomRemove all furniture, rugs, and decor from the room. This gives you ample space to work and prevents damage to your belongings. Move items to another room or to a protected area in a garage.
- Protect Adjacent AreasUse painter’s tape and plastic sheeting to protect baseboards, doorways, and any adjacent flooring that you are not refinishing. This prevents damage from dust, chemicals, or accidental scratches.
- Clean the FloorSweep and vacuum the floor thoroughly to remove all loose dirt, debris, and dust. This prevents these particles from getting ground into the wood during the removal process, which could cause scratches or imperfections.
Using Chemical Strippers
Chemical strippers are effective at dissolving polyurethane. Follow these steps for their application. Remember to work in small sections so the stripper doesn’t dry out before you can remove it.
- Apply the StripperPour the chemical stripper into a paint tray. Using a natural bristle brush or a roller, apply a thick, even coat of stripper to a small section of the floor, about 3-4 square feet at a time. Work with the wood grain.
- Allow to WorkLet the stripper sit on the surface for the time recommended by the manufacturer, usually 15-30 minutes. You should see the polyurethane start to bubble or soften.
- Scrape Away the FinishUse a plastic putty knife or a floor scraper to gently scrape away the softened polyurethane. Work in the direction of the wood grain. Collect the dissolved finish in a disposable container.
Avoid metal scrapers on delicate woods to prevent gouging.
- Clean the ResidueAfter scraping, use a clean rag dampened with mineral spirits (for oil-based strippers) or water (for water-based strippers) to wipe away any remaining residue.
- Repeat and NeutralizeContinue this process section by section until the entire floor is stripped. Once all the polyurethane is removed, you might need to neutralize the stripper. Check the product instructions.
Some require a final wash with a specific solution or soap and water.
A case study from a homeowner in Portland, Oregon, showed that using a soy-based stripper, they were able to remove three layers of polyurethane from their oak floor with minimal fumes and less effort than sanding alone.
Using Mechanical Sanding
Sanding is a more physical approach that uses abrasive paper to remove the finish. Renting the right equipment is key here.
- Choose the Right Sander and GritRent a drum sander for large areas and an edger for the perimeter. Start with a coarse grit sandpaper, like 36 or 40 grit, to chew through the polyurethane.
- Begin SandingOperate the drum sander according to the rental company’s instructions. Move slowly and steadily in overlapping passes, always moving with the direction of the wood grain. Avoid stopping in one spot, which can create gouges.
- Edge SandingUse the edger sander to sand the areas along the walls and in corners that the drum sander cannot reach. Be careful with the edger as it can be aggressive.
- Progress to Finer GritsOnce the polyurethane is mostly removed, switch to progressively finer grit sandpaper. Move from 60 grit to 100 or 120 grit. This refines the wood surface, removing any scratches left by coarser grits.
- Vacuum ThoroughlyAfter each sanding pass, vacuum up all the dust. A shop vacuum is best for this. This is crucial for achieving a smooth finish and for the proper adhesion of new finishes.
Statistics from the National Wood Flooring Association suggest that proper sanding technique can reduce refinishing time by up to 30% and improve the final finish quality.
Dealing with Stubborn Polyurethane
Sometimes, polyurethane can be particularly tough to remove, especially multiple layers or old, hardened finishes. You might need to combine methods or try a more aggressive approach.
- Repeat ApplicationsIf using chemical strippers, you may need to apply a second or even third coat to fully break down a thick or resilient finish. Allow each application to work thoroughly before scraping.
- Scraping TechniquesWhen scraping, use firm but controlled pressure. For very stubborn areas, a sharp scraper might be more effective, but use it with extreme care to avoid damaging the wood.
- Sanding AidsFor sanding, if the sandpaper clogs quickly with polyurethane residue, try using a sanding screen instead of sandpaper. Sanding screens are more resistant to clogging and can help cut through tough finishes. Make sure to use them with your sander.
- Consider Professional HelpIf you are struggling significantly or worried about damaging your floors, it might be time to call a professional floor refinisher. They have the experience and equipment to handle difficult situations.
After Removal Care and Preparation for New Finish
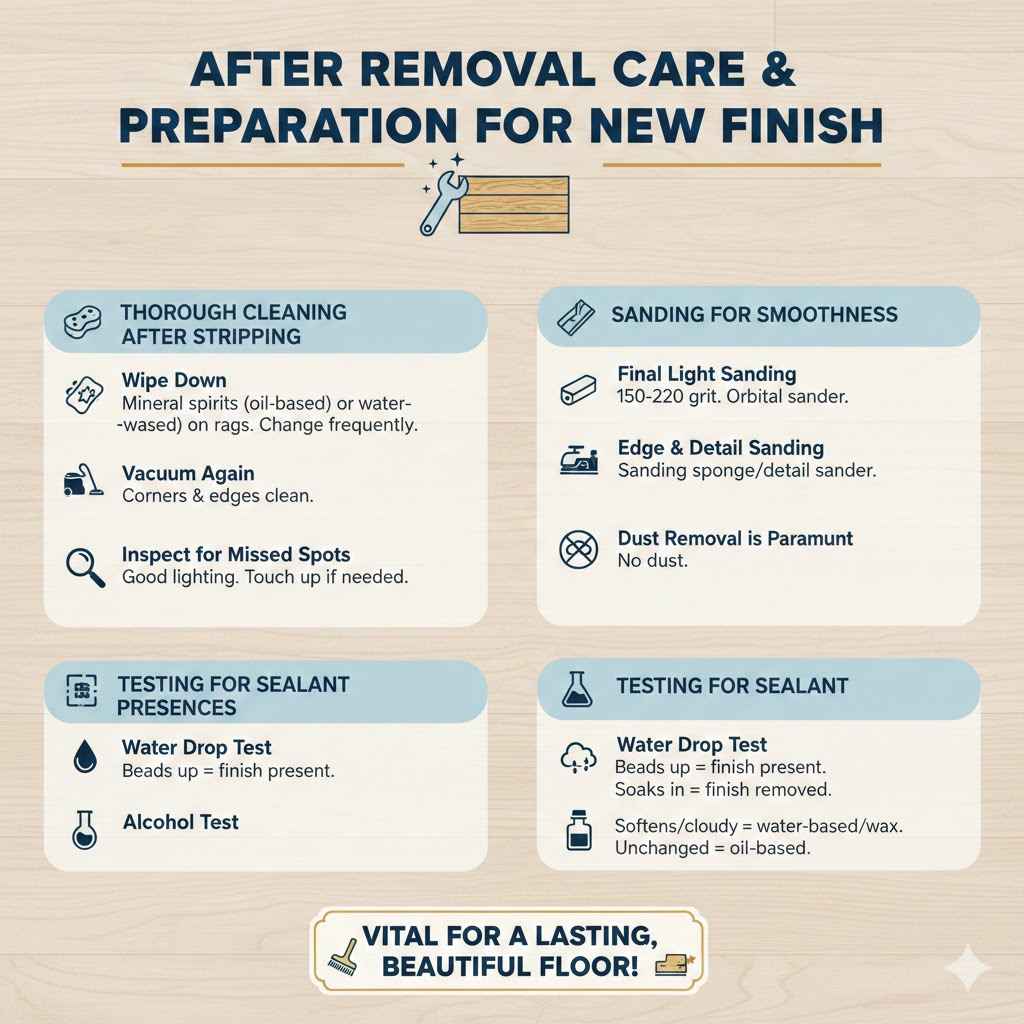
Once the polyurethane is gone, the floor is not immediately ready for a new coating. Proper cleaning and preparation are essential to ensure the new finish adheres well and looks its best. This stage is often overlooked but is vital for a lasting, beautiful floor.
Thorough Cleaning After Stripping
After all the polyurethane is removed, the floor will likely have residue from the stripper and dust from sanding. Cleaning it properly is key.
- Wipe DownUse clean rags dampened with mineral spirits (for oil-based residue) or plain water (for water-based residue) to wipe down the entire floor. Change rags frequently as they become saturated with residue.
- Vacuum AgainAfter wiping, vacuum the floor one last time to pick up any remaining dust or debris. Ensure all corners and edges are clean.
- Inspect for Any Missed SpotsCarefully inspect the entire floor under good lighting. Look for any areas where polyurethane might still be present. Touch up these spots with your chosen removal method.
Sanding for Smoothness
Even after initial sanding, a final light sanding might be needed to create a perfectly smooth surface. This also helps open the wood’s pores for better finish adhesion.
- Final Light SandingUse a very fine grit sandpaper, such as 150 or 220 grit, in your orbital sander or with a sanding block. This removes any minor imperfections and slightly roughens the wood surface.
- Edge and Detail SandingUse a sanding sponge or an orbital detail sander for areas like edges and corners. Ensure a consistent texture across the entire floor.
- Dust Removal is ParamountAfter this final sanding, vacuum again. Then, use a tack cloth or a vacuum with a brush attachment to remove every trace of fine dust. This step is crucial; any remaining dust can ruin the new finish.
Testing for Sealant Presence
It’s a good idea to confirm that all polyurethane has been removed, especially if you are unsure. A simple test can save you from future problems.
- Water Drop TestPlace a few drops of water on different areas of the floor. If the water beads up and sits on the surface, there may still be some polyurethane or sealer present. If the water soaks into the wood or leaves a dark spot, the finish has likely been removed.
- Alcohol TestAnother test involves applying denatured alcohol to a small, inconspicuous area. If the finish softens or becomes cloudy, it’s likely a water-based finish or wax, which might react differently to strippers. If it remains unchanged, it might be an oil-based polyurethane that needs a stronger solvent.
Frequently Asked Questions
Question: How long does it take to remove polyurethane from hardwood floors?
Answer: The time can vary greatly depending on the method used, the size of the room, and the number of polyurethane layers. Chemical stripping might take 6-12 hours, while aggressive sanding could take 8-16 hours for a standard room. Preparation and cleanup add to this time.
Question: Can I just put a new coat of finish over old polyurethane?
Answer: It is generally not recommended. New finishes may not adhere properly to old polyurethane, leading to peeling, cracking, or an uneven appearance. Proper removal ensures a durable and attractive new finish.
Question: What is the safest way to remove polyurethane?
Answer: Using a low-VOC (volatile organic compound) or plant-based chemical stripper with excellent ventilation and proper personal protective equipment is often considered the safest chemical method. For a less chemical approach, thorough sanding with a well-maintained HEPA vacuum system is effective.
Question: Will sanding damage my hardwood floors?
Answer: Sanding can damage floors if done incorrectly. Using too coarse a grit, sanding against the grain, or stopping in one spot can create deep scratches or gouges. Renting professional equipment and following proper techniques minimizes this risk.
Question: How do I know if I have oil-based or water-based polyurethane?
Answer: Oil-based polyurethane typically has an amber or yellow tint, even when new, and takes longer to dry. Water-based polyurethane dries clear and dries much faster, often with less odor. A small test with denatured alcohol can also give clues; oil-based is more resistant.
Summary
Successfully removing polyurethane from your hardwood floors is achievable with the right knowledge and tools. You’ve learned about safe chemical and mechanical methods, including essential preparation and aftercare. Following these steps carefully ensures a smooth, clean surface ready for your new floor finish, bringing new life to your home.