How to Remove Sanding Dust Before Painting
Getting ready to paint can feel a little tricky sometimes, especially for folks just starting out. You’ve done the sanding, which is great work! But now you’re left with all that fine dust.
If you don’t get it all off before you paint, your finished job might not look as smooth as you want. It’s a common hurdle, but don’t worry! We’ll walk through how to remove sanding dust before painting with simple steps that anyone can follow.
Let’s make your next painting project a success.
Why Dust Matters Before Painting
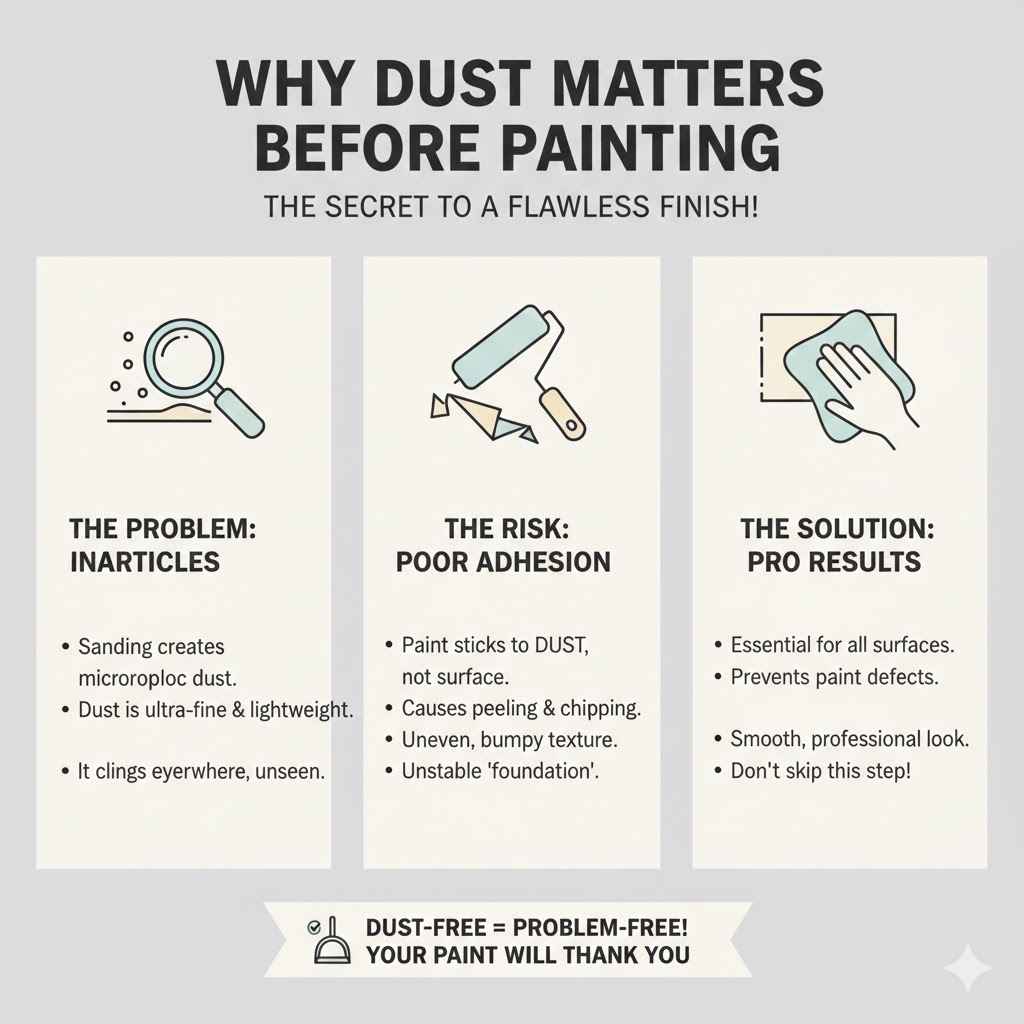
When you sand any surface, whether it’s wood, drywall, or even old paint, you create tiny particles. This dust is incredibly fine and light. It gets everywhere.
Think of it like glitter that never leaves. Even if you can’t see it easily, it’s there, clinging to the surface you just worked hard to prepare.
If you skip the step of removing this dust, your paint will stick to the dust particles instead of the actual surface. This can cause a few problems. The paint might not adhere well, leading to peeling or chipping later on.
You might also see little bumps or an uneven texture on your finished paint job. It’s like trying to build a house on a layer of loose sand; it’s not a stable foundation.
For beginners, it’s easy to overlook this part. You might think you’ve wiped the surface clean enough. But sanding dust is sneaky.
It’s often invisible to the naked eye, especially in low light. That’s why knowing the best ways to get rid of it is key to getting a professional-looking paint finish.
The Best Ways to Remove Sanding Dust
There are several effective ways to tackle sanding dust. The trick is to use a combination of methods to ensure you get every last speck. We’ll cover the most common and helpful techniques.
Vacuuming First
Starting with a vacuum cleaner is a smart first move. It removes the bulk of the dust quickly and efficiently. Use a vacuum with a brush attachment.
This helps to lift dust that might be stuck in textures or corners.
Be thorough when vacuuming. Go over the entire surface, paying attention to edges, corners, and any crevices. If you’re working on furniture, vacuum all sides, including underneath.
For walls, vacuum from the ceiling down to the floor.
Some people worry about vacuuming spreading dust. This can happen if your vacuum cleaner bag is full or if the filter isn’t great. A good quality vacuum with a HEPA filter will trap most of the dust, preventing it from being blown back into the air.
Tack Cloths Are Your Friend
After vacuuming, a tack cloth is the next essential tool. A tack cloth is a specially treated piece of cheesecloth or a similar material. It’s slightly sticky, which allows it to grab and hold onto fine dust particles that vacuuming might have missed.
When using a tack cloth, don’t scrub. Gently wipe the surface. Use light, overlapping strokes.
Think of it as dabbing or lifting the dust away. If you press too hard, you might just push the dust around.
It’s important to fold the tack cloth often. As you pick up dust, the sticky surface gets covered. Folding it exposes a fresh, sticky section.
This ensures you’re always picking up dust, not just smearing it.
Always use a new tack cloth for each painting project. Once a tack cloth is fully loaded with dust, it’s no longer effective and could even scratch your surface. They are inexpensive, so don’t hesitate to use a fresh one.
Damp Cloth Method
For some surfaces, especially wood, a slightly damp cloth can be very effective after vacuuming. Use a clean, lint-free cloth dampened with water. Wring it out really well so it’s not dripping wet.
You want it just barely damp.
Wipe the surface gently. The slight moisture will help pick up any remaining fine dust. Again, use overlapping strokes and rinse the cloth frequently.
Make sure you allow the surface to dry completely before you proceed with painting.
This method works well for general dust but be cautious on certain materials. If you’re painting over a very delicate finish or a material that could be damaged by moisture, a tack cloth might be a safer choice.
Compressed Air
Compressed air can be useful for getting dust out of hard-to-reach areas. Think of grooved trim or intricate carvings. A can of compressed air, like those used for cleaning electronics, can blow dust out from tight spots.
When using compressed air, wear eye protection. The air can blow dust around, and you don’t want it in your eyes. Hold the can upright and use short bursts of air.
This method is best used as a follow-up to vacuuming and wiping. It’s for those extra stubborn bits of dust lodged in tight corners.
Wiping with a Dry Cloth
Sometimes, a clean, dry microfiber cloth can do a decent job of picking up dust. Microfiber is known for its ability to trap particles. Similar to the damp cloth method, use gentle, overlapping strokes.
While a dry cloth is better than nothing, it’s usually not as effective as a tack cloth for really fine dust. The particles can sometimes just be pushed around rather than being held onto.
Cleaning Different Surfaces
The best method for how to remove sanding dust before painting can also depend on the surface you’re working on.
Walls and Ceilings
For walls and ceilings, start with a vacuum cleaner with a brush attachment. Go from top to bottom. Then, use a tack cloth for a final clean.
If the walls are particularly dusty, you might vacuum twice.
Wood Furniture and Trim
Wood surfaces can hold dust in their grain. Vacuuming with a brush attachment is a good start. Follow up with a tack cloth.
For very smooth wood, a slightly damp cloth, followed by a dry cloth, can also work well. Ensure the wood is completely dry before painting.
Metal
Metal surfaces are usually smooth, so dust removal is straightforward. Vacuuming and then using a tack cloth is usually sufficient. For bare metal, you might also use a solvent-based cleaner to ensure no oils or residues remain, but this is usually done before sanding.
Plastic
Plastic can sometimes hold a static charge, attracting dust. Vacuuming and then using a tack cloth is effective. Some people find that wiping with a dryer sheet can help reduce static and repel dust for a short time, but this isn’t a substitute for proper cleaning.
Step-by-Step Guide to Dust Removal
Here is a straightforward plan to ensure your surfaces are dust-free and ready for paint.
-
Prepare Your Workspace
If possible, close doors and windows to prevent new dust from entering. Lay down drop cloths to catch any dust that might fall.
-
Vacuum Thoroughly
Use your vacuum cleaner with a brush attachment. Work from the top of the area you’re painting downwards. Cover every inch of the surface.Don’t forget corners and edges.
-
Use a Tack Cloth
Take a fresh tack cloth. Gently wipe the entire surface using light, overlapping strokes. Fold the cloth frequently to expose a clean, sticky surface.This step is crucial for capturing the finest dust particles.
-
Consider a Damp Cloth (Optional)
If you’re working on a surface like wood and feel there might still be some dust, use a lint-free cloth that is only slightly damp. Wring it out very well. Wipe the surface gently.Let it air dry completely.
-
Inspect Your Work
Look at the surface under good light. You should not be able to see any visible dust. If you do, repeat the tack cloth step.
Common Mistakes and How to Avoid Them
Even with the best intentions, people sometimes make mistakes when trying to remove sanding dust.
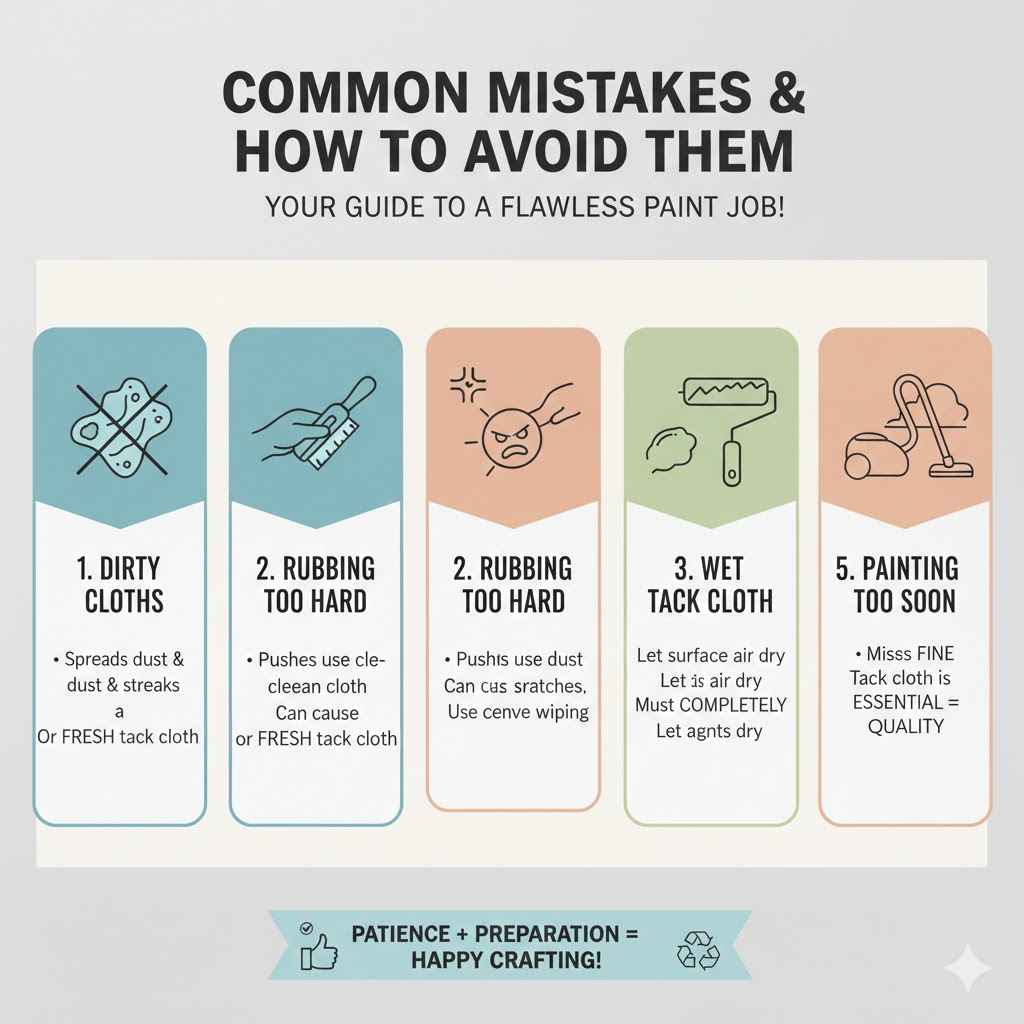
- Using a dirty cloth: If your cleaning cloth isn’t clean, you’ll just spread dust around or leave streaks. Always use a clean cloth or a fresh tack cloth.
- Rubbing too hard: Aggressive scrubbing can sometimes press dust deeper into textures or create scratches. Gentle wiping is usually best.
- Not waiting for surfaces to dry: If you used a damp cloth, make sure the surface is completely dry before painting. Moisture can affect paint adhesion.
- Skipping the tack cloth: While vacuuming is important, it rarely gets all the super fine dust. A tack cloth is essential for that final, invisible layer of clean.
- Painting too soon: Always give yourself enough time to properly clean the surface. Rushing this step can lead to a less-than-perfect paint job.
Frequently Asked Questions
Question: Can I just wipe with a wet rag to remove sanding dust?
Answer: A wet rag can help, but it’s often not enough on its own, especially for very fine dust. It can also leave surfaces too wet, which isn’t good for painting. Using a tack cloth after vacuuming is a much more effective way to grab all the dust.
Question: How do I know if I’ve removed all the sanding dust?
Answer: Look at the surface under good light. It should appear smooth and free of any powdery residue. If you run a clean hand over it (wear gloves if you’ve just applied primer or paint), it shouldn’t feel gritty.
Question: What is a tack cloth and where can I buy one?
Answer: A tack cloth is a slightly sticky cloth designed to pick up fine dust. You can buy them at hardware stores, home improvement stores, and many online retailers. They are usually found in the painting or finishing supplies section.
Question: Is it okay to use a leaf blower to remove sanding dust?
Answer: A leaf blower is generally not recommended for indoor projects like painting. It can blow dust everywhere, making a mess and potentially spreading it into areas you don’t want it. It’s also very noisy and can stir up a lot of airborne particles.
Question: How often should I change my tack cloth?
Answer: You should fold your tack cloth to expose a fresh, sticky surface as soon as the current one starts to look loaded with dust. Once the entire cloth is covered in dust and no longer sticky, it’s time to use a new one.
Final Thoughts
Learning how to remove sanding dust before painting is a simple but important skill. Getting rid of that fine powder ensures your paint sticks well. It leads to a smooth, professional-looking finish.
Always start with a good vacuum. Then, a tack cloth is your best friend. Gentle wiping and patience are key.
Follow these steps, and your painted surfaces will look fantastic.