How to Remove Water Marks from Wood Furniture
Spots on wood furniture from water can be really frustrating. Many people find it tricky to get them out, especially if they are new to furniture care. You worry about making it worse!
Don’t worry, this is a common problem, and there are simple, easy ways to fix it. We’ll walk you through each step so you can bring your furniture back to its best. Get ready to learn some easy tips.
Understanding Wood Furniture Water Marks
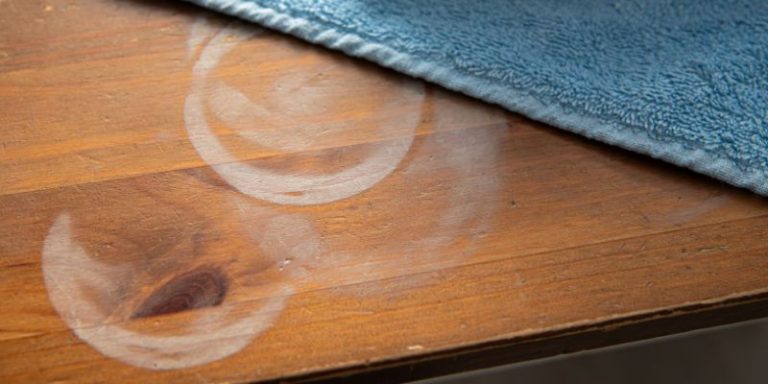
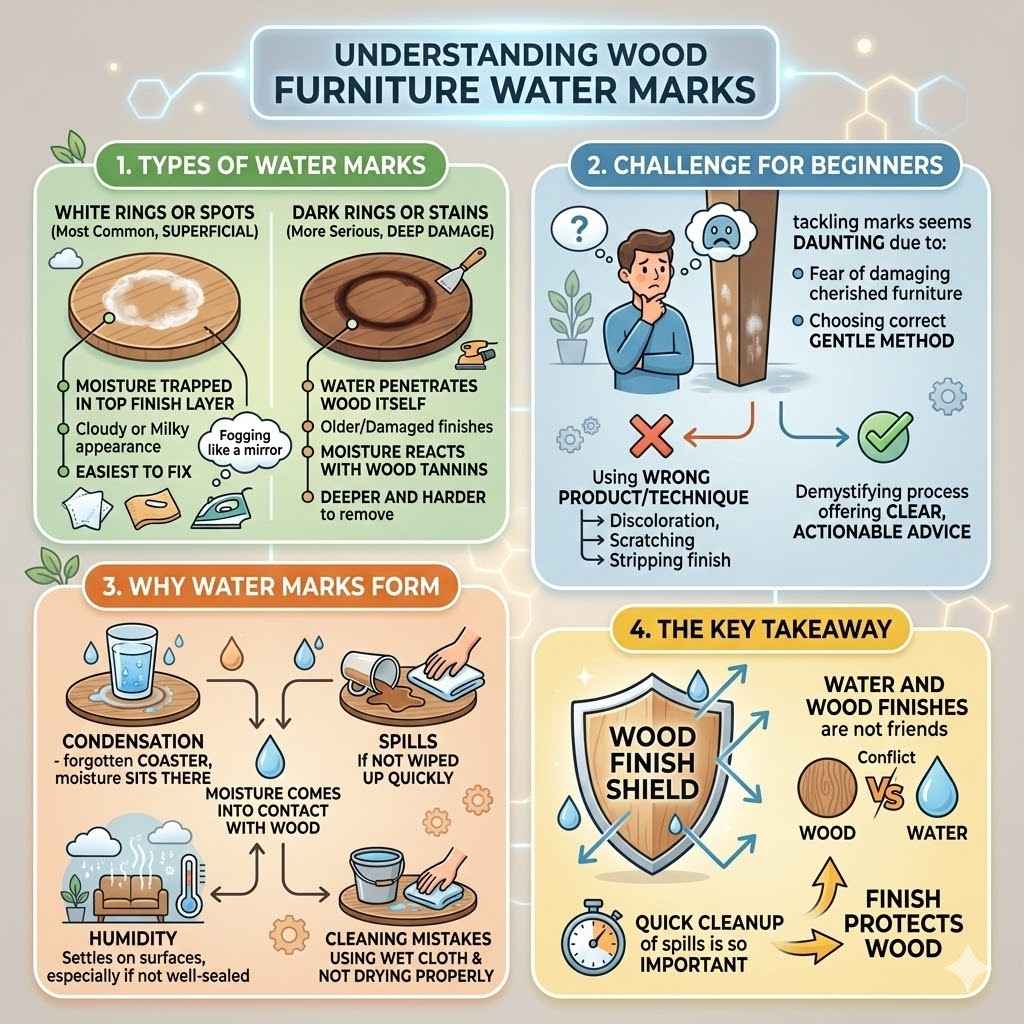
Water marks on wood furniture are a common sight and often cause for concern for homeowners. These marks appear when moisture penetrates the finish and either mixes with the finish itself, causing cloudiness, or affects the wood beneath, leading to darker stains. They can range from faint white rings, which are usually superficial, to dark, deep stains that indicate damage to the wood itself.
For beginners, the fear of damaging their cherished furniture can make tackling these marks seem like a daunting task.
The challenge often lies in identifying the type of water mark and choosing the correct, gentle method for removal. Using the wrong product or technique can lead to discoloration, scratching, or stripping of the wood finish. This guide aims to demystify the process, offering clear, actionable advice that is easy for anyone to follow.
Types of Water Marks on Wood
Water marks on wood furniture are not all the same. The way they look tells you a lot about how deep the problem goes and what you need to do to fix it. Understanding these differences is key to selecting the right removal method and avoiding further damage.
- White Rings or Spots: These are the most common and usually the easiest to fix. They happen when moisture gets trapped in the top layers of the wood finish, like wax or varnish. The water hasn’t reached the actual wood, so it just makes the finish look cloudy or milky. Think of it like fogging up a mirror. They often appear as light circles or splotches.
- Dark Rings or Stains: These are more serious. They occur when water seeps through the finish and penetrates the wood itself. This can happen with older finishes, unfinished wood, or when the finish is already damaged. The moisture reacts with the tannins in the wood, causing a permanent discoloration. These marks are deeper and harder to remove than white rings.
Knowing whether you have a light, superficial white mark or a deep, dark stain will help you decide which approach to take. The good news is that most white marks can be dealt with using household items. Darker stains might require a bit more effort but are often still salvageable.
Why Water Marks Form
Water marks form when moisture comes into contact with your wood furniture. This can happen in several ways, and the result depends on the type of finish on the wood and how long the moisture stays there.
- Condensation: Cold drinks left directly on the surface of your furniture can sweat, and this condensation creates a ring. If the coaster is forgotten, the moisture sits there.
- Spills: Accidental spills of water, drinks, or even wet cleaning cloths can leave marks if not wiped up quickly.
- Humidity: High humidity levels in a room can sometimes cause moisture to settle on surfaces, especially if the furniture’s finish is not well-sealed.
- Cleaning Mistakes: Using a wet cloth and not drying the surface properly after cleaning can lead to water marks forming over time.
The key takeaway here is that water and wood finishes are not good friends. The finish is there to protect the wood. When water gets past the finish, it can cause problems.
This is why quick cleanup of spills is so important for protecting your furniture.
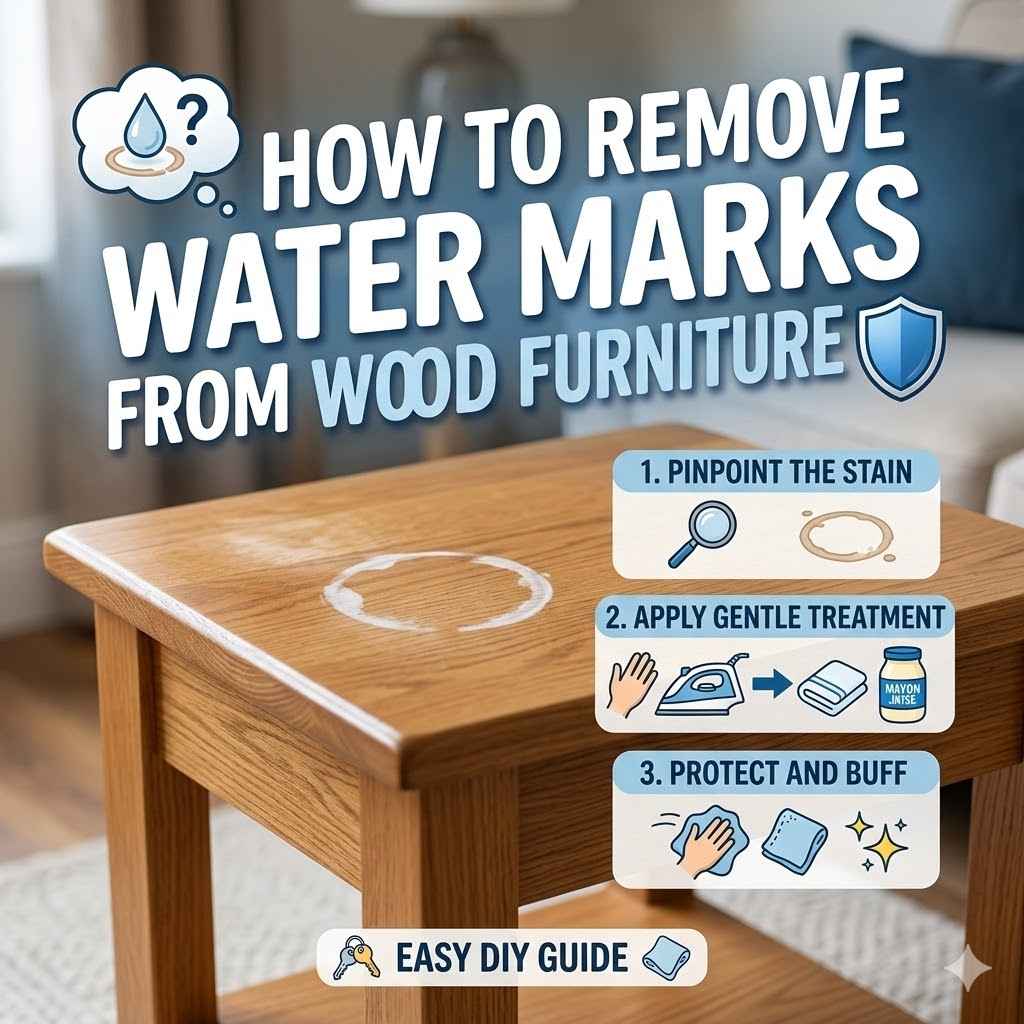
How to Remove White Water Marks From Wood Furniture
White water marks are the most common and thankfully, the easiest to tackle. These marks indicate that the moisture has only affected the top layer of your furniture’s finish. This means the wood itself is likely unharmed.
Many common household items can gently lift this trapped moisture, restoring the finish to its original clarity. You don’t need fancy chemicals to fix these simple spots.
The goal here is to either absorb the moisture or very gently buff out the affected area without damaging the surrounding finish. We will explore several simple, effective methods that use things you probably already have in your kitchen or pantry. Each method works slightly differently, but all aim to gently coax the moisture out of the finish.
Using Household Staples for White Marks
You can often fix those annoying white water rings with items found right in your kitchen. These methods are gentle and work by either absorbing the moisture or lightly abrading the clouded finish.
- Ironing Method: Place a clean, dry cotton cloth or towel over the white mark. Set your iron to a low heat setting with no steam. Briefly and gently press the iron onto the cloth over the mark. Lift the iron and cloth frequently to check your progress. The gentle heat helps to draw the moisture out of the finish. Be very careful not to overheat or leave the iron in one spot for too long, as this can damage the finish.
- Mayonnaise or Petroleum Jelly: Apply a small amount of mayonnaise or petroleum jelly directly onto the white mark. Let it sit for a few hours, or even overnight. The oils in these products can help to displace the moisture trapped in the finish. After waiting, wipe the area clean with a soft cloth and buff gently. This method is very mild and is great for less stubborn marks.
- Toothpaste (Non-Gel): Use a small amount of non-gel white toothpaste. Gently rub it into the white mark with a soft cloth in a circular motion. Toothpaste contains a mild abrasive that can help to buff out the cloudy layer. Wipe away the toothpaste residue with a damp cloth, then dry and buff the area. Avoid using colored or gel toothpastes, as they can stain.
These methods are all about being gentle. The idea is to remove the moisture without scratching or damaging the wood’s protective coating. Always test on an inconspicuous area first if you are unsure.
The Ironing Method Explained
The ironing method is a popular choice for white water marks because it’s quick and effective. It works by using low heat to help evaporate the trapped moisture from the wood finish. It’s important to approach this method with caution to avoid causing more harm than good.
- Gather Your Supplies: You will need an iron, a clean, dry, absorbent cotton cloth (like a tea towel or an old t-shirt), and your wood furniture piece.
- Prepare the Area: Ensure the cloth is completely dry and free of any lint. Place it directly over the white water mark.
- Apply Gentle Heat: Set your iron to the lowest heat setting. Critically, ensure the steam function is turned OFF. Briefly hold the iron on top of the cloth for a few seconds.
- Check and Repeat: Lift the iron and cloth to inspect the mark. You should see the white mark begin to disappear. Repeat this process, moving the iron slightly each time and checking frequently. The heat should be just warm enough to help the moisture escape.
This technique relies on the principle that heat can help to vaporize moisture. By placing a dry cloth between the iron and the wood, you create a barrier that diffuses the heat, making it gentler. The cloth also absorbs any moisture that is released.
It’s a balance of warmth and speed to avoid damaging the finish. Always err on the side of caution by using less heat and shorter application times.
Mayonnaise and Petroleum Jelly: Oil-Based Solutions
These creamy concoctions might seem unusual, but their oil content makes them surprisingly effective for white water marks. The oils work by penetrating the clouded finish and helping to loosen the trapped moisture, allowing it to dissipate.
- Choose Your Agent: Either full-fat mayonnaise or plain petroleum jelly will work. Avoid light or fat-free versions, as they won’t have enough oil.
- Apply Generously: Spoon a small amount onto the white mark. You want to cover the entire affected area with a visible layer.
- Let It Sit: This is where patience comes in. Leave the mayonnaise or petroleum jelly on the mark for at least a few hours. For tougher marks, you can leave it overnight. The longer it sits, the more time the oils have to work.
- Wipe and Buff: After the waiting period, wipe away the excess with a clean, soft cloth. Then, buff the area gently to restore the shine. You might need to repeat the process if the mark is still visible.
The oils in these products act as a solvent, helping to break down the water’s grip on the finish. It’s a gentle, non-abrasive method that is particularly good for delicate finishes. The key is to let the oils do their work over time.
The process is simple: apply, wait, and wipe. It’s a fantastic first step for many common furniture blemishes.
Toothpaste as a Mild Abrasive
The common white, non-gel toothpaste you use for brushing your teeth can also be a surprisingly effective tool for removing white water marks from wood furniture. This method relies on the mild abrasive quality of toothpaste to gently buff away the cloudy layer of the finish.
- Select the Right Toothpaste: It is crucial to use plain white, non-gel toothpaste. Avoid colored toothpastes, whitening formulas that might contain harsher chemicals, or gel varieties, as these could potentially stain or damage the wood finish.
- Apply a Small Amount: Squeeze a small dab of toothpaste onto a soft, clean cloth. You do not need much.
- Gentle Rubbing: Gently rub the toothpaste into the white mark using a soft cloth in a circular motion. Apply only light pressure. The goal is to create a light friction to buff out the cloudiness, not to scrub aggressively.
- Clean and Buff: Once the mark has disappeared, wipe away the toothpaste residue with a slightly damp cloth. Immediately follow up by drying the area with a clean, dry cloth and then buffing to restore the sheen.
This method works because the fine particles in the toothpaste act like a very mild polishing compound. They gently lift the moisture that has fogged the finish without being so harsh that they scratch the wood. It’s a quick fix for those frustrating white rings, and the results can be quite satisfying.
Remember, the gentleness of your touch is just as important as the toothpaste itself.
Other Methods for White Marks
Beyond the most common household remedies, a few other gentle approaches can be effective for tackling those pesky white water marks. These methods often involve slightly different principles but achieve the same goal: restoring your furniture’s finish.
- Baking Soda Paste: Mix baking soda with a small amount of water to create a paste. Apply this paste to the white mark with a soft cloth and gently rub in a circular motion. Like toothpaste, baking soda is a mild abrasive. Wipe clean with a damp cloth, dry, and buff.
- Steel Wool (0000 Grade): For more stubborn white marks, you might consider using super-fine steel wool, often labeled as 0000 grade. Gently rub the steel wool over the mark in the direction of the wood grain. This is a more abrasive method, so use it sparingly and with light pressure. Always follow up by buffing the area to restore shine.
- Commercial Wood Cleaners: There are specific products designed to remove white water marks from wood furniture. These are often sold at hardware or furniture stores. Follow the product instructions carefully, as they can vary.
Each of these methods offers a different level of abrasiveness or chemical action. It’s important to choose the one that seems most appropriate for the severity of the mark and the type of finish on your furniture. Always remember to test any new method in an unseen area first.
How to Remove Dark Water Stains from Wood Furniture
Dark water stains on wood furniture are a sign of a more serious problem. Unlike white marks, which only affect the finish, dark stains mean water has penetrated the wood itself. This can lead to permanent discoloration and requires a more intensive approach.
These stains can be caused by spills that sat for too long or damage to the protective finish.
The process for removing dark stains is more involved because you’re not just dealing with a cloudy finish; you’re dealing with the wood’s color being altered. This often involves bleaching the stain out or, in some cases, refinishing the affected area. We will explore several techniques, starting with milder options and moving to more aggressive ones.
Bleaching Wood Stains
When water has soaked into the wood and caused a dark stain, bleaching is often the most effective method for removal. Bleaching works by breaking down the pigments that cause the dark color. This process requires careful application and protective gear.
- Types of Bleach: There are a few common types of bleaches you can use. Household bleach (chlorine bleach) can be effective but may also lighten the natural wood color unevenly. Oxalic acid crystals are often preferred for wood stains as they are specifically designed to lift dark water and rust stains without excessively lightening the wood.
- Preparation is Key: Before you begin bleaching, you must clean the area thoroughly. Ensure the wood is dry. You will need rubber gloves, eye protection, and good ventilation.
- Application: Mix the oxalic acid crystals with warm water according to product directions, or dilute household bleach if using that. Apply the bleach solution to the stained area using a brush or cloth. Let it sit and work on the stain.
- Neutralizing: After the stain has lightened sufficiently, it’s crucial to neutralize the bleach. For oxalic acid, a solution of baking soda and water is often recommended. For chlorine bleach, a solution of vinegar and water can help. This stops the bleaching process and prevents damage to the wood.
- Rinsing and Drying: Rinse the area thoroughly with clean water and allow the wood to dry completely. This process might need to be repeated for very deep stains.
Bleaching is a powerful tool, but it must be used with respect for the material. It’s important to test the bleach on an inconspicuous area first to see how it affects your specific wood and finish. Always follow the manufacturer’s instructions for any commercial bleach product.
Oxalic Acid for Dark Stains
Oxalic acid is a highly effective wood bleach that is particularly good at removing dark water stains, rust marks, and iron stains from wood. It works by chemically reacting with the iron and tannins in the wood that cause the dark coloration, lifting them to the surface.
- What It Is: Oxalic acid is a naturally occurring organic compound, but for wood treatment, it’s usually sold in crystalline form. It’s a safer option for wood than chlorine bleach because it doesn’t typically lighten the wood’s natural color as much and is less prone to damaging the wood fibers.
- Mixing the Solution: You will typically mix oxalic acid crystals with warm water. The ratio will vary based on the product’s instructions, but a common starting point is about 1 to 1.5 cups of crystals per gallon of warm water. Wear rubber gloves and eye protection, and work in a well-ventilated area.
- Application and Waiting: Apply the solution to the dark stain using a brush or sponge. Work the solution into the stained area. You will need to let it sit for a period, allowing it to penetrate and lighten the stain. The time can range from 30 minutes to several hours, depending on the severity of the stain.
- Neutralizing and Rinsing: Once the stain is significantly lightened, you must neutralize the acid. A common neutralizing agent is a solution of baking soda and water (about 1-2 tablespoons of baking soda per quart of water). Apply the neutralizer, then rinse the area thoroughly with clean water. Let the wood dry completely.
This method is very effective for deep-set stains that other methods cannot touch. The key is to follow the instructions precisely and ensure thorough neutralization. It can sometimes take a couple of applications to fully remove a stubborn dark stain.
Always test in an inconspicuous area first.
Household Chlorine Bleach Cautions
While household chlorine bleach might seem like an easy solution for dark water stains, it comes with significant risks and limitations when used on wood furniture. It’s a powerful chemical that can cause unintended damage if not handled with extreme care.
- How It Works (and Doesn’t Work Well): Chlorine bleach works by oxidizing color molecules. While it can lighten dark stains, it often does so by lightening the wood itself, potentially leading to an unnatural, patchy appearance. It doesn’t target the specific compounds causing wood stains as effectively as oxalic acid.
- Risk of Damage: Chlorine bleach can dry out and damage wood fibers if left on for too long. It can also weaken the wood’s structure over time. Furthermore, it can react with certain finishes or wood types in unpredictable ways, leading to new discoloration or a rubbery texture.
- Dilution and Application: If you choose to use chlorine bleach, it must be heavily diluted with water. Apply it only to the stained area and work quickly. Never let it soak into the wood for extended periods.
- Neutralization: After application, it’s essential to neutralize the bleach. A weak solution of vinegar and water (about one part vinegar to three parts water) can help. Rinse thoroughly and let the wood dry.
Because of the potential for damage and uneven lightening, household chlorine bleach is generally not the preferred method for removing dark water stains from fine wood furniture. Oxalic acid is often a much safer and more targeted approach. If you must use chlorine bleach, exercise extreme caution and test thoroughly.
Sanding and Refinishing
For very deep or stubborn dark water stains that bleaching cannot fully remove, sanding and refinishing might be the only option. This process involves removing the damaged top layers of the wood finish and potentially a thin layer of the wood itself, then reapplying a new finish.
- Assessing the Damage: First, determine how deep the stain is. If it’s only in the finish, sanding might be enough. If it’s in the wood, you’ll need to sand deeper.
- Sanding Process: Start with a medium-grit sandpaper (e.g., 120-grit) to remove the old finish and the stained layer of wood. Gradually move to finer grits (e.g., 180-grit, 220-grit) to smooth the surface. Always sand in the direction of the wood grain. Ensure you sand slightly beyond the stained area to create a smooth transition.
- Cleaning: After sanding, use a tack cloth or a slightly damp cloth to remove all sanding dust. This is critical for a smooth finish.
- Applying New Finish: Once the surface is smooth and clean, you can reapply a new finish. This could be stain to match the original color, followed by a protective topcoat like varnish, polyurethane, or wax. Apply thin, even coats, allowing each to dry according to the product’s instructions.
This is a more labor-intensive method, but it can completely restore the appearance of your furniture. It’s important to be patient and methodical throughout the process. Choosing the right stain and topcoat to match your existing furniture is key to a seamless repair.
Sanding Techniques for Refinishing
Sanding is a crucial step when you need to remove a dark water stain that has deeply impacted the wood. It’s the process of physically removing the damaged surface layers to reveal fresh wood underneath. This requires the right tools and techniques.
- Choosing the Right Sandpaper: You’ll typically start with a coarser grit sandpaper to remove the bulk of the damage. For wood, this might be around 100 or 120-grit. Once the stain is gone and the surface is relatively smooth, you’ll move to finer grits, such as 180-grit and then 220-grit, to create a smooth finish ready for refinishing.
- Sanding Direction: Always sand in the direction of the wood grain. Sanding against the grain will create visible scratches that will be difficult to remove later. Use long, smooth strokes.
- Using a Sanding Block: For flat surfaces, use a sanding block. This helps to distribute pressure evenly and prevent you from creating divots or uneven spots. For curved areas, you might need to wrap sandpaper around a soft cloth or use a flexible sanding sponge.
- Removing Dust: After each grit of sandpaper, it’s essential to remove all dust. Use a shop vacuum with a brush attachment, then wipe the surface with a dry cloth, and finally, use a tack cloth. This ensures that no dust particles are trapped in the new finish.
Sanding can be a physically demanding process, but it is very rewarding. Taking your time and using progressively finer grits ensures a beautiful, smooth surface. It is the foundation for a successful refinish and makes a significant difference in the final look.
Matching Wood Stain and Finish
One of the most challenging parts of refinishing an area damaged by a dark water stain is matching the new stain and finish to the rest of the furniture. Even a small difference can make the repair noticeable.
- Stain Selection: You can buy stain that’s pre-mixed to match common wood types. However, for older or unique furniture, you might need to experiment. It’s often best to buy a few different shades and mix them yourself to achieve the perfect color. Always test the stain on a scrap piece of wood or an inconspicuous area first to see how it dries. Different woods absorb stain differently.
- Applying Stain: Apply the stain evenly with a brush or cloth, following the direction of the wood grain. Wipe off any excess stain after a few minutes, depending on the desired depth of color.
- Topcoat Options: After the stain has dried completely, you need to apply a protective topcoat. Options include polyurethane, varnish, lacquer, or wax. Polyurethane is durable and water-resistant, making it a good choice for tabletops. Varnish offers good protection and a classic sheen. Lacquer dries quickly and provides a smooth finish. Wax offers a more natural look but less protection.
- Application of Topcoat: Apply thin, even coats of your chosen topcoat, allowing each coat to dry fully and lightly sanding with very fine-grit sandpaper (e.g., 320 or 400-grit) between coats for a super smooth finish.
Getting the color and sheen right requires patience and practice. It’s a skill that improves with experience, but even beginners can achieve good results by testing and taking their time. The goal is for the repaired area to blend seamlessly with the rest of the piece.
Preventing Future Water Marks on Wood Furniture
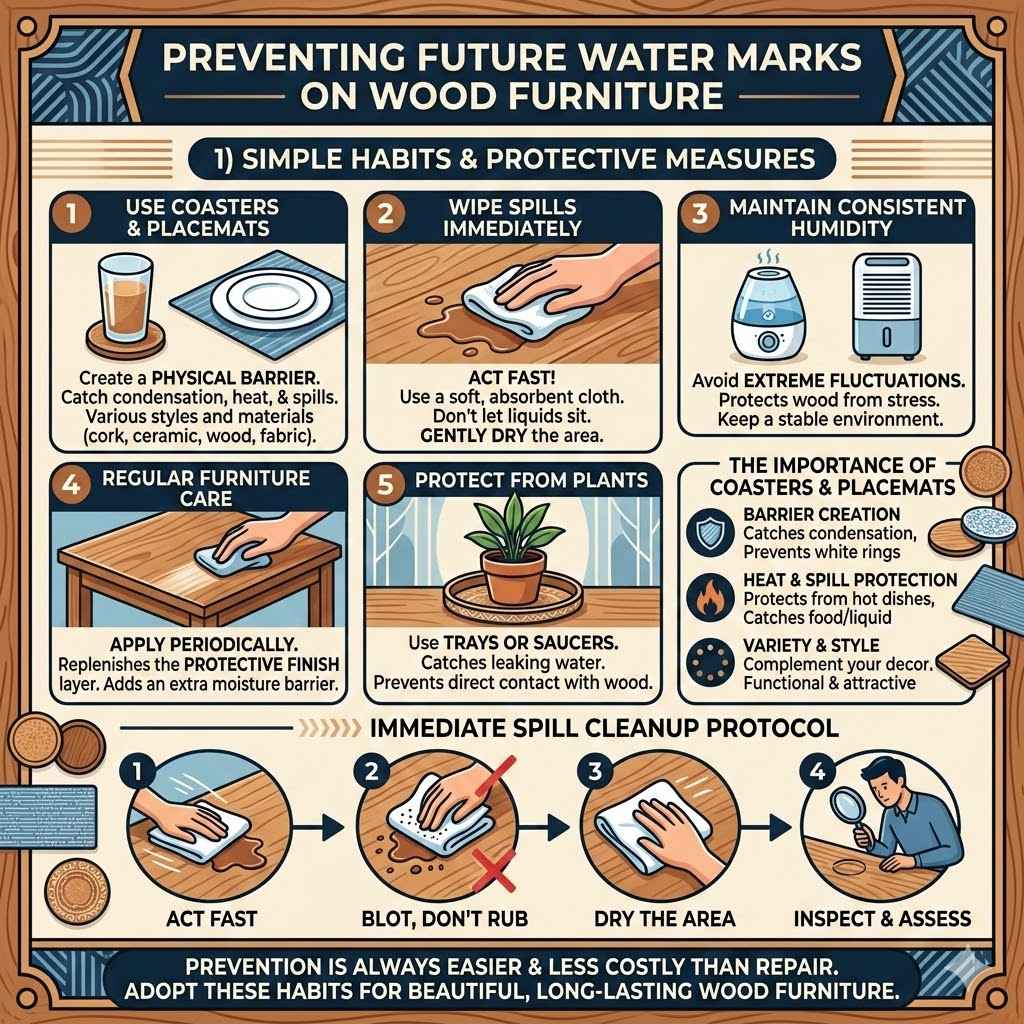
The best way to deal with water marks is to prevent them from happening in the first place. Protecting your wood furniture from moisture is key to keeping it looking its best for years to come. Simple habits and a few protective measures can make a world of difference.
Think of it like this: your furniture’s finish is its shield against the elements, including water. By maintaining this shield and being mindful of potential moisture sources, you can significantly reduce the risk of water damage. Here are some practical tips to keep your wood furniture safe and beautiful.
- Use Coasters and Placemats: This is the most basic and effective prevention tip. Always use coasters under glasses, mugs, and bottles. Use placemats under plates and serving dishes, especially when serving hot or cold items.
- Wipe Spills Immediately: Don’t let spills sit on the surface. Use a soft, absorbent cloth to wipe up any liquid immediately. Then, dry the area gently.
- Maintain Consistent Humidity: Extreme fluctuations in humidity can stress wood. Using a humidifier or dehumidifier as needed can help maintain a stable environment for your furniture.
- Regular Furniture Care: Apply a good quality furniture polish or wax periodically. This replenishes the protective layer of the finish and adds an extra barrier against moisture.
- Protect from Plants: Keep potted plants on trays or saucers to catch any water that might leak from the pot.
By adopting these simple habits, you can significantly extend the life and beauty of your wood furniture. Prevention is always easier and less costly than repair.
The Importance of Coasters and Placemats
Coasters and placemats are perhaps the simplest yet most effective tools for preventing water marks on wood furniture. They create a physical barrier between potentially wet items and the furniture’s surface, preventing condensation and spills from reaching the finish.
- Barrier Creation: Coasters are specifically designed to catch the condensation that forms on the outside of cold glasses or bottles. Without a coaster, this moisture will drip onto the furniture surface, potentially causing white rings or even darker stains over time if left unchecked.
- Protecting Against Heat and Spills: Placemats serve a similar purpose for plates, bowls, and serving dishes. They protect the wood from the heat of hot dishes, which can also damage the finish, and they catch any food or liquid spills.
- Variety and Style: Coasters and placemats come in a vast array of materials, from absorbent cork and ceramic to stylish wood and fabric. Choosing ones that complement your decor makes them an attractive as well as functional addition to your dining or living space.
Making it a habit to use coasters and placemats consistently is one of the best investments you can make in maintaining the condition of your wood furniture. It’s a small effort that yields significant long-term benefits.
Immediate Spill Cleanup Protocol
Accidents happen, but how you react to them can be the difference between a minor inconvenience and a permanent furniture blemish. Having a clear protocol for immediate spill cleanup is crucial for protecting your wood furniture.
- Act Fast: The moment a spill occurs, grab a clean, soft, absorbent cloth. Do not delay. The longer a liquid sits on the wood, the more likely it is to penetrate the finish and cause damage.
- Blot, Don’t Rub: Gently blot the spill with the cloth to absorb as much liquid as possible. Avoid rubbing, as this can spread the liquid and potentially push it deeper into the wood grain or damage the finish.
- Dry the Area: After blotting, use a dry part of the cloth or a separate dry cloth to gently dry the area. Ensure no moisture remains on the surface.
- Inspect and Assess: Once the area is dry, inspect it for any signs of a mark. If a faint white ring appears, you can try one of the gentle methods for white marks mentioned earlier. If it’s a dark stain, you’ll know to proceed with more intensive methods.
This quick response is your first line of defense against water marks. It’s a simple habit that can save your furniture from damage and preserve its natural beauty.
Frequently Asked Questions
Question: How long should I leave mayonnaise on a white water mark
Answer: For most white water marks, leaving mayonnaise on for a few hours should be enough. For tougher marks, you can leave it overnight to let the oils work into the finish.
Question: Can I use any type of steel wool on wood furniture
Answer: No, only super-fine steel wool, labeled as 0000 grade, should be used with extreme caution on wood furniture for water marks. Coarser grades will scratch the finish.
Question: What is the best way to remove dark stains from antique wood furniture
Answer: For dark stains on antique wood furniture, oxalic acid crystals are generally the most recommended method. Always test in an inconspicuous area first, and be prepared to refinish if the stain is very deep.
Question: Will baking soda scratch my wood finish
Answer: Baking soda is a mild abrasive. When used as a paste with water and rubbed gently, it is unlikely to scratch most wood finishes. However, always test on a hidden spot first.
Question: How can I tell if a water mark is white or dark
Answer: White water marks appear as a cloudy or milky discoloration on the surface of the finish. Dark water stains look like a deep shadow or ring that has penetrated into the wood itself.
Summary
Fixing water marks on wood furniture is manageable with the right approach. White marks often yield to simple household remedies like iron and cloth, mayonnaise, or toothpaste. Darker stains require more effort, potentially involving oxalic acid bleaching or sanding and refinishing.
Consistent use of coasters and immediate spill cleanup are your best defenses against future damage, keeping your wood furniture looking its best.