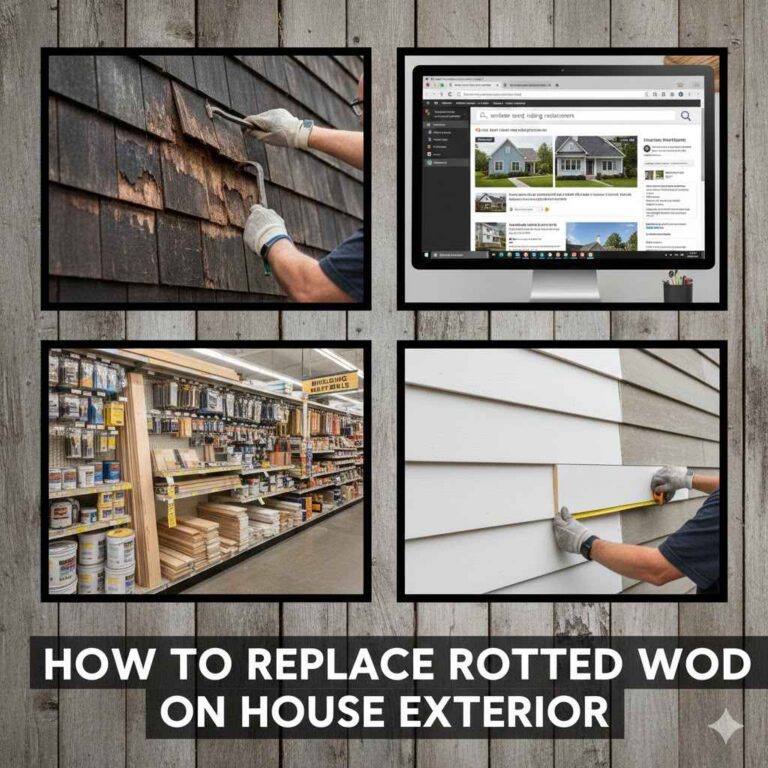
How to Repair Rotting Wood Without Replacing It
Dealing with wood rot can feel like a big problem. You might think you have to rip out the damaged wood and buy all new lumber, which sounds expensive and tricky. But guess what? You often don’t have to. This guide shows you a simple way, step-by-step, to fix rotting wood yourself. We’ll show you how to repair rotting wood without replacing it, making your home stronger and saving you money. Get ready to learn a useful skill that’s easier than you think.
Understanding Wood Rot and Its Causes
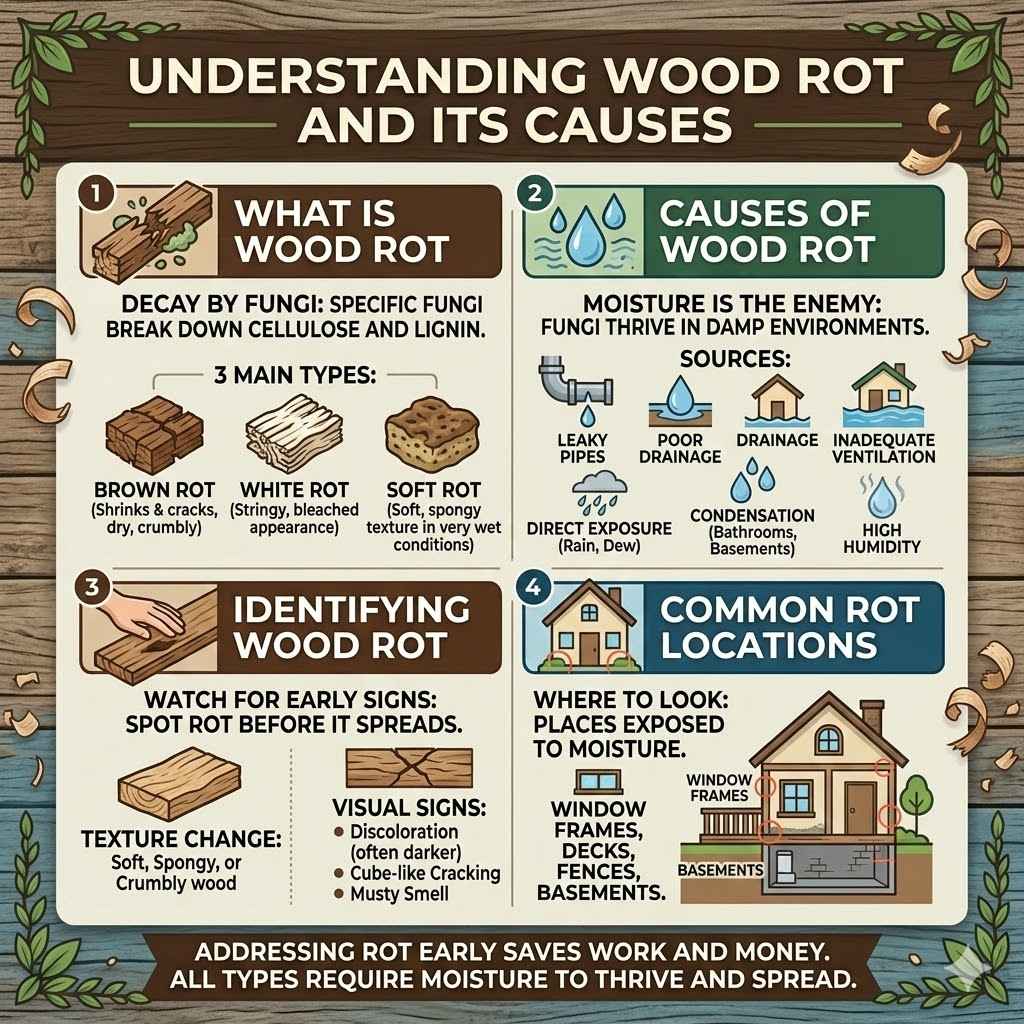
Wood rot is a common issue many homeowners face. It happens when certain types of fungi get into wood and break it down. These fungi need moisture, oxygen, and a food source (the wood itself) to grow. If wood stays wet for too long, especially in places like bathrooms, kitchens, or outside your home, rot can start.
It’s often found in window frames, decks, fences, and basements. Spotting rot early is key to fixing it easily. If you see soft, spongy, or crumbly wood, it’s likely rotting. Sometimes, it might even look discolored or have a musty smell. Addressing rot before it spreads can save you a lot of work and money down the line.
What is Wood Rot
Wood rot refers to the decay of wood caused by specific types of fungi. These fungi consume the cellulose and lignin, which are the main components that give wood its strength and structure. When these substances are broken down, the wood loses its integrity, becoming soft, brittle, and crumbly. There are three main types of wood rot: brown rot, white rot, and soft rot. Brown rot typically causes wood to shrink and crack into cube-like shapes, making it feel dry and crumbly.
White rot breaks down both cellulose and lignin, often leaving wood with a stringy, bleached appearance. Soft rot occurs in very wet conditions and causes a soft, spongy texture on the wood’s surface. All types require moisture to thrive and spread.
Common Causes of Wood Rot
Moisture is the biggest enemy of wood. When wood is exposed to water for extended periods without drying out, fungi find a perfect environment to grow. This can happen from leaky pipes, poor drainage around your home, inadequate ventilation, or direct exposure to rain and dew. For example, a window frame that doesn’t have proper sealing might let rainwater seep in, causing the wood behind it to rot over time.
Another common cause is condensation, especially in bathrooms or basements where warm, humid air meets cooler wood surfaces. Even high humidity levels can be enough to encourage fungal growth if the wood cannot dry out. Without sufficient airflow, moisture gets trapped, creating ideal conditions for rot to take hold and spread.
Identifying Wood Rot
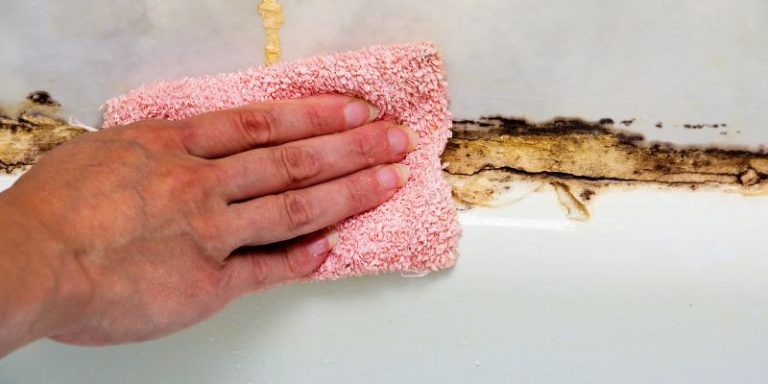
The first sign of wood rot is often a change in the wood’s texture. Instead of being hard and firm, it may feel soft, spongy, or crumbly when you press on it. You might be able to push a screwdriver or awl easily into the wood if it’s significantly decayed. Visually, you might notice discoloration, with rotten wood often appearing darker than healthy wood. In some cases, especially with brown rot, the wood can shrink and develop cracks that run across the grain.
A musty or damp smell is another common indicator. If you suspect rot, gently probe the area with a tool to check for softness. Pay close attention to areas that are constantly exposed to moisture or have had past water damage.
Preparing the Rotting Wood for Repair
Before you can fix rotting wood, you need to make sure the area is ready. This means cleaning out all the rotted parts and making sure the wood is dry. It’s like cleaning a wound before putting a bandage on it. You need to get rid of all the bad bits so the repair materials can stick properly and the rot doesn’t come back. This step is super important for the repair to last. We’ll guide you through what tools you’ll need and how to do it carefully. Getting this part right means your repair will be strong and effective.
Tools and Materials Needed
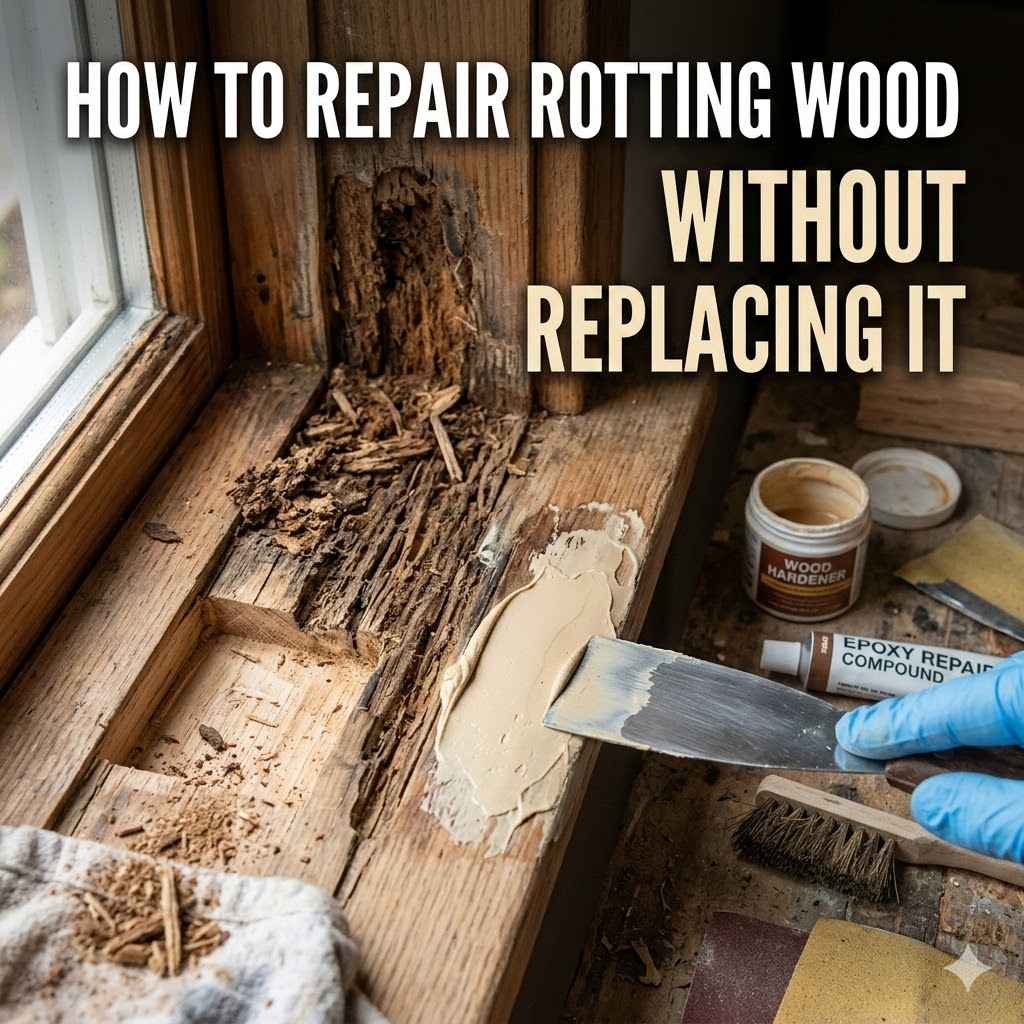
To start, you’ll need a few basic tools. A stiff putty knife or a small chisel is great for scraping out loose, rotten wood. For larger areas, a wire brush can help clean the surface. You’ll also want some sandpaper, both coarse and fine grit, to smooth out the area after cleaning. Safety gear is a must, so grab some work gloves and safety glasses to protect yourself from dust and debris. For the actual repair, you’ll typically need a wood hardener, which soaks into the wood to strengthen it, and a wood filler or epoxy putty specifically designed for wood repair. These products are available at most hardware stores.
Removing Damaged Wood
The first step in preparing the rotten wood is to remove as much of the decayed material as possible. Use your putty knife or chisel to carefully scrape away all the soft, crumbly wood. You want to get down to the sound, solid wood underneath. Don’t be afraid to remove all the mushy bits. The cleaner you get the area, the better the repair will hold. After scraping, use a wire brush to scrub away any remaining loose particles and dust. This also helps to roughen up the surface of the remaining wood, which gives the new repair materials something to grip onto.
Cleaning and Drying the Area
Once all the rotted wood has been scraped out, you need to thoroughly clean the area. Brush away all the dust and debris created during the scraping process. If there’s any dirt or grime, you can wipe it down with a damp cloth, but make sure to let it dry completely afterward. It’s absolutely crucial that the wood is dry before you proceed. Moisture trapped under the repair materials will just continue to feed any remaining rot or cause new problems. You can speed up drying with a fan or a heat gun on a low setting, but ensure the wood is completely dry to the touch and to your probing tool.
How to Repair Rotting Wood Without Replacing It Using Modern Products
Now comes the exciting part – fixing the wood! We’re going to use special products that make this easy. These aren’t just any old glues; they are designed to harden the wood and fill in the missing pieces so well that you’ll forget the rot was ever there. We’ll walk you through applying these products step-by-step. This is where the magic happens, and you’ll see how effectively you can repair rotting wood without replacing it. It’s a process that’s straightforward and gives you impressive results.
Applying Wood Hardener
Once the damaged area is clean and bone dry, it’s time to apply a wood hardener. A wood hardener is a liquid product, often resin-based, that soaks into the porous, weakened wood fibers. Its purpose is to strengthen and stabilize the wood, turning it from a spongy mess into a solid surface. It also helps to seal the wood, preventing future moisture penetration and further decay.
You typically apply it with a brush, much like you would paint. Apply thin, even coats, allowing each coat to penetrate. It’s important to follow the manufacturer’s instructions for drying times between coats. You might need several applications for deeply affected areas.
Using Wood Filler or Epoxy Putty
After the wood hardener has dried completely, you’ll use a wood filler or epoxy putty to rebuild the damaged section. These materials are designed to be strong, durable, and paintable once cured. Wood fillers are generally paste-like and easier to work with for minor damage. Epoxy putties come in two parts that you mix together. They are often stronger and more water-resistant, making them excellent for structural repairs or areas exposed to more stress.
You’ll mix the filler or putty according to the product’s instructions. Then, using a putty knife, press the material firmly into the void left by the rotten wood. Pack it in tightly to eliminate air pockets. Build it up slightly higher than the surrounding wood, as it may shrink a little as it cures.
Shaping and Sanding the Repaired Area
Once the filler or putty has cured according to the manufacturer’s directions (this can take a few hours to a full day), it’s time to shape and smooth the repair. Use a sanding block or sandpaper to carefully sand the hardened filler down until it is flush with the surrounding wood. Start with a coarser grit sandpaper to quickly shape the material and then move to finer grits to achieve a smooth finish.
The goal is to make the repaired area look and feel like part of the original wood. You should be able to run your hand over it and not feel any bumps or ridges.
Priming and Painting the Repaired Wood
The final step in the repair process is to protect your work and make it blend in. Apply a good quality primer over the repaired area. This helps to seal the filler and provide a uniform surface for paint. Once the primer is dry, you can paint the repaired section to match the surrounding wood or structure. Use exterior-grade paint if the repair is on an outside surface. Applying a couple of coats will give you the best coverage and protection.
You might even want to paint the entire surface or adjacent areas to ensure the repair is completely invisible and well-protected from the elements.
Preventing Future Wood Rot
Repairing wood rot is great, but stopping it from happening again is even better! This means keeping your wood dry and healthy. Simple things like fixing leaks, ensuring good airflow, and using protective coatings can make a huge difference. We’ll cover the best ways to protect your home’s wood from moisture and pests.
Taking these steps means you won’t have to worry about this problem again for a long time. Preventing future wood rot is the smartest way to care for your home.
Managing Moisture Levels
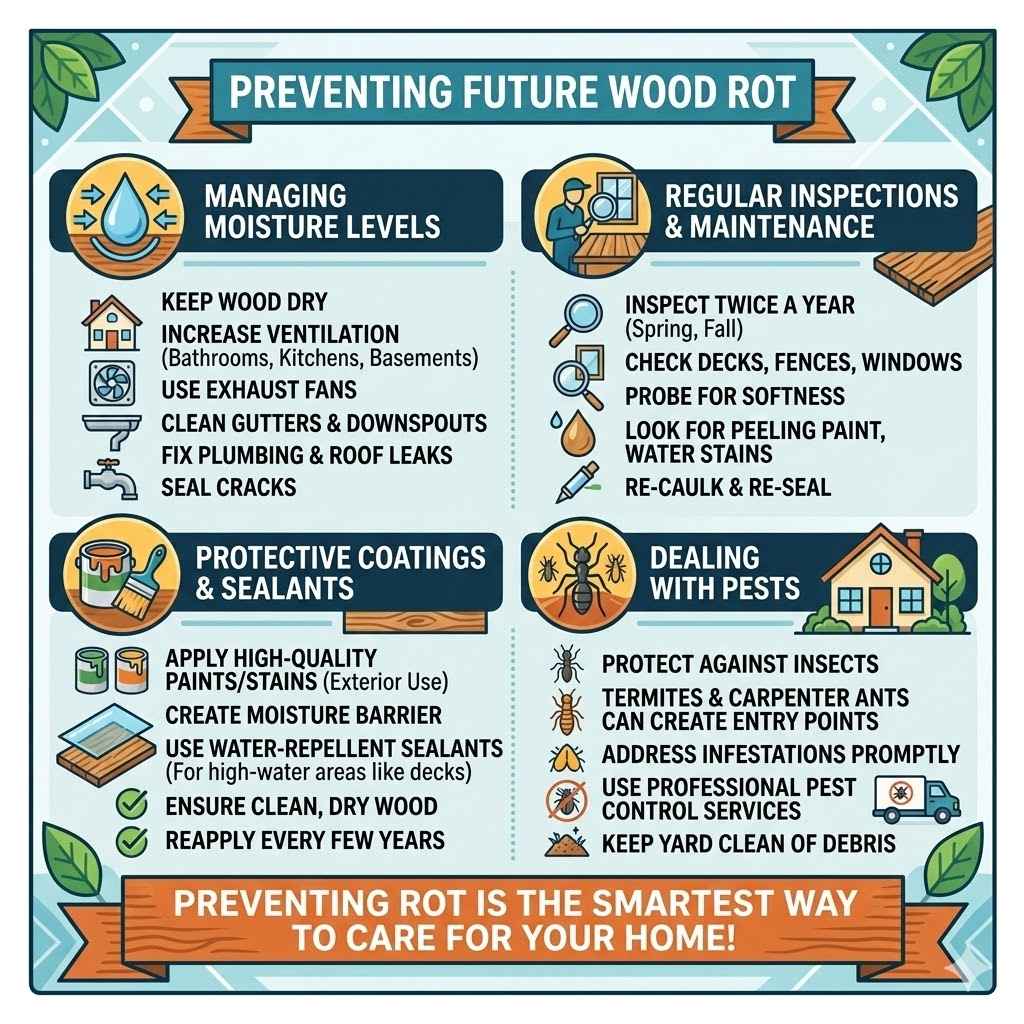
Controlling moisture is the most critical step in preventing wood rot. Ensure your home has adequate ventilation, especially in areas prone to dampness like bathrooms, kitchens, and basements. Use exhaust fans when cooking or showering. For outdoor structures, ensure proper drainage away from the foundation. Gutters and downspouts should be clean and directing water away from the house. Check for and repair any leaks in plumbing or roofing promptly.
Sealing small cracks in exterior surfaces can also prevent water from seeping into the wood. Regularly inspecting these areas helps catch small problems before they become big ones.
Regular Inspections and Maintenance
Making regular checks of your home’s wooden components is a smart preventive measure. Walk around your house at least twice a year, perhaps in spring and fall, and look closely at window frames, door frames, decks, fences, and any other exposed wood. Poke at them gently with a screwdriver to check for softness. Look for signs of peeling paint, water stains, or discoloration. If you find any potential issues, address them immediately.
Routine maintenance, like re-caulking window frames or resealing decks, can prevent water from getting into the wood in the first place. These simple actions can save you from extensive repairs later.
Protective Coatings and Sealants
Applying protective coatings is a strong defense against wood rot. For exterior wood, use high-quality paints or stains designed for outdoor use. These products not only add color but also create a barrier against moisture. For areas that get a lot of water, like decks or outdoor furniture, consider using water-repellent sealants.
These sealants penetrate the wood and form a protective layer that repels water. When painting or staining, always ensure the wood is clean and dry before application. Reapply these coatings every few years, as they can wear down over time due to weather exposure.
Dealing with Pests
While fungi cause rot, some insects can also damage wood or create entry points for moisture and fungi. Termites and carpenter ants are notorious for their ability to weaken wooden structures. If you suspect a pest infestation, it’s important to address it promptly. Professional pest control services can help identify and eliminate these threats.
Keeping your home and yard clean can also help deter pests. Removing decaying wood or debris near your home reduces potential nesting sites for insects. Protecting your wood from pests is another layer of defense against decay.
Frequently Asked Questions
Question: Can I repair any type of wood rot
Answer: While most common wood rot can be repaired using the methods described, severely compromised structural wood might require professional assessment and replacement for safety reasons.
Question: How long does a wood repair typically last
Answer: With proper preparation, high-quality products, and good maintenance, wood repairs can last for many years, often as long as the surrounding wood.
Question: Do I need special skills to do this repair
Answer: No, this process is designed for beginners. It requires basic tools and following simple steps, making it achievable for most homeowners.
Question: What if the rot is deep inside the wood
Answer: For deep rot, it’s essential to remove as much decayed material as possible and apply multiple coats of wood hardener to penetrate and strengthen the core.
Question: Can I use regular wood filler for rot
Answer: It’s best to use wood fillers or epoxy putties specifically designed for wood repair. They are formulated to bond well and withstand environmental conditions better than standard fillers.
Conclusion
You’ve learned how to tackle rotting wood without the hassle of replacement. By cleaning out decay, strengthening the wood, and filling the gaps with modern repair products, you can restore damaged areas. This method is practical and effective for many common rot problems. Remember to always prioritize drying the wood and protecting your repairs. With these steps, you can confidently fix rotting wood and keep your home in great shape.