How To Replace A Toilet: Essential Guide
Quick Summary:
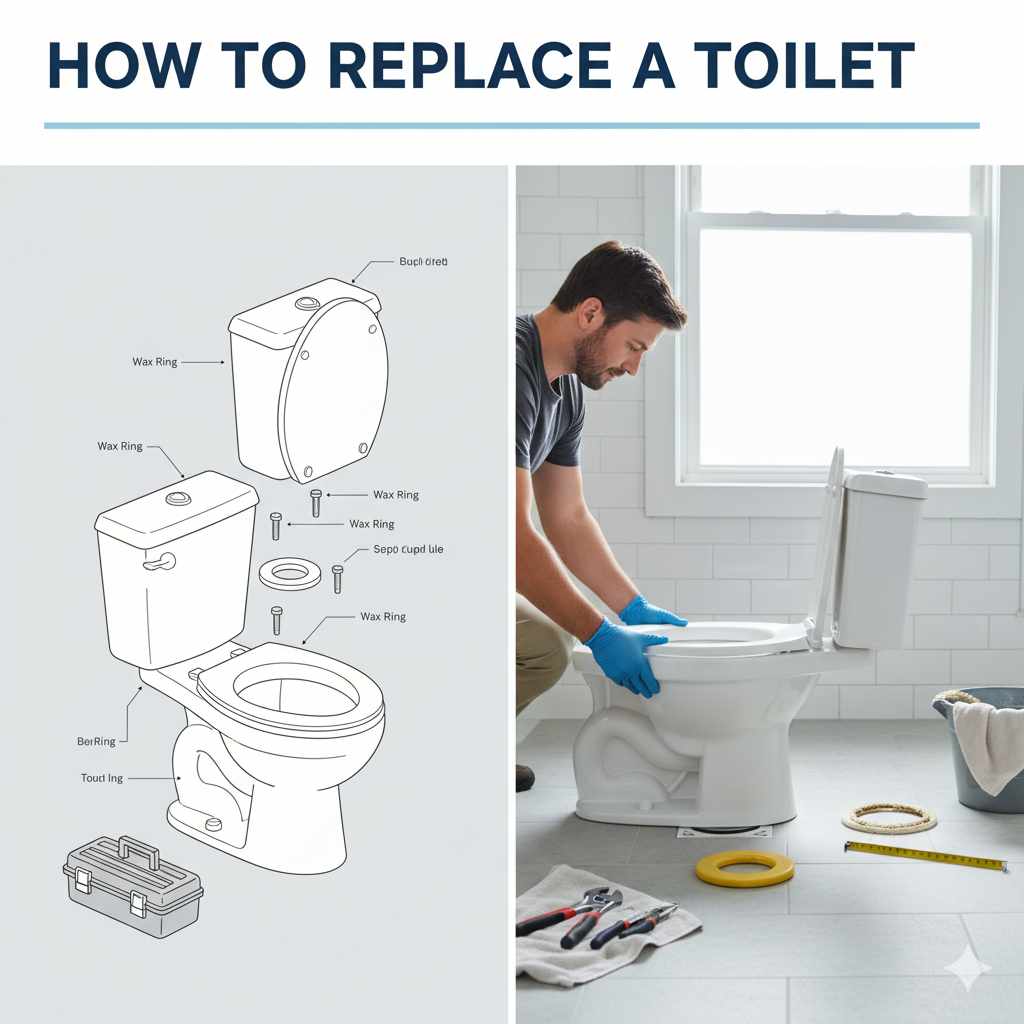
Replacing a toilet is a manageable DIY project for homeowners. With clear steps, the right tools, and a little patience, you can successfully swap out an old toilet for a new one, saving money and gaining valuable home improvement skills.
A leaky, wobbly, or outdated toilet can be a real headache. You might be wondering if this is a job best left to the pros. Well, I’m here to tell you that with a little guidance, you can absolutely tackle this project yourself! Replacing a toilet might seem daunting, but it’s actually one of the more straightforward home improvement tasks. Think of it as a rewarding upgrade that can refresh your bathroom’s look and functionality. We’ll go through it step-by-step, making sure you feel confident and prepared. Ready to get started on giving your bathroom a much-needed facelift?
Why Replace Your Toilet?
There are several good reasons to consider replacing your toilet. Sometimes, it’s purely aesthetic – a new toilet can instantly modernize your bathroom. Other times, it’s about function and efficiency. Older toilets can be water guzzlers, costing you more on your water bill and contributing to unnecessary waste. A leaky toilet, even a small one, can waste gallons of water every day and potentially damage your floor or subfloor over time. Plus, a toilet that rocks or constantly runs is just plain annoying. Whatever your reason, replacing it is often a more cost-effective and environmentally friendly solution than trying to constantly repair an aging fixture.
Tools and Materials You’ll Need
Gathering all your tools and materials before you start is key to a smooth project. This way, you won’t find yourself halfway through and needing to run to the hardware store. Here’s a comprehensive list to get you prepared:
Essential Tools:
- Adjustable wrench
- Plumber’s putty or wax ring with a built-in seal
- Bucket
- Old towels or rags
- Sponge
- Putty knife or scraper
- Pry bar (optional, for stubborn old toilets)
- Level
- Measuring tape
- Gloves
- Safety glasses
- Utility knife or putty knife
- Possibly a hacksaw or reciprocating saw (for stubborn bolts)
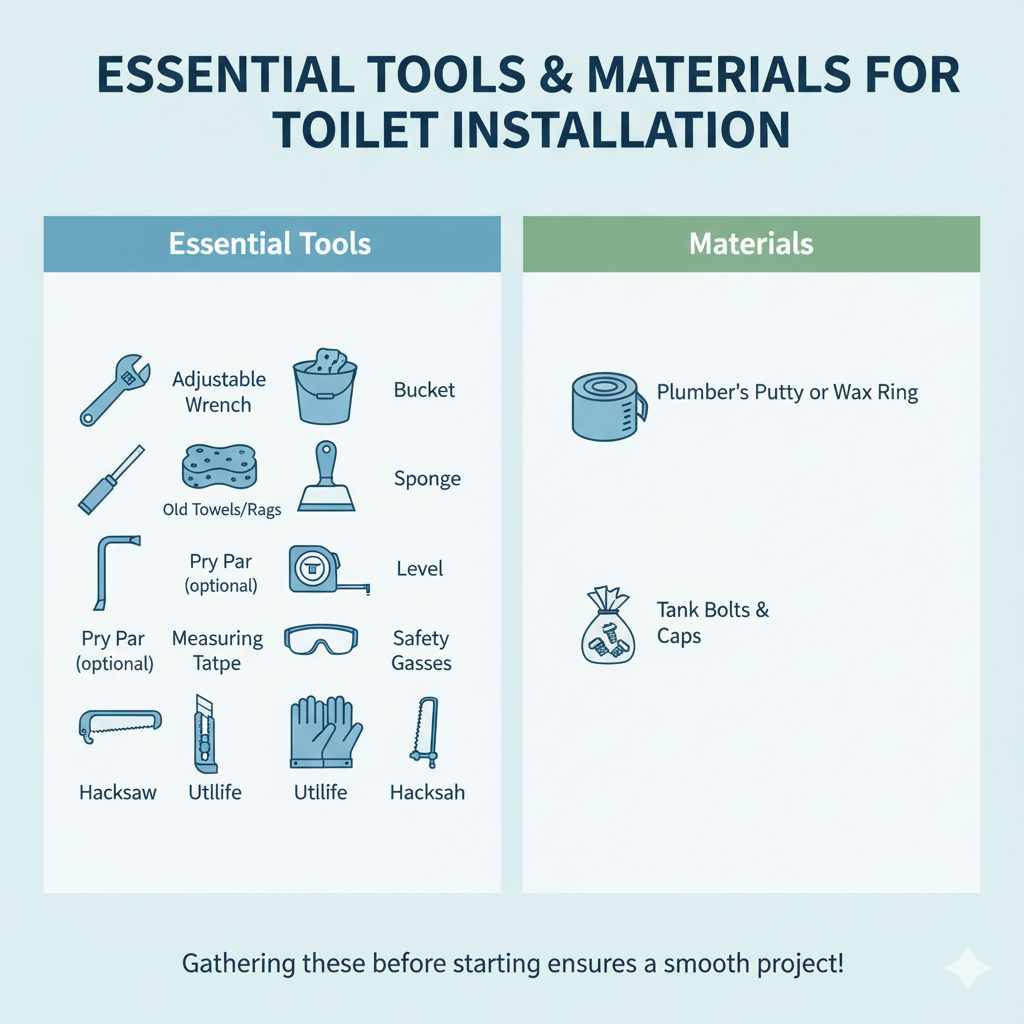
New Toilet Components:
- New toilet (bowl and tank)
- New wax ring (often comes with new toilets, but having an extra is good)
- New toilet bolts and caps
- Possibly new supply line
Step-by-Step Guide to Replacing Your Toilet
Let’s break down the process into manageable steps. Remember to take your time and follow each instruction carefully. Safety first!
Step 1: Turn Off the Water Supply
This is the most crucial first step. Look for the shut-off valve behind the toilet, usually on the wall or floor. Turn it clockwise until it stops. If you can’t find this valve or it’s stuck, you’ll need to turn off the main water supply to your house. Once the valve is closed, flush the toilet to drain as much water as possible from the tank. Hold the flush lever down until most of the water is gone.
Step 2: Empty the Tank and Bowl
Use a sponge and your bucket to soak up any remaining water in the tank and the bottom of the bowl. This prevents spills when you move the old toilet. You can use old towels to catch any drips as you work.
Step 3: Disconnect the Water Supply Line
Using your adjustable wrench, carefully loosen the coupling nut that connects the water supply line to the bottom of the toilet tank. Be prepared for a little residual water to drip out. Have your bucket and towels ready.
Step 4: Remove the Old Toilet Tank
Look at the bolts at the base of the tank where it connects to the bowl. You’ll likely see nuts underneath. Use your wrench to unscrew these nuts. You might need to hold the bolt head on top with a screwdriver to prevent it from spinning. Once the nuts are off, gently lift the tank straight up and off the bowl. Set it aside on some old towels.
Step 5: Remove the Old Toilet Bowl
Now, look at the bolts at the base of the toilet bowl, usually covered by plastic caps. Pry off these caps with a putty knife or screwdriver. You’ll see nuts on these floor bolts. Unscrew them with your wrench. If the nuts are rusted or difficult to remove, you might need to use a penetrating lubricant or, in stubborn cases, a hacksaw or reciprocating saw to cut them off. Be very careful not to damage the floor. Once the nuts are off, gently rock the toilet bowl back and forth to break the seal of the wax ring. Lift the bowl straight up and away from the floor. It will be heavy, so be prepared.
Step 6: Clean the Flange and Floor
This is a critical step for a good seal. Use your putty knife or scraper to remove all traces of the old wax ring from the toilet flange (the plastic or metal ring on the floor where the toilet sits). Ensure the flange is clean and smooth. Also, clean the floor around the flange. Check the flange for any cracks or damage. If it’s damaged, it will need to be repaired or replaced before installing the new toilet. You can find information on flange repair from resources like This Old House, a reputable source for home repair guidance.
Step 7: Install the New Toilet Bolts
Place the new toilet bolts into the slots on the flange. They should stand upright. You can secure them in place with the plastic washers that often come with them, or a dab of plumber’s putty, to keep them from falling over.
Step 8: Place the New Wax Ring
Take your new wax ring and press it firmly onto the flange, ensuring it’s centered. Some wax rings have a rubber sleeve; make sure that part faces down towards the flange. This wax ring creates a watertight seal between the toilet and the drain pipe.
Step 9: Set the New Toilet Bowl
Carefully lift your new toilet bowl and align the bolt holes with the new bolts you just installed on the flange. Gently lower the bowl straight down onto the wax ring. Press down firmly to set the wax. Make sure the bowl is level and stable. If it rocks, you might need to shim it slightly.
Step 10: Secure the Toilet Bowl
Place the washers and nuts onto the new toilet bolts. Tighten them alternately and evenly with your wrench. Don’t overtighten, as this can crack the porcelain. Just snug them up so the toilet is secure and doesn’t move.
Step 11: Attach the Tank
Place the new tank onto the bowl, aligning the bolt holes. Insert the tank bolts (with rubber washers) and tighten the nuts underneath. Again, tighten evenly and snugly, but don’t overtighten. Connect the refill tube to the overflow pipe inside the tank.
Step 12: Connect the Water Supply Line
Attach the new water supply line to the fill valve at the bottom of the tank and to the shut-off valve. Tighten the coupling nuts with your wrench. Ensure the line isn’t kinked.
Step 13: Turn On the Water and Test
Slowly turn the water supply valve back on (counter-clockwise). Let the tank fill. Once full, check for any leaks around the bolts, the base of the tank, and the base of the toilet bowl. Flush the toilet a few times and check again for leaks. Look for water around the base and ensure the tank refills properly.
Step 14: Finish Up
Place the decorative caps over the toilet bolts. Clean up your tools and any mess. Congratulations, you’ve replaced your toilet!
Choosing the Right Toilet for Your Home
When it comes to selecting a new toilet, there are a few things to consider beyond just the look. Your choice can impact your water usage, comfort, and even the ease of installation.
Types of Toilets
Here’s a quick rundown of common toilet types:
| Type | Description | Pros | Cons |
|---|---|---|---|
| Two-Piece Toilet | The tank and bowl are separate units bolted together. | Most common, generally less expensive, easier to maneuver during installation due to lighter components. | Can sometimes have a slight gap between the tank and bowl where grime can collect. |
| One-Piece Toilet | The tank and bowl are a single, integrated unit. | Sleeker look, easier to clean (no gap), often more durable. | Generally more expensive, heavier and can be harder to install due to size and weight. |
| High-Efficiency Toilet (HET) | Uses 1.28 gallons per flush (GPF) or less. | Saves water, reduces utility bills, environmentally friendly. | Initial cost might be higher, some older models required multiple flushes for effective waste removal (though modern ones are very effective). |
| Dual-Flush Toilet | Offers two flush options: a partial flush for liquid waste and a full flush for solid waste. | Significant water savings, customizable for different needs. | Can be more complex to repair if the mechanism fails. |
| Comfort Height Toilet (ADA Compliant) | Taller bowl height (usually 17-19 inches) for easier sitting and standing. | More comfortable for taller individuals, seniors, or those with mobility issues. | May not be suitable for very young children or shorter individuals. |
Water Efficiency Matters
Look for toilets that meet the U.S. Environmental Protection Agency’s (EPA) WaterSense criteria. These toilets use at least 20% less water than the current federal standard of 1.6 GPF, saving you money and conserving a precious resource. Modern WaterSense toilets are designed to flush effectively with less water, so you don’t sacrifice performance for efficiency.
Rough-In Measurement
Before you buy, measure the “rough-in” distance. This is the distance from the finished wall behind the toilet to the center of the drain pipe or the floor bolts. The most common rough-in is 12 inches, but 10-inch and 14-inch rough-ins also exist. Ensure your new toilet matches your existing rough-in measurement. You can measure this yourself by taking a tape measure from the wall to the center of the floor bolts (or the center of the drain if there are no bolts visible yet).
Troubleshooting Common Issues
Even with careful work, you might run into a few snags. Here are some common problems and how to fix them:
The Toilet Rocks or Wobbles
Cause: The toilet wasn’t set evenly on the flange, or the floor is uneven. The nuts securing the bowl to the flange might also be too loose.
Solution: Check that the floor bolts are snugged evenly. If the floor is uneven, you may need to use shims made for toilets under the base to stabilize it. If the flange is uneven, you might need to address that separately. Ensure the nuts are tightened sufficiently, but not to the point of cracking the porcelain.
Leaking Around the Base
Cause: The wax ring wasn’t seated properly, is damaged, or the flange is cracked.
Solution: Turn off the water, drain the toilet, and remove it. Clean off the old wax and inspect the flange. If the flange is cracked, it needs to be repaired or replaced. If the flange is fine, install a new wax ring, ensuring it’s centered and the bowl is set firmly onto it. Re-tighten the floor bolts evenly.
Water Continues to Run into the Bowl
Cause: The flapper in the tank isn’t sealing properly, or the fill valve is faulty.
Solution: Check the flapper for any debris or damage. Ensure the chain isn’t too tight or too loose, preventing a proper seal. If the flapper looks good, the fill valve might need to be replaced. This is a separate part that controls water entering the tank.
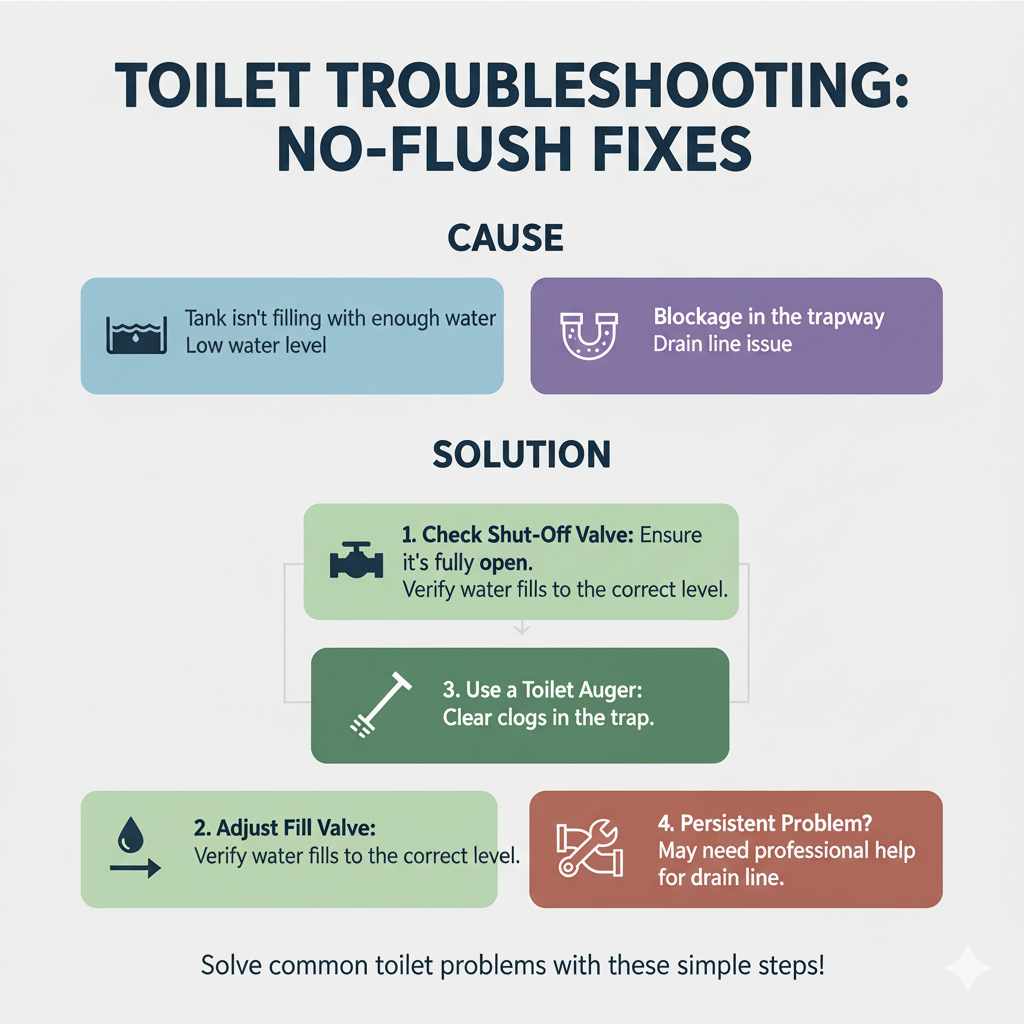
The Toilet Won’t Flush Properly
Cause: The tank isn’t filling with enough water, or there’s a blockage in the trapway.
Solution: Ensure the shut-off valve is fully open. Check the fill valve to make sure the tank is filling to the correct water level. If the water level is good, try using a toilet auger (a specialized plunger) to clear any potential blockages in the trapway. If the problem persists, it could indicate a more significant issue with the drain line.
FAQ: Your Toilet Replacement Questions Answered
Q1: How long does it typically take to replace a toilet?
A1: For a beginner, plan for about 2-3 hours. If you’re more experienced, it can be done in an hour or less. Taking your time is more important than speed.
Q2: Do I need a plumber to replace a toilet?
A2: Not necessarily! Many homeowners successfully replace their own toilets by following clear instructions. It’s a great DIY project to build confidence.
Q3: What is a wax ring, and why is it so important?
A3: The wax ring creates a watertight and airtight seal between the toilet bowl and the drainpipe in the floor. It’s essential to prevent leaks and sewer gases from entering your home.
Q4: Can I reuse the old wax ring?
A4: Absolutely not. The wax ring is designed for a single use. It gets deformed when the toilet is removed and must be replaced with a new one to ensure a proper seal.
Q5: What if the nuts holding the toilet to the floor are rusted or won’t come off?
A5: You might need to use a penetrating oil to loosen them. If that doesn’t work, a hacksaw or reciprocating saw can be used to cut the bolts off. Be very careful not to damage the floor or flange.
Q6: How do I know if my toilet flange is damaged?
A6: After removing the old toilet, inspect the flange (the ring on the floor). Look for cracks, chips, or signs of significant corrosion. A damaged flange needs to be repaired or replaced before installing a new toilet.
Q7: What’s the difference between a standard toilet and a “comfort height” toilet?
A7: Comfort height toilets are taller, usually around 17-19 inches from the floor to the seat. This makes them easier to sit on and stand up from, especially for taller individuals, seniors, or those with mobility issues.
Conclusion
There you have it – a comprehensive guide to replacing your toilet! We’ve covered everything from the tools you’ll need to the step-by-step process, including how to choose a new toilet and tackle common issues. Remember, patience and careful attention to detail are your best friends on this project. You’ve got this! By following these steps, you’ll not only have a new, functional toilet but also the immense satisfaction of knowing you accomplished a significant home improvement task yourself. Happy plumbing!