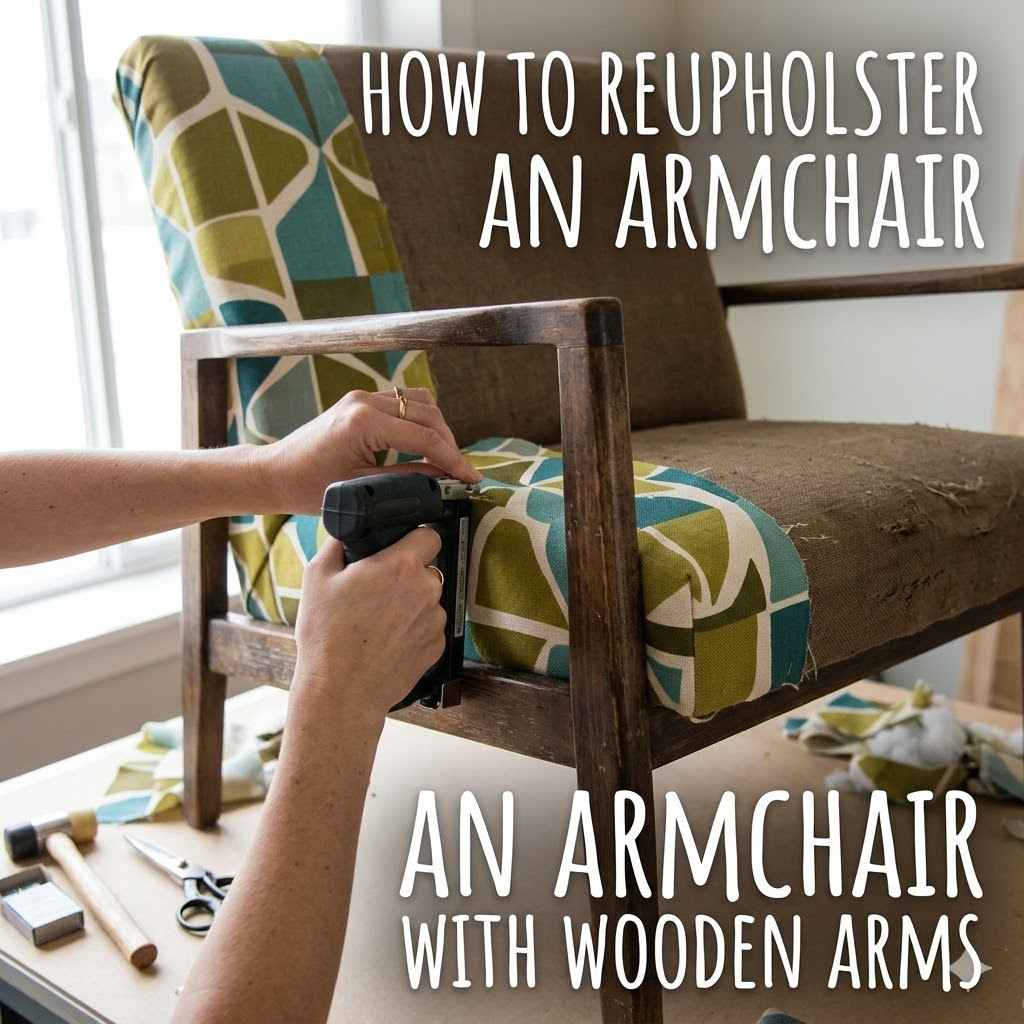
How to Reupholster an Armchair with Wooden Arms
Reupholstering an old armchair can give it a new lease on life, but doing How to Reupholster an Armchair with Wooden Arms yourself might seem tricky at first. You might worry about messing it up or not knowing where to start, especially with those wooden parts to consider. But don’t fret!
We’ll walk you through it step by step, making it easy to transform your chair. Get ready to see your armchair look brand new with these simple instructions.
This section is your main guide for tackling the project of How to Reupholster an Armchair with Wooden Arms. We will break down the entire process into manageable steps, from gathering your supplies to putting on the final fabric. This approach is designed for beginners, ensuring you don’t feel overwhelmed.
We will cover everything you need to know to successfully give your armchair a fresh new look, paying close attention to the details that make reupholstering chairs with wood accents a bit different.
Gathering Your Essential Supplies
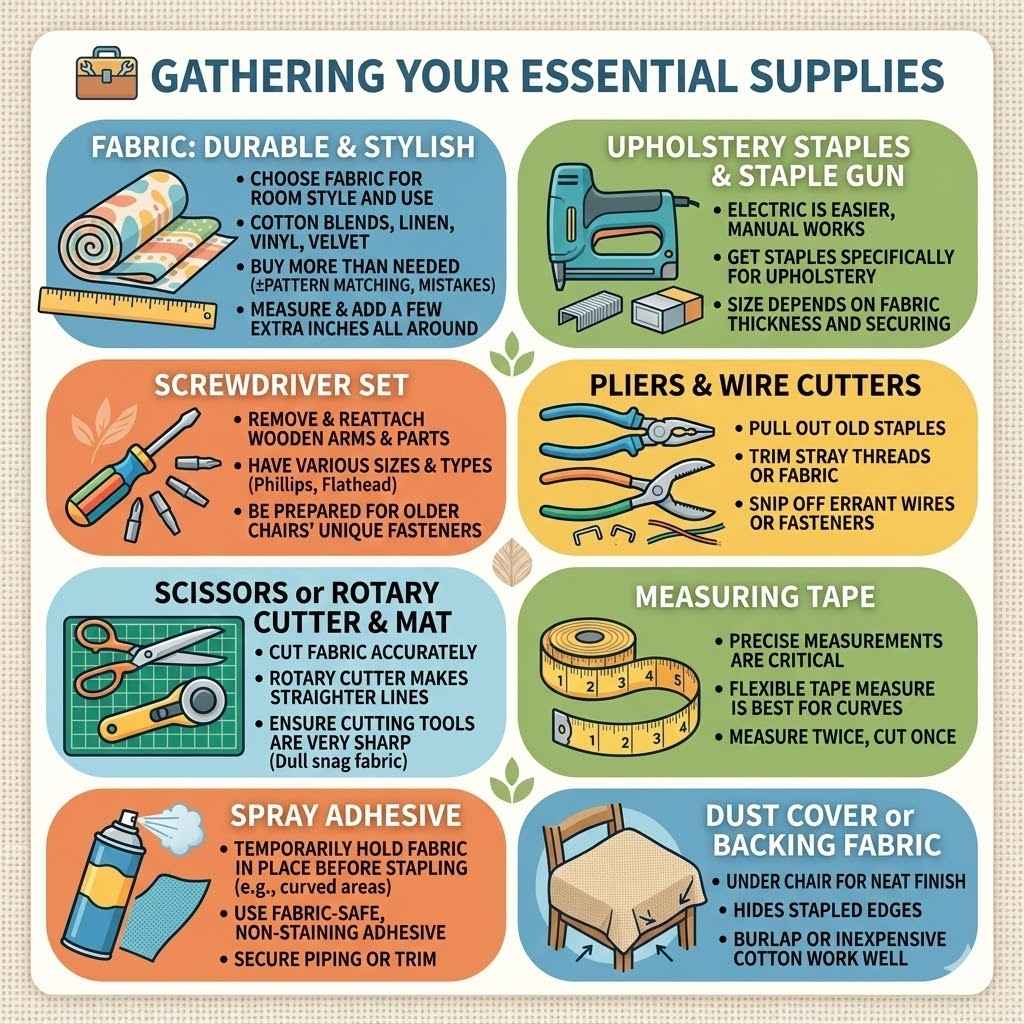
Before you begin, having all your tools and materials ready makes the whole process much smoother. This includes the fabric, of course, but also some important tools. You won’t need super fancy equipment; most items are common household or craft store finds.
Having everything in one place prevents interruptions and helps you stay focused on the task at hand.
Fabric: Choose a fabric that you love and that will stand up to wear and tear. Consider the style of your room and how you use the chair. Durable fabrics like cotton blends, linen, or even vinyl are good choices for frequently used chairs. For a more luxurious feel, velvet or faux leather can work well. Make sure you buy enough fabric, usually a bit more than you think you’ll need, to account for pattern matching and potential mistakes. A good rule of thumb is to measure your chair’s surfaces and add a few extra inches all around.
Upholstery Staples and Staple Gun: This is how you’ll attach the new fabric. An electric staple gun is easier to use and more powerful than a manual one, but a good manual gun can also get the job done. Make sure you get staples specifically made for upholstery, as they are stronger and less likely to rust. The size of the staples depends on the thickness of your fabric and how much you need to secure.
Screwdriver Set: You’ll need this to remove and reattach the wooden armrests, as well as any other parts of the chair that are held on by screws. Having a set with various sizes and types of heads (Phillips and flathead) is essential. Some older chairs might have unique types of fasteners, so being prepared is key.
Pliers and Wire Cutters: These are useful for pulling out old staples and trimming any stray threads or fabric. A good pair of pliers with a strong grip can help you get a firm hold on stubborn staples. Wire cutters are handy for snipping off any errant wires or fasteners you encounter.
Scissors or Rotary Cutter and Mat: Sharp scissors are a must for cutting fabric accurately. A rotary cutter with a self-healing mat can make cutting straighter lines easier, especially for larger pieces of fabric. Ensure your cutting tools are very sharp; dull blades can snag and pull the fabric, leading to uneven edges.
Measuring Tape: Precise measurements are important for cutting the fabric to the right size. A flexible measuring tape is best for conforming to the curves of the chair. Measure twice and cut once is the golden rule here.
Spray Adhesive: This can help to temporarily hold fabric in place before stapling, especially in curved areas or where multiple fabric pieces meet. It’s also useful for securing piping or decorative trim. Make sure to use an adhesive that is safe for fabrics and won’t stain them.
Dust Cover or Backing Fabric: This is the fabric used on the underside of the chair to give it a neat finish and hide the stapled edges. Burlap or a simple, inexpensive cotton fabric works well.
Preparing Your Armchair for Reupholstering
Getting the chair ready is just as important as the actual reupholstering. This involves taking it apart carefully and removing the old fabric. Proper preparation ensures a smooth surface for your new fabric and prevents lumps or bumps from showing through.
This step is where you get up close and personal with your armchair’s construction.
Removing the Old Fabric and Hardware
This is where you see how the chair was put together. Start by carefully removing the wooden armrests. They are usually attached with screws, so use your screwdriver set.
Keep the screws organized, perhaps in a small bag or container, so you don’t lose them.
Next, begin stripping away the old fabric. Use your pliers to pull out staples, working from the edges inward. Sometimes, staples are hidden under fabric folds or welting.
Take your time to remove every single one to avoid snagging your new fabric later.
As you remove the old fabric, look at how it was applied. Notice the seams, the way it was stretched, and where staples were placed. This is like getting a blueprint for your new upholstery.
You might find padding underneath; assess its condition. If it’s worn out, you might want to
When you remove the fabric, you’ll see the frame underneath. Make sure to remove all old staples and any other fasteners. Some chairs might have tack strips holding the fabric in place; these are thin metal strips with teeth that grip the fabric.
You’ll likely need to pry these up carefully.
Document the Process: Take pictures as you disassemble the chair. This is incredibly helpful for remembering how parts fit together, especially if you get interrupted or have a complex chair design. Photos are your best friend when it comes to reassembly.
Organize Hardware: Keep all screws, bolts, and other fasteners in labeled bags. You can even use a muffin tin or an ice cube tray to keep different types of hardware separate. This prevents confusion and ensures you use the correct screws when reassembling.
Inspect the Frame: While the chair is disassembled, check the wooden frame for any damage. Loose joints can be glued and clamped, and small cracks can be repaired. A stable frame is crucial for a good-looking and sturdy reupholstered chair.
Cleaning and Preparing the Wooden Armrests
Since your armchair has wooden arms, this part is extra important. Once the old fabric is off, you can give the wooden parts a good cleaning. Use a damp cloth to wipe away dust and grime.
If the wood is scratched or dull, you might want to lightly sand it and apply a fresh coat of stain or varnish.
Sanding the wood should be done with fine-grit sandpaper to avoid damaging the surface. Always sand in the direction of the wood grain. After sanding, wipe away all dust with a tack cloth or a slightly damp microfiber cloth.
Applying a new finish can really make the wooden arms pop and complement your new fabric. Choose a stain color that matches your decor or a clear varnish to protect the natural wood. Let the finish dry completely before proceeding to the next steps.
Sometimes, wooden armrests are attached with bolts that go through the frame. Make sure these are clean and free of rust. If they are a bit stiff, a drop of lubricant can help.
The goal is to have the wooden parts looking as good as new, ready to be reattached.
Cutting Your New Fabric
This step requires accuracy. Lay your old fabric pieces flat on top of your new fabric, aligning them carefully. You want to cut the new fabric slightly larger than the old pieces to allow for stretching and stapling.
This extra margin is crucial for a taut finish.
If you are using patterned fabric, pay close attention to how the pattern will line up on different parts of the chair. This is called pattern matching and can significantly affect the final look. You may need to cut your pieces with more fabric than usual to ensure the pattern flows seamlessly across seams.
Measure the dimensions of each part of the chair that needs new fabric. For example, the seat cushion, the backrest, and the sides. Add about 3-4 inches to each measurement for a generous overlap.
This overlap is where you will staple the fabric to the frame.
Pattern Matching: If your fabric has a directional pattern, make sure all your cuts are oriented the same way. This means if there’s a picture of a flower, the flower should be upright on the seat, back, and arms. This can be tricky with repeating patterns.
Grain of Fabric: For plain fabrics, ensure the grain of the fabric runs straight and true on each part of the chair. The grain is the direction of the threads in the fabric. This prevents the fabric from looking distorted.
Test Fit: Before you start stapling, do a dry run. Drape the fabric over the chair and see how it fits. This allows you to make small adjustments to your cuts if needed. You can even use small clamps to hold the fabric in place temporarily to visualize the final look.
How to Reupholster an Armchair with Wooden Arms The Upholstery Process
Now for the exciting part: attaching the new fabric. This is where your armchair really starts to transform. We’ll go through each section of the chair, making sure the fabric is smooth and tight.
Remember to work patiently and keep the fabric taut as you staple.
Attaching Fabric to the Seat and Back
Start with the seat. Drape your cut fabric over the seat cushion area, making sure it’s centered and there’s an even overhang on all sides. Pull the fabric taut from one side and staple it to the underside of the seat frame.
Then, go to the opposite side and pull the fabric equally taut, stapling it down. Continue this process on the remaining two sides. The key here is to pull the fabric evenly to avoid wrinkles and ensure a drum-tight finish.
For corners, fold the fabric neatly, like wrapping a gift. Pull the fabric up from the sides and front, folding the excess neatly at the back and stapling it down securely. This creates a clean edge.
Repeat a similar process for the back of the chair. If the backrest has a separate cushion, you’ll treat it like the seat. If the back is part of the main frame, you’ll staple the fabric to the back of the frame, ensuring it’s smooth and wrinkle-free.
Working with Curved Areas and Corners
Curved areas can be a bit more challenging. Make small relief cuts in the fabric if needed to help it lie smoothly around curves. These cuts should be small and placed where they can be hidden by the stapling.
When stapling around a curve, work in small sections. Pull the fabric gently and staple, then pull a little more and staple again. This allows the fabric to conform to the shape without bunching up.
For corners, you have a few options. You can create a neat pleat, similar to how you’d wrap a present. Alternatively, for a very clean look, you can cut a dart into the fabric and then fold and staple.
The goal is to have a smooth, well-fitted corner that doesn’t pucker.
The Double Fold Method: For a very clean edge on exposed areas, fold the raw edge of the fabric under twice (about ½ inch each time) before stapling. This hides the raw edge and creates a finished look. This is best done on areas that will be visible, like the top edge of a seat.
Pleating for Curves: When fabric needs to go around a tight curve, small pleats or gathers are your best friend. Make tiny, controlled folds in the fabric and staple them down. From a distance, these subtle pleats won’t be noticeable but allow the fabric to conform smoothly.
Using a Skirt or Casing: Some chairs have a skirt around the bottom. For this, you’ll cut a separate piece of fabric, hem the bottom edge, and then attach it to the main seat fabric or the frame itself, creating a decorative hemline that hides the staples.
Reattaching the Wooden Armrests
Once the main parts of the chair are upholstered, it’s time to put the wooden armrests back on. Carefully align them with the frame. Ensure you are using the correct screws, especially if they are different lengths.
If you sanded and refinished the wood, this is where the effort pays off. The newly refreshed wood will look fantastic against your new fabric. Gently tighten the screws, making sure not to overtighten, which could strip the wood.
Check that the armrests are secure and don’t wobble. If they feel a bit loose, you might need to add a washer or a slightly larger screw if the hole has become a bit worn.
This step is relatively straightforward, but it’s important to get it right for both the aesthetics and the stability of the chair. The wooden arms are often a key design element, so their proper attachment is crucial.
Adding the Dust Cover and Finishing Touches
The final step is to attach the dust cover to the underside of the chair. This fabric hides all your stapled edges and gives the chair a professional, finished look from beneath. Cut the dust cover fabric to size, leaving a small overhang, and staple it neatly around the bottom edges of the frame.
You can also add decorative elements like new piping along seams or decorative tacks if your chair design calls for it. Ensure all staples are fully seated and no sharp points are sticking out.
Step back and admire your work! You’ve successfully learned How to Reupholster an Armchair with Wooden Arms. It’s a rewarding project that can save you money and give you a custom piece of furniture.
Neat Underside: The dust cover, often made of a strong, dark fabric like muslin or burlap, is stapled to the bottom of the chair frame. This isn’t just for looks; it prevents dust and pests from getting into the chair’s internal stuffing. Make sure to pull it taut and staple it securely, just like the main upholstery.
Welting and Piping: If your original chair had welting (a fabric-covered cord that runs along seams), you can buy pre-made welting or make your own. This is attached with the main fabric before stapling and adds a crisp, defined edge to the upholstery.
Decorative Tacks: For chairs with a more traditional style, decorative nailhead trims or upholstery tacks can be added along the edges of the wooden arms or around the base. These are hammered in carefully to add a touch of elegance.
Common Challenges When Reupholstering Armchairs with Wood
While the general process of reupholstering is similar for many furniture pieces, chairs with wooden arms present a few specific hurdles. Understanding these challenges beforehand can help you avoid frustration and achieve a better result. The interplay between fabric and wood requires careful handling.
Dealing with Fixed Wooden Parts
Unlike fully upholstered chairs, chairs with attached wooden arms mean you can’t simply pull the fabric around the entire frame easily. The wood acts as a boundary, and you need to carefully cut and shape the fabric to meet the wood cleanly. This requires precision in your fabric cutting.
You need to decide how the fabric will end at the wood. Will it tuck neatly underneath? Will it wrap around a specific edge?
The way the original fabric was attached to meet the wood is a good clue. Often, the fabric is stapled to the underside of a wooden frame or tucked into a groove.
If the wooden arms are structural and can’t be removed without dismantling the chair significantly, it adds another layer of complexity. You’ll need to work around these fixed elements, making sure your fabric is smooth and well-fitted without bunching or pulling strangely where it meets the wood.
Maintaining the Integrity of the Wood Finish
A major concern with chairs featuring wooden arms is protecting the wood’s finish during the reupholstering process. Accidental scratches from tools, snags from fabric, or spills from adhesives can ruin hours of work on the wood. This means you need to be extra cautious.
Covering the wooden arms temporarily with painter’s tape or even soft cloths can provide a barrier against accidental damage while you work on the upholstery. When removing old fabric, be careful not to pry against the wood. Use a thin shim or pry bar that’s protected with a cloth to avoid marring the surface.
If you are planning to refinish the wood, this is best done before you start upholstery. However, if the wood is in good condition, you still need to be mindful of protecting it. Any sanding dust or stain drips need to be cleaned up immediately to prevent them from setting into the wood or staining the new fabric.
Achieving a Professional Look at Wood Transitions
The point where fabric meets wood is often the most visible and can determine if your reupholstered chair looks professionally done or like a DIY project. Achieving clean lines, tight seams, and no gaps is key. This is where attention to detail really matters.
Consider how the fabric will end. Will it be a simple fold and staple? Or will you use a small piece of trim or piping to create a transition?
Sometimes, the original design has a channel or groove where the fabric is tucked. Mimicking this can give a very neat result.
If you’re aiming for a very high-end finish, you might need to get a bit creative. This could involve carefully stitching a small flange of fabric to tuck under the edge of the wood or using a specialized adhesive to secure the fabric edge very precisely. Practicing these transition techniques on a scrap piece of fabric can be very beneficial.
The Two-Part Approach: For chairs where the wooden arms are separate pieces that can be removed and reattached, it’s often easiest to upholster the main chair body first, then reattach the arms. This way, you can work on the fabric right up to the point where the arm meets the body without obstruction.
Pre-fitting Fabric: Before making any permanent cuts or staples, drape and pin your fabric pieces onto the chair. This allows you to see exactly how the fabric will fall around the wooden arms and identify any potential problem areas or awkward folds. You can then mark your cut lines with chalk or a fabric marker.
Using Trim for Seamlessness: A well-placed piece of cording or piping can act as a natural transition between the fabric and the wood. It adds a decorative element while neatly covering the edge where the two materials meet, hiding any slight imperfections in the join.
Tools and Techniques for Easier Reupholstering
Certain tools and techniques can significantly simplify the process of reupholstering, especially for beginners. These are not always the most expensive tools, but rather smart ways of working that save time and effort. They make the project more enjoyable and the results more professional.
Leveraging a Good Staple Gun
A quality staple gun is probably the most important tool for upholstery. An electric staple gun offers more power and consistency than a manual one, reducing hand fatigue and ensuring staples are driven in fully. This is crucial for securely attaching fabric.
Make sure your staple gun uses staples of the appropriate size. Too short, and the fabric won’t hold; too long, and they might go through the wood or be difficult to remove later. Practice on a scrap piece of fabric and wood to get the feel for it.
When stapling, pull the fabric taut to avoid wrinkles. Start in the middle of one side and work your way out towards the corners. Then, move to the opposite side and repeat.
This tension creates a smooth, professional finish.
Consider getting a staple gun with a narrower crown, which means the staple has a smaller width across its top. This helps it sink into the fabric more discreetly.
The Role of Spray Adhesive and Batting
Spray adhesive can be a lifesaver for tricky areas. It’s great for holding down fabric edges before stapling, securing the dust cover, or attaching batting to smooth out the form of the chair. Use it sparingly and in a well-ventilated area.
Batting, often made of polyester, is a layer of soft padding that goes over the chair’s foam or existing padding. It helps to create smooth, rounded contours and can hide minor imperfections in the underlying layers. It’s especially useful around curves and corners to give the upholstery a fuller, more finished look.
When applying batting, lay it smoothly over the chair and then trim it to size, leaving enough to be pulled taut and stapled under the fabric. It should be smooth, with no wrinkles or lumps, as these will show through the final fabric layer.
Smart Techniques for Tightening Fabric
Achieving a taut fabric finish is vital for a professional look. One effective technique is to work from the center of each side outwards, always pulling the fabric taut before you staple. This method ensures even tension across the entire surface.
Another useful trick is the “pull and stretch” method. As you staple one side, have someone gently pull the fabric on the opposite side. This helps create an even tension across the entire piece.
If you’re working alone, you can use clamps to hold the fabric taut while you staple.
For very tight areas, like the corners of the seat or around the base of the arms, you might need to use a bit more force. Some upholsterers use a “pulling claw” or a heavy-duty staple remover to get a better grip on the fabric and pull it tighter before stapling.
The “French Fold” Technique: This is a method for creating very neat corners. You fold the fabric edge over itself twice, creating a clean, enclosed edge. Then, you pull it taut and staple it down. This technique works well on visible edges where a crisp finish is desired.
Using a Skewer or Awl: When stapling in tight spots, a sharp skewer or an awl can be used to hold the fabric exactly where you want it while you position and fire your staple gun. This gives you more control over precise placement.
Working in Sections: Don’t try to staple one whole side at once. Staple a few times in the center, then move to the opposite side, then the other two sides. Work in small sections, constantly checking for wrinkles and adjusting tension. This prevents the fabric from shifting and allows you to correct mistakes easily.
Reupholstering an Armchair with Wooden Arms Case Studies
Seeing how others have approached reupholstering chairs with wooden arms can offer valuable insights and inspiration. These examples highlight different challenges and successful solutions, showing the versatility of this DIY project. Real-world scenarios demonstrate practical application of the techniques discussed.
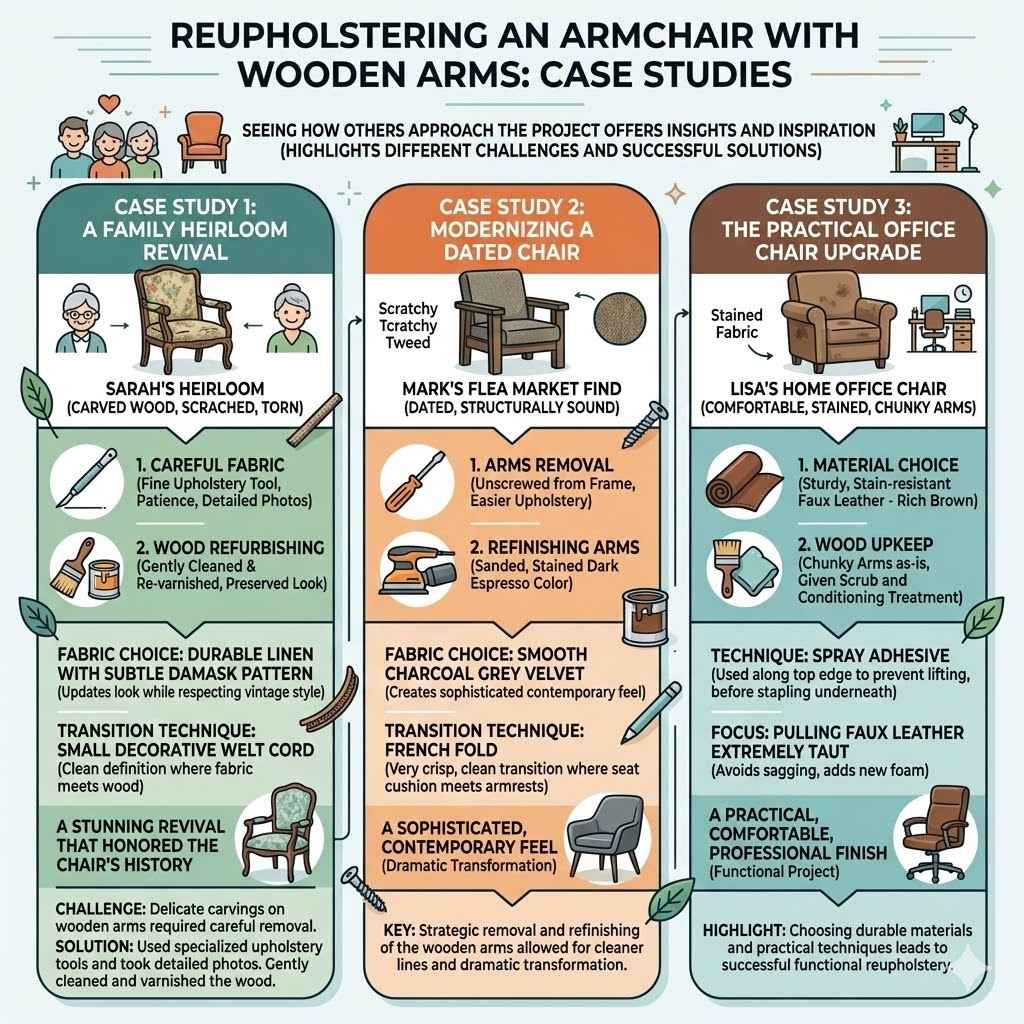
Case Study 1 A Family Heirloom Revival
Sarah inherited a beautiful, but very worn, armchair from her grandmother. The armchair had carved wooden arms that were scratched and the floral fabric was faded and torn. Sarah wanted to keep the chair’s vintage charm but update its appearance.
Her first challenge was carefully removing the old fabric without damaging the delicate carvings on the arms. She used a fine-tipped upholstery tool and a lot of patience. She documented every step with her phone.
The wood beneath was a bit dull, so she decided to gently clean and reapply a clear varnish to preserve its original look.
For the fabric, she chose a durable linen with a subtle damask pattern that echoed the original style but felt more current. She carefully measured and cut her fabric, paying close attention to pattern repeat for the seat and back. At the points where the fabric met the wooden arms, she used a small decorative welt cord to create a clean, defined line, hiding the raw edge of the fabric.
The result was a stunning revival that honored the chair’s history.
Case Study 2 Modernizing a Dated Chair
Mark found a sturdy armchair at a flea market with a very dated, scratchy tweed fabric and chunky wooden arms. He wanted to give it a more modern, minimalist look for his living room. The chair was structurally sound, but visually tired.
He decided to remove the arms entirely for easier upholstery. This involved unscrewing them from the frame. He then sanded the arms down to bare wood and stained them a dark, almost black, espresso color.
For the upholstery, he chose a smooth, charcoal grey velvet. Because the arms were removed, he could upholster the main chair body and then reattach the arms seamlessly. He used a “French fold” technique on the top edges of the seat cushion where it met the armrests to create a very crisp, clean transition.
The dark wood and the plush velvet created a sophisticated, contemporary feel.
The key here was the strategic removal and refinishing of the wooden arms, which allowed for cleaner upholstery lines and a dramatic style transformation.
Challenge: Delicate carvings on wooden arms required careful fabric removal.
Solution: Used specialized upholstery tools and took detailed photos. Gently cleaned and varnished the wood.
Fabric Choice: Durable linen with a subtle pattern to update the look while respecting vintage style.
Transition Technique: Used welt cord to create a clean edge where fabric met wood.
Outcome: A beautifully revived heirloom that looks both classic and current.
Case Study 3 The Practical Office Chair Upgrade
Lisa had an old but comfortable armchair in her home office. The fabric was stained and the wooden arms were worn from years of resting her elbows. She needed something that was both durable for office use and looked presentable.
She opted for a sturdy, stain-resistant faux leather in a rich brown color. The wooden arms were a bit chunky, so she decided to keep them as-is but give them a good scrub and a conditioning treatment to bring out their natural sheen.
Her approach involved stapling the faux leather directly to the frame and wrapping it around the underside of the wooden arms where possible. She used spray adhesive along the top edge of the wooden arms to secure the faux leather before stapling underneath. This prevented the fabric from lifting away from the wood.
For the seat and back, she focused on ensuring the faux leather was pulled extremely taut to avoid any sagging over time. She also added a thick layer of new foam to the seat for extra comfort during long work sessions. The resulting chair was practical, comfortable, and had a professional finish that upgraded her office space.
This case highlights how choosing durable materials and practical techniques can lead to a successful and functional reupholstery project.
Frequently Asked Questions
Question: Do I need to remove the wooden armrests completely?
Answer: It depends on the chair’s construction. For easier access and cleaner results, removing them is often best, but if they are integral to the frame and hard to remove, you can work around them carefully.
Question: How much fabric do I need for an armchair?
Answer: This varies greatly by chair size and design. A general guideline is 5-8 yards of standard-width fabric, but it’s always best to measure your chair’s surfaces and add extra for pattern matching and mistakes.
Question: Can I reupholster without a staple gun?
Answer: While possible with other methods like tacks or heavy-duty glue, a staple gun is the most efficient and secure way to attach upholstery fabric. An electric one makes the job much easier.
Question: What if my fabric has a pattern?
Answer: You will need to pay close attention to pattern matching. This means carefully aligning the pattern on each section of the chair, which often requires buying extra fabric and cutting pieces with more precision.
Question: My wooden arms are scratched. What should I do?
Answer: You can lightly sand them with fine-grit sandpaper and then reapply a matching stain or varnish. Make sure to protect the wood while you are reupholstering to prevent new scratches.
Conclusion
Successfully reupholstering an armchair with wooden arms is achievable. Focus on careful preparation, precise fabric cutting, and patient stapling. Pay attention to how the fabric meets the wood for a polished look.
Don’t be afraid to take your time. Enjoy your refreshed and beautiful armchair.