How to Set a Water Softener
Hey there! So, you’ve got a water softener at home, but you’re scratching your head wondering, “How do I set this thing up?” Don’t worry—I’ve been there! When I first got my water softener, I was clueless, staring at the manual like it was written in another language. Hard water was leaving spots on my dishes and making my skin feel like sandpaper, so I knew I had to figure it out. After some trial and error, a few chats with plumbers, and a lot of tinkering, I’ve learned the ins and outs of setting up a water softener. In this article,
I’m going to walk you through every step, clear and simple, like we’re sitting at my kitchen table. Whether you’re a first-time homeowner or just new to water softeners, I’ll make sure you can set yours up like a pro. Let’s dive in!
Why Set Up a Water Softener Properly?
Before we get to the how-to, let’s talk about why setting up a water softener matters. Hard water, full of minerals like calcium and magnesium, can wreak havoc on your home. I noticed it in my old apartment—limescale buildup in the shower, dingy laundry, and even my coffee maker acting up. A water softener removes those minerals, making your water kinder to your pipes, appliances, and skin.
But here’s the thing: if you don’t set it up right, it won’t work well. I learned this the hard way when my first softener wasn’t softening at all because I skipped a key step. Proper setup ensures your water is soft, your system lasts longer, and you save money on salt and water. Let’s look at what you need to get started.
Tools and Supplies You’ll Need
When I set up my water softener, I made sure to have everything ready. It saved me a trip to the hardware store mid-process. Here’s what you’ll need:
- Water Softener Manual: Every model is different, so keep the manual handy. I lost mine once and regretted it!
- Wrench and Screwdriver: For tightening connections. I used an adjustable wrench and a Phillips screwdriver.
- Pipe Cutter or Hacksaw: If you’re installing plumbing connections yourself. I borrowed a pipe cutter from a neighbor.
- Teflon Tape: For sealing pipe threads. It’s cheap and prevents leaks.
- Bypass Valve and Fittings: Most softeners come with these, but double-check. I had to buy an extra fitting for my setup.
- Salt: Use water softener salt, not table salt. I grabbed a 40-pound bag from the hardware store.
- Bucket and Hose: For flushing the system. I used an old garden hose.
- Water Hardness Test Kit: To check your water’s hardness level. My softener came with one, but you can buy them for about $10.
Having these ready makes the process smoother. I learned to double-check my supplies after starting a job without Teflon tape—big mistake!
Understanding Your Water Softener
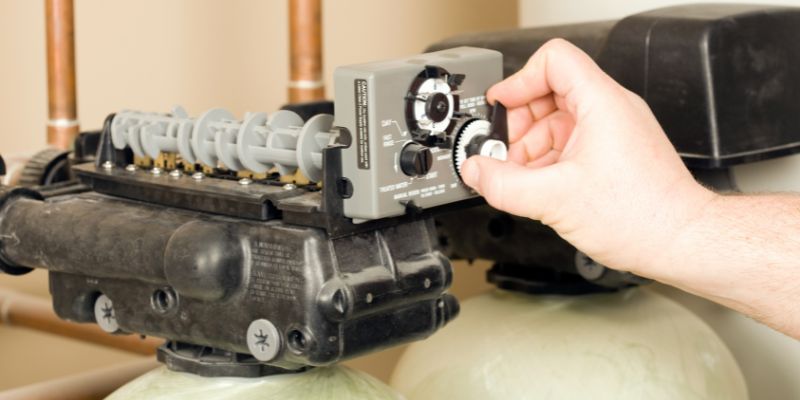
Before you start twisting knobs, it helps to know how your water softener works. I was confused at first, but it’s pretty simple once you get it. A water softener has a resin tank filled with tiny beads that grab onto hard minerals. A brine tank holds salt, which cleans the beads during a process called regeneration. The control valve is the brain—it decides when to regenerate and how much water to use.
My softener has a digital control panel, but some older models have dials. Either way, you’ll need to set the hardness level, regeneration time, and sometimes the salt dose. I’ll walk you through each setting, but first, let’s talk about installing the unit if it’s not already in place.
Installing Your Water Softener
If your water softener isn’t installed yet, you’ll need to set it up physically before programming it. I did this for my house, and it took a Saturday afternoon. Here’s how I did it:
- Choose a Location: Pick a spot near your main water line, with a drain nearby for regeneration water. My softener is in the basement, close to the water heater.
- Turn Off the Water: Shut off the main water supply to avoid a mess. I forgot this once, and let’s just say my floor got a bath!
- Install the Bypass Valve: Connect the bypass valve to your water line. I used copper pipes, but PEX works too. Use Teflon tape on threads to prevent leaks.
- Connect the Softener: Attach the softener’s inlet and outlet to your water line. I followed the manual’s diagram to get it right.
- Set Up the Drain Line: Run a hose from the softener’s drain to a floor drain or utility sink. Make sure it’s secure—I had a hose pop off once, and it was a cleanup nightmare.
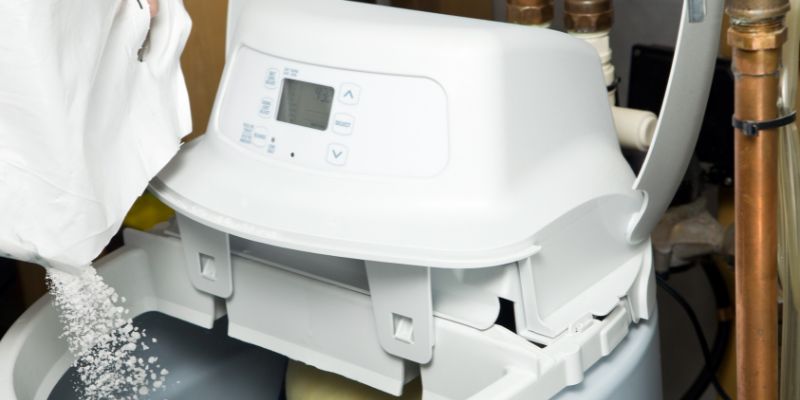
- Add Salt to the Brine Tank: Fill the brine tank with water softener salt. I used about half a bag to start.
- Turn the Water Back On: Slowly open the main valve to check for leaks. I tightened a loose fitting that was dripping.
If plumbing isn’t your thing, hire a pro. I tried doing it alone the first time and ended up calling a plumber to fix a leak. It cost me $100, but it was worth it for peace of mind.
Testing Your Water Hardness
To set your water softener, you need to know how hard your water is. Hardness is measured in grains per gallon (GPG). I didn’t know this when I started, and my softener wasn’t working right because I guessed the setting. A water hardness test kit makes it easy. Here’s what I do:
- Get a Test Kit: Mine came with the softener, but you can buy one at a hardware store or online.
- Collect a Water Sample: Run your tap for a minute, then fill the test vial. I used a clean glass to avoid contamination.
- Add the Test Solution: Follow the kit’s instructions—usually a few drops. My kit turned the water blue if it was hard.
- Check the Results: The kit will show your hardness level in GPG. My water was 15 GPG, which is moderately hard.
Here’s a quick table to understand hardness levels:
| Hardness Level | Grains Per Gallon (GPG) | Description |
|---|---|---|
| Soft | 0–3 | No treatment needed |
| Slightly Hard | 3–7 | May need a softener |
| Moderately Hard | 7–10 | Softener recommended |
| Hard | 10–15 | Softener strongly recommended |
| Very Hard | 15+ | Softener essential |
My 15 GPG water needed a softener, and setting it correctly made a huge difference—no more spots on my dishes!
Setting the Water Hardness on Your Softener
Once you know your water’s hardness, you need to program it into the softener. This tells the system how much work it needs to do. I messed this up on my first try, and my water stayed hard. Here’s how to get it right:
- Find the Control Panel: On my softener, it’s a digital screen with buttons. Older models might have dials.
- Enter Programming Mode: Check your manual for how to do this. Mine required holding a “set” button for five seconds.
- Set the Hardness Level: Enter your GPG number from the test. I set mine to 15 GPG.
- Adjust for Iron: If your water has iron (mine had a bit), add 4 GPG for every 1 ppm of iron. My plumber told me this trick.
- Save the Setting: Press the “save” or “enter” button. I forgot to save once, and the softener reset to default!
Double-check your manual, as every model is different. My neighbor’s softener had a different button sequence, and we had to redo it.
Setting the Regeneration Schedule
Regeneration is when your softener cleans itself by flushing the resin beads with saltwater. I didn’t realize how important this was until my softener stopped softening because it wasn’t regenerating enough. Here’s how I set it:
- Choose a Time: Pick a time when you’re not using water, like 2 a.m. I set mine for 3 a.m. to avoid interruptions.
- Set Frequency: Most softeners regenerate every 3–7 days, depending on water use and hardness. My 15 GPG water needs it every 5 days.
- Select the Mode: Some softeners have “demand-initiated” regeneration, which only regenerates when needed. I switched to this, and it saves salt.
- Check Salt Levels: Make sure the brine tank has enough salt. I top mine off monthly to keep it full.
My softener’s manual had a chart for regeneration frequency based on household size and hardness. For my family of four with 15 GPG water, every 5 days works great.
Adjusting the Salt Dose
The salt dose controls how much salt is used during regeneration. Too little, and your water won’t soften. Too much, and you’re wasting salt. I had to tweak this a few times to get it right. Here’s how:
- Check the Manual: It’ll suggest a salt dose based on hardness. Mine recommended 6 pounds per regeneration for 15 GPG.
- Find the Setting: On my digital softener, it’s in the programming menu. Older models might have a dial.
- Adjust as Needed: If your water still feels hard, increase the dose slightly. I bumped mine to 8 pounds when I noticed limescale.
- Monitor Salt Usage: Check the brine tank monthly. I was surprised how fast it went through salt at first!
Finding the right dose took some experimenting, but now my water feels silky, and my appliances are happy.
Flushing and Testing the System
After setting everything, you need to flush the system to make sure it’s working. I skipped this once, and my water tasted salty for a day—gross! Here’s what I do:
- Run a Manual Regeneration: Most softeners have a “regenerate now” button. I pressed it to flush the system.
- Check the Water: Run a tap for a few minutes to clear any air or salt. I used a bucket to catch the water.
- Test for Hardness: Use your test kit again. My water went from 15 GPG to 0 GPG after a proper setup—success!
- Look for Leaks: Check all connections. I found a small drip once and tightened it with a wrench.
This step ensures your softener is doing its job. I felt like a pro when my water tested soft for the first time!
Maintaining Your Water Softener
Setting up your softener is just the start. I learned that regular maintenance keeps it running smoothly. Here’s my routine:
- Check Salt Monthly: Top off the brine tank. I use about one bag every 1–2 months for my family.
- Clean the Brine Tank: Every 6 months, scoop out any gunk. I found a salty sludge once—yuck!
- Inspect Resin Tank: Every few years, have a pro check the resin beads. Mine were fine after 5 years, but it’s worth checking.
- Test Water Hardness: I test every few months to make sure the softener’s working. It’s quick and reassuring.
I ignored maintenance at first, and my softener started acting up. Now, I stick to this schedule, and it’s smooth sailing.
Common Mistakes to Avoid
I’ve made plenty of mistakes setting up my water softener. Here’s what to watch out for:
- Using Table Salt: Only use water softener salt. I tried table salt once, and it clogged the system.
- Skipping the Hardness Test: Guessing the hardness level leads to poor performance. I learned this after months of hard water.
- Overfilling the Brine Tank: Too much salt can cause bridging, where it hardens and blocks water. I had to break up a salt bridge once.
- Ignoring Leaks: Even small drips can waste water. I fixed a leak early and saved my basement from damage.
- Wrong Regeneration Time: Setting it during peak water use (like shower time) can disrupt flow. I switched to 3 a.m. after learning this.
Avoiding these saved me time and frustration. Learn from my mistakes!
Benefits of a Properly Set Water Softener
Once I got my softener dialed in, I noticed a big difference. My dishes sparkled, my skin felt softer, and my water heater stopped building up limescale. Here’s what you’ll enjoy:
- Cleaner Dishes and Laundry: No more spots or dull clothes. My wife was thrilled with our brighter towels.
- Longer Appliance Life: Soft water protects your water heater, dishwasher, and washing machine. My plumber said it could add years to their life.
- Better Skin and Hair: Hard water dried out my skin. Soft water feels like a spa treatment!
- Less Soap Usage: Soft water lathers better, so you use less soap and detergent. I noticed this in my shampoo bill.
It’s amazing how much a little machine can improve your home. Setting it right is worth the effort.
Conclusion
So, how do you set a water softener? It’s all about installing it correctly, testing your water hardness, and programming the hardness level, regeneration schedule, and salt dose. From my own journey—leaky pipes, salty water mishaps, and finally getting it right—I’ve learned that a little patience goes a long way. With the right tools, a hardness test, and some attention to detail, you can have soft water flowing through your home in no time.
It’s not just about avoiding limescale; it’s about making your life easier, from cleaner dishes to softer skin. I hope this guide gives you the confidence to set up your water softener like a pro. Got more questions? Check out the FAQs below for quick answers!
FAQs
How do I know my water’s hardness level?
Use a water hardness test kit. Collect a water sample, add the test solution, and check the results in grains per gallon (GPG). My water was 15 GPG, which needed softening.
Can I use regular salt in my water softener?
No, use water softener salt. Table salt can clog the system. I made this mistake once, and it was a mess to clean up.
How often should my water softener regenerate?
It depends on your water hardness and usage. For my 15 GPG water and family of four, every 5 days works. Check your manual for guidance.
What happens if I set the wrong hardness level?
If it’s too low, your water won’t soften fully. Too high, and you’ll waste salt. I had to adjust mine after guessing wrong at first.
How much salt does a water softener use?
It varies, but mine uses 6–8 pounds per regeneration. I check the brine tank monthly and add a bag every 1–2 months.
Can I install a water softener myself?
Yes, if you’re handy with plumbing. I did it but needed a plumber to fix a leak. If you’re unsure, hire a pro to save time and hassle.
Why does my water taste salty after setting up the softener?
You might need to flush the system. I ran a manual regeneration and opened the tap for a few minutes to clear the salt taste.