How to Shorten Chandelier Chain: Essential Guide
Quick Summary: Shortening your chandelier chain is a straightforward DIY project. With the right tools and a few simple steps, you can easily adjust your chandelier’s height for a perfect fit in any room, enhancing its look and functionality safely.
Ever brought home a beautiful chandelier, only to find it hangs a little too low, bumping your head or obscuring your view? It’s a common decorating dilemma! Those long chains, while stylish, aren’t always the right length for every ceiling height or room. The good news is, you don’t need to be a professional electrician or a master craftsman to fix it. Adjusting a chandelier chain is a manageable DIY task that can make a world of difference to your space. With a little patience and the right approach, you can have your chandelier hanging just right, making your room feel more balanced and welcoming. Let’s get your chandelier looking exactly how you envision it!
Your Essential Guide to Shortening Chandelier Chain
As a fellow home improver, I know that sometimes the smallest adjustments can have the biggest impact. A chandelier that’s the perfect height can truly elevate a room. It’s not just about aesthetics; it’s also about safety and functionality. Imagine walking into a room and not having to duck, or having your dining table fully visible from the rest of the house. That’s the power of getting your chandelier chain length just right. This guide is designed to walk you through the process, step-by-step, making it easy and stress-free, even if you’ve never tackled a project like this before. We’ll cover everything from what you’ll need to the actual process of shortening the chain, ensuring you feel confident and ready to go.

Why Shorten Your Chandelier Chain?
There are several reasons why you might find yourself needing to shorten a chandelier chain. Understanding these can help you appreciate the importance of this simple adjustment:
- Ceiling Height: This is the most common reason. Standard ceiling heights vary, and a chandelier that looks great in a grand hall might be overwhelming or impractical in a room with an 8-foot ceiling. Proper height ensures clearance for walking and optimal light distribution.
- Room Size and Scale: A chandelier should be proportionate to the room it’s in. Too long, and it can make a small room feel cluttered. Too short, and it might get lost in a large space. Adjusting the chain helps achieve the right visual balance.
- Furniture Placement: Especially in dining rooms, the chandelier’s height is crucial. It should hang low enough to illuminate the table without being intrusive, and high enough so diners don’t feel like they’re dining under a ceiling fixture. A general rule of thumb is 30-36 inches above the tabletop.
- Aesthetic Preference: Sometimes, it’s simply a matter of personal taste. You might prefer a more minimalist look, or you might want the chandelier to be a focal point without dominating the entire space.
- Relocation: When moving a chandelier to a room with a different ceiling height, you’ll almost certainly need to adjust the chain length.
Tools and Materials You’ll Need
Before we dive into the steps, let’s gather our supplies. Having everything ready makes the process much smoother. Don’t worry if you don’t have all these items; many are standard household tools, and you can often borrow them from a friend or neighbor if needed.
- Safety Glasses: Always protect your eyes, especially when working overhead.
- Gloves: To keep your hands clean and provide a better grip.
- Ladder or Sturdy Step Stool: Ensure it’s stable and the right height for you to comfortably reach the chandelier.
- Pliers (Two Pairs Recommended): Needle-nose pliers are excellent for manipulating the chain links. Having two pairs allows you to hold one link steady while opening another.
- Wire Cutters or Bolt Cutters (Optional, for thicker chains): If your chain links are very thick and difficult to bend with pliers, these might be necessary.
- Measuring Tape: To determine the desired length.
- A Helper (Highly Recommended): An extra pair of hands is invaluable for holding the ladder steady, passing tools, and supporting the chandelier if needed.
- Drop Cloth or Old Sheets: To protect your furniture and floor from dust or any small pieces that might fall.
- A Small Container or Bag: To keep any removed chain links or hardware safe.
- A Lamp or Work Light: To ensure you have good visibility.
Safety First: Important Considerations Before You Start
Working with lighting fixtures, even when they’re turned off, requires caution. Your safety is paramount. Here are a few crucial points to keep in mind:
- Turn Off the Power: This is non-negotiable. Locate the circuit breaker that controls the chandelier and switch it OFF. It’s a good idea to also turn off the main light switch in the room for an extra layer of safety. To be absolutely sure, you can use a non-contact voltage tester on the wires once you disconnect the fixture.
- Let it Cool: If the chandelier has been on recently, allow it to cool down completely. Light bulbs and metal components can get very hot.
- Support the Chandelier: While you’re working on the chain, the chandelier will be hanging by the electrical wire and possibly the canopy. You’ll want to ensure it’s supported so it doesn’t put undue stress on the wiring or the ceiling box. Your helper can be crucial here.
- Work on a Stable Surface: Ensure your ladder or step stool is on a level, non-slippery surface. Never overreach; move the ladder as needed.
- Electrical Wiring: You will not be directly working with the electrical wires when shortening the chain itself, but it’s important to be aware of them. If you need to disconnect the fixture entirely, ensure the power is off and consider consulting an electrician if you’re not comfortable. For this task, we’re only adjusting the chain, not the wiring.
Step-by-Step: How to Shorten Your Chandelier Chain
Now that you’re prepared and safety is covered, let’s get to the exciting part: shortening the chain! This process is all about carefully removing links to achieve your desired length. We’ll focus on the most common type of chandelier chain, which is made of interlocking oval or circular links.
Step 1: Measure and Determine the New Length
Before you touch the chain, you need to know how much shorter it needs to be. Measure from the ceiling hook (or mounting point) to where you want the top of the chandelier to hang. A common guideline for dining rooms is 30-36 inches above the tabletop. For general living areas, aim for at least 7 feet (84 inches) from the floor to the bottom of the chandelier, or ensure it’s at least 1 foot below any ceiling fan blades. Measure your existing hanging length and subtract your desired length to find out how many inches or feet you need to remove.
Example: If your chandelier currently hangs 48 inches from the ceiling, and you want it to hang 36 inches, you need to shorten the chain by 12 inches.
Step 2: Access the Chandelier Chain
Safely climb your ladder or step stool. You’ll need to reach the top of the chandelier chain where it connects to the ceiling canopy and the hook. The canopy is the decorative cover that hides the electrical connection and mounting hardware against the ceiling. Gently pull the canopy down if it slides along the chain. You might need to gently pry it down or it might just slide. Be careful not to force it, as this could damage the canopy or wiring. If it’s stiff, look for a small set screw that might be holding it in place.
Once the canopy is down, you’ll see how the chain attaches to the electrical cord and the mounting hardware. You might also see a decorative finial or cap holding the canopy in place. You may need to remove this finial to slide the canopy down further. The electrical cord will likely be threaded through the chain.
Step 3: Identify the Links to Remove
Look closely at the chandelier chain. You’ll need to remove a section of chain that adds up to the total length you want to shorten. For example, if you need to shorten it by 12 inches, and each link is about 1 inch long, you’ll need to remove approximately 12 links. Count the links carefully to ensure accuracy.
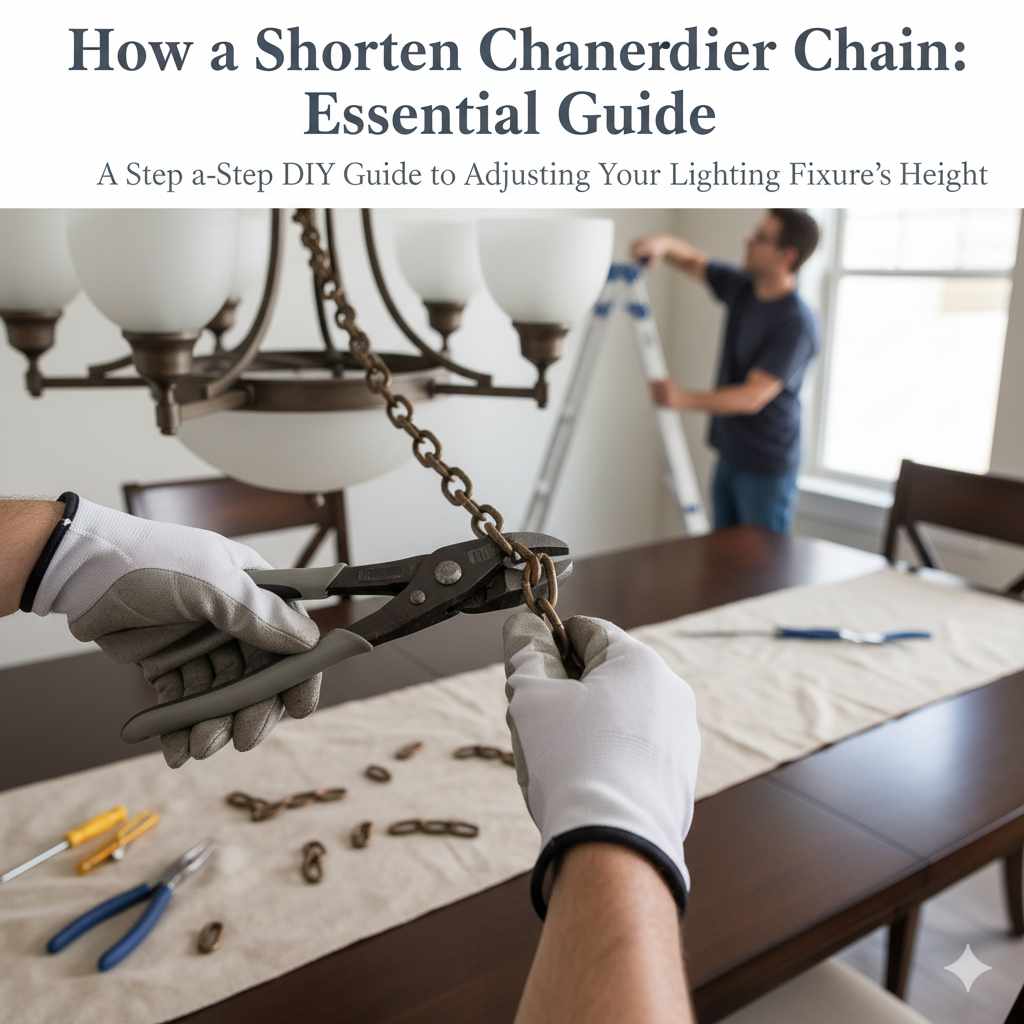
Step 4: Open and Remove Chain Links
This is where your pliers come in handy. Chandelier chain links are typically connected by being bent open. To remove a link, you need to carefully bend it back into its original position to open it, or sometimes, you might need to gently twist and pull. The goal is to open the link enough to detach it from the links above and below it, without damaging the surrounding links or the electrical cord running through it.
Using Two Pairs of Pliers:
- Grip one link firmly with one pair of pliers.
- With the second pair of pliers, grip the adjacent link that you want to remove.
- Gently twist and pull the second pair of pliers to open the link. You are essentially reversing the bending process that originally closed the link.
- Work slowly and deliberately. Avoid forcing the links, as this can deform them or even break them.
- Once a link is open, detach it. Repeat this process for each link you need to remove.
Important Note: Be extremely careful not to damage the electrical cord that runs through the chain. The chain is there to support the weight, but the cord carries the electricity. You do not want to nick or cut the cord.
Step 5: Re-Secure the Chain
After removing the desired number of links, you’ll have a gap in the chain. You need to reconnect the remaining chain securely. This usually involves closing the last link you kept attached to the top section of the chain and the first link of the bottom section. You might need to use your pliers to gently bend these links back into a closed, secure position. Ensure they are closed tightly so they don’t accidentally open later.
Some chandeliers have a special connector link at the top or bottom of the chain. If you are removing links from the middle, you’ll simply reconnect the two ends of the chain. If you are removing links from the top, you’ll need to ensure the remaining top link securely attaches to the chandelier’s hanging mechanism.
Tip: If your chain has a decorative “quick link” or “quick connect” clip at the top, you might be able to simply open that clip to adjust the length. This is often the easiest method if available.
Step 6: Thread the Electrical Cord and Reassemble
Once the chain is the correct length and securely connected, you’ll need to re-thread the electrical cord through the adjusted chain. Pull the cord gently from the bottom of the chandelier until it’s snug but not taut. Ensure there’s a little slack so the cord isn’t pulling on the electrical connections inside the fixture or the ceiling box.
Slide the canopy back up the chain towards the ceiling. It should cover the electrical connections and mounting hardware. Re-attach any finials or decorative caps you removed earlier.
Step 7: Test the Height and Functionality
Carefully descend from the ladder. Step back and look at the chandelier. Does it hang at the desired height? Is it level? Does it clear any walkways or furniture as intended? Make any minor adjustments needed. If you need to make it a little longer or shorter, you may need to repeat the process of opening and closing links.
Step 8: Restore Power and Enjoy
Once you are completely satisfied with the height and the chandelier is securely in place, it’s time to restore power. Go back to your circuit breaker and flip the switch back ON. Then, turn on the light switch for the chandelier. It should illuminate beautifully at its new, perfect height!
Alternative Methods for Chandelier Chain Adjustment
While opening and closing chain links is the most common method, some chandeliers might have different adjustment mechanisms. Understanding these can save you time and effort.
1. Using a Quick Link or Carabiner Clip
Many modern chandeliers come with a decorative quick link (also called a carabiner clip or snap hook) at the top of the chain. This is designed for easy adjustment. You simply open the clip, detach the chain at the desired link, and re-clip it to shorten the length. This is the simplest method and requires no tools other than your hands.
2. Using a Wire or Cable Management System
Some fixtures, especially those with a more contemporary or minimalist design, might not have a traditional chain. Instead, they might use a metal cable or a series of rods. Adjusting these can be more complex and might involve disassembling parts of the fixture or using specific cable management clips. For these, it’s always best to consult the manufacturer’s instructions. If you’re unsure, it’s wise to seek professional help.
3. Using a Chandelier Cable Lock
For fixtures that use a cable instead of a chain, a “chandelier cable lock” or “cord grip” might be used. These devices clamp onto the cable to hold the fixture at the desired height. Adjusting these typically involves loosening a screw on the lock, sliding the cable to the new position, and then re-tightening the screw. Always ensure the cable lock is rated for the weight of your fixture.
4. Professional Installation
If your chandelier has a very thick, heavy-duty chain, or if you’re uncomfortable with any part of the process, don’t hesitate to call a qualified electrician. They have the experience and specialized tools to handle any type of fixture safely and efficiently. For complex fixtures or if you’re dealing with wiring concerns, professional help is always the safest bet.
Table: Common Chandelier Chain Link Types and How to Adjust Them
Understanding the type of chain your chandelier has will help you determine the best way to shorten it. Here’s a quick guide:
| Chain Link Type | Appearance | Tools Needed | Adjustment Method | Difficulty Level |
|---|---|---|---|---|
| Standard Oval/Circular Links | Interlocking metal loops, often with a slight gap or seam where they are joined. | Two pairs of pliers (needle-nose recommended). | Carefully open a link to detach it, then re-close the remaining links to secure. | Beginner to Intermediate |
| Quick Link / Snap Hook | A single link with a spring-loaded gate that opens and closes. | Hands only. | Open the gate, move the chain to the desired link, and re-clip. | Very Easy |
| Welded Links | Links that are permanently sealed, often appearing smooth and without a visible opening. | Bolt cutters or specialized metal snips. | Cut through the link. This permanently shortens the chain, and the cut ends may need to be filed smooth. | Intermediate to Advanced (requires more force and care) |
| Decorative Chain (e.g., beaded, crystal) | May involve non-metal components or intricate designs where the chain links are less obvious. | Depends on construction; may require specialized tools or professional help. | Varies greatly. May involve removing decorative elements, special connectors, or cutting. | Advanced / Professional |
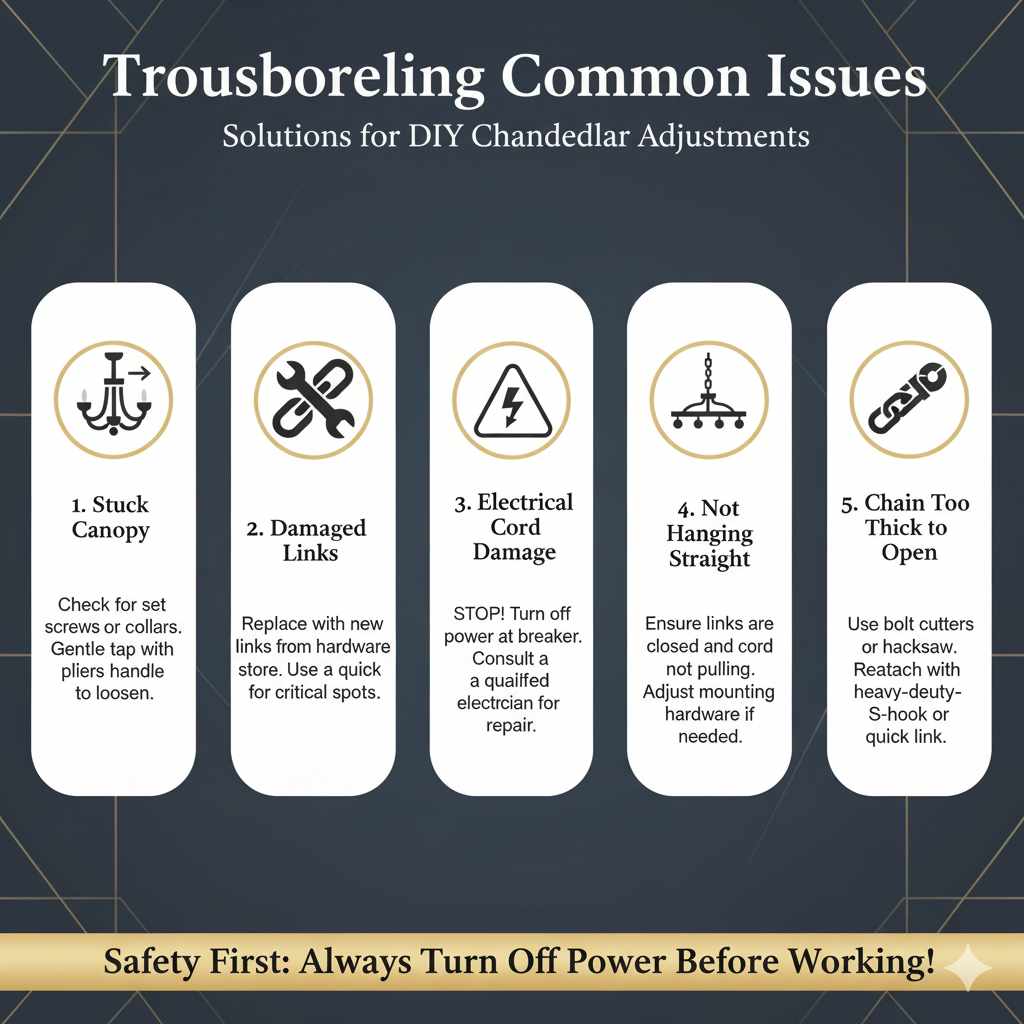
Troubleshooting Common Issues
Even with the best preparation, you might run into a snag. Here are a few common problems and how to solve them:
- Stuck Canopy: If the canopy won’t slide down, check for set screws, decorative collars, or any other mechanisms holding it in place. Sometimes, a gentle tap with the handle of your pliers can help loosen it, but be very careful not to damage it.
- Damaged Links: If you accidentally deform a link while trying to open it, you might need to replace it. You can often buy replacement chain links at hardware stores. If it’s a critical link at the top or bottom, you might need to use a quick link to bridge the gap or reattach it.
- Electrical Cord Damage: If you suspect you’ve nicked or damaged the electrical cord, STOP immediately. Turn off the power at the breaker, and do not proceed. You will need to consult a qualified electrician to repair or replace the cord safely.
- Chandelier Not Hanging Straight: Ensure all links are properly closed and that the electrical cord is not pulling unevenly. If the ceiling box or hook is not perfectly centered, you might need to adjust the mounting hardware itself, which can be a more complex task.
- Chain is Too Thick to Open: For very robust chains, standard pliers might not be enough. You may need to use bolt cutters or a hacksaw to cut through a link. If you have to cut, ensure you have a way to securely reattach the remaining chain, perhaps with a heavy-duty S-hook or a new quick link.
FAQ: Your Chandelier Chain Questions Answered
Q1: How much chain should I remove?
A1: This depends on your ceiling height and the desired look. Measure from the ceiling to where you want the top of the chandelier to be. Subtract this from the current hanging length to find out how much to remove. A common rule for dining rooms is 30-36 inches above the tabletop.
Q2: Do I need to turn off the power?
A2: Absolutely YES! Always turn off the power to the chandelier at the circuit breaker before you start any work. This is the most critical safety step.
Q3: Can I just cut the chain?
A3: For standard chandelier chains, it’s better to open and close links with pliers. Cutting can leave sharp edges and might be more difficult. If you must cut (e.g., very thick chain), use appropriate tools like bolt cutters and ensure the remaining ends are secured properly.
Q4: What if my chandelier has a cord instead of a chain?
A4: If it’s a thick cord, you might need to adjust it using a cord lock or by re-tying it higher up, ensuring there’s enough slack for the connections. If it’s a thin decorative wire, consult the manufacturer’s instructions or a professional.
Q5: How do I know if I’ve removed enough chain?
A5: After you’ve adjusted the chain, gently pull the canopy up. The chandelier should now hang at your desired height. Step back and visually assess the proportion and clearance. You can always make further adjustments if needed.
Q6: What if the electrical wire is too short after shortening the chain?
A6: This is a possibility. If the electrical wire becomes too short to safely connect, you may need to extend it. This is an electrical job and should ideally be done by a qualified electrician to ensure it’s safe and up to code. Never try to splice wires yourself unless you are experienced and knowledgeable about electrical work.
Q7: Can I use one pair of pliers?
A7: While it’s possible, using two pairs of pliers makes the job much easier and safer. One pair holds the stationary link while the other opens the one you want to remove. This prevents strain on the chandelier’s wiring and makes the process more controlled.
Conclusion: Your Chandelier, Perfectly Hung
See? Shortening a chandelier chain is a perfectly achievable DIY project. By following these steps, prioritizing safety, and using the right tools, you can transform your space with a chandelier that hangs just right. It’s incredibly rewarding to tackle these home improvement tasks yourself, and the result is a more beautiful, functional, and personalized home. Whether it’s improving the flow in your dining room or adding the perfect ambiance to your living area, getting that chandelier height spot-on makes all the difference. So, gather your tools, enlist a friend if you can, and get ready to enjoy your perfectly hung chandelier!