Install Fresh Air Intake for Wood Stove Easily
Many folks wonder if it’s hard to Install Fresh Air Intake for Wood Stove Easily. Sometimes, instructions can seem tricky. But it doesn’t have to be that way!
We’ll walk you through it step by step. You’ll see it’s simpler than you think to get more clean air for your stove. Let’s get your home warmer and safer without any fuss.
Why Install a Fresh Air Intake for Your Wood Stove
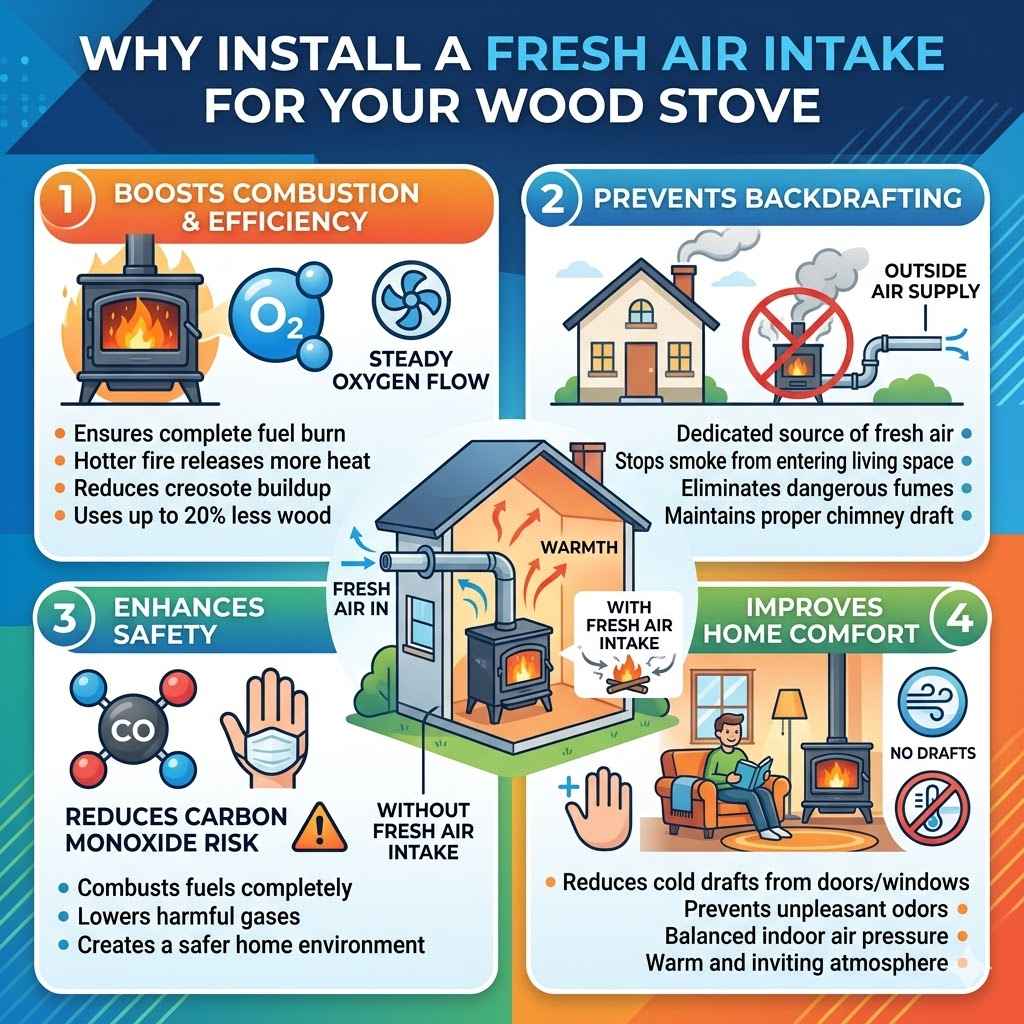
Adding a fresh air intake to your wood stove is a smart move for safety and efficiency. This system brings outside air directly to your stove. This prevents the stove from using up the warm air inside your house.
It also makes sure your stove gets the oxygen it needs to burn fuel completely. This means a cleaner burn and less wasted heat. It’s a simple upgrade that makes a big difference.
Combustion Air Needs of Modern Wood Stoves
Modern wood stoves are designed to burn very efficiently. This efficiency means they need a lot of oxygen to work at their best. Older homes are often “leaky,” meaning they have enough natural air infiltration to supply this oxygen.
However, modern, well-sealed homes can struggle. Without enough fresh air, the stove can struggle to burn properly. This leads to creosote buildup and reduced heat output.
It can even be dangerous.
This oxygen is essential for complete combustion. Incomplete combustion happens when there isn’t enough air. It produces more smoke and harmful gases like carbon monoxide.
A fresh air intake ensures a steady supply of oxygen. This helps the fire burn hotter and cleaner.
Preventing Backdrafting and Carbon Monoxide
Backdrafting occurs when smoke or fumes flow back into your living space instead of up the chimney. This is a serious safety hazard. It can happen when your home is too airtight.
The stove tries to pull air from inside. If there isn’t enough, it can pull air from the chimney, forcing smoke out.
A direct air kit, or fresh air intake, solves this. It provides a dedicated source of air for the stove. This air comes from outside.
It prevents the stove from needing to pull air from your home’s atmosphere. This significantly reduces the risk of backdrafting.
Carbon monoxide is an odorless, colorless gas. It’s a byproduct of incomplete combustion. If a stove backdrafts, carbon monoxide can enter your home.
This gas is deadly. Installing a fresh air intake is a key safety measure against this threat. It ensures your stove has the air it needs for a safe and complete burn.
Improving Stove Efficiency and Heat Output
When your wood stove gets the right amount of combustion air, it burns better. A hotter, more complete fire means more heat is released from the wood. This heat then transfers into your home.
Without enough air, the fire is cooler. It doesn’t burn all the fuel. This wastes wood and produces less heat.
A fresh air intake can make your stove more efficient. It reduces the amount of heat that escapes up the chimney. This is because the stove is not pulling heated room air to feed the fire.
Instead, it uses colder outside air.
Many studies show efficiency gains with proper air supply. For example, one report found that stoves with dedicated air intakes can be up to 20% more efficient. This means you use less wood to get the same amount of heat.
This saves you money and effort.
Creating a More Comfortable Home Environment
A wood stove that struggles for air can create drafts. This is because it pulls air from all sorts of places. It might pull air under doors or through window frames.
This can make certain rooms feel cold or uncomfortable. It can also lead to unpleasant odors being pulled into your home.
By providing a direct source of air for the stove, you reduce this pulling effect. The stove is less likely to create drafts. The air it uses comes from outside.
This makes your home feel more balanced and comfortable. You won’t have those cold spots caused by the stove searching for air.
Understanding Your Wood Stove’s Air Needs
Every wood stove needs a certain amount of air to burn properly. This amount is called combustion air. The way this air is supplied makes a big difference in how well your stove works and how safe it is.
Knowing this helps you understand why adding a fresh air intake is important.
The Role of Oxygen in Combustion
Combustion is a chemical reaction. It’s basically burning. For burning to happen, you need three things: fuel (wood), heat, and oxygen.
Oxygen is the key ingredient that makes the fire keep going. It reacts with the wood. This reaction produces heat and light.
When there’s plenty of oxygen, the wood burns completely. This creates a hot, clean flame. Most of the energy stored in the wood is released as heat.
The byproducts are mainly carbon dioxide and water vapor, which go up the chimney.
If there isn’t enough oxygen, the burning is incomplete. The fire will be smoky and smoldering. Instead of fully burning the wood, it creates more smoke and soot.
This is because not all the carbon in the wood has reacted with oxygen. This incomplete burning is less efficient and produces harmful gases.
Natural Air Infiltration in Older Homes
Older houses were often built with less emphasis on sealing out air. They have more gaps and cracks. These leaks around windows, doors, and foundations allow air to flow in naturally.
This is called natural air infiltration.
For a wood stove, this natural air supply was often enough. The stove could pull the air it needed from these leaks. This meant that a separate air supply system wasn’t always necessary.
The house itself provided the needed oxygen.
However, this also meant that older homes could be drafty. They might have felt less energy efficient. While it helped the wood stove, it wasn’t always ideal for comfort or heating costs.
Challenges with Modern Airtight Homes
Modern homes are built to be much more energy-efficient. They are tightly sealed to keep heated or cooled air inside. This is great for reducing energy bills.
However, it creates a challenge for wood stoves. These airtight homes don’t have much natural air infiltration.
When a wood stove tries to burn in an airtight house, it can quickly use up all the available oxygen. This can lead to the problems we discussed: backdrafting, poor burning, and carbon monoxide risk. The stove needs a dedicated source of fresh air.
A study by the Environmental Protection Agency (EPA) noted that airtight construction can significantly impact indoor air quality and appliance performance. They recommend dedicated combustion air for fuel-burning appliances in such homes.
Determining Your Stove’s Air Requirements
Your wood stove’s manual is the best place to find its specific air requirements. It will tell you the minimum amount of air needed for safe and efficient operation. It might also specify if the stove is designed for a direct air kit.
Some stoves have a rating called the BTU output. Higher BTU stoves generally need more air. You can also look at the stove’s design.
If it has a special port or connection for an air intake pipe, it’s designed to use one.
If you’re unsure, it’s always best to consult the stove manufacturer or a qualified installer. They can assess your stove and home to determine the right air supply needs.
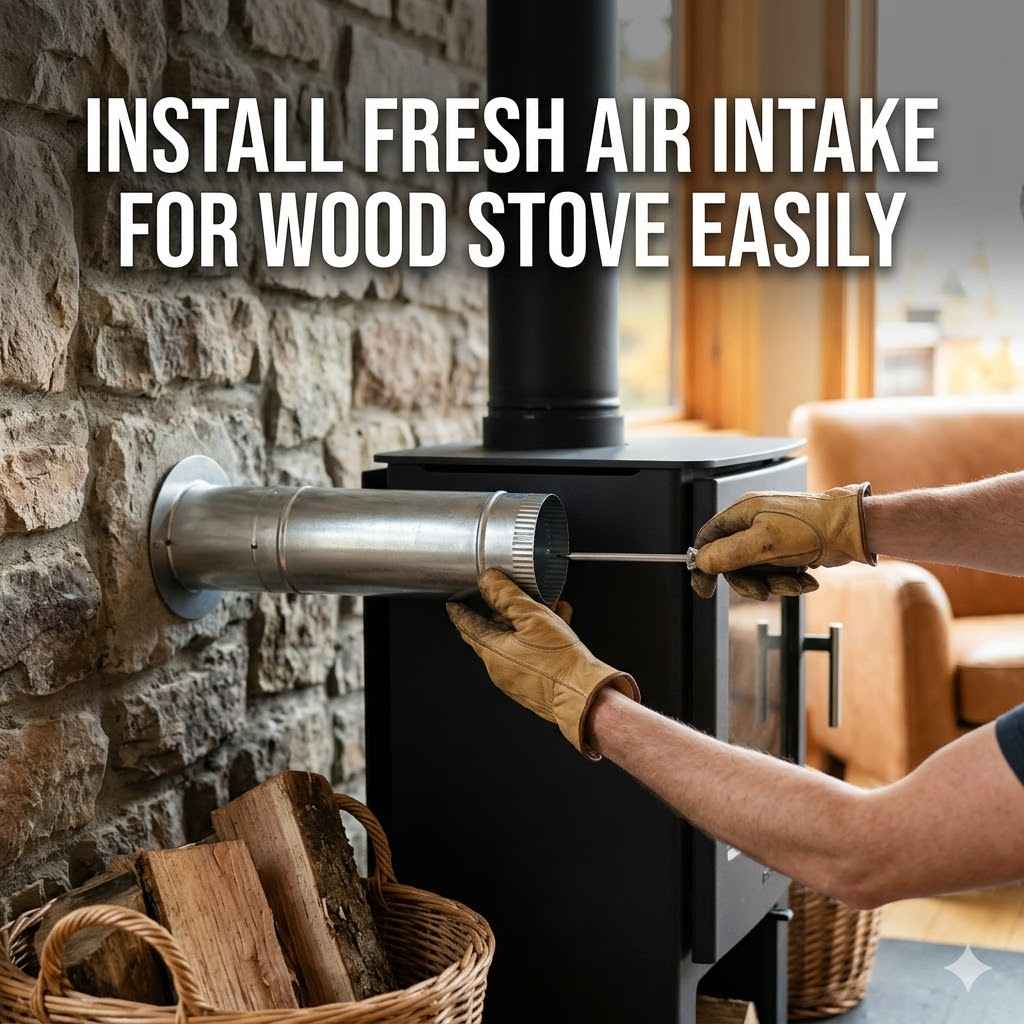
How to Install Fresh Air Intake for Wood Stove Easily
Installing a fresh air intake can seem complicated, but it’s a manageable DIY project. By following these steps, you can add this important safety and efficiency feature to your wood stove. We’ll focus on the most common types and methods.
Gathering Your Tools and Materials
Before you start, make sure you have everything you need. This will save you time and frustration. Common tools include a drill, a jigsaw or hole saw, a screwdriver set, a tape measure, and safety glasses.
You’ll also need a fresh air intake kit. These kits usually include the pipe, an exterior vent cap, and sometimes a connection to the stove.
The specific materials will depend on your stove model and the type of wall you’re going through. You might need a wall thimble if you’re running the pipe through a masonry wall. For wood frame walls, you’ll need appropriate flashing and sealing materials to prevent drafts and moisture.
It’s also a good idea to have a pencil for marking, a stud finder if working with walls, and possibly some caulk or sealant for weatherproofing.
Locating the Best Spot for the Intake
The fresh air intake pipe needs to bring air from outside to your stove. The ideal location is as close to the stove as possible. This makes the piping shorter and more direct.
It also means less chance of air leaks along the pipe’s path.
Consider the exterior wall of your home. You want a spot that is easy to access from both the inside and outside. Avoid locations that might be blocked by porches, decks, or landscaping.
The exterior vent cap should be positioned so it won’t be easily clogged by snow, leaves, or debris.
It’s also important to consider local building codes and manufacturer recommendations. They might have specific guidelines on where the intake can be placed. Some codes require a certain height above the ground or away from other vents.
Drilling the Hole for the Intake Pipe
Once you’ve chosen the location, it’s time to drill. Measure and mark the center of where your pipe will go through the wall. Use a drill bit that matches the size of your intake pipe.
If you’re using a hole saw, this makes a clean, round cut. If you’re using a standard drill bit, you might need to drill a pilot hole first, then use a jigsaw to enlarge it.
Be prepared for what’s inside the wall. You might encounter insulation, wiring, or plumbing. If you hit something unexpected, stop and reassess.
It might be safer to choose a different location or consult a professional.
When drilling through an exterior wall, be aware of any structural elements like studs. You may need to position the hole between studs or reinforce the area afterward. Always wear safety glasses when drilling.
Running the Pipe and Connecting to the Stove
Now, run the intake pipe from the outside through the hole you drilled. If your kit comes with sections, connect them securely. Make sure the pipe is sloped slightly downwards towards the outside.
This helps prevent water from entering the pipe.
On the outside, attach the vent cap. Seal around it with caulk to prevent water from getting into your wall. On the inside, connect the pipe to your wood stove.
Your stove might have a designated intake collar. If not, you might need an adapter. Ensure all connections are airtight.
Some kits include a damper. This allows you to control the airflow if needed. Make sure the damper operates smoothly and can be easily accessed.
The pipe should be insulated if it runs through unheated spaces to prevent condensation.
Sealing and Finishing Touches
After the pipe is in place and connected, it’s crucial to seal everything properly. On the outside, ensure the vent cap is sealed tightly against the wall. Use exterior-grade caulk.
This prevents rain, snow, and drafts from entering your home around the pipe.
On the inside, seal any gaps between the pipe and the wall opening. Again, use caulk or appropriate sealant. If the pipe passes through combustible materials, make sure you’ve used a firestop or wall thimble as required by code and manufacturer instructions.
Double-check all connections to ensure they are secure and airtight. This is vital for the system to work correctly and safely. A well-sealed intake system prevents air leaks and improves overall efficiency.
Choosing the Right Fresh Air Kit for Your Wood Stove
Not all fresh air kits are created equal. Selecting the right one for your specific wood stove and home setup is key to a successful installation and optimal performance. Consider the type of stove you have and the materials you’ll be working with.
Direct Air Kits vs. Ambient Air Kits
Direct air kits are the most common and effective type for modern wood stoves. They bring outside air directly to the stove’s combustion chamber through a dedicated pipe. This completely bypasses your home’s indoor air.
Ambient air kits, also known as room air kits, draw air from the room the stove is in. They then condition this air and supply it to the stove. These are less common for direct air needs and might be used in specific situations.
For most wood stoves, a direct air kit is the preferred and safest option.
The primary advantage of a direct air kit is that it ensures the stove always has a dedicated, fresh source of oxygen. This is especially important in airtight homes where indoor air quality can be a concern.
Compatibility with Your Wood Stove Model
It’s essential to choose a fresh air kit that is compatible with your specific wood stove model. Most manufacturers offer specific direct air kits designed for their stoves. These kits are engineered to connect seamlessly to the stove’s intake collar or designated port.
Using a manufacturer-approved kit ensures the correct airflow and proper fit. If your stove doesn’t have a specific intake port, you might need an adapter or a universal kit. Always check your stove’s manual for compatibility information.
Some stoves require a specific diameter for the intake pipe. Make sure the kit you choose matches these specifications. Using the wrong size can affect performance and potentially create safety issues.
Materials and Durability of the Kit
Fresh air intake kits are typically made from durable materials like galvanized steel or stainless steel. These materials are resistant to corrosion and can withstand the outdoor environment.
Consider the thickness of the metal. Thicker gauge metal will be more durable and less prone to damage. The vent cap on the exterior should also be robust.
It needs to withstand weather conditions and prevent pests from entering.
When looking at kits, check for features like weather stripping around the vent cap and secure fastening mechanisms. These details contribute to the long-term performance and durability of the system.
Considering Wall and Chimney Types
The type of wall you are drilling through will influence the installation process and materials needed. For exterior wood-framed walls, you’ll need proper flashing to seal the opening and prevent water damage. For masonry walls, a wall thimble is often required to provide a safe passage for the pipe and prevent heat transfer.
If your chimney is also unusually airtight, a fresh air intake might still be beneficial. However, the primary purpose is to supply the stove directly, not the chimney itself. Ensure the installation complies with all local building codes for both wall penetrations and chimney systems.
The type of chimney you have may also affect airflow dynamics. While the intake directly supplies the stove, a well-functioning chimney is still critical for venting smoke. Ensure your chimney is properly sized and maintained.
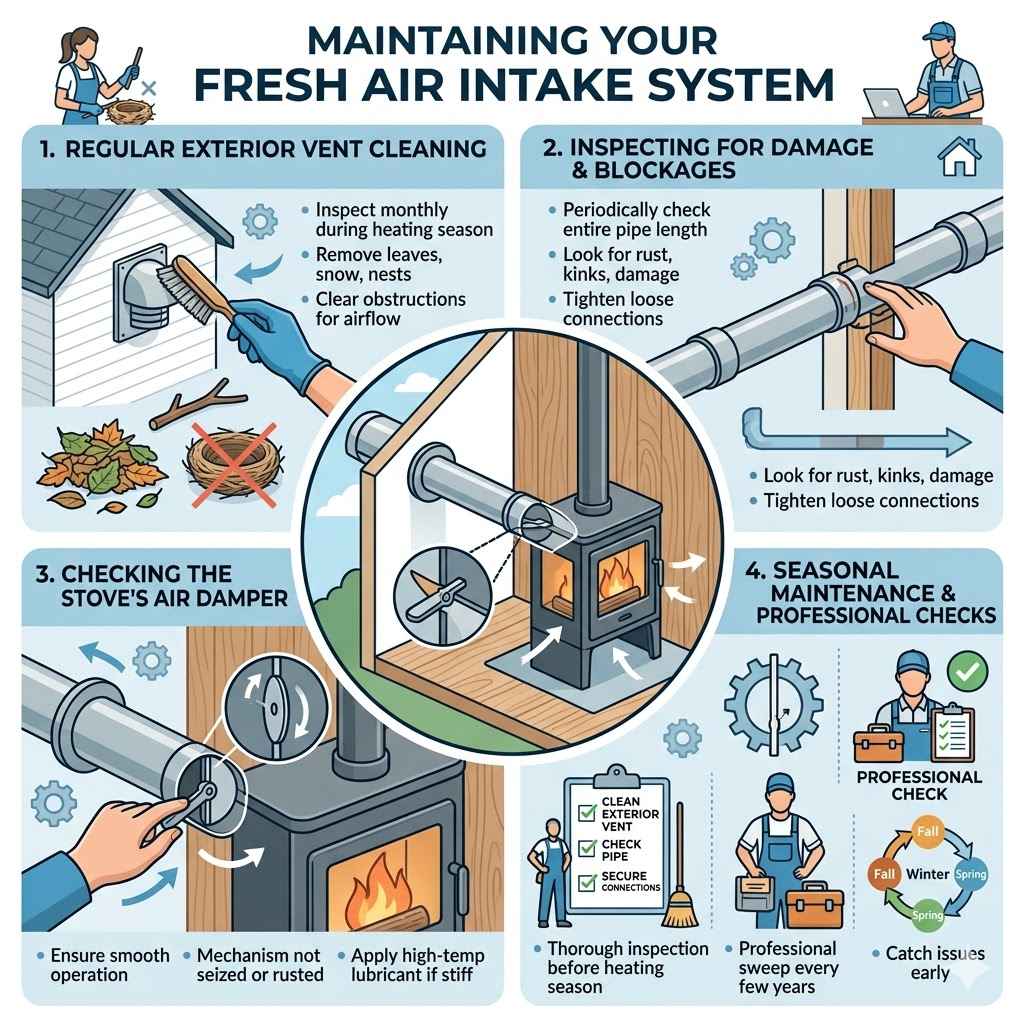
Maintaining Your Fresh Air Intake System
Once your fresh air intake is installed, it’s important to maintain it. Regular checks ensure it continues to work effectively and safely. This isn’t a difficult task but is crucial for optimal performance.
Regular Cleaning of the Exterior Vent
The vent cap on the outside of your house is exposed to the elements. Leaves, snow, bird nests, and other debris can accumulate and block the airflow. You should inspect and clean this vent regularly, especially at the beginning of the heating season and after major weather events.
Use a brush or your hand to clear away any obstructions. If the vent cap is removable, take it off for easier cleaning. Make sure no pests have built a nest inside.
Blocked vents can starve your stove of air, leading to poor performance and safety issues.
A simple check every month or so during the heating season is usually sufficient. This preventative maintenance is quick and easy.
Inspecting for Damage or Blockages
Periodically, inspect the entire length of the intake pipe. Look for any signs of damage, corrosion, or kinks. Ensure that connections are still tight and that the pipe is securely fastened.
Inside, check where the pipe connects to the stove. Make sure this connection remains airtight. Dust and debris can accumulate here over time, so a quick visual check is helpful.
If you notice any damage, repair it promptly. A compromised intake pipe can lead to air leaks, reducing efficiency and potentially compromising safety. If you see significant corrosion or damage, it might be time to replace parts of the system.
Checking the Stove’s Air Damper
If your fresh air intake system includes a damper, make sure it operates smoothly. The damper allows you to control the amount of air entering the stove. You should be able to open and close it fully without difficulty.
Ensure the damper mechanism is not seized or rusted. If it is stiff, apply a lubricant designed for high temperatures or moving parts. A damper that doesn’t work properly can lead to inconsistent airflow and affect your stove’s performance.
Knowing how to adjust the damper is part of operating your stove efficiently. Usually, you’ll want it fully open for maximum combustion air, but some situations might call for partial closure.
Seasonal Maintenance and Professional Checks
Before each heating season, perform a thorough inspection of your fresh air intake system. Clean the exterior vent, check the pipe for damage, and ensure all connections are secure. This is also a good time to have your chimney swept and inspected.
While many homeowners can handle basic maintenance, it’s wise to have a professional wood stove installer inspect your system every few years. They can identify potential problems you might miss. They can also ensure everything is up to code and performing at its best.
Professional checks can catch issues early. This saves you from potential problems down the line. It ensures your wood stove continues to operate safely and efficiently throughout the colder months.
Frequently Asked Questions
Question: Do I really need a fresh air intake for my wood stove?
Answer: If you have a modern, airtight home or your wood stove is located in a well-sealed room, then yes, you likely need a fresh air intake. It provides the necessary oxygen for safe and efficient burning and prevents backdrafting.
Question: Can I use any kind of pipe for a fresh air intake?
Answer: No, you should use materials specifically designed for combustion air intake. These are typically made of metal and are sized correctly for your stove. Check your stove’s manual and local codes for approved materials.
Question: How far from the stove should the fresh air intake be?
Answer: The fresh air intake pipe should be as short and direct as possible, connecting directly to the stove. The exterior vent should be located on an exterior wall, usually a few feet from the stove’s location inside.
Question: Will a fresh air intake make my house colder?
Answer: No, in fact, it can make your home more comfortable. By providing dedicated outside air for the stove, it prevents the stove from pulling warm air from your living space, which can create drafts.
Question: What if I have a basement installation?
Answer: If your wood stove is in the basement, the fresh air intake can often be routed through a basement wall to the outside. Ensure the vent is positioned to avoid moisture and snow accumulation.
Summary
Installing a fresh air intake for your wood stove is a straightforward process that enhances safety and efficiency. By bringing outside air directly to the stove, you ensure proper combustion. This reduces the risk of backdrafting and carbon monoxide.
It also helps your stove perform better, using less wood to generate more heat. Following simple steps and choosing the right kit makes this an easy and valuable upgrade.