Proven Way to Remove Painted Popcorn Ceilings
Yes, you can successfully remove painted popcorn ceilings! The proven way involves careful preparation, using a scoring tool to break the paint seal, and gently scraping with a wide putty knife or ceiling scraper. Patience and the right tools are key to achieving a smooth, updated look without damaging your ceiling.
That textured popcorn ceiling might have been trendy once, but for many of us, it’s a dated look we’re eager to leave behind. If yours has also been painted, you might be wondering if it’s even possible to get rid of it. Many homeowners find this a frustrating challenge, fearing the mess or the potential for damaging the ceiling surface underneath. But don’t worry! With the right approach and a little bit of elbow grease, you can transform your space. This guide will walk you through a proven method to tackle painted popcorn ceilings, making the process manageable and even rewarding. We’ll cover everything you need, from essential safety gear to the step-by-step process that will have your ceiling looking smooth and modern in no time.
Why Remove Painted Popcorn Ceilings?
Popcorn ceilings, also known as acoustic ceilings, were a popular choice for many years. Their primary appeal was their ability to hide imperfections in the ceiling drywall and to absorb sound. However, time and changing design trends have made them less desirable for many homeowners. Here are a few common reasons why people opt to remove them, especially when they’ve been painted over:
- Aesthetic Update: Smooth ceilings are widely considered more modern and elegant. They reflect light better, making rooms feel brighter and more spacious.
- Easier Cleaning: The textured surface of popcorn ceilings is a dust magnet. A smooth ceiling is much easier to wipe down and keep clean.
- Painting Challenges: While popcorn ceilings can be painted, the texture makes it difficult to achieve an even finish. It also makes it harder to repaint in the future.
- Potential for Asbestos: Older popcorn ceilings, installed before the 1980s, may contain asbestos. If you suspect your ceiling is old and unpainted, testing is crucial. However, once painted, the risk of disturbing asbestos fibers is significantly reduced unless the paint itself is disturbed. For painted ceilings, the primary concern shifts from asbestos to the difficulty of removal due to the paint layer.
- Improved Resale Value: A modern, smooth ceiling can be a selling point for your home, appealing to a broader range of potential buyers.
Is It Safe to Remove Painted Popcorn Ceilings?
The primary safety concern with popcorn ceilings is the potential presence of asbestos in ceilings installed before the 1980s. If your ceiling was installed before this period and has never been painted, you should have it tested for asbestos by a qualified professional before attempting removal. You can find resources on asbestos testing from the Environmental Protection Agency (EPA) at EPA.gov.
However, once a popcorn ceiling has been painted, the risk of disturbing asbestos fibers is significantly reduced. The paint acts as a sealant, binding the popcorn texture to the ceiling. The main challenge with painted popcorn ceilings is the physical act of removal and the mess it creates, rather than a health hazard from asbestos. Nevertheless, always prioritize safety by wearing appropriate protective gear.
Tools and Materials You’ll Need
Gathering the right tools and materials before you start will make the job much smoother and more efficient. Think of this as prepping your workbench before starting a woodworking project – it saves time and frustration later!
Essential Tools:
- Safety Glasses: Absolutely crucial to protect your eyes from falling debris and paint chips.
- Dust Masks or Respirator: A good quality mask (N95 or better) will protect your lungs from dust.
- Drop Cloths or Plastic Sheeting: You’ll need plenty to cover floors, furniture, and walls. Heavy-duty plastic is often best for containing dust.
- Painter’s Tape: To secure the drop cloths and protect edges.
- Scoring Tool (Popcorn Ceiling Scraper or Scoring Blade): This is a specialized tool with rotating blades designed to lightly score the painted popcorn texture, allowing water to penetrate. You can often find these at home improvement stores.
- Pump Sprayer: For applying water to the ceiling.
- Wide Putty Knife or Ceiling Scraper: A 6-inch or wider putty knife or a dedicated ceiling scraper with a long handle is ideal for scraping.
- Step Ladder or Extension Ladder: Ensure it’s stable and appropriate for your ceiling height.
- Bucket: For scraping debris.
- Utility Knife: For cutting tape and plastic sheeting.
- Gloves: To protect your hands.
- Sponge or Damp Cloth: For wiping down surfaces.
- Trash Bags: Heavy-duty ones for disposing of debris.
Optional but Helpful Materials:
- Primer and Paint: If you plan to repaint the ceiling after removal.
- Joint Compound and Drywall Tape: For repairing any minor gouges or imperfections in the drywall.
- Sanding Block or Pole Sander: For smoothing any rough spots after scraping.
Step-by-Step Guide to Removing Painted Popcorn Ceilings
This process requires patience, much like waiting for glue to dry on a fine woodworking joint. Take your time, and you’ll achieve a great result.
Step 1: Prepare Your Workspace and Yourself
This is arguably the most critical step, just like laying out your lumber for a project. Proper preparation prevents a much larger cleanup job.
- Clear the Room: Remove all furniture, rugs, and wall hangings from the room. If you can’t move everything, cover it completely with plastic sheeting and painter’s tape.
- Protect the Floor and Walls: Lay down thick drop cloths or plastic sheeting, extending them several feet up the walls. Secure the edges with painter’s tape. Overlap the sheeting to ensure no gaps.
- Cover Outlets and Vents: Use painter’s tape to cover electrical outlets, light fixtures, and air vents to prevent dust and moisture from getting inside.
- Gear Up: Put on your safety glasses, dust mask or respirator, gloves, and old clothing.
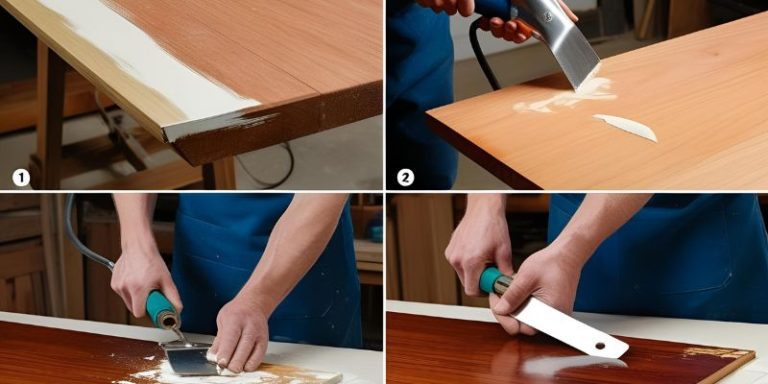
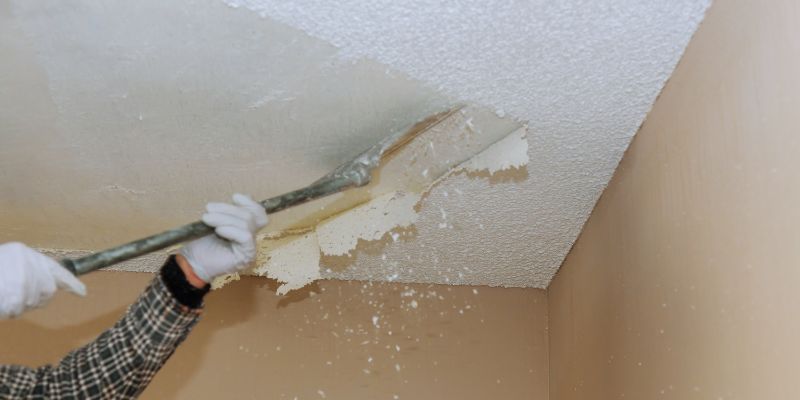
Step 2: Score the Popcorn Texture
This step is key for painted ceilings. The paint creates a barrier that prevents water from soaking into the popcorn material. Scoring allows the water to penetrate and loosen the adhesive.
- Use the Scoring Tool: Gently run the scoring tool over the painted popcorn ceiling. You’re not trying to cut into the drywall, just to create tiny perforations or shallow scores in the paint layer and the popcorn material itself. The goal is to break the paint’s seal.
- Work in Sections: Score a manageable section of the ceiling at a time, perhaps 4-6 feet square. This prevents the water from drying out before you can scrape it.
- Even Coverage: Ensure you score the entire surface you intend to work on.
Step 3: Wet the Ceiling
Applying water is what loosens the adhesive holding the popcorn texture to the ceiling.
- Fill the Sprayer: Fill your pump sprayer with clean water.
- Apply Water Evenly: Lightly mist the scored section of the ceiling. Don’t drench it; you want the water to soak in, not run off. The popcorn material should feel damp, not saturated.
- Allow Soaking Time: Let the water sit for about 10-15 minutes. This allows it to penetrate the scoring and soften the adhesive. You’ll notice the popcorn material beginning to swell slightly.
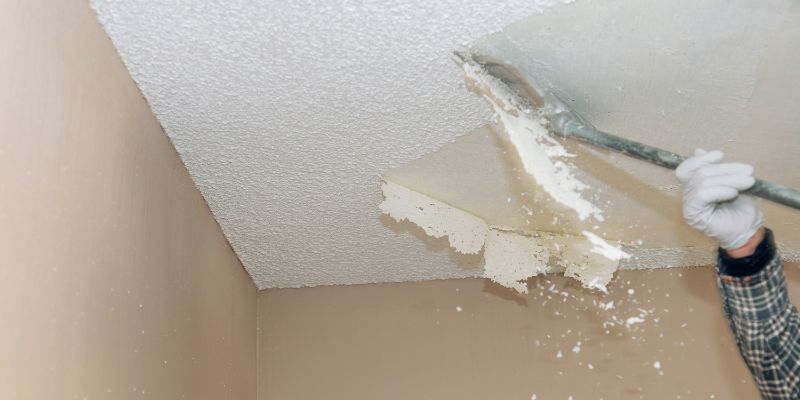
Step 4: Scrape Away the Popcorn
Now comes the scraping. Patience is your best friend here, much like waiting for a mortise and tenon joint to set.
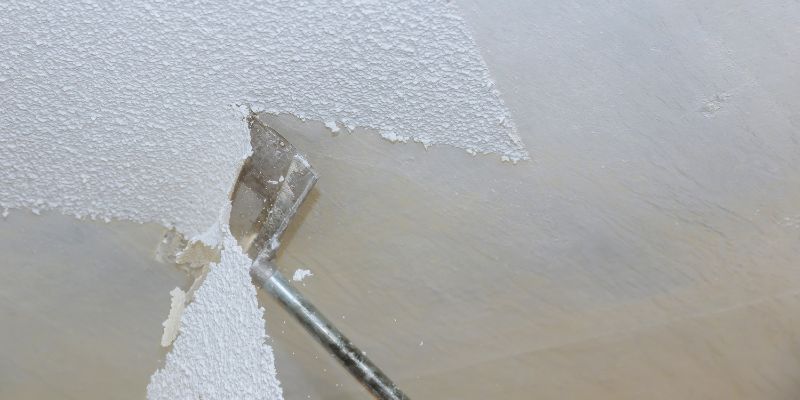
- Start Scraping: Begin scraping the softened popcorn texture with your wide putty knife or ceiling scraper. Hold the scraper at a slight angle (around 30-45 degrees) to the ceiling.
- Gentle Pressure: Apply steady, gentle pressure. The popcorn should peel off relatively easily. If it’s sticking, it might need more water or more soaking time. Avoid gouging the drywall underneath.
- Collect Debris: Scrape the material directly into a bucket or onto your drop cloths.
- Work in Sections: Continue working in sections, scoring, wetting, and scraping as you go. Don’t try to do the entire ceiling at once.
- Rinse Scraper: If the popcorn starts to clump on your scraper, rinse it with water.
Step 5: Clean Up
A thorough cleanup is essential for a professional finish.
- Gather Debris: Carefully gather all the scraped popcorn material and soiled drop cloths. Fold the drop cloths inward to contain the dust.
- Dispose of Waste: Place the debris into heavy-duty trash bags, seal them tightly, and dispose of them properly.
- Wipe Down Surfaces: Once the bulk of the material is removed, use a damp sponge or cloth to wipe down the ceiling and any walls that may have gotten dusty.
- Clean Floors and Walls: Carefully remove the drop cloths and plastic sheeting, again folding them inward to minimize dust spread. Clean the floors and walls as needed.
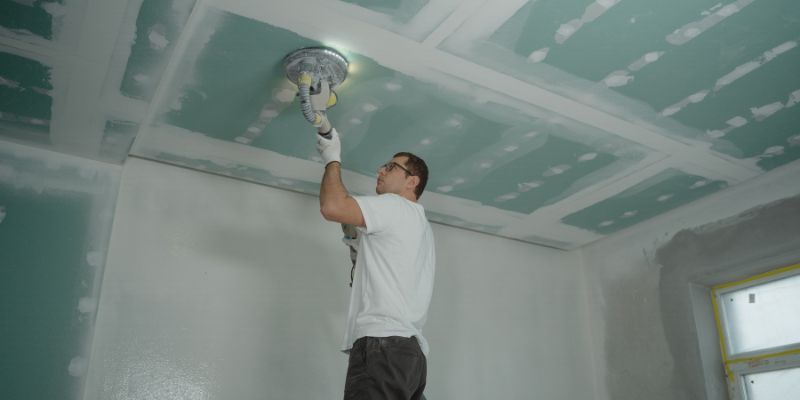
Step 6: Inspect and Repair
After scraping, you’ll likely see the bare drywall. It might have minor imperfections.
- Inspect for Damage: Look closely at the ceiling for any gouges or rough spots left by the scraping.
- Repair Imperfections: Fill any minor dents or gouges with joint compound using a putty knife. Let it dry completely according to the manufacturer’s instructions.
- Sand Smooth: Once the joint compound is dry, lightly sand the repaired areas with a sanding block or pole sander until they are smooth and flush with the surrounding ceiling. Use fine-grit sandpaper (120-150 grit). Wear your dust mask for this!
- Clean Dust: Wipe down the ceiling again with a damp cloth to remove any sanding dust.
Step 7: Prime and Paint
This is the final touch that makes all your hard work shine.
- Apply Primer: Apply a thin, even coat of a good quality primer designed for drywall. This will seal the surface and provide a uniform base for your paint.
- Allow Primer to Dry: Let the primer dry completely as per the product instructions.
- Apply Ceiling Paint: Apply one or two coats of your chosen ceiling paint, using a roller and brush. Use light, even strokes for a smooth finish.
- Enjoy Your New Ceiling: Step back and admire your smooth, updated ceiling!
Troubleshooting Common Issues
Even with the best preparation, you might encounter a few snags. Here’s how to handle them:
- Popcorn Not Scraping Easily: This usually means the paint is too thick, or the popcorn material is not sufficiently wet. Try scoring the area again or let the water soak for longer. Sometimes, a second application of water is needed.
- Gouging the Drywall: If you’re accidentally digging into the drywall paper, adjust the angle of your scraper to be flatter against the ceiling. Use less pressure, and let the water do the work.
- Stubborn Patches: Some areas might be more resistant. A slightly sharper putty knife or a specialized scraper might help, but always be gentle.
- Visible Ceiling Grid (if it was a drop ceiling with popcorn applied): If the popcorn was applied over a suspended grid system, scraping might reveal the grid. In this case, you might need to skim coat the entire ceiling with joint compound to achieve a smooth finish, or consider replacing the ceiling panels.
Comparing Removal Methods
While the wet-scraping method is the most common and proven for painted popcorn ceilings, other methods exist, each with pros and cons.
| Method | Pros | Cons | Best For |
|---|---|---|---|
| Wet Scraping (Proven Method) | Effective for painted ceilings, relatively inexpensive, readily available tools. | Messy, time-consuming, requires patience and physical effort. | Most painted popcorn ceilings, DIYers on a budget. |
| Dry Scraping | Less water involved, potentially less messy if done carefully. | Ineffective for painted ceilings as the paint seals the texture; can create significant airborne dust. | Unpainted popcorn ceilings only. |
| Covering with New Drywall | Creates a perfectly smooth, new surface, can hide significant ceiling damage. | More expensive, adds weight to ceiling structure, requires more advanced DIY skills or hiring a professional. | Heavily damaged ceilings, or when a perfectly smooth finish is desired without extensive scraping. |
| Applying Ceiling Texture (e.g., knockdown) | Can cover minor imperfections, offers a new decorative finish. | Doesn’t remove the popcorn, just covers it; requires careful application to avoid an uneven look. | Minor imperfections after partial removal, or if a different texture is desired. |
For painted popcorn ceilings, the wet-scraping method detailed in this guide remains the most practical and effective DIY solution.
Frequently Asked Questions (FAQs)
Here are some common questions beginners have about removing painted popcorn ceilings:
-
Q: How long does it take to remove popcorn ceilings?
A: The time can vary greatly depending on the room size and your pace. For a standard 10×12 foot room, expect it to take anywhere from a full day to a weekend, including preparation and cleanup. -
Q: Will removing popcorn ceilings damage my drywall?
A: It’s possible to nick or gouge the drywall if you apply too much pressure or use a dull scraper. However, with careful scraping at a shallow angle, you can minimize damage. Minor damage can usually be repaired with joint compound. -
Q: Is it better to scrape or skim coat painted popcorn ceilings?
A: Scraping is generally the preferred method for removal. Skim coating (applying a thin layer of joint compound over the entire ceiling) is usually done to cover minor imperfections after scraping, or if you’re covering an unremovable texture. For full removal, scraping is the way to go. -
Q: Can I use a garden hose with a spray nozzle to wet the ceiling?
A: While a hose might seem convenient, a pump sprayer offers much better control. A hose can easily oversaturate the ceiling, leading to drywall damage and making the popcorn heavier and harder to scrape. A pump sprayer allows for a light, even mist. -
Q: What if the popcorn is really stubborn and won’t scrape off?
A: If it’s not scraping easily, it likely needs more water or longer soaking time. Ensure you’ve scored the surface adequately. Sometimes, a second scoring and wetting pass can help stubborn areas. Avoid excessive force. -
Q: Do I need to prime the ceiling after scraping before painting?
A: Yes, priming is highly recommended. It seals the drywall surface, ensures even paint absorption, and provides a uniform base for your final paint color, preventing “flashing” (uneven sheen).
Conclusion
Transforming your space by removing those painted popcorn ceilings is a very achievable DIY project. It might seem daunting at first, like facing a large woodworking project with many intricate cuts. But by breaking it down into manageable steps, preparing meticulously, and using the right tools, you can confidently tackle this task. Remember the key is patience: score effectively, wet thoroughly, and scrape gently. The result will be a smooth, modern ceiling that brightens your room and gives it a fresh, updated feel. So, gather your supplies, put on your safety gear, and get ready to reveal a beautiful new surface. You’ve got this!