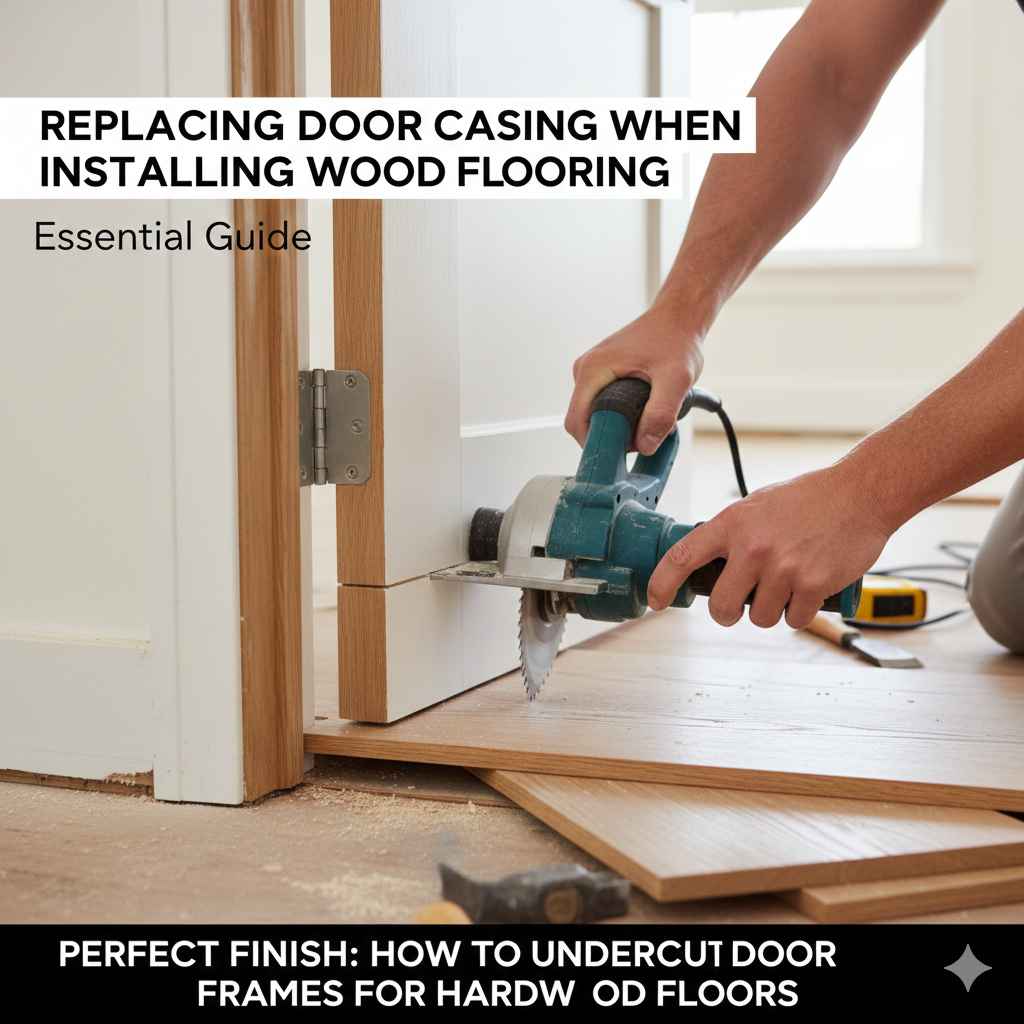
Replacing Door Casing When Installing Wood Flooring: Essential Guide
Quick Summary: Replacing door casing when installing wood flooring is necessary when the new floor height is significantly different from the old one. Usually, you remove the existing casing, install the new flooring flush to the subfloor, and then reinstall or replace the casing. This keeps the trim looking clean and professional, covering the expansion gap neatly.
So, you’re finally installing that beautiful new wood floor! That’s exciting. But wait—what about the door trim, or “casing”? When you add thickness with new wood, laminate, or luxury vinyl plank (LVP), the old casing often sits too high, leaving an ugly gap underneath. This leaves many homeowners wondering: Do I have to take it off?
The short answer is usually yes, if you want a showroom finish. Don’t worry! I’m Md Meraj, and I promise this step isn’t as scary as it sounds. We will go through this together, step by step, making sure your cuts are straight and your trim looks perfect against that stunning new floor. Let’s tackle replacing door casing when installing wood flooring and see how easy it can be.
Why Replacing Door Casing When Installing Wood Flooring is Essential
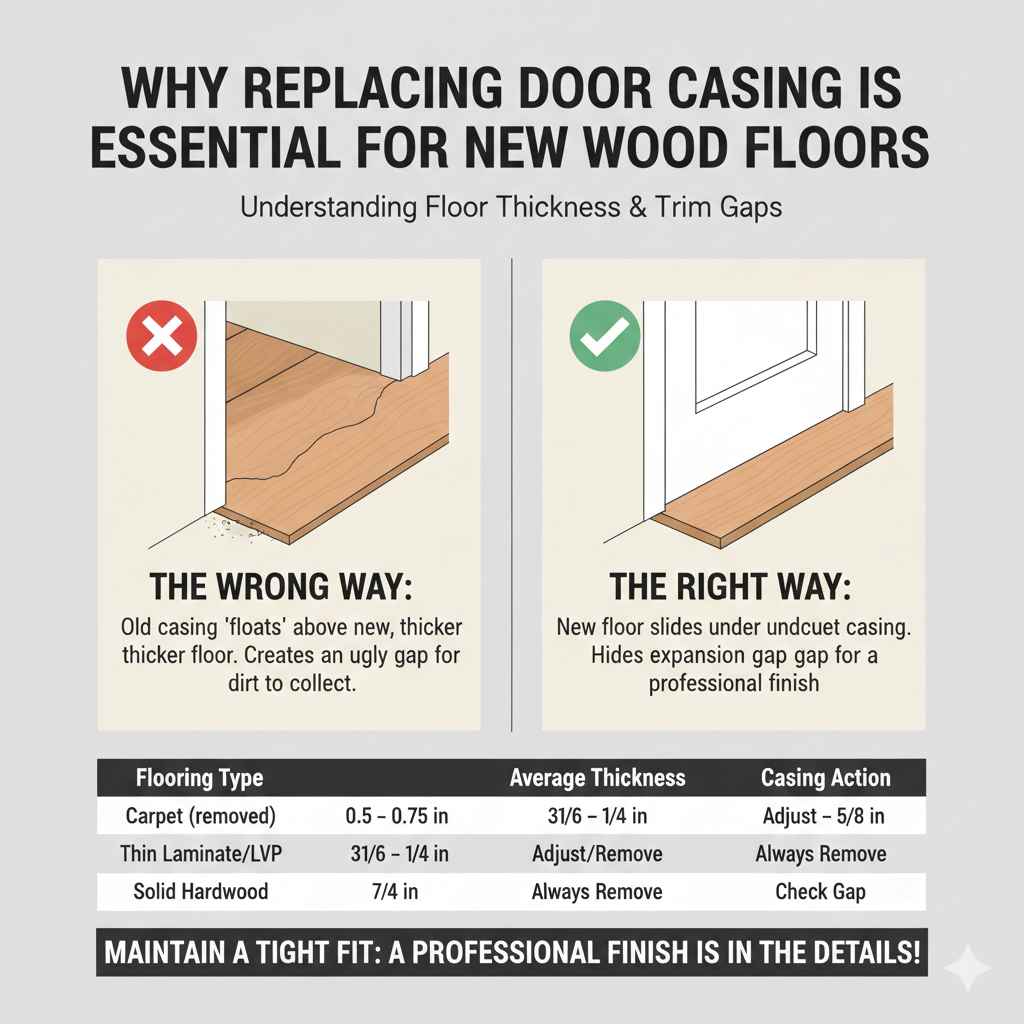
When you switch from thin carpet or old vinyl to new engineered wood or solid hardwood, you are adding height. Even a small difference matters when it comes to trim work. Trim needs to rest on top of the finished floor, or very close to it, to hide the necessary expansion gap.
If your new floor raises the surface by, say, half an inch, the old casing will now be floating half an inch above the new floor. This gap is a magnet for dirt and looks sloppy. For a truly professional finish, especially when installing wood flooring, you must deal with the casing.
Understanding Floor Thickness and Trim Gaps
Different flooring materials have different thicknesses. Knowing this upfront helps you decide if removal is necessary.
| Flooring Type | Average Thickness (Approx.) | Recommended Action |
|---|---|---|
| Carpet (removed) | 0.5 – 0.75 inches (padding included) | Often requires casing adjustment. |
| Thin Laminate/LVP | 3/16 – 1/4 inch | Minor adjustment might suffice, but removal is safer. |
| Solid Hardwood | 3/4 inch | Almost always requires removing and resetting casing. |
| Engineered Wood | 1/4 – 5/8 inch | Crucial to check the gap before proceeding. |
As a general rule supported by many building standards, the trim should overlap the flooring surface by at least 1/8 inch to 1/4 inch. If your new floor creates a gap larger than that, it’s time to address the casing.
Tools You Will Need for the Job
Don’t let a long tool list scare you! Most of these are basic items every DIYer should have. We want clean, safe cuts, so using the right gear matters.
Essential Tools Checklist:
- Pry Bar & Wood Block: For careful removal without damaging walls.
- Miter Saw: Essential for making those clean, perfect 45-degree angle cuts (the “cope cut” replacement).
- Pin Nailer or Finish Nailer (or Hammer & Brad Nails): For securely fastening the new casing.
- Utility Knife: To score the caulk line before prying.
- Tape Measure & Pencil: For accurate measurements.
- Stud Finder: To ensure you are nailing into the door frame studs, not just drywall.
- Safety Gear: Safety glasses and hearing protection (especially for the nailer).
Step-by-Step Guide: Replacing Door Casing When Installing Wood Flooring
This process is broken down into manageable stages. Take your time, especially with removal, to save yourself repair work later!
Phase 1: Preparing the Doorway
Before touching the trim, you must have your subfloor ready for the new flooring. The new floor should be installed right up to the door jamb itself, leaving only the small expansion gap (usually 1/4 to 3/8 inch, depending on the manufacturer’s instructions, like those outlined by the National Association of the Flooring Association).
Step 1: Score and Remove Caulk
If the casing was previously caulked to the wall or the existing baseboard, use a sharp utility knife to carefully slice through the paint or caulk line where the trim meets the wall. This prevents you from tearing the drywall paper when you start prying.
Step 2: Determine the Best Removal Method
There are two main ways the casing is attached: face-nailed or blind-nailed (where the nails go through the back side, often into the door jamb).
If Face-Nailed: You will see the nail heads. You can try to gently pull them out with pliers, or simply cut the casing at the corner and remove it in sections.
If Blind-Nailed (Most Common): You must carefully pry.
Step 3: Carefully Pry Off the Casing
This is where patience pays off! We want to save the existing casing if possible, as reusing it simplifies measurement.
1. Place a small, thin scrap of wood (a shim works well) against the wall, right next to the casing you are removing. This acts as a buffer so the pry bar doesn’t gouge your existing wall paint or drywall.
2. Place the end of your pry bar over the shim.
3. Gently apply slight leverage, working slowly to release the nails holding the casing to the door jamb.
4. Once one side is loose, repeat the process on the other side of the door frame. Work from the top down or bottom up, depending on where the nails are holding best.
Pro Tip: If the casing is coming off in one long piece, use extra caution. If it breaks, that’s okay! We’ll be cutting new pieces soon anyway.
Phase 2: Flooring Installation
Once the casing is safely set aside (or you have removed the old, damaged pieces), proceed with installing your new wood flooring. Follow your flooring manufacturer’s exact instructions. Crucially, ensure the new flooring comes right up to the door jamb, leaving only the necessary expansion gap.
Phase 3: Preparing the New or Reused Casing
If your old casing is damaged, you must buy new casing material that matches the thickness and profile of the old one. If you are reusing it, just clean off any old glue or debris.
Step 4: Measure for the New Casing Legs
The “legs” of the casing are the two vertical pieces next to the door.
1. Place the casing piece vertically against the door jamb where it will go.
2. Mark the bottom edge where the new flooring surface sits.
3. Measure from this new bottom mark up to where the top of the old casing sat (or where you want the top to sit). This measurement is key for ensuring the height matches the other leg.
4. Use your miter saw to cut the bottom of the leg piece perfectly square (90 degrees) to the floor line. You must have a perfectly flat cut for the new floor to meet it cleanly.
Step 5: Mastering the Miter Cut for Inside Corners
The corners of the door casing are usually joined using a 45-degree miter cut. When reinstalling, you need to ensure the joint closes perfectly against the door jamb.
1. If you are keeping the existing casing on the other side of the door, measure the existing casing piece’s exposed length.
2. Set your miter saw to a 45-degree angle.
3. Cut the new piece so that when it butts against the old piece, they form a perfect corner. Always cut the short side of the angle facing the door jamb side.
If you are replacing all four pieces, measure the length needed from the edge of the door stop to the desired outside edge of the new trim stack.
Phase 4: Reattaching the Casing
Now we secure the trim back onto the door jamb and wall studs.
Step 6: Nailing the Casing
We will use a pin nailer or small brad nails here for a clean look.
1. Start by attaching the vertical legs. Place the first nail about 6 inches from the top and another 6 inches from the bottom, aiming directly into the door jamb (the vertical wood frame).
2. Once the legs are stable, attach the top header piece. Nail it into the jamb header.
3. Finally, address the inside corner joint where the two mitered pieces meet. Nail these sections lightly to hold the joint tight while you check alignment.
Safety Note: Always use a stud finder to verify you are hitting the framing behind the door jamb when possible. A nail hitting only drywall might pull out later. Always wear eye protection when operating pneumatic tools.
Step 7: Finishing the Joint (The Nail Set)
If you used a finish nailer, use a nail set tool to gently tap the heads of the nails just below the surface of the wood. Then, you can fill these tiny divots with wood putty matching your casing color before painting or staining.
Advanced Technique: The Coping Saw Alternative (For Expert Finish)
While simple butt joints (where two 45-degree pieces meet) are common, sometimes the miter joint opens up slightly due to wall movement or flooring height changes. For a truly seamless, professional look, many woodworkers prefer using a coping saw to cope one piece of the casing instead of meeting it with a 45-degree cut.
When to Cope Instead of Mitering
Coping involves cutting the profile of one piece of trim and making it “hug” the face of the adjacent piece. This creates a stronger, more forgiving joint that naturally closes gaps caused by slight variations in wall squareness.
Coping Steps (If Reusing High-Quality Casing):
- Set your miter saw to 45 degrees and cut one side of the casing piece that will butt against the other. This gives you your baseline.
- Using a pencil, trace the profile (the decorative shape) of the mitered piece onto the face of the second piece.
- Set your miter saw to a complementary compound angle (this requires a bit more setup—often around 30–35 degrees, depending on your trim profile). Cut along this line.
- Use your coping saw to carefully cut away the waste material right up to your traced line. This leaves you with the exact profile that fits snugly against the first piece, even if the wall isn’t perfectly square.
If you are new to this, sticking to tight 45-degree miters is perfectly fine, especially since the new wood flooring installation often necessitates removing the old trim entirely and starting fresh anyway. Check resources like university extension programs, such as those often provided by K-State Architecture resources, for detailed diagrams on coping joints, as they are complex to describe purely in text.
Troubleshooting Common Issues
Even the best-laid plans hit snags. Here’s how to fix the most common problems encountered when replacing door casing when installing wood flooring.
Problem 1: The Pry Bar Damages the Drywall
This is very common. When you pry off casing, the pressure can pull a small divot or tear the paper face of the drywall right next to the jamb.
The Fix: Don’t panic! Let the drywall dry if it’s wet, but typically it’s just paper damage. Use a lightweight spackling compound or joint compound to fill the small gouge. Sand lightly once dry, prime, and touch up the paint after the casing is reinstalled. A clean caulk line will hide any minor imperfections where the trim meets the wall again.
Problem 2: Mitered Corners Won’t Close Tightly
If the two 45-degree cuts don’t meet cleanly (one side seems too long or too short), it means your measurement was off by a hair, or the wall isn’t perfectly 90 degrees.
The Fix: Never try to force a tight fit with nails. Instead, set your miter saw to slightly less than 45 degrees (say, 44.5 degrees) and trim the end that appears too long. Test fit. Repeat until the joint is snug. A tiny gap can always be filled with paintable caulk later.
Problem 3: The New Casing Sits Too High Above the Floor
This happens if you used casing that is thicker than the old piece, or if you used new casing that is actually thinner.
The Fix (If the casing is too low): You may need to install a thin riser board (a narrow strip of wood matching your baseboard thickness) underneath the casing leg pieces, nailing through it into the door jamb. Then, install the casing on top of that riser.
The Fix (If the casing is too high): If the gap underneath is now too small, you will need to trim the bottom of the casing pieces shorter using your miter saw until you achieve that desired 1/8 to 1/4 inch overlap onto the new floor.
A Comparison: Removing Casing vs. Undercutting Door Jambs
When faced with changing floor height, homeowners have two main options: adjust the trim (casing) or adjust the door jamb (the vertical structure holding the door). Here is a quick look at both methods when installing wood flooring.
| Method | Difficulty Level | Pros | Cons |
|---|---|---|---|
| Replacing/Resetting Casing | Beginner/Intermediate | Easier to achieve precise heights; less invasive to door function. | Requires careful nailing and possibly purchasing new trim. |
| Undercutting Jambs | Intermediate/Advanced | Keeps existing trim; clean look if done perfectly. | Requires specialized tools (like an oscillating multi-tool); difficult to cut a straight line perfectly flush with the floor. |
For beginners focusing on replacing door casing when installing wood flooring, removing and resetting the casing is usually the safest and most predictable route. Undercutting the door jamb requires a steady hand with a power tool and can easily scratch the new flooring if you slip.
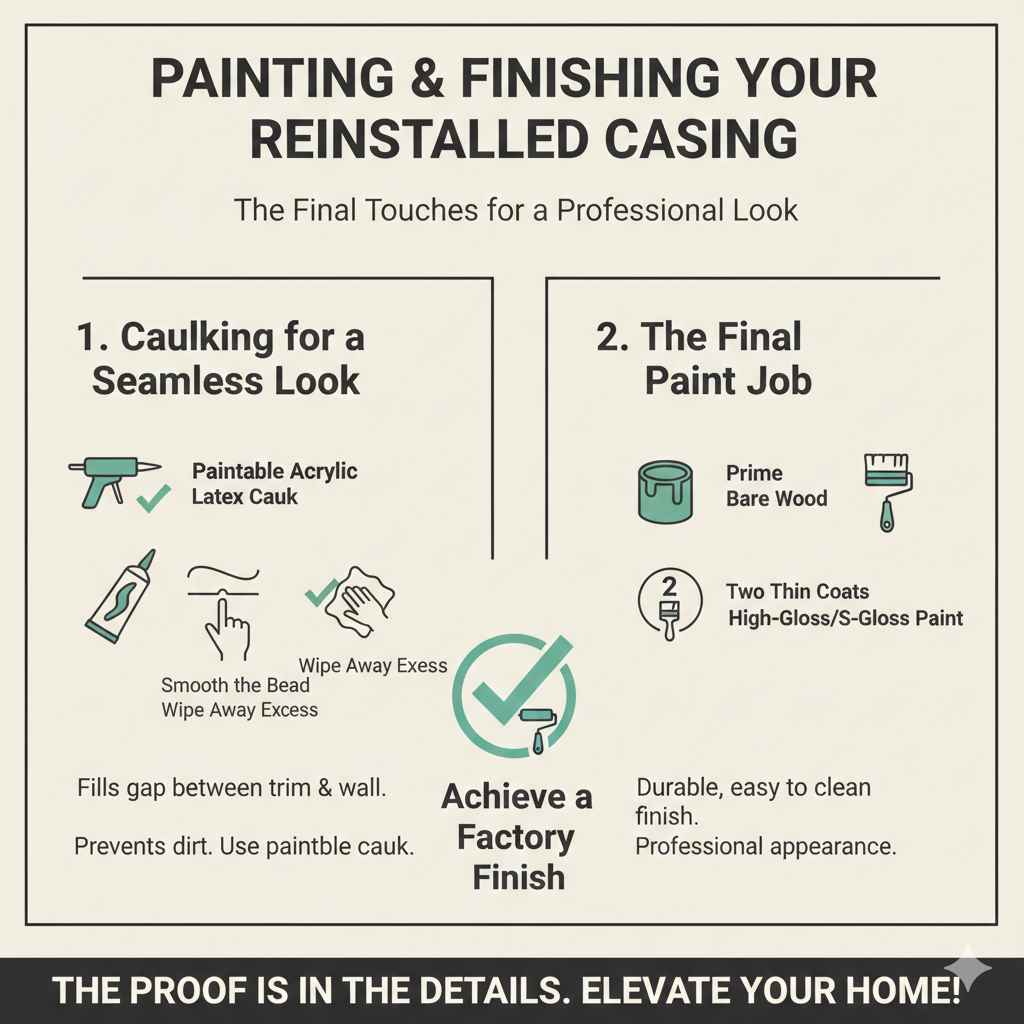
Painting and Finishing Your Reinstalled Casing
Once the casing is nailed securely and you’ve filled any nail holes, you are ready for the final touches that truly sell the professional look.
Caulking for a Seamless Look
The final step to make your trim look factory-installed is caulking the joint between the casing and the wall.
1. Use a high-quality, paintable acrylic latex caulk.
2. Run a thin, consistent bead of caulk where the trim meets the painted wall surface.
3. Use a damp finger or a caulk finishing tool to smooth the bead, pressing gently. Wipe away any excess immediately with a damp rag.
4. Let the caulk cure completely (check the manufacturer’s time—usually a few hours).
The Final Paint Job
If you are painting your new casing:
Prime any bare wood or patched areas first.
Apply two thin coats of quality trim paint. Using a high-gloss or semi-gloss paint on trim makes it durable and easy to clean, which is excellent for high-traffic areas around doors.
By taking the time to set the casing correctly relative to the new floor height, you ensure that the transition is smooth, safe, and beautiful for years to come.
Frequently Asked Questions (FAQ)
Q1: Can I avoid replacing the door casing entirely and just leave a gap?
A: While you technically can, it is highly discouraged. A large gap under the trim invites dust, debris, and moisture, and it looks unfinished. If the gap is tiny (less than 1/8 inch), you might get away with using wood filler or a specialized floor transition strip, but generally, the casing needs adjustment.
Q2: How do I reuse the old casing without damaging the corner cuts?
A: If the old corner joints are tight, try to remove the casing as a whole piece rather than cutting it apart. When prying, start near the middle of the leg pieces, pulling them away from the jamb studs slowly. If the joint breaks, you’ll have to cut new miters, but at least you have the old pieces as a template for measurement.
Q3: What is the difference between casing and baseboard when installing new flooring?
A: Casing goes around the door frame, while the baseboard runs along the wall line. Both usually need adjustment when the floor height changes. Baseboards are often easier to handle, as you can sometimes use a shoe molding or quarter round over a small gap, but door casing must sit flush against the door jamb.
Q4: Do I need to remove the door itself before taking off the casing?
A: Generally, no. You do not need to remove the door from its hinges to remove the casing. You only need to ensure the door is closed tightly while you work around the frame. This saves a lot of extra time and hassle!
Q5: How far down onto the new wood floor should the casing overlap?
A: The best practice is to overlap the finished floor surface by about 1/8 to 1/4 of an inch. This is called the ‘overlap’ or ‘reveal.’ This slight overlap neatly covers the necessary expansion gap you leave for the wood to move naturally with humidity changes.
Q6: If I use LVP flooring, which is thinner, do I still need to remove the casing?
A: It depends on the LVP thickness. If your LVP is 3/16 inch thick and your old flooring was carpet (which could be 5/8 inch thick with padding), you might have created a larger gap. Always measure the difference between the old floor surface and the new one. If the height change is more than 1/8 inch, plan on removing and resetting the casing for the cleanest outcome.
Conclusion
Tackling the job of replacing door casing when installing wood flooring might seem daunting, but as we have walked through, it’s fundamentally about careful measurement, gentle removal, and precise reinstallation. You are simply resetting your trim to match the new plane of your floor. Remember to move slowly when prying—that’s where most beginners get into trouble. By taking your time with the cuts and using patience when nailing, you will achieve a professional, seamless transition around every door. Give yourself a pat on the back; you’ve just upgraded your home’s appearance with skill and confidence! Now, stand back and admire that beautiful, perfectly trimmed new wood floor. You made that happen!