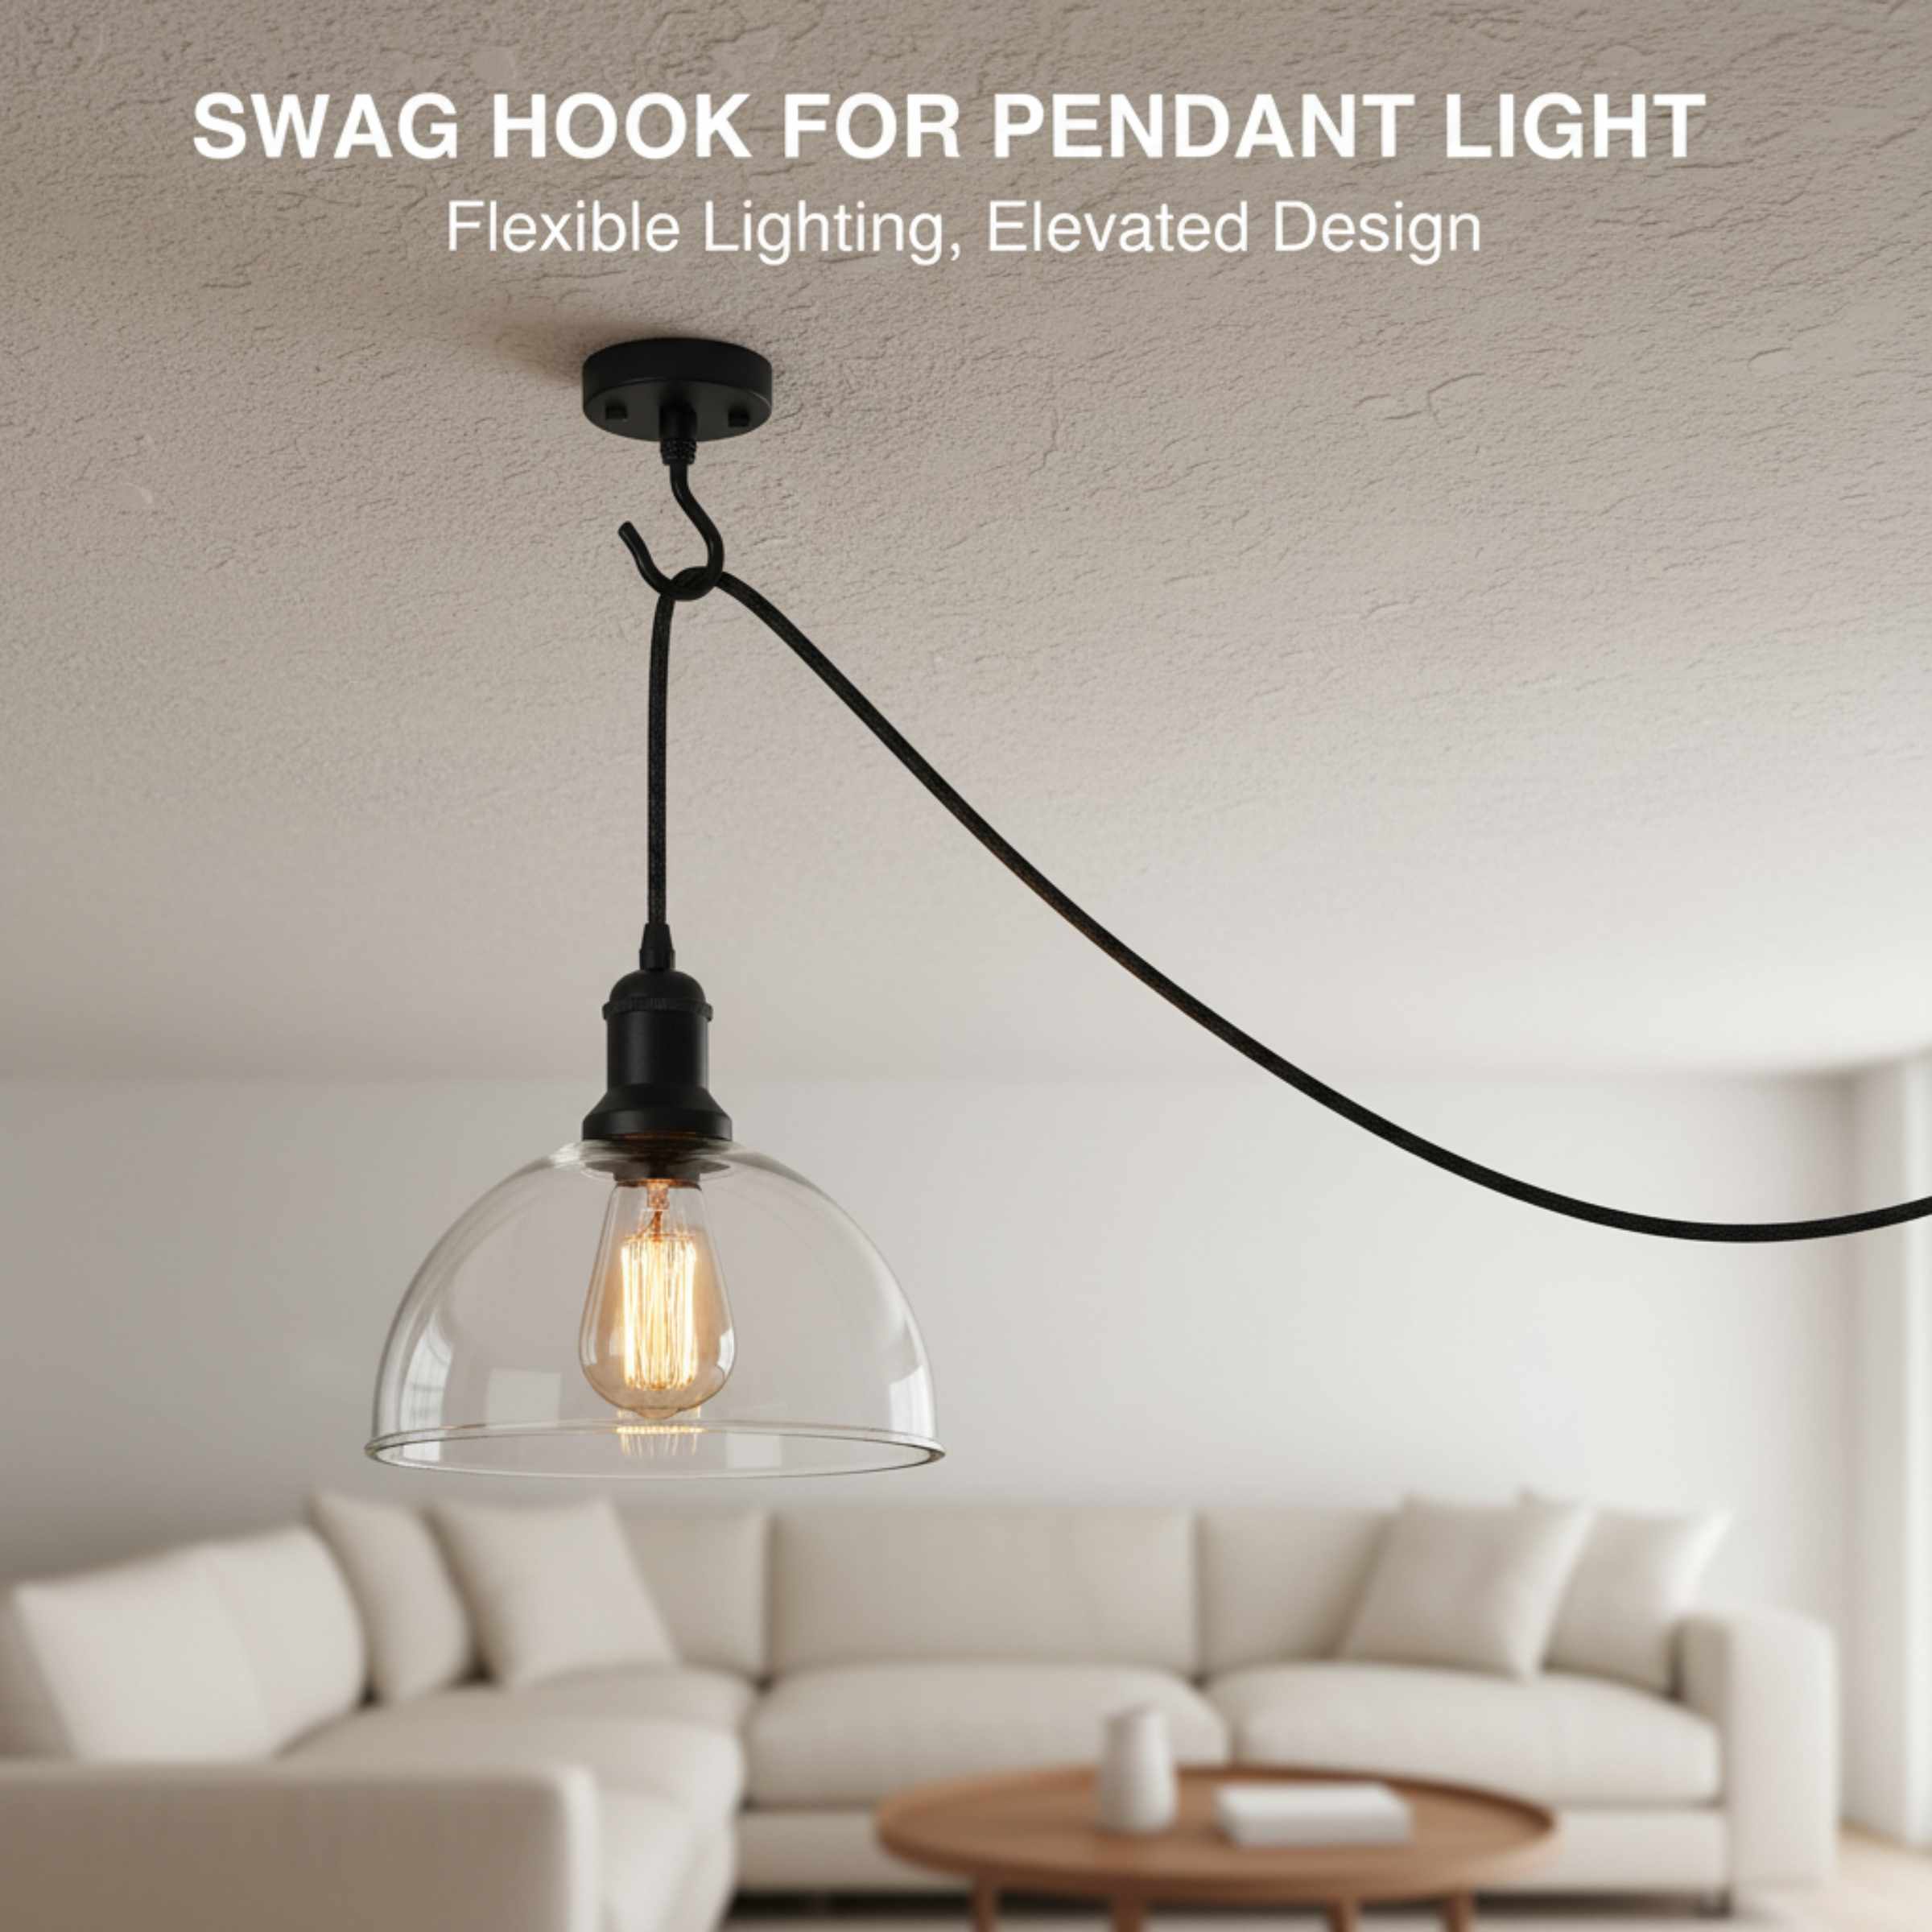
Swag Hook For Pendant Light: Essential Guide
A swag hook for a pendant light is a simple yet crucial ceiling-mounted hook that securely holds your pendant light fixture, allowing the cord to hang elegantly without being directly wired into the ceiling box. It’s an easy DIY solution for stylish lighting placement.
Ever fallen in love with a pendant light, only to realize its cord won’t reach exactly where you envision it? Or perhaps you’ve wanted to add a statement light without the hassle of complex wiring or drilling into your ceiling joists. Many homeowners face this exact dilemma. The good news is, there’s a wonderfully simple and effective solution: the swag hook. This little piece of hardware can transform your lighting possibilities, allowing you to hang your beautiful pendant light exactly where you want it, adding charm and personality to any room. Let’s dive in and explore how this easy fix can make a big difference in your home décor!
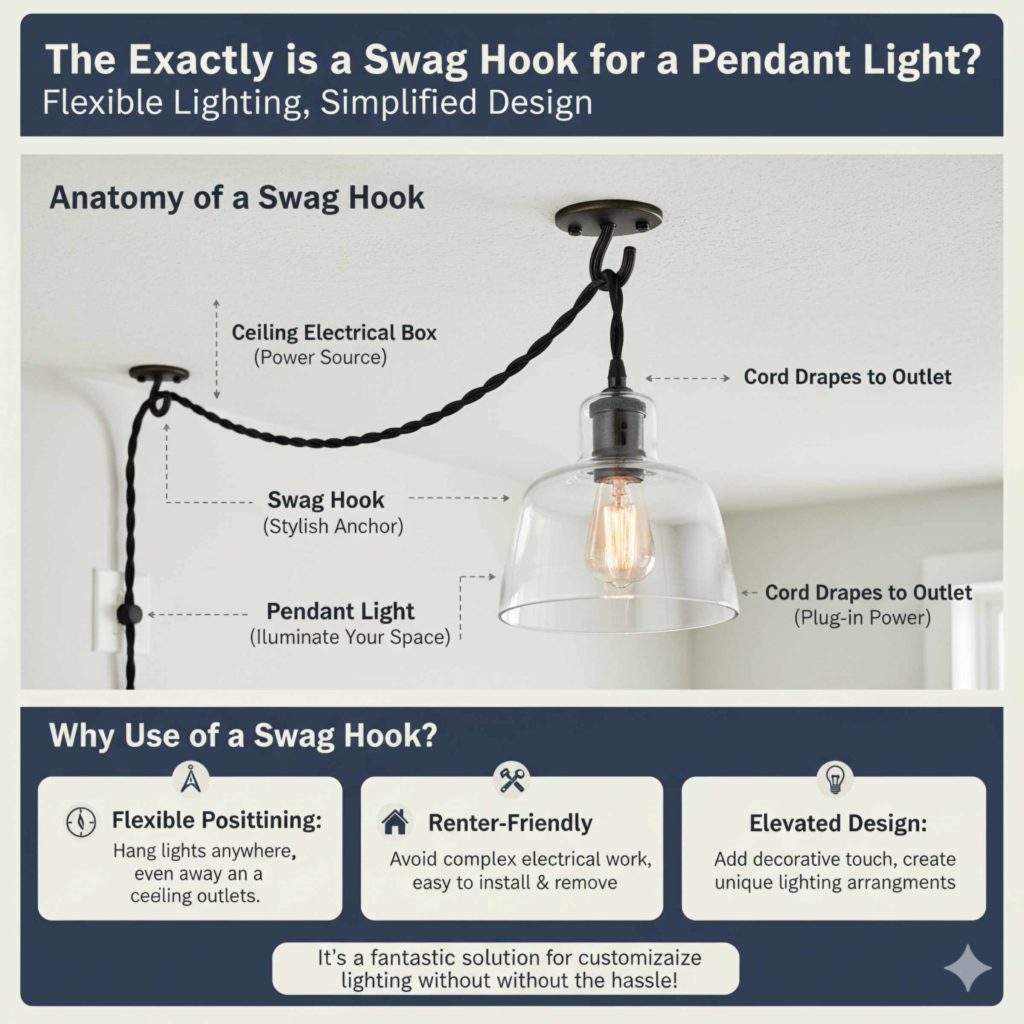
What Exactly is a Swag Hook for a Pendant Light?
Think of a swag hook as a stylish anchor for your pendant light. It’s a decorative hook, usually made of metal, that you securely attach to the ceiling. Instead of the pendant light’s electrical cord running directly from a ceiling electrical box, the cord “swags” or drapes from the ceiling hook down to the light fixture. This allows you to position your pendant light away from the electrical source, giving you incredible flexibility in your lighting design. It’s a fantastic option for renters or anyone who wants to avoid extensive electrical work.
Why Use a Swag Hook? The Benefits You’ll Love
Using a swag hook for your pendant light isn’t just about convenience; it opens up a world of design possibilities. Here are some of the key advantages:
- Flexible Placement: This is the biggest win! You can hang your pendant light anywhere you like, regardless of where your ceiling electrical box is located. Perfect for centering a light over a coffee table, a reading nook, or even in a corner to create ambiance.
- Easy Installation: Compared to hardwiring a new fixture, installing a swag hook is a breeze. Most can be installed with basic tools and a little patience, making it a very beginner-friendly DIY project.
- Cost-Effective: You can save money by avoiding the need for an electrician to move or install an electrical box. Plus, swag hooks themselves are very affordable.
- Aesthetic Appeal: Many swag hooks are designed to be decorative elements in themselves, adding a touch of vintage charm or modern flair to your ceiling.
- Renter-Friendly: Since you’re not permanently altering the main electrical system, swag hooks are often a great solution for renters who want to personalize their space with stylish lighting.
- Versatility: They work with a wide variety of pendant lights, from small, delicate fixtures to larger, statement pieces.
Understanding the Components: What You’ll Need
Before you start, it’s good to know what makes up this simple lighting solution. For a swag hook setup, you’ll typically have:
- The Pendant Light Fixture: This is your chosen light, complete with its electrical cord and plug.
- The Swag Hook: The decorative and functional hook that attaches to the ceiling.
- Ceiling Anchor (if needed): Depending on your ceiling material and the weight of the fixture, you might need a drywall anchor or a toggle bolt for secure mounting.
- Cord Management Accessories (optional): Things like cord clips or covers can help keep the swagged cord neat and tidy.
It’s important to note that the pendant light must have a plug that can be plugged into a nearby wall outlet. The swag hook simply supports the cord; it doesn’t replace the need for a power source.
Choosing the Right Swag Hook for Your Pendant Light
With so many options available, picking the perfect swag hook can seem daunting. But don’t worry, it’s all about considering a few key factors. Here’s what to keep in mind:
1. Weight Capacity: Safety First!
This is the most critical consideration. Your swag hook must be able to safely support the weight of your pendant light. Always check the manufacturer’s specifications for both the light fixture and the swag hook. Hooks designed for light-duty applications might not be suitable for heavier chandeliers or substantial pendant lights. Overloading a hook can lead to the fixture falling, which is dangerous and costly.
General Weight Guidelines (Always check manufacturer specs!):
| Hook Type | Typical Weight Capacity | Best For |
|---|---|---|
| Standard Screw-in Hooks | 10-25 lbs (4.5-11 kg) | Lightweight pendant lights, small lamps |
| Heavy-Duty Hooks (with anchors) | 25-50 lbs (11-23 kg) | Medium-weight pendant lights, small chandeliers |
| Toggle Bolt Hooks | 30-60 lbs (14-27 kg) | Heavier fixtures, especially in drywall where joist access is difficult |
| Joist-Mounted Hooks | 50+ lbs (23+ kg) | Very heavy fixtures, ensuring maximum security |
Note: These are approximate ranges. Always verify with the product’s listed specifications.
2. Material and Finish: Style Matters
Swag hooks come in a variety of materials and finishes to complement your décor:
- Brass: Offers a classic, warm look. Available in polished, antique, or brushed finishes.
- Steel: Durable and often available in finishes like chrome, nickel, black, or stainless steel, fitting modern and industrial styles.
- Iron: Can provide a rustic or vintage feel, often in black or dark finishes.
- Plastic: Lightweight and inexpensive, usually best for very light fixtures or temporary solutions.
Consider the style of your pendant light and the overall aesthetic of the room. Do you want the hook to blend in or be a decorative accent? A polished nickel hook might look great with a contemporary pendant, while an antique brass hook could enhance a vintage-inspired fixture.
3. Mounting Style: How it Attaches
The way a swag hook mounts to the ceiling is crucial for its strength:
- Direct Screw-In: These hooks have a threaded screw that you drive directly into a ceiling joist or a pre-drilled hole in wood. This is the most secure method if you can locate a joist.
-
Anchor-Based: For mounting into drywall or plaster without hitting a joist, you’ll need an appropriate anchor. Common types include:
- Drywall Anchors (Plastic or Metal): Suitable for lighter loads.
- Toggle Bolts: These have “wings” that spread out behind the drywall, offering much greater holding power for heavier items.
4. Hook Design: Shape and Size
The shape and size of the hook itself should accommodate your pendant light’s cord. Ensure the opening is wide enough for the cord, and that the hook is deep enough to prevent the cord from slipping out. Some hooks have a more decorative, scrolled design, while others are simple and functional.
Tools and Materials You’ll Need for Installation
Gathering your tools beforehand makes the process smoother and safer. For most swag hook installations, you’ll likely need:
- Your chosen Swag Hook and any necessary Ceiling Anchors
- Pencil: For marking the spot.
- Measuring Tape: To determine the desired hanging height and placement.
- Stud Finder: Essential if you plan to screw directly into a ceiling joist. This is highly recommended for security. You can find reliable stud finders at most hardware stores.
- Drill and Drill Bits: To create pilot holes for screws or holes for anchors. The size of the drill bit will depend on the type of screw or anchor you’re using.
- Screwdriver: To match the head of your screws (usually Phillips or flathead).
- Ladder or Step Stool: To safely reach the ceiling. Ensure it’s stable and on a level surface.
- Safety Glasses: Always protect your eyes from dust and debris.
- Optional: Wire Strippers and Wire Nuts: If your pendant light has a cut cord and you need to attach a plug (this is an advanced step and may require more electrical knowledge). For most plug-in pendants, this won’t be necessary.
Step-by-Step Guide: Installing Your Swag Hook
Let’s get your pendant light hung! This guide assumes you have a pendant light with a pre-attached cord and plug. Remember, safety first – if you’re uncomfortable at any point, especially with electrical components, consult a qualified electrician.
Step 1: Plan Your Placement
Decide exactly where you want your pendant light to hang. Use your measuring tape to mark the desired spot on the ceiling. Consider the height – you don’t want it to be a head-banger, but high enough to provide adequate light. Also, think about proximity to a wall outlet where the pendant’s plug will reach.
Step 2: Locate a Ceiling Joist (Highly Recommended!)
Using your stud finder, scan the area where you marked your spot. If you find a joist directly above your mark, that’s the ideal place to install your swag hook. Screwing directly into a joist provides the strongest possible support. If you can’t find a joist at your desired location, don’t worry, you’ll use anchors in the next step.
Why are joists important? Ceiling joists are the structural beams that support your ceiling and any weight attached to it. Attaching directly to a joist ensures maximum safety and stability for your light fixture. For more information on finding studs and joists, resources like This Old House offer excellent guidance.
Step 3: Prepare the Ceiling for Mounting
- If mounting into a joist: Mark the exact center of the joist where your hook will go. Drill a small pilot hole (slightly smaller than the screw diameter of your hook) into the joist. This makes it easier to drive the screw and prevents the wood from splitting.
-
If using an anchor:
- For Drywall Anchors: Follow the anchor’s instructions. Typically, you’ll drill a hole of a specific size (indicated on the anchor packaging) and then insert the anchor into the hole.
- For Toggle Bolts: You’ll need to drill a larger hole suitable for the toggle mechanism to pass through. Once the bolt is through the drywall, the “wings” will spring open behind the ceiling. Then, you’ll attach the hook to the bolt.
Step 4: Install the Swag Hook
- Into a Joist: Align your swag hook with the pilot hole and begin screwing it in. Use a screwdriver or your drill on a low-torque setting. Screw it in firmly until it’s snug against the ceiling, ensuring it’s securely embedded in the joist.
-
With an Anchor:
- Drywall Anchor: Screw the hook into the anchor until it’s tight against the ceiling.
- Toggle Bolt: Insert the bolt through the hook’s mounting plate and through the hole in the ceiling. Once the toggle is behind the drywall, tighten the bolt securely.
Give the hook a gentle tug to ensure it’s firmly attached and can hold the weight of your light. It should not wiggle or feel loose.
Step 5: Hang Your Pendant Light
Carefully place the pendant light’s cord over the installed swag hook. Adjust the cord so it hangs smoothly down towards the wall outlet. Ensure the cord is not twisted or kinked.
Step 6: Plug In and Enjoy!
Run the pendant light’s cord to the nearest wall outlet and plug it in. Turn on the light switch to test your new, stylishly placed lighting. Admire your work!
Troubleshooting Common Issues
Even with the best intentions, DIY projects can sometimes throw a curveball. Here are a few common issues and how to fix them:
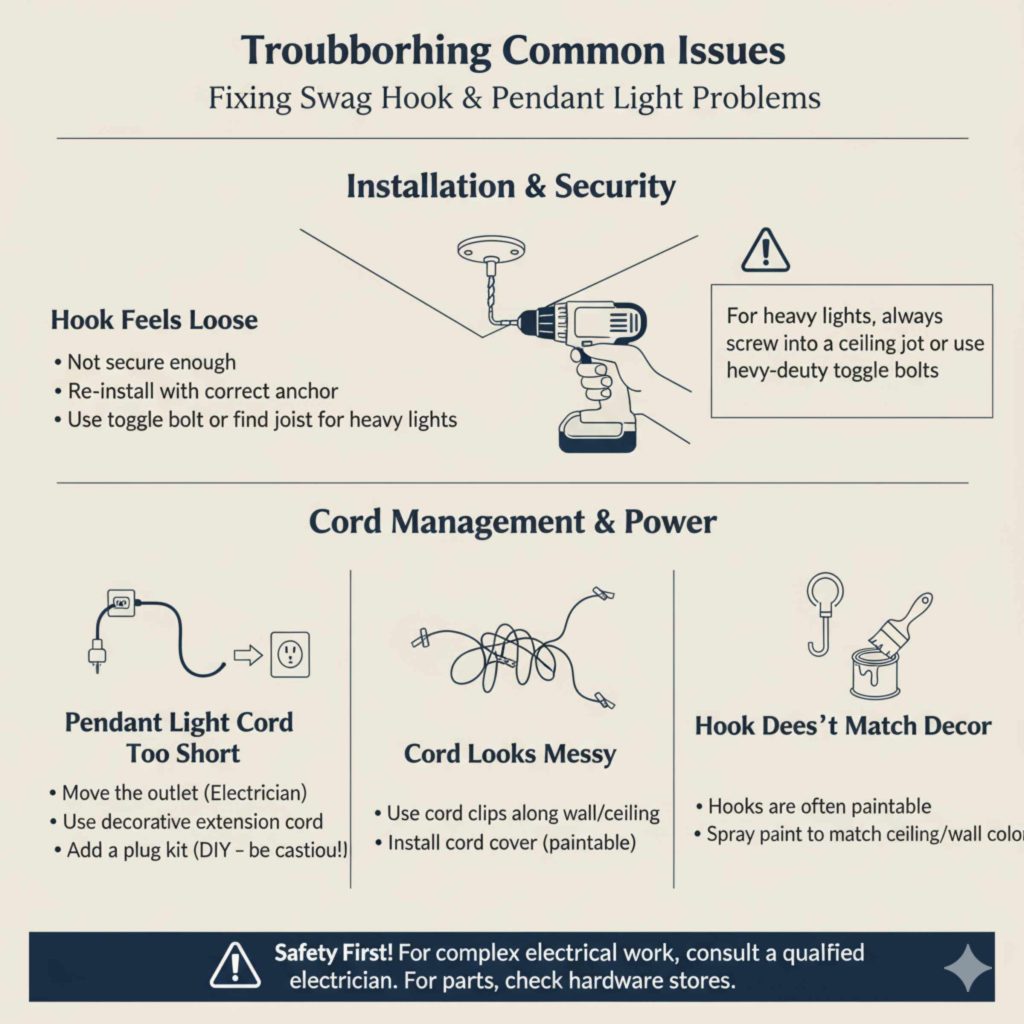
- Hook Feels Loose: If the hook wiggles after installation, it’s not secure enough. Remove the hook and re-install it, ensuring you’re using the correct anchor for your ceiling type or, ideally, finding a joist. For heavier lights, a toggle bolt or screwing into a joist is essential.
-
Pendant Light Cord Too Short: If the cord doesn’t quite reach the outlet, you have a few options:
- Move the Outlet: This is a more involved electrical job and likely requires an electrician.
- Use an Extension Cord: While functional, it can be unsightly. Look for fabric-covered or decorative extension cords designed for lighting.
- Add a Plug: If the pendant light cord is bare wire at the end, you can purchase a plug kit from a hardware store and wire it on yourself. Warning: This involves electrical work and should only be done if you are confident in your abilities or with professional guidance. Consult resources like the Consumer Product Safety Commission for electrical safety information.
- Cord Looks Messy: Use cord clips or a cord cover to keep the swagged cord neat and tidy along the wall or ceiling. You can find these at most home improvement or craft stores.
- Hook Doesn’t Match Decor: Swag hooks are often paintable. You can spray paint them to match your ceiling or wall color for a more seamless look.
Frequently Asked Questions (FAQ)
Q1: Can I hang any pendant light with a swag hook?
Generally, yes, as long as the pendant light has a plug and its weight is within the capacity of the swag hook and its mounting system. Always check the weight limits!
Q2: Do I need an electrician to install a swag hook?
For most plug-in pendant lights, no. The swag hook itself is a mechanical fastener. However, if you’re unsure about finding joists, using anchors, or dealing with the pendant’s electrical cord (e.g., adding a plug), consulting an electrician is a wise choice for safety.
Q3: How do I know if I’ve hit a ceiling joist?
A stud finder is the easiest way. When it signals a joist, you can often confirm by gently tapping the area or by drilling a very small exploratory pilot hole to feel for solid wood resistance.
Q4: What’s the difference between a drywall anchor and a toggle bolt for a swag hook?
Drywall anchors are usually plastic or metal inserts that expand in the drywall. Toggle bolts have spring-loaded wings that open up behind the drywall, providing significantly more holding power for heavier items.
Q5: Can I paint a metal swag hook?
Yes! Most metal swag hooks can be spray-painted to match your décor. Clean the hook thoroughly, lightly sand it for better adhesion, apply a primer suitable for metal, and then use your chosen spray paint color.
Q6: What if my pendant light doesn’t have a plug?
If your pendant light is designed to be hardwired directly into a ceiling box, a swag hook system isn’t the appropriate solution. You would need to have a junction box installed by an electrician and hardwire the fixture, or purchase a pendant light that comes with a cord and plug.
Q7: How far can I swag a pendant light cord?
The “swag” distance depends on the length of your pendant cord and how neatly you want to manage it. Avoid excessively long, slack cords that could be a tripping hazard or look untidy. Aim for a smooth, gentle curve.
Conclusion
Adding a beautiful pendant light to your space doesn’t have to be complicated or expensive. The humble swag hook is a testament to simple, effective DIY solutions. By understanding your options, choosing the right hook for your light’s weight, and following these straightforward installation steps, you can confidently place your pendant light exactly where you want it. It’s a rewarding project that adds both style and personalized functionality to your home. So go ahead, embrace the flexibility, and let your creativity shine with your perfectly swagged pendant light!