What Batteries Are In Solar Lights: Essential Guide
Quick Summary: Solar lights typically use rechargeable batteries like NiMH or Lithium-ion. These store solar energy to power the light at night. Understanding your light’s battery type is key for replacement and optimal performance.
Hello there! Ever wondered what makes those little solar lights in your garden glow night after night? It’s all thanks to a special kind of battery that soaks up sunshine all day and then powers your path when it gets dark. Sometimes, these lights might start to dim, or maybe they just don’t last as long as they used to. This can be a bit puzzling, especially when you’re trying to keep your outdoor spaces looking great. Don’t worry, figuring out what batteries are inside your solar lights and how to care for them is simpler than you might think. We’ll walk through it together, step-by-step, so you can get your lights shining bright again.
Understanding the Heart of Your Solar Lights: The Battery
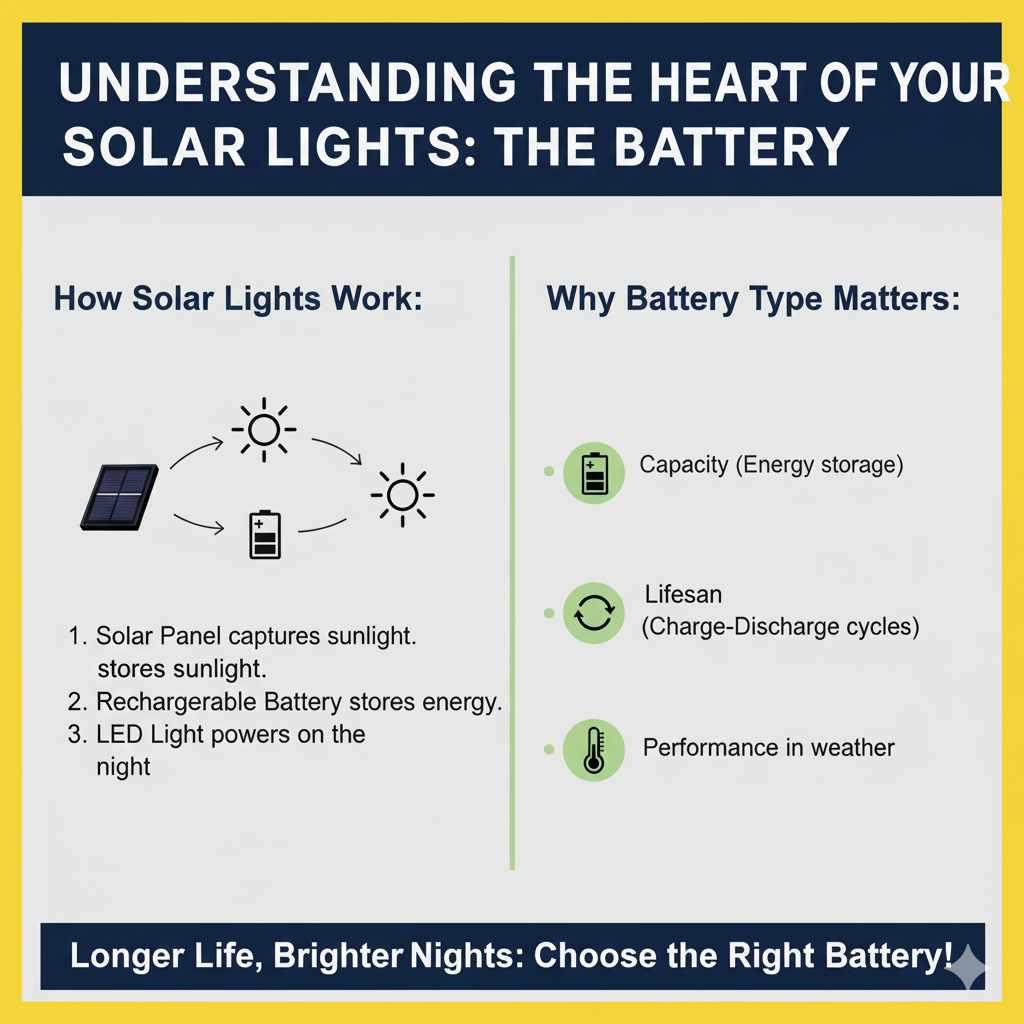
Solar lights are wonderfully simple devices. They’re designed to be low-maintenance, which is why many homeowners love them. The core idea is this: a small solar panel on top captures sunlight during the day. This energy is then stored in a rechargeable battery. When the sun goes down, or when the light sensor detects low light, the battery releases its stored energy to power the LED bulb.
The type of battery used is crucial because it affects how long the light lasts, how many times it can be recharged, and how well it performs in different weather conditions. Over time, all rechargeable batteries wear out. Knowing what’s inside your specific solar lights will help you troubleshoot when they aren’t performing as expected and will guide you when it’s time for a replacement.
Why Battery Type Matters
Think of the battery as the energy bank for your solar light. Different battery types have different capacities (how much energy they can hold), lifespans (how many charge-discharge cycles they can handle), and operating temperatures. For instance, some batteries perform better in cold weather than others. Choosing the right replacement battery, or understanding the limitations of your current one, means your solar lights will work reliably when you need them most.
Common Battery Types Found in Solar Lights
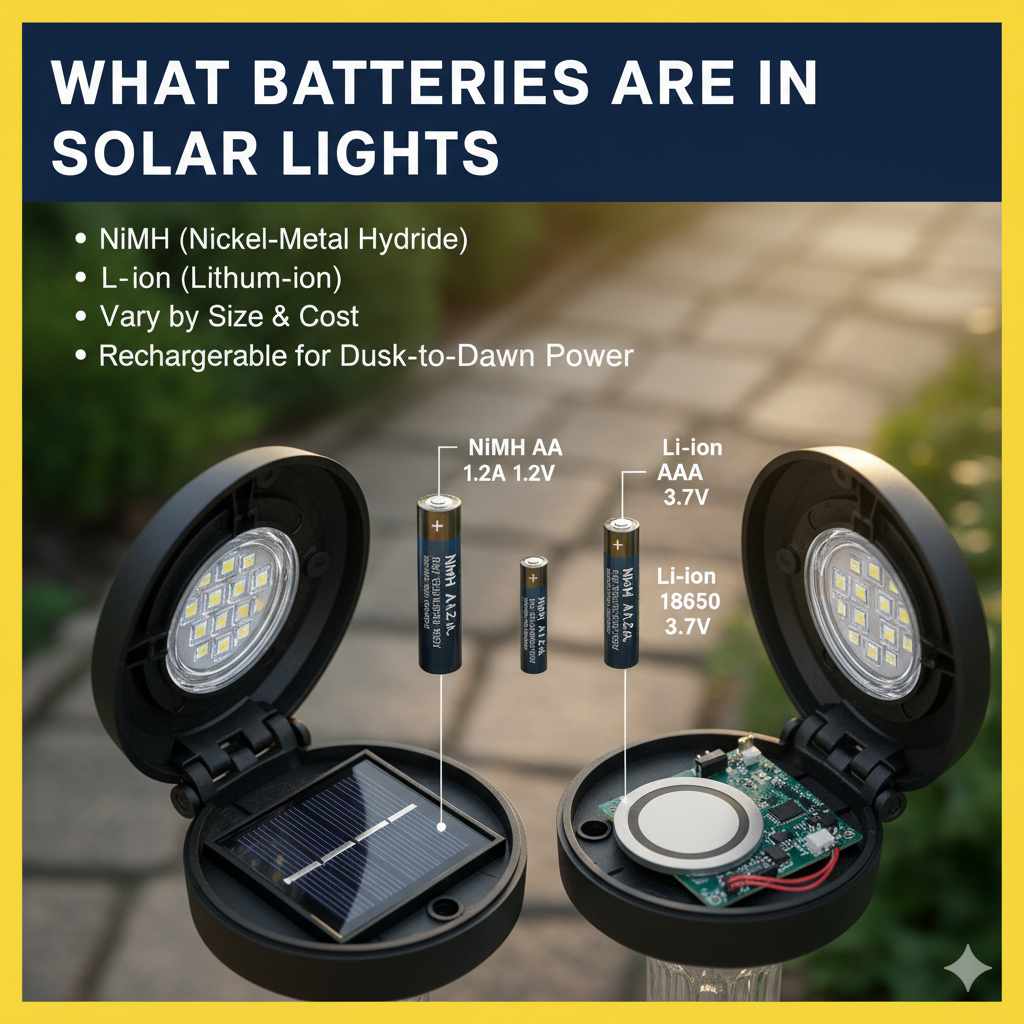
Most solar lights, especially the decorative and pathway varieties you find at home improvement stores, use rechargeable batteries. The two most common types you’ll encounter are Nickel-Metal Hydride (NiMH) and Lithium-ion (Li-ion) batteries. Older or very basic models might still use Nickel-Cadmium (NiCd) batteries, but they are becoming less common due to environmental concerns and performance limitations.
1. Nickel-Metal Hydride (NiMH) Batteries
NiMH batteries have been a popular choice for solar lights for a long time. They are a good balance of performance, cost, and environmental friendliness compared to their predecessors (NiCd). You’ll often find them in AA or AAA sizes, just like the regular batteries you might use in a remote control.
Pros of NiMH Batteries:
- Environmentally Friendly: They don’t contain toxic heavy metals like cadmium, making them safer for disposal.
- Good Capacity: They can store a decent amount of energy, providing several hours of light.
- Readily Available: They are common and relatively inexpensive.
- Lower Self-Discharge: They lose their charge more slowly when not in use compared to NiCd batteries.
Cons of NiMH Batteries:
- Temperature Sensitive: Performance can decrease in very cold or very hot temperatures.
- Memory Effect (Minor): While much less pronounced than in NiCd batteries, a slight “memory effect” can occur if they are repeatedly recharged before being fully depleted, though this is rarely an issue with typical solar light usage.
- Lower Voltage: Their voltage per cell is lower (1.2V) than alkaline or Li-ion, which might require more cells in series for some applications, though most solar lights are designed around this.
2. Lithium-ion (Li-ion) Batteries
Lithium-ion batteries are becoming increasingly common in newer and higher-end solar lights. They are known for their high energy density, meaning they can pack a lot of power into a small size. You might see these in various shapes and sizes, not always the standard AA or AAA form factor.
Pros of Li-ion Batteries:
- High Energy Density: Lighter and smaller for the same power output compared to NiMH.
- Longer Lifespan: Can often handle more charge cycles than NiMH batteries.
- No Memory Effect: Can be recharged at any time without negatively impacting capacity.
- Higher Voltage: Typically operate at a higher voltage (3.7V per cell), which can be more efficient for certain electronics.
- Lower Self-Discharge: Hold their charge for a long time when not in use.
Cons of Li-ion Batteries:
- Cost: Generally more expensive than NiMH batteries.
- Temperature Sensitivity: Can be sensitive to extreme temperatures, and charging in freezing temperatures can damage them.
- Requires Protection Circuitry: Often need a built-in circuit to prevent overcharging, over-discharging, and short circuits for safety and longevity.
- Disposal: While better than NiCd, proper disposal is still important.
3. Nickel-Cadmium (NiCd) Batteries (Less Common)
NiCd batteries were one of the earliest types of rechargeable batteries used in many electronic devices, including older solar lights. While they are still around, they are largely being phased out due to their environmental impact and some performance drawbacks.
Pros of NiCd Batteries:
- Good High-Drain Performance: Can deliver high current when needed.
- Temperature Tolerance: Generally tolerate a wider range of temperatures than NiMH.
- Durable: Can withstand physical shock well.
Cons of NiCd Batteries:
- Environmental Hazard: Contain toxic cadmium, making disposal problematic.
- Memory Effect: Suffer from a significant memory effect, where their capacity reduces if repeatedly recharged before fully discharged.
- Lower Energy Density: Heavier and bulkier than NiMH or Li-ion for the same capacity.
- Shorter Lifespan: Typically have fewer charge cycles than NiMH or Li-ion.
How to Find Out What Batteries Are in Your Solar Lights
Figuring out the battery type in your solar lights is usually straightforward. Most of the time, the information is right there if you know where to look!
1. Check the Manufacturer’s Label or Manual
The easiest way is to look for information provided by the manufacturer.
- Product Packaging: If you still have the original box, it will almost certainly list the battery type and specifications.
- Instruction Manual: Any manual that came with your lights should detail the battery type.
- On the Light Itself: Sometimes, there’s a sticker or engraving on the light fixture, often near the battery compartment, that specifies the battery type (e.g., “NiMH AA,” “3.7V Li-ion”).
2. Open the Battery Compartment
Most solar lights have a compartment where the batteries are housed. This is often accessed by unscrewing a cover or lifting a small panel.
- Locate the Compartment: This is usually on the underside of the solar panel, or sometimes in the base of the light fixture.
- Open It Carefully: You might need a small screwdriver, or the cover might just pop off.
- Inspect the Batteries: Once you can see the batteries, look for labels on them. They will usually indicate the type (NiMH, Li-ion), size (AA, AAA), and capacity (mAh).
3. Note the Battery Size and Shape
Solar lights often use standard battery sizes like AA or AAA. If you see these cylindrical batteries, they are most likely NiMH. If the battery is a different shape, like a flat pack or a cylindrical cell with wires attached, it’s more likely to be a Lithium-ion battery, especially in newer models. This visual clue can help you narrow down the possibilities if there’s no label.
4. Consider the Age and Quality of the Light
Generally, older and less expensive solar lights are more likely to use NiMH batteries. Newer, more advanced, or higher-quality lights are increasingly opting for Li-ion batteries due to their superior performance and lifespan. If your light is several years old and was an affordable option, it’s a good bet it has NiMH batteries.
Replacing Batteries in Your Solar Lights
Replacing the batteries in your solar lights is a simple DIY task that can give them a new lease on life. It’s important to replace them with the correct type and specifications to ensure your lights work properly and safely.
Step-by-Step Battery Replacement Guide
Here’s a general guide. Always refer to your specific light’s manual if available.
- Gather Your Supplies: You’ll need the correct replacement batteries (same type, size, and ideally similar or higher capacity), and possibly a small screwdriver if your battery compartment requires one.
- Turn Off the Light: If there’s an on/off switch on the light, set it to off. This prevents accidental activation and helps conserve any remaining charge in the old batteries.
- Access the Battery Compartment: Carefully open the compartment as described in the previous section.
- Remove Old Batteries: Note the orientation of the old batteries (positive and negative ends). You can usually gently pry them out with a non-metallic tool or your fingers.
- Insert New Batteries: Place the new batteries into the compartment, ensuring they are oriented correctly according to the markings (+/-) inside the compartment.
- Close the Battery Compartment: Securely close the compartment cover. Make sure it’s watertight if it’s designed to be.
- Test the Light: Place the solar light in direct sunlight for a full day to charge the new batteries. Then, test it at night or cover the solar panel to simulate darkness and see if it turns on.
Important Considerations When Replacing Batteries
- Match Battery Type: Always replace with the same chemistry (NiMH, Li-ion). Do not mix battery types.
- Match Battery Size: Use the same physical size (e.g., AA, AAA).
- Capacity (mAh): You can often use batteries with a higher milliampere-hour (mAh) rating. This means they can store more energy and potentially provide light for longer periods on a single charge. For example, replacing 600mAh NiMH batteries with 1000mAh NiMH batteries is usually fine.
- Voltage: Ensure the voltage matches. This is usually dictated by the battery type and size, but it’s critical for Li-ion batteries which can come in various voltages.
- Avoid Mixing Old and New: If your light uses multiple batteries, replace them all at once. Never mix old and new batteries, or batteries of different charge levels, as this can damage the batteries and reduce performance.
- Recycle Old Batteries: Dispose of old rechargeable batteries responsibly. Many local recycling centers or electronic stores have collection points for rechargeable batteries. Check resources like Call2Recycle for drop-off locations.
Battery Lifespan and Maintenance for Solar Lights
Rechargeable batteries don’t last forever. Their lifespan is measured in charge cycles (how many times they can be fully charged and discharged) and also by calendar time. With proper care, you can extend the life of your solar lights’ batteries.
Factors Affecting Battery Lifespan
- Depth of Discharge: Constantly draining the battery completely can shorten its life. Modern solar lights and batteries are generally designed to manage this, but very deep discharges are still not ideal.
- Charge Cycles: Every charge and discharge cycle wears the battery down slightly. The number of cycles varies greatly by battery type. NiMH typically lasts 500-1000 cycles, while Li-ion can last 1000-2000+ cycles.
- Temperature Extremes: Excessive heat or cold can degrade batteries faster. Leaving lights in direct sun all day in very hot climates or exposed to freezing temperatures can reduce lifespan.
- Charging Conditions: Inconsistent or insufficient sunlight means the batteries aren’t getting a full charge, which can sometimes lead to issues over time, especially with older battery technologies.
- Quality of the Battery: Higher-quality batteries from reputable brands tend to last longer.
Tips for Maintaining Your Solar Light Batteries
- Ensure Adequate Sunlight: Position your solar lights where they receive at least 6-8 hours of direct sunlight daily. Clear away any debris or leaves that might shade the solar panel.
- Clean the Solar Panel: Dust, pollen, and dirt can accumulate on the solar panel, reducing its efficiency. Wipe it clean regularly with a damp cloth. A clean panel means better charging.
- Avoid Complete Discharge When Possible: While difficult to control in a solar light, if you ever have the option to turn them off for a few days when they are fully charged, it can be beneficial.
- Store Properly: If you need to store solar lights for an extended period (e.g., over winter), ensure they are clean and store them in a cool, dry place. It’s a good idea to charge them fully before storage and perhaps give them a top-up charge every few months.
- Replace All Batteries at Once: As mentioned, when you replace batteries, swap them all out. This ensures consistent performance and prevents one weaker battery from dragging down the others.
Troubleshooting Common Solar Light Battery Issues
When your solar lights aren’t working as expected, the battery is often the culprit. Here are some common problems and how to address them:
Light Doesn’t Turn On at All
- Check the On/Off Switch: Ensure the light is set to “On” or “Auto.”
- Check Battery Orientation: Make sure the new batteries are inserted correctly (+/-).
- Faulty New Batteries: Though rare, the new batteries could be dead on arrival. Try testing them with a battery tester or replacing them with another set.
- Battery Contact Issue: The metal contacts inside the battery compartment might be dirty or corroded. Gently clean them with a pencil eraser or a cotton swab dipped in rubbing alcohol.
- Internal Fault: If all else fails, there might be an issue with the solar panel, the internal wiring, or the light’s electronics.
Light is Dim or Doesn’t Last All Night
- Old Batteries: This is the most common reason. The batteries can no longer hold a full charge. Replace them with new, high-quality rechargeable batteries.
- Insufficient Sunlight: The solar panel isn’t getting enough direct sun to fully charge the batteries. Check for shade from trees, buildings, or overgrown plants.
- Dirty Solar Panel: A dirty panel significantly reduces charging efficiency. Clean it regularly.
- Battery Capacity Too Low: If you replaced old batteries with new ones that have a significantly lower mAh rating, they won’t store as much energy.
- Temperature: Extreme cold can reduce battery performance and light output.
Light Turns On During the Day
- Faulty Light Sensor: Most solar lights have a sensor that detects darkness. If this sensor is dirty, blocked, or malfunctioning, the light might not turn on at night or could turn on prematurely. Clean the sensor.
- Internal Wiring Issue: This is less common, but possible.
Battery Specifications: What Those Numbers Mean
When you look at a rechargeable battery, you’ll see numbers and letters. Understanding these helps you choose the right replacement.
Here’s a quick breakdown of common specifications:
| Specification | Meaning | Importance for Solar Lights |
|---|---|---|
| Type (Chemistry) | e.g., NiMH, Li-ion, NiCd | Crucial. Must match the original type for compatibility and safety. |
| Size/Form Factor | e.g., AA, AAA, 18650, Prismatic | Must fit physically in the battery compartment. |
| Voltage (V) | e.g., 1.2V (NiMH), 3.7V (Li-ion) | Must match. Incorrect voltage can damage the light. |
| Capacity (mAh) | milliampere-hours, e.g., 600mAh, 2500mAh | Indicates how much energy the battery can store. Higher mAh means longer run time. You can usually go higher than the original. |
| Recharge Cycles | e.g., 500 cycles, 1000+ cycles | Indicates the battery’s expected lifespan in terms of recharges. |
For example, if your solar light uses “NiMH AA 1.2V 600mAh” batteries, a good replacement would be “NiMH AA 1.2V 800mAh” or “NiMH AA 1.2V 1000mAh.” You are sticking with the NiMH type and AA size, keeping the voltage the same, and increasing the capacity.
Environmental Considerations for Solar Light Batteries
Rechargeable batteries are a much greener choice than single-use alkaline batteries. However, their production, use, and disposal still have environmental impacts. Being mindful of these can help you make more sustainable choices.
Why Recycling is Important
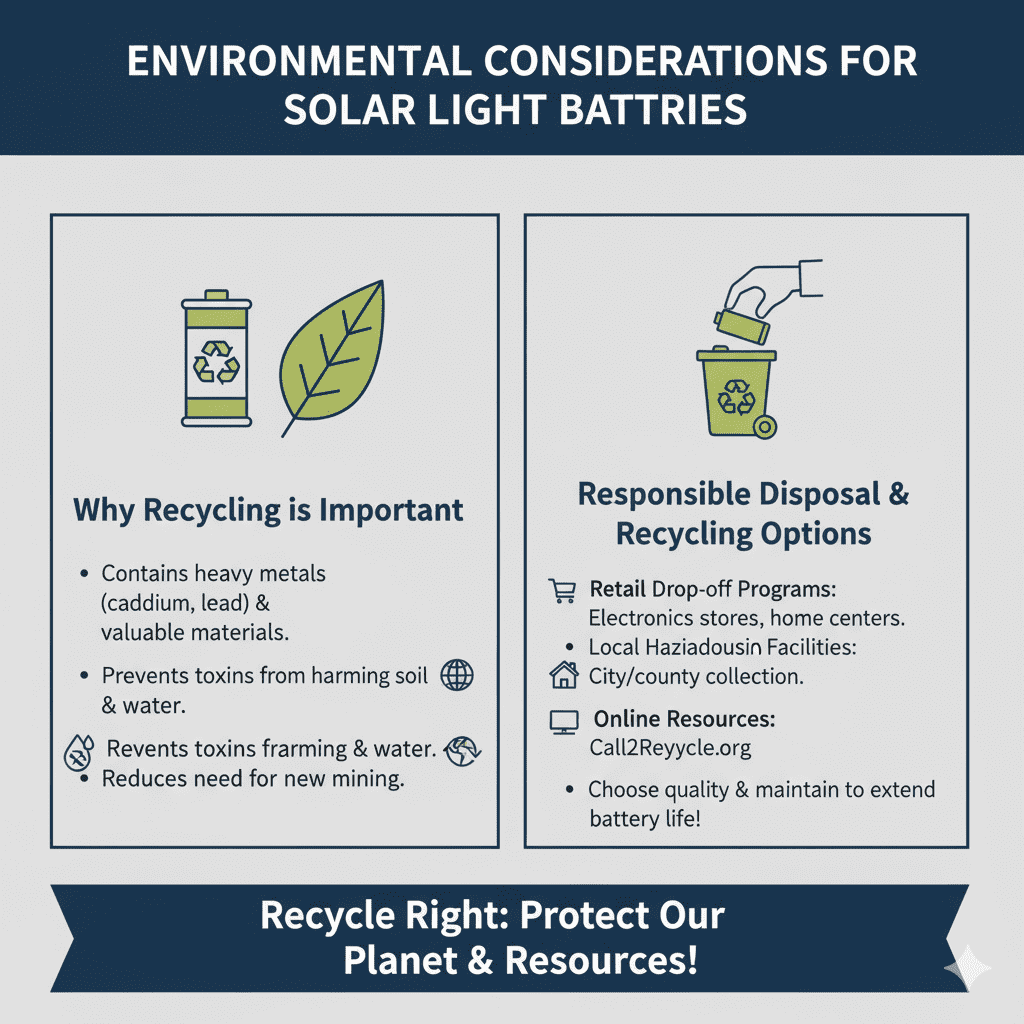
Rechargeable batteries, especially older NiCd types, contain heavy metals like cadmium and lead, which are toxic. If these batteries end up in landfills, these toxins can leach into the soil and water. Even NiMH and Li-ion batteries contain materials that can be recovered and reused, reducing the need for mining new resources. Proper recycling ensures these materials are handled safely and responsibly.
Responsible Disposal and Recycling Options
Never throw rechargeable batteries in your regular household trash. Instead, look for:
- Retail Drop-off Programs: Many electronics stores and home improvement centers offer battery recycling bins.
- Local Hazardous Waste Facilities: Your city or county likely has a facility or designated collection days for household hazardous waste, including batteries.
- Online Resources: Websites like Call2Recycle offer tools to find battery recycling locations near you.
Choosing high-quality batteries and maintaining your solar lights properly will also extend their lifespan, meaning you’ll have to replace batteries less often, further reducing waste.
Frequently Asked Questions (FAQ)
What is the most common battery type in solar garden lights?
The most common battery types found in solar garden lights are Nickel-Metal Hydride (NiMH) and Lithium-ion (Li-ion). NiMH batteries, often in AA or AAA sizes, are very prevalent, while Li-ion batteries are increasingly used in newer, more advanced models.
Can I use regular alkaline batteries in my solar lights?
No, you should not use regular alkaline batteries in solar lights. Solar lights require rechargeable batteries that can withstand repeated charging and discharging cycles powered by the solar panel. Alkaline batteries are designed for single use and cannot be recharged this way, and attempting to do so can be dangerous.
How long do solar light batteries typically last?
The lifespan of solar light batteries varies by type and usage. NiMH batteries typically last 1-3 years, while Li-ion batteries can last 3-5 years or even longer under optimal conditions. This also depends on the number of charge cycles they endure and exposure to extreme temperatures.
My solar light is dim, do I need to replace the battery?
A dim light is a common sign that the rechargeable battery is nearing the end of its life and can no longer hold a full charge. Replacing the old battery with a new, fully charged rechargeable battery of the correct type and specifications is usually the solution. Also, ensure the solar panel is clean and receiving ample sunlight.
Where can I buy replacement batteries for solar lights?
You can buy replacement batteries for solar lights at most hardware stores, home improvement centers, electronics stores, and online retailers like Amazon. It’s important to match the battery type (NiMH, Li-ion), size (AA, AAA), and voltage to ensure compatibility.
Do I need to replace all the batteries in my solar light at once?
Yes, if your solar light uses multiple batteries, it’s highly recommended to replace them all at the same time. Mixing old and new batteries, or batteries with different charge levels, can lead to uneven charging, reduced performance, and potentially damage to the batteries or the solar light itself.
What does mAh mean on a battery?
mAh stands for milliampere-hour. It’s a measure of electric charge capacity, indicating how much current a battery can deliver over a period of time. A higher mAh rating means the battery can store more energy, potentially allowing your solar light to run for longer on a single charge.
Conclusion
So there you have it! Understanding what batteries are in your solar lights is key to keeping your garden, pathways, and outdoor spaces beautifully lit. We’ve explored the common types like NiMH and Li-ion, learned how to identify them, and walked through the simple steps for replacement. Remember, a little bit of care – like keeping those solar panels clean and ensuring they get plenty of sun – goes a long way in extending the life of your batteries and your solar lights.
Don’t be intimidated by a dimming light; it’s often just a sign that the battery needs a refresh. By following these tips and choosing the right replacements, you can confidently tackle this easy DIY task and enjoy the warm glow of your solar lights for seasons to come. Happy lighting!