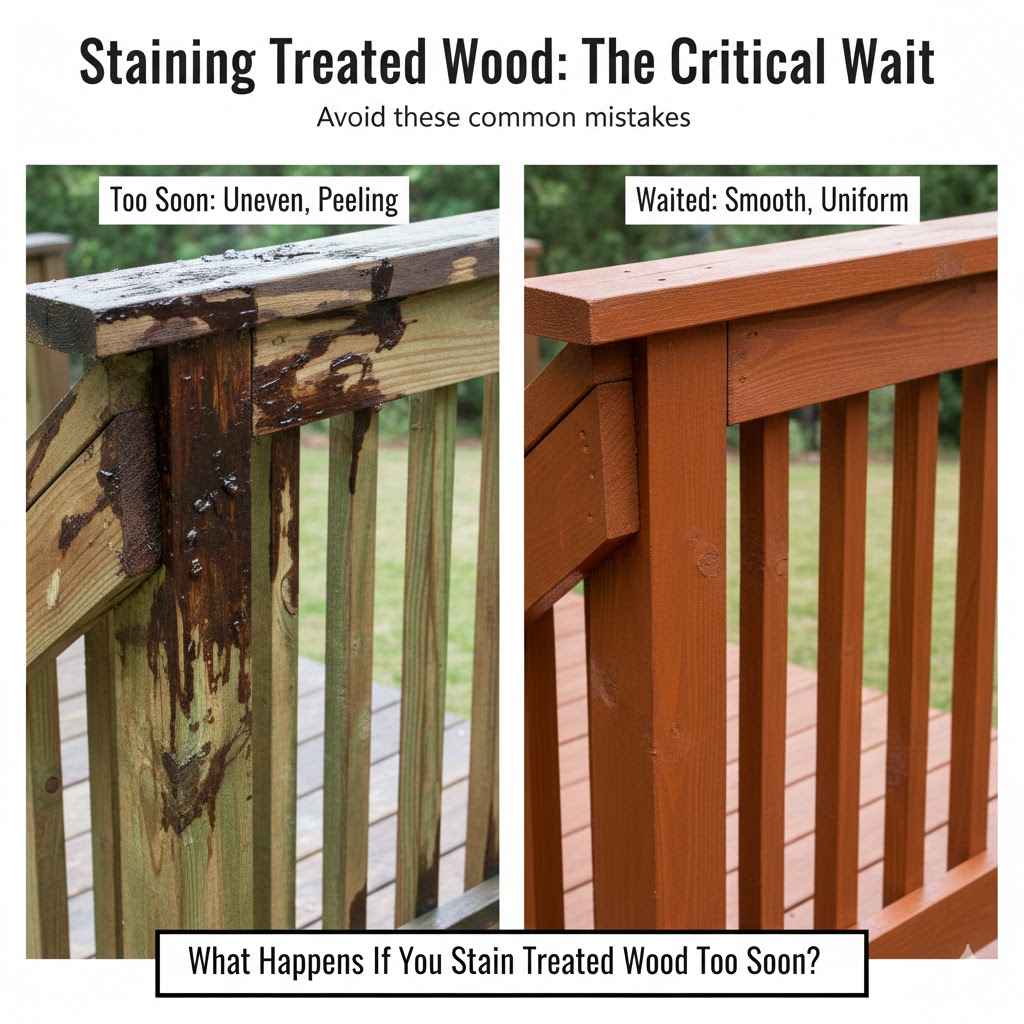
What Happens If You Stain Treated Wood Too Soon
Many people get excited to finish their DIY projects, especially after treating wood. But sometimes, the eagerness to stain can lead to a common mistake. Knowing what happens if you stain treated wood too soon is key to a beautiful, lasting finish.
This can be tricky for beginners because treated wood needs time to dry properly. Don’t worry! We’ll break it all down simply.
Let’s find out what you need to know before you grab that stain.
Why Treated Wood Needs To Dry Before Staining
This section will explain the importance of letting treated wood dry out before you apply any stain or sealant. When wood is treated, it absorbs a lot of liquid. This liquid needs to evaporate over time. If you stain too early, the stain might not soak in correctly, leading to patchy color and poor protection. It’s like trying to paint over a wet surface; the paint just slides off or looks uneven. Understanding this drying process helps ensure your project looks great and lasts longer.
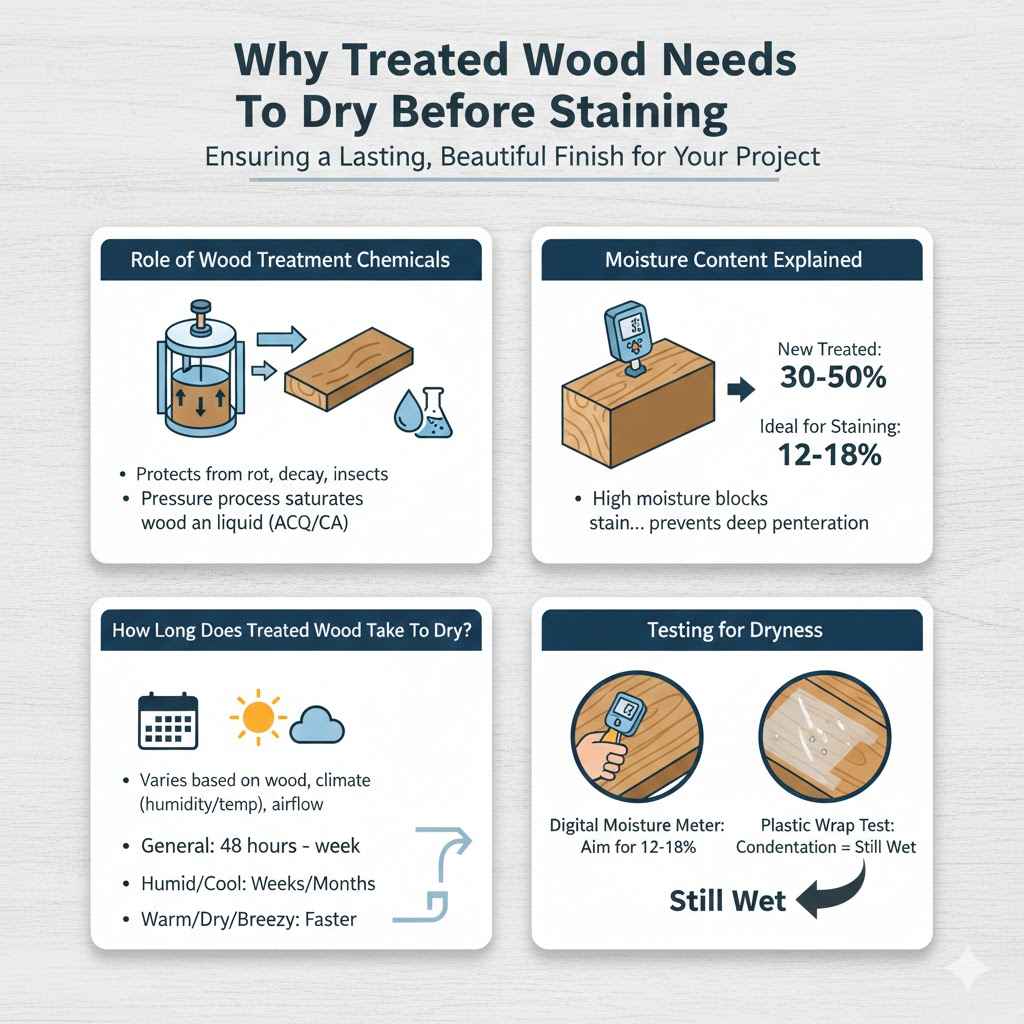
The Role of Wood Treatment Chemicals
Wood treatment, often using chemicals like alkaline copper quaternary (ACQ) or copper azole (CA), is designed to protect lumber from rot, decay, and insect infestation. This process involves pressure treating, where the wood is placed in a sealed cylinder, and the treatment solution is forced deep into the wood fibers under high pressure. This solution saturates the wood, making it heavier and sometimes giving it a greenish hue.
This saturation means the wood holds a significant amount of moisture from the treatment process, in addition to its natural moisture content. This absorbed moisture is not just water; it contains the protective chemicals. Waiting for the wood to dry allows these chemicals to set and bond with the wood fibers, creating a stable base for any subsequent coatings.
Moisture Content Explained
The moisture content of wood refers to the amount of water present in its cellular structure. For construction lumber, this is typically measured as a percentage of the wood’s dry weight. New, freshly treated lumber often has a moisture content that can range from 30% to over 50%.
For staining and finishing, the ideal moisture content for most wood is significantly lower, usually between 12% and 18%. High moisture content prevents stains and sealers from penetrating the wood properly. The liquid in the stain struggles to reach the wood fibers when they are already packed with water. This leads to surface-level adhesion rather than deep protection and color.
How Long Does Treated Wood Take To Dry
The drying time for treated wood can vary greatly depending on several factors. These include the type of wood, the specific treatment solution used, the atmospheric conditions (temperature, humidity, airflow), and how long the wood was treated. Generally, it is recommended to let treated wood air dry for at least 48 hours to a week before staining.
In very humid or cool conditions, drying can take much longer, potentially several weeks or even months. Warmer, drier, and breezy conditions will speed up the drying process considerably. It’s crucial to test the wood’s dryness before applying any finish.
Testing for Dryness
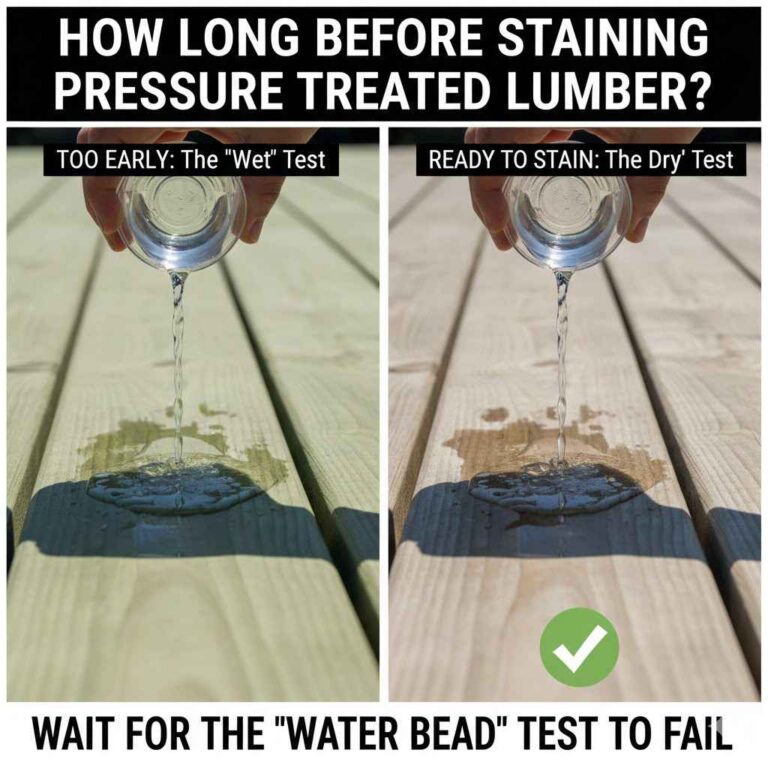
A reliable way to check if your treated wood is dry enough to stain is by using a moisture meter. These are electronic devices that can be purchased at most hardware stores. You simply insert the prongs of the meter into the wood.
Aim for a reading between 12% and 18%. If you don’t have a moisture meter, a less precise method is to tape a small piece of plastic wrap tightly to the wood surface. Leave it for 24 hours. If you find condensation or moisture droplets on the inside of the plastic wrap after 24 hours, the wood is not yet dry enough. This indicates that moisture is still escaping from the wood.
What Happens If You Stain Treated Wood Too Soon
When you stain treated wood before it has adequately dried, several undesirable outcomes can occur. These issues affect both the appearance and the protective qualities of your finish. Understanding these potential problems highlights why patience is so important in woodworking and finishing projects involving treated lumber.
Poor Stain Adhesion and Uneven Color
One of the most immediate and visible problems is poor stain adhesion. When the wood is still saturated with treatment moisture, the stain cannot penetrate the wood fibers effectively. Instead of soaking in to create a uniform color, the stain may pool on the surface or be repelled in areas. This results in a patchy, streaky, or blotchy appearance that is far from the desired look.
This uneven adhesion means some areas of the wood will appear darker or lighter than others, creating an inconsistent finish. Even if you apply multiple coats, the underlying issue of poor penetration often remains, leading to a disappointing aesthetic. The stain essentially sits on top of the wood rather than becoming a part of it.
Reduced Durability and Protection
Staining treated wood too soon compromises the stain’s ability to protect the wood. The primary role of a stain or sealant is to provide a barrier against moisture, UV rays, and physical wear. If the stain is not properly bonded to the wood due to excessive moisture, this protective layer will be weaker and more prone to failure.
This can lead to premature peeling, flaking, or cracking of the stain. The wood itself will then be more vulnerable to weathering, rot, and insect damage, negating the benefits of the initial wood treatment and the staining process. The intended longevity of your project is significantly shortened.
The Stain May Not Cure Properly
Many stains contain solvents and oils that need to evaporate or react with the wood to cure properly. If the wood is too wet, these components cannot escape. This can prevent the stain from drying to a hard, durable finish.
Instead, the stain might remain gummy, tacky, or soft for an extended period. This not only makes the surface unpleasant to touch but also attracts dirt and debris, further degrading the appearance and protection. In some cases, the stain may never fully cure, remaining a weak layer on the wood’s surface.
Water Beading Issues
A properly stained and sealed wood surface should repel water. If you stain treated wood too soon, the stain might not create a uniform, water-repellent barrier. You might notice that water doesn’t bead up nicely on the surface but instead soaks in unevenly, leaving dark spots.
This indicates that the protective layer is not intact. These dark spots are areas where the wood is still absorbing moisture, which can lead to swelling, warping, and ultimately, the breakdown of the wood and the finish.
Potential for Chemical Reactions
While less common, there’s a slight possibility of unintended chemical reactions between the remaining wood treatment chemicals and the stain’s components if the wood is not properly dried. These reactions could alter the color of the stain or weaken its structure.
The chemicals in the treatment are designed to be stable once dried, but when they are in a liquid state and mixed with other chemicals from the stain, unpredictable results can occur. This is another reason why allowing the wood to dry is a critical step.
Proper Staining Process for Treated Wood
Following the correct procedure for staining treated wood ensures a beautiful, long-lasting finish. It involves careful preparation, the right timing, and appropriate application techniques. This section outlines the steps to achieve optimal results, preventing the common pitfalls associated with staining too soon.
Preparation Is Key
Before you even think about applying stain, preparing the treated wood is essential. Start by ensuring the wood is clean and free of any dirt, dust, or debris. You can use a stiff brush or a broom for this.
If the wood has been exposed to the elements for a while, it might have a gray, weathered surface. You may need to clean it with a wood cleaner or a deck wash. Always follow the product instructions carefully and rinse the wood thoroughly afterward. Allow the wood to dry completely after cleaning before proceeding.
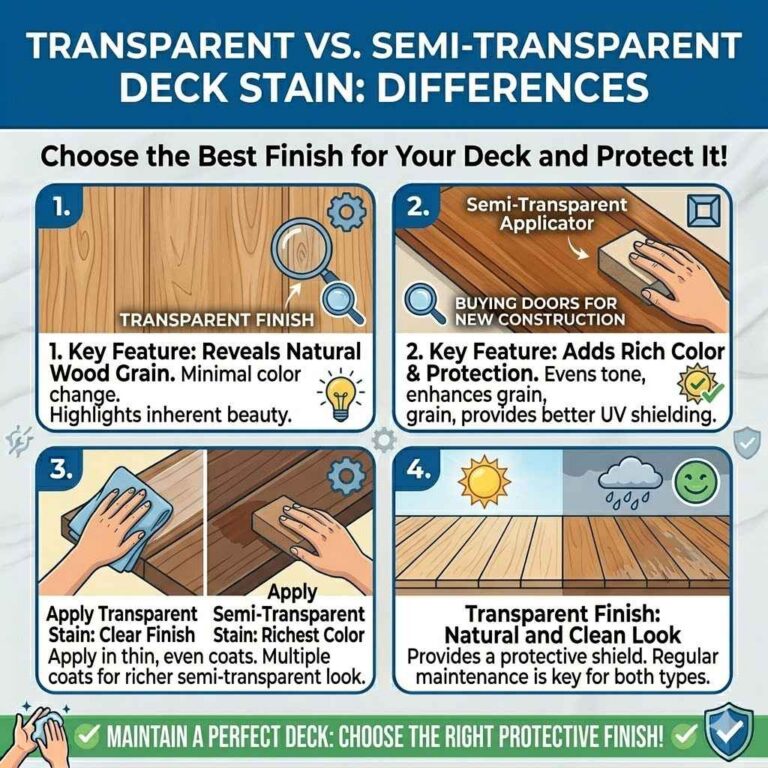
Choosing the Right Stain
There are many types of stains available, and choosing the right one for treated wood is important. For exterior treated wood, consider stains that offer UV protection and water repellency. You can opt for a semi-transparent stain to let some of the wood grain show through, or an opaque stain for a more solid color.
Oil-based stains generally penetrate better into dry wood and offer good durability. Water-based stains are often easier to clean up and can be a good choice for many projects. Read the product labels carefully to ensure they are suitable for pressure-treated lumber.
Application Techniques for Success
Once the wood is clean and completely dry, you can begin staining. Always test the stain on an inconspicuous area first to ensure you like the color and how it absorbs.
Apply the stain evenly, working in the direction of the wood grain. Use a brush, roller, or sprayer, depending on your preference and the project size. For decks or fences, rollers and sprayers can speed up the process. If using a brush, avoid overworking the stain, which can lead to lap marks.
Wiping Off Excess Stain
For many stains, especially semi-transparent and oil-based ones, it’s important to wipe off any excess stain after a short waiting period. The amount of time you let the stain sit before wiping can affect the depth of the color.
Generally, you’ll apply the stain to a small section at a time, let it penetrate for about 5-15 minutes (check the product instructions), and then use a clean, lint-free cloth or a dry brush to wipe away any stain that hasn’t soaked into the wood. This step is crucial for achieving an even finish and preventing the stain from becoming sticky or forming a film.
Allowing Proper Drying Between Coats
If your project requires multiple coats of stain, it’s vital to allow each coat to dry thoroughly before applying the next. The drying time between coats can range from a few hours to 24 hours, depending on the stain type and environmental conditions.
Skipping this drying time can lead to the same problems as staining too soon initially. The wet stain layers can trap moisture and prevent proper curing, resulting in a weak and uneven finish. Always refer to the stain manufacturer’s recommendations for drying times between coats.
Final Curing and Protection
After the final coat of stain has been applied and allowed to dry, the stain will continue to cure over the next few days or even weeks. During this period, the stain hardens and fully bonds with the wood, providing its maximum protective qualities.
Avoid placing heavy objects on the stained surface or exposing it to harsh weather if possible during the curing phase. Once fully cured, your treated wood will be well-protected and beautifully finished, ready to withstand the elements. Regular maintenance, like cleaning and reapplication of sealant every few years, will help maintain its appearance and integrity.
Common Mistakes To Avoid
When working with treated wood and stains, several common errors can lead to less than ideal results. Being aware of these mistakes and knowing how to prevent them will help ensure your project turns out the way you envisioned. These often stem from impatience or a lack of information about the specific needs of treated lumber.
Ignoring Manufacturer Instructions
One of the biggest mistakes is not reading and following the instructions provided by the manufacturer of both the treated wood and the stain. Each product is formulated differently and has specific requirements for application, drying times, and curing.
For instance, some stains might suggest a specific humidity range for application, while others might have unique preparation steps. Ignoring these guidelines is like trying to bake a cake without following the recipe; you’re likely to end up with a less-than-perfect outcome.
Rushing the Drying Process
As discussed extensively, rushing the drying process of treated wood is a primary cause of staining problems. People often want to complete their project quickly, so they skip the essential waiting period.
This impatience directly leads to the issues of poor adhesion, uneven color, and reduced durability. Even if the wood feels dry to the touch, it might still hold excess moisture deep within its fibers, especially if it’s a thicker piece of lumber.
Using the Wrong Type of Stain
Not all stains are created equal, and some are not suitable for use on pressure-treated wood. For example, some stains might contain harsh chemicals that react poorly with the treatment preservatives.
Conversely, some stains might not be formulated for exterior use and will break down quickly when exposed to sun and rain. Always select a stain specifically recommended for exterior use and compatible with pressure-treated lumber.
Inadequate Surface Preparation
Failing to properly clean and prepare the wood surface before staining is another common mistake. If there is dirt, grime, mill glaze (a smooth, hard surface created during the milling process), or old finishes on the wood, the new stain will not adhere properly.
This can lead to peeling, flaking, and an uneven appearance. Taking the time to clean and potentially abrade the surface ensures that the stain has a good “tooth” to cling to, leading to a much more durable and attractive finish.
Applying Stain in Poor Weather Conditions
Many people overlook the impact of weather on staining. Applying stain on a very hot, sunny day can cause it to dry too quickly, preventing proper penetration and leading to lap marks.
Conversely, staining in very humid or rainy conditions can prevent the stain from drying and curing correctly. It can also wash away uncured stain. Ideal conditions are usually mild temperatures (between 50°F and 85°F or 10°C and 30°C), low humidity, and no rain expected for at least 24-48 hours after application.
Case Studies and Real-World Examples
Understanding the theory behind why you shouldn’t stain treated wood too soon is one thing, but seeing real-world examples can solidify the importance of this advice. These scenarios illustrate the consequences of rushing the process and the benefits of patience.
Scenario 1 The Impatient Deck Builder
Mark was building a new deck and wanted to finish it before a weekend barbecue. He treated his lumber and, after just two days, decided it was dry enough to stain. He applied a beautiful semi-transparent stain. By Monday, he noticed splotchy patches and some areas where the stain looked like it was peeling off the surface. A few weeks later, the stain started to flake more noticeably, and the wood underneath looked unevenly colored. The moisture trapped in the wood prevented the stain from penetrating, leading to a poor, short-lived finish that needed redoing after only one season.
Scenario 2 The Careful Fence Project
Sarah was staining her new fence. She knew treated wood needed to dry, so she waited two full weeks after the lumber was installed. She used a moisture meter and confirmed the wood’s moisture content was below 18%. She then cleaned the fence and applied an oil-based stain, wiping off the excess as recommended. The fence looked fantastic, with a rich, even color that highlighted the wood grain. Over the next few years, the stain held up well, providing excellent protection against the elements, proving that patience paid off.
Scenario 3 The DIY Patio Table Disaster
After building a patio table with treated wood, David was eager to protect it. He stained it the very next day. The table looked okay initially, but after the first rain, dark streaks appeared where the water had pooled. The stain continued to soften and became sticky, attracting pollen and dirt. He realized he had sealed in the treatment moisture, and the stain couldn’t form a protective barrier. He ended up having to strip the table and wait for the wood to dry properly before restaining it.
These examples clearly show that failing to let treated wood dry adequately leads to aesthetic problems and reduced protection, ultimately costing more time and money in the long run.
Statistics on Wood Finishing Failures
While specific statistics for “staining treated wood too soon” are hard to isolate, general woodworking and home improvement surveys often highlight common finishing failures. For instance, a survey by a major paint and coatings manufacturer found that over 30% of DIY exterior finishing projects required repair or refinishing within two years, with poor adhesion and premature wear being the most cited issues.
Another industry report indicated that improper surface preparation, which includes substrate moisture content, accounts for a significant percentage of coating failures on wood surfaces. These figures underscore the importance of following best practices, including adequate drying times for treated lumber.

Frequently Asked Questions
Question: Can I stain treated wood right after it’s installed
Answer: No, it is not recommended to stain treated wood right after installation. Treated wood contains a significant amount of moisture from the treatment process, and it needs time to dry out. Staining too soon will prevent the stain from penetrating properly, leading to uneven color and poor protection.
Question: How long should I wait before staining treated wood
Answer: The general recommendation is to wait at least 48 hours to a week. However, this can vary greatly depending on weather conditions. It’s best to use a moisture meter to ensure the wood’s moisture content is between 12% and 18% before staining.
Question: What are the signs that treated wood is too wet to stain
Answer: Signs include a dark, damp appearance, a noticeable weight increase, or condensation forming on a piece of plastic wrap taped to the surface. A moisture meter reading above 18% is also a clear indicator that the wood is too wet.
Question: Will staining treated wood too soon damage the wood
Answer: While it may not directly damage the wood fibers, staining too soon will compromise the effectiveness of the stain and sealant. This means the wood will be less protected against rot, decay, and UV damage, potentially leading to premature wear and a shorter lifespan for your project.
Question: Can I use a blower to speed up the drying of treated wood
Answer: You can use fans or blowers to improve airflow and help speed up the drying process, especially in humid conditions. However, avoid using direct high heat, as this can cause the wood to crack or warp. Natural air drying is generally the safest and most effective method.
Summary
Waiting to stain treated wood is essential. Staining too soon leads to patchy color and weak protection because the wood is too wet. This causes stains to peel or flake, and the wood is not properly shielded from weather. Always let treated wood dry thoroughly, ideally to a moisture content of 12-18%, and follow product instructions for the best results that last.