Why Does My Toilet Flush Slow? Proven Fixes
A slow toilet flush is often caused by a simple clog in the trapway or drainpipe, or issues with the tank’s water level or flapper. Most common problems can be fixed easily with basic tools and a bit of know-how, often without needing a plumber.
Hey there, DIY friends! Md Meraj here. Ever get that sinking feeling when you flush the toilet, only to watch the water rise higher than it should, or just… slowly drain away? It’s a common household puzzle, and honestly, a bit of a messy one! But don’t you worry. These slow-flushing toilet mysteries are usually not big, scary problems. Think of it like a stubborn screw that just needs a little gentle persuasion or the right tool. We’re going to tackle this together, step-by-step, so you can get your commode working like a champ again. We’ll explore the usual suspects and I’ll show you exactly how to fix them, keeping things simple and safe. Ready to restore your toilet’s power flush?
Understanding the Slow Flush: What’s Really Happening?
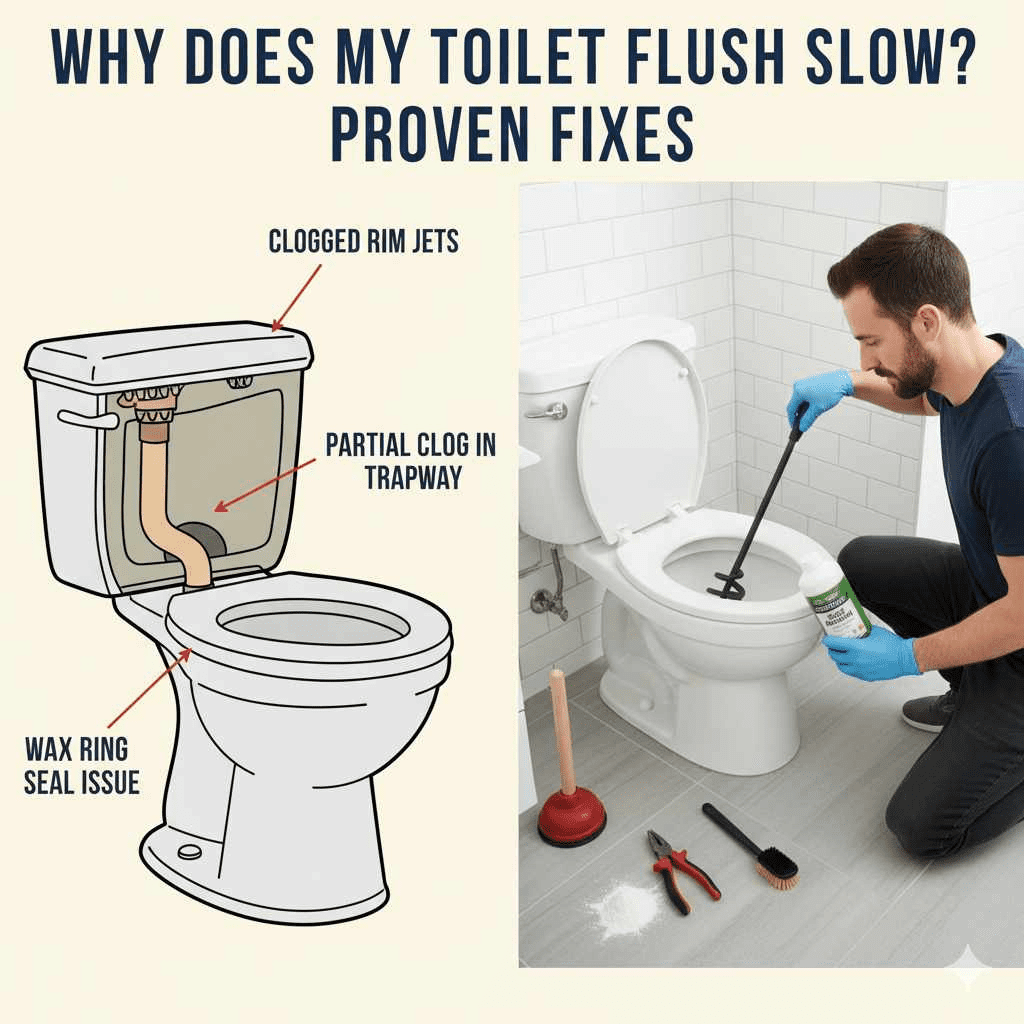
When your toilet doesn’t flush with its usual gusto, it’s like it’s telling you something’s not quite right. The water level in the bowl might stay high after flushing, or it might go down incredibly slowly, sometimes even with gurgling sounds. This usually points to a blockage somewhere in the system or a problem with how the tank is delivering water. Your toilet’s flushing mechanism is designed to create a powerful siphon action. If anything interrupts that flow, you get a slow flush.
Think of it like a garden hose. If you kink the hose, the water flow slows to a trickle. A toilet works similarly, but with water and waste. The water in the tank is stored at a higher level, and when you pull the handle, it’s released rapidly into the bowl. This rush of water pushes waste through the S-shaped trapway and into the main drainpipe. If that pathway is narrowed or blocked, the water can’t flow freely, and you’re left with a sluggish flush.
The good news is, most of these issues are totally fixable for a homeowner. We’re talking about simple clogs, adjustments to the tank, or minor repairs. No need to call in the cavalry just yet!
Common Culprits Behind a Slow-Flushing Toilet
Let’s break down the most frequent reasons your toilet might be performing like it’s stuck in slow motion. Understanding these will help us zero in on the solution.
1. The Clog: The Usual Suspect
This is by far the most common reason for a slow flush. The clog can be in a few places:
- The Toilet Trapway: This is the S-shaped curve right at the bottom of the toilet bowl. It’s designed to hold a bit of water, but it’s also the first place things can get stuck. Small items, too much toilet paper, or even accumulated waste can create a partial blockage here.
- The Drainpipe: Further down the line, the pipe leading away from your toilet can also get clogged. This could be due to build-up of toilet paper, grease, hair, or even tree roots if you have older pipes outside your home.
- Vent Pipe Blockage: Your plumbing system has vent pipes that allow air to enter, which helps water flow smoothly. If a vent pipe is blocked (often by leaves, nests, or debris), it can create a vacuum effect, slowing down drainage.
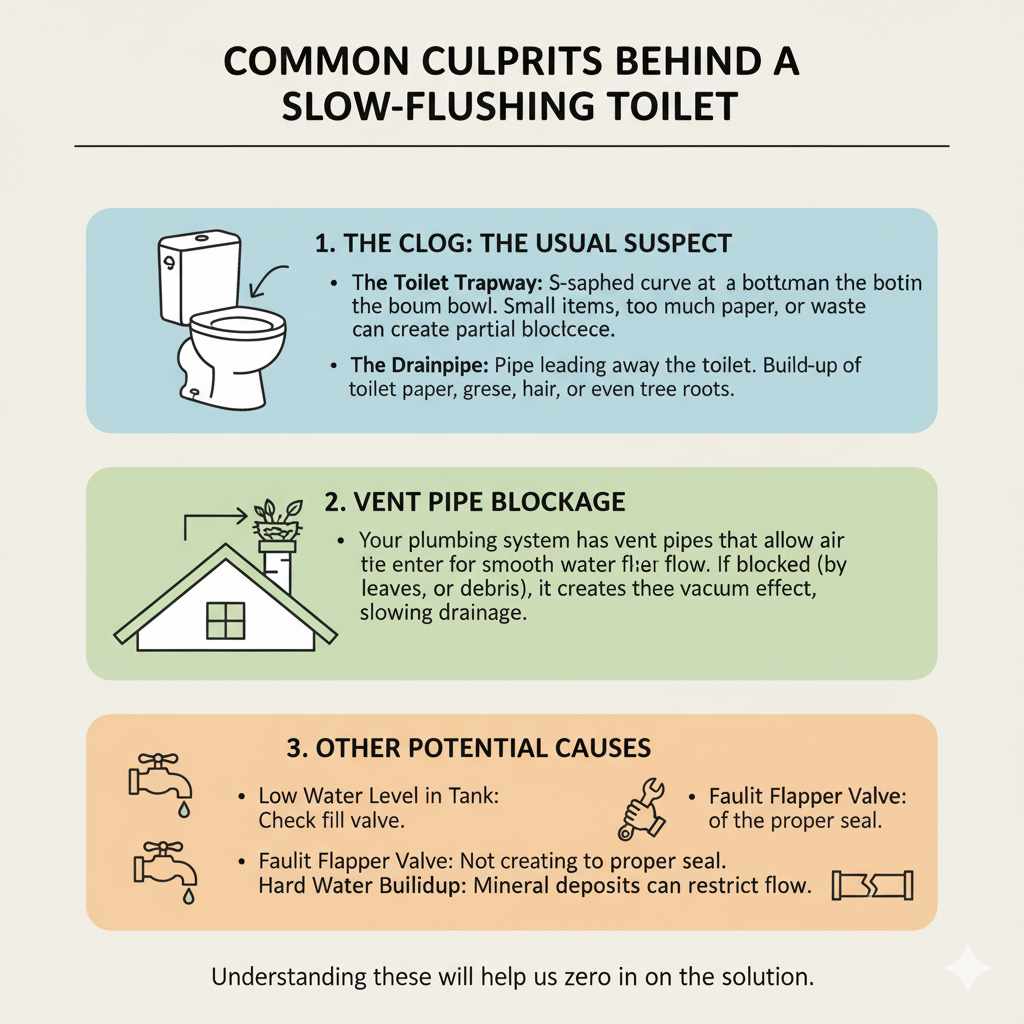
2. Low Water Level in the Tank
The amount of water in your toilet tank is crucial for a powerful flush. If the water level is too low, there simply isn’t enough volume to create the necessary siphon action. This can happen if:
- The Fill Valve is Malfunctioning: The fill valve (also called the ballcock) controls how much water enters the tank after each flush. If it’s not working correctly, it might not refill the tank to the proper level.
- The Flapper is Leaking: The flapper is the rubber seal at the bottom of the tank that lifts to let water out. If it’s old, worn, or not seating properly, water can slowly leak out of the tank, meaning there’s less water available for the next flush.
3. The Flapper Chain is Too Long or Too Short
The flapper is connected to the flush lever by a chain. The length of this chain is important.
- Too Long: If the chain is too long, it might not lift the flapper high enough or for long enough to allow a full, powerful rush of water.
- Too Short: If the chain is too short, it might not let the flapper seal completely, causing a slow leak from the tank and reducing flush power.
4. Partial Clog in the Toilet Bowl Rim Jets
Around the rim of your toilet bowl, there are small holes called rim jets. These spray water into the bowl to help rinse it clean. If these jets get clogged with mineral deposits (like calcium and lime), the water flow into the bowl will be reduced, weakening the overall flush. You can learn more about common mineral deposits and how they affect plumbing from resources like the EPA’s information on hard water.
5. Issues with the Drain Line
Sometimes, the problem isn’t just in the toilet itself but further down the main sewer line connecting your home to the municipal sewer system or your septic tank. A significant blockage or a problem with your septic system could cause slow draining in all your plumbing fixtures, not just the toilet. If you notice slow drains in sinks and showers too, this might be the cause.
DIY Fixes for a Slow-Flushing Toilet
Alright, let’s roll up our sleeves and get these toilets flowing again! Most of these fixes are straightforward and don’t require fancy tools.
Step-by-Step Guide to Clearing a Toilet Clog
When you suspect a clog, this is your first line of defense. Patience is key here!
Method 1: The Plunger (Your Best Friend!)
A good plunger is essential for any homeowner. Make sure you have a flange plunger, which has an extra flap that extends to seal the toilet drainpipe better than a standard cup plunger.
- Prepare the Plunger: Ensure there’s enough water in the bowl to cover the rubber cup of the plunger. If not, add some water from a bucket.
- Create a Seal: Place the plunger over the drain hole at the bottom of the bowl, making sure the rubber cup completely covers it. Wiggle it gently to create an airtight seal.
- Plunge Vigorously: Push down and pull up with firm, steady strokes. Aim for about 15-20 repetitions. The goal is to use both the push and pull to dislodge the clog.
- Break the Seal: On the last pull, pull the plunger away sharply to break the seal.
- Check the Water Level: If the water level drops and drains away, congratulations! You’ve likely cleared the clog. If it’s still slow, repeat the plunging process.
- Test Flush: Once the water has drained, try a flush to see if it’s working properly. If it’s still slow, you might have a tougher clog or another issue.
Method 2: The Toilet Auger (Closet Auger)
If plunging doesn’t work, a toilet auger (sometimes called a closet auger) is the next best tool. It’s designed to reach further into the trapway and break up stubborn clogs.
- Insert the Auger: Gently place the auger’s cable end into the toilet drain hole.
- Crank the Handle: Slowly crank the handle to feed the cable into the trapway. You’ll feel resistance when you hit the clog.
- Break Through: Keep cranking and gently pushing until you feel the auger break through the clog. You might need to twist and pull it back and forth a bit.
- Retract the Auger: Once you think the clog is broken up, slowly crank the handle in reverse to retract the cable.
- Dispose of Debris: Clean any debris that comes out with the auger.
- Test Flush: Flush the toilet to check the drainage.
Method 3: Hot Water and Dish Soap (For Minor Clogs)
This is a gentler approach that can work for minor, organic clogs.
- Heat Water: Heat a gallon of water in a pot or kettle. Do NOT use boiling water, as it can crack the porcelain bowl. Aim for hot tap water temperature.
- Add Dish Soap: Pour about half a cup of liquid dish soap into the toilet bowl. Let it sit for about 15-20 minutes to help lubricate the clog.
- Pour Hot Water: Carefully pour the hot (not boiling!) water into the bowl from about waist height. The height adds a bit of force.
- Wait and See: Let it sit for another 15-20 minutes, or even longer. The hot water and soap should help break down or loosen the clog.
- Test Flush: If the water level has gone down, try flushing.
Addressing Tank Water Levels and Flapper Issues
If plunging and augering don’t seem to be the problem, let’s look inside the tank.
Adjusting the Water Level
The water level in your tank should be about an inch below the top of the overflow tube. If it’s lower, your flush will be weak.
- Locate the Fill Valve: This is the mechanism that refills the tank. It usually has a float ball or a float cup.
-
Adjust the Float:
- Float Ball Type: Look for an adjustment screw on the fill valve arm, or gently bend the metal arm downwards. This tells the valve to shut off at a lower level. You want to adjust it so the water fills higher.
- Float Cup Type: There’s usually a clip or screw on the side of the fill valve shaft that you can slide up or down to set the water level.
- Test: After adjusting, flush the toilet and let the tank refill. Check the water level. It should be at the desired mark.
Checking and Replacing the Flapper
A worn-out flapper is a common cause of weak flushes and phantom leaks.
- Inspect the Flapper: Look at the rubber flapper at the bottom of the tank. Is it cracked, brittle, or misshapen? Does it seal well when it’s down?
- Test the Seal: You can test for leaks by adding a few drops of food coloring to the tank water and letting it sit for 15-20 minutes without flushing. If colored water appears in the bowl, the flapper is leaking.
- Replace if Necessary: If the flapper looks or tests bad, it’s time to replace it. They are inexpensive and easy to find at any hardware store. Take the old one with you to ensure you get the right size and type.
-
Installation:
- Turn off the water supply to the toilet (valve is usually on the wall behind the toilet).
- Flush the toilet to empty the tank.
- Unhook the old flapper from the chain attached to the flush lever.
- Remove the old flapper from its posts.
- Attach the new flapper to its posts.
- Hook the new flapper to the chain, adjusting the length so it lifts fully when you flush but doesn’t get stuck.
- Turn the water supply back on and test.
Adjusting the Flapper Chain
The chain connecting the flush lever to the flapper needs to be just right.
- Check the Slack: With the tank lid off, flush the toilet. Watch the chain. It should have just a little bit of slack – enough so the flapper seals completely when down, but not so much that it prevents the flapper from lifting fully during a flush.
- Adjust the Links: Most chains have clips or links you can easily adjust. If there’s too much slack, shorten the chain by moving the clip to a higher link. If it’s too tight and the flapper doesn’t seal, lengthen it.
Clearing Blocked Rim Jets
These little holes are important for a good rinse!
- Locate the Jets: Look under the rim of the toilet bowl. You’ll see small holes.
- Clean with a Tool: Use a small, stiff brush (like an old toothbrush or a wire brush) or a thin piece of wire (like a straightened paperclip) to gently poke into each jet and dislodge any mineral buildup.
- Vinegar Soak (Optional): For tougher buildup, you can try soaking a rag in white vinegar, wringing it out, and tucking it under the rim to cover the jets. Let it sit for a few hours or overnight. The acetic acid in vinegar helps dissolve mineral deposits.
- Flush: After cleaning, flush the toilet to rinse away debris and check the water flow.
When to Call a Professional Plumber
While most slow-flush issues are DIY-friendly, there are times when it’s best to call in the experts. If you’ve tried the steps above and your toilet is still flushing slowly, or if you notice any of the following, it’s time to contact a plumber:
- Recurring Clogs: If you’re constantly dealing with slow drains or clogs, there might be a more serious underlying issue like a damaged pipe or a blockage deep in your main drain line.
- Multiple Fixtures Affected: If sinks, showers, and toilets are all draining slowly, it indicates a problem with the main sewer line or your septic system, which requires professional diagnosis and repair.
- Sewage Backups: Any sign of sewage backing up into your home is a serious plumbing emergency that needs immediate professional attention.
- Uncertainty or Discomfort: If you’re not comfortable performing any of the DIY fixes, or if you’re unsure about the cause, a plumber has the experience and specialized tools to diagnose and fix the problem safely and efficiently.
Plumbers have access to advanced tools like drain cameras that can inspect your pipes for hidden damage or blockages, and powerful drain-clearing machines. For instance, The National Association of the Plumbing-Heating-Cooling Contractors (NAPHCC) offers resources for finding qualified professionals in your area.
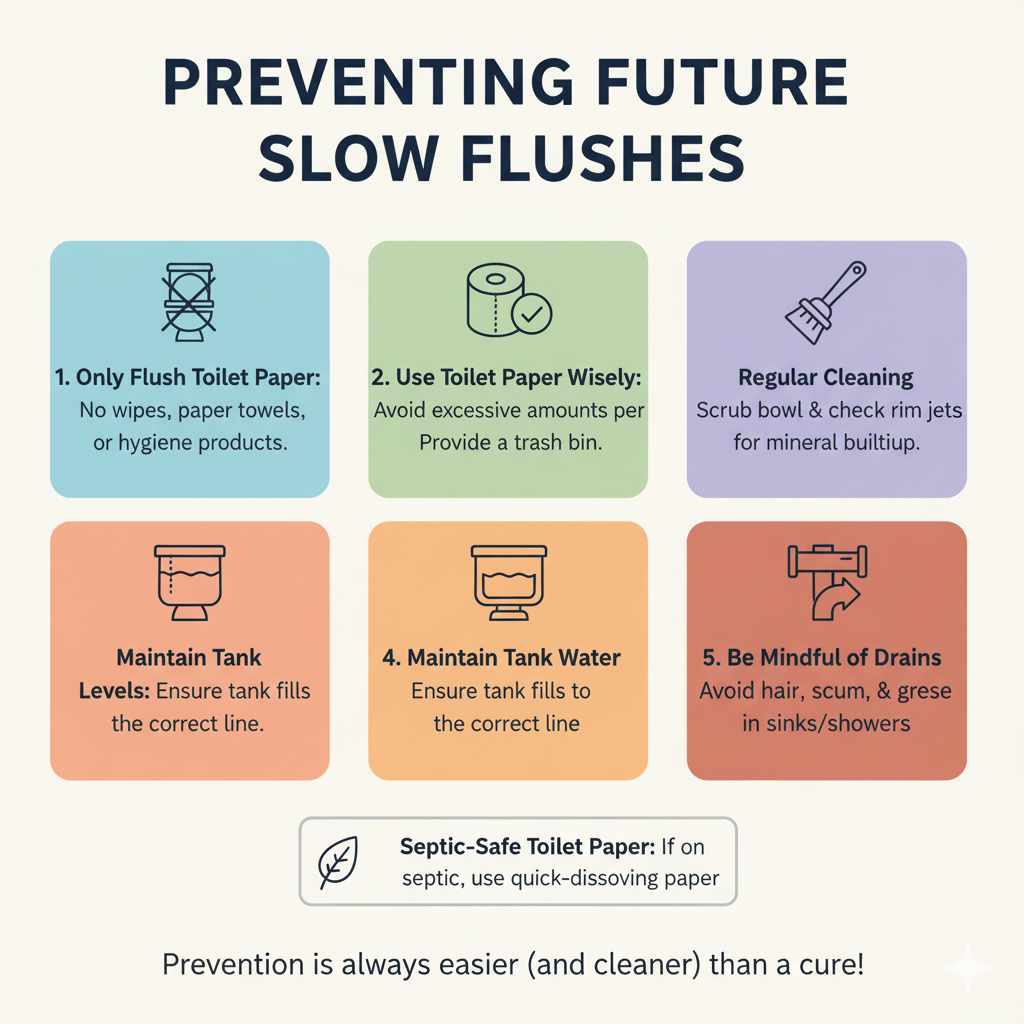
Preventing Future Slow Flushes
Once you’ve got your toilet flushing like new, you’ll want to keep it that way! Prevention is always easier (and cleaner) than a cure.
- Only Flush Toilet Paper: Avoid flushing anything other than human waste and toilet paper. Items like paper towels, wet wipes (even those labeled “flushable” can cause problems), feminine hygiene products, cotton balls, and dental floss do not break down and are major culprits for clogs.
- Use Toilet Paper Wisely: While you don’t need to skimp, avoid using excessive amounts of toilet paper in a single flush. If you have guests who tend to use a lot, have a small trash bin nearby for their convenience.
- Regular Cleaning: Keep your toilet bowl clean. Regularly scrubbing the bowl and checking the rim jets for clogs can prevent buildup.
- Maintain Tank Water Levels: Periodically check that your tank is filling to the correct level.
- Consider a Septic-Safe Toilet Paper: If you have a septic system, opt for toilet paper that is specifically designed to break down easily.
- Be Mindful of What Goes Down the Drain: In your bathroom sink and shower, avoid letting hair, soap scum, and grease build up and go down the drain, as these can contribute to overall drain line issues that might affect your toilet.
Frequently Asked Questions (FAQs)
Q1: Can I use chemical drain cleaners for a slow toilet flush?
A: It’s generally not recommended to use harsh chemical drain cleaners in toilets. They can be very corrosive and may damage your pipes, the toilet’s porcelain, or the internal tank components. Plus, they are not always effective on toilet clogs and can be harmful to the environment. Mechanical methods like plunging or augering are safer and often more effective.
Q2: My toilet is gurgling when it flushes slowly. What does that mean?
A: Gurgling sounds usually indicate that air is being trapped in your plumbing system. This is often a sign of a partial clog somewhere in the drain line or a blockage in your vent pipe. The air is trying to escape through the water in the bowl, causing the gurgling sound.
Q3: How often should I replace my toilet flapper?
A: Toilet flappers typically last between 5 to 10 years, depending on water quality and usage. If you notice your toilet constantly running, or if it fails the food coloring test (colored water appearing in the bowl without flushing), it’s a sign the flapper needs to be replaced sooner.
Q4: Is it safe to pour bleach down the toilet if it’s flushing slowly?
A: While bleach can sanitize, it’s not designed to break up clogs. Like chemical drain cleaners, bleach can be harsh on pipes and seals. It’s better to use mechanical methods for clogs. If you need to sanitize, do so after the clog is cleared.
Q5: Why does my toilet flush slowly only sometimes?
A: Intermittent slow flushing often points to a partial clog that gets dislodged and then moves further down, or a clog that’s just the right size to be overcome by a strong flush but causes issues with a weaker one. It could also be related to fluctuating water levels in the tank or a flapper that isn’t sealing perfectly every time.
Q6: What is the overflow tube, and how does it relate to my slow flush?
A: The overflow tube is a vertical pipe inside your toilet tank. Its main purpose is to prevent the tank from overflowing if the fill valve fails. If the water level in the tank is supposed to be below the top of this tube, but it’s actually reaching or going over it, then the fill valve is set too high, or there’s a leak, which can reduce the amount of water available for a powerful flush.
Conclusion
So there you have it, my friends! A slow-flushing toilet might seem like a daunting problem, but as you can see, it’s usually quite manageable with a little know-how and the right approach. We’ve explored the common culprits, from simple clogs in the trapway to issues with your tank’s water level and flapper. Most importantly, we’ve walked through practical, step-by-step DIY fixes using tools you likely already have or can easily acquire. Remember, a plunger and a bit of patience can solve a surprising number of toilet troubles!
By understanding how your toilet works and performing simple maintenance, you can keep it flushing powerfully and efficiently. Don’t let a sluggish flush disrupt your day. With these proven fixes, you’re well-equipped to tackle the problem head-on, save yourself a plumber’s bill, and gain that satisfying confidence that comes with a successful DIY repair. Keep these tips in mind, and happy flushing!