Woodcut vs. Engraving: Proven Differences
Woodcut uses a raised surface to print, while engraving cuts into a surface to print. Woodcut is carved away from the block, leaving the image raised. Engraving cuts into the block, leaving the image incised. The resulting prints have distinct textures and visual qualities.
Hey there, fellow woodworkers! Ever looked at two beautiful prints and wondered how they were made? Sometimes, the subtle differences between woodcut and wood engraving can be a bit puzzling, especially when you’re just starting out. It’s like trying to tell apart two similar-looking tools – you know they’re different, but pinning down exactly how can be tricky. Don’t worry, we’ve all been there! In this guide, I’ll break down the core differences between these two fascinating printmaking techniques. We’ll explore what makes each unique, how they’re made, and what kind of amazing results you can expect. Get ready to understand these art forms like a pro!
Understanding the Core Concepts
Before we dive into the nitty-gritty, let’s get a clear picture of what woodcut and wood engraving actually are. Think of them as two different ways to use wood to create art, but the methods and the final look are quite distinct.
What is Woodcut?
Woodcut is one of the oldest forms of printmaking. Imagine carving into a piece of wood, but you’re careful to leave the parts you want to print standing proud, like little islands. Everything else – the background, the areas you don’t want to show up in the print – gets carved away.
Here’s the basic idea:
- The artist carves away the non-image areas of a wooden block.
- The image is left in relief (raised) on the surface of the block.
- Ink is applied to the raised surface.
- Paper is pressed onto the inked block, transferring the image.
This technique is known for its bold lines and strong contrasts. Because you’re typically working with the grain of the wood, you often get a characteristic texture in the print.
What is Wood Engraving?
Wood engraving is a bit of a clever twist on woodcut. Instead of working with the wood grain, wood engraving is traditionally done on the end grain of a block of hardwood, like boxwood. This means you’re carving across the wood fibers, not along them.
Here’s how it works:
- The artist carves into the surface of the wood block, creating lines and shapes.
- The areas that are carved away will not receive ink.
- Ink is applied to the surface of the block, filling the incised lines and the uncarved areas.
- Paper is pressed onto the block. The ink from the uncarved surfaces transfers to the paper, while the carved-out lines remain white.
This method allows for much finer detail and smoother tones compared to woodcut. It’s like using a tiny chisel to draw directly onto the wood.
The Key Differences: A Side-by-Side Look
Now that we have a basic understanding, let’s break down the main differences. These distinctions affect everything from the tools used to the final appearance of the print.
Wood Grain vs. End Grain
This is perhaps the most fundamental difference.
Woodcut: Typically carved on the plank side of the wood, meaning the artist works with the wood grain. This can create a distinctive texture and sometimes limits the fineness of detail.
Wood Engraving: Traditionally carved on the end grain of a hardwood block. This provides a much smoother, more uniform surface to work on, allowing for incredibly fine detail and precise lines.
Tools of the Trade
The tools used also reflect the different approaches.
Woodcut: Often uses knives and gouges to cut away larger areas of wood. The tools are designed to work along the grain.
Wood Engraving: Uses very fine, sharp tools called burins or gravers. These are similar to tools used by metal engravers and are perfect for cutting precise lines into the hard end grain.
The Printing Process
While both involve inking and pressing, the way the ink adheres is different.
Woodcut: Ink is applied to the raised surface of the block. The carved-away areas are left ink-free.
Wood Engraving: Ink is applied to the entire surface. The incised lines are where the ink is not, so they print as white. This is often called intaglio printing, even though it’s done on wood.
Resulting Image and Detail
The visual outcome is where the differences become most apparent.
Woodcut: Tends to produce bold, graphic images with strong lines and visible wood grain texture. It’s excellent for creating dramatic contrasts and expressive marks.
Wood Engraving: Capable of producing very fine, detailed images with smooth tonal gradations. It can mimic the appearance of pencil or pen drawings, making it ideal for intricate illustrations.
A Table of Proven Differences
To make it even clearer, let’s put these differences into a handy table. This will help you quickly see the main points at a glance.
| Feature | Woodcut | Wood Engraving |
|---|---|---|
| Wood Surface | Plank side (along the grain) | End grain (across the grain) |
| Carving Action | Cutting away non-image areas, leaving image raised (relief printing) | Cutting into the surface, creating incised lines (intaglio-like printing) |
| Typical Tools | Knives, gouges | Burins, gravers |
| Detail Level | Bold, graphic, can show grain texture | Fine, precise, smooth tonal gradations |
| Typical Wood Type | Softer woods like pearwood, pine, or cherry | Hardwoods like boxwood |
| Ink Application | Applied to raised surface | Applied to entire surface; ink in carved lines is removed or doesn’t transfer |
| Historical Use | Early book illustrations, popular in East Asia | Victorian-era book illustrations, newspaper illustrations, fine art |
The Carving Process Explained
Let’s get a little more hands-on and talk about how each is actually carved. This will give you a better appreciation for the skill involved.
How Woodcut is Carved
Think of it like sculpting, but in reverse. You’re removing material to reveal your image.
- Prepare the Block: A block of wood, usually a plank with the grain running consistently, is prepared. The surface is often smoothed.
- Transfer the Design: The artist draws or transfers their design onto the wood surface.
- Carving: Using knives and gouges, the artist carves away the areas that should remain white in the final print. The lines and shapes that form the image are left raised. The direction of the grain can influence the carving process and the look of the marks.
- Inking: Once carving is complete, ink is rolled onto the raised surface of the block with a brayer (a type of roller).
- Printing: A piece of paper is placed on the inked block, and pressure is applied. This can be done by hand with a barren (a tool for rubbing the back of the paper) or by using a printing press. The ink transfers from the raised areas of the block to the paper.
A great resource for understanding the practicalities of relief printing, which includes woodcut, can be found at resources like Printmaking Today, which offers insights into various techniques.
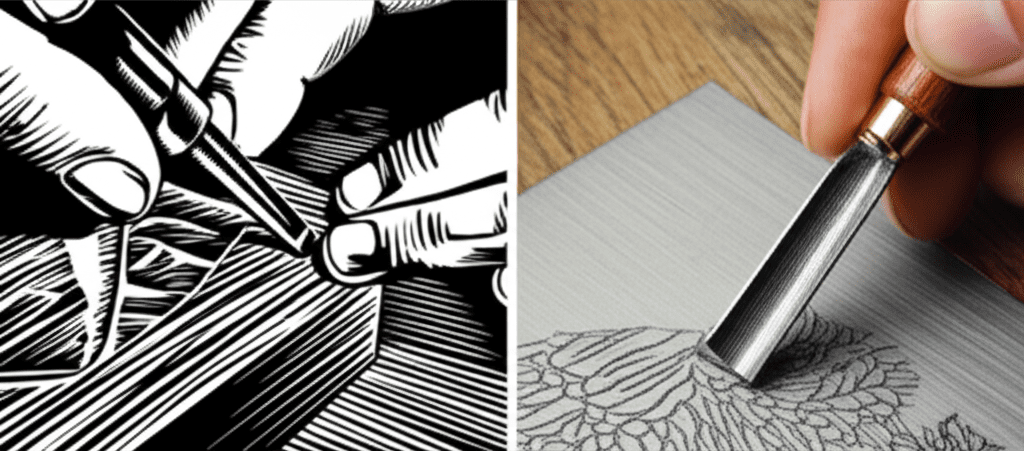
How Wood Engraving is Carved
This process requires a delicate touch and precise movements.
- Prepare the Block: A block of dense hardwood, typically boxwood, is cut so you are working on the end grain. This provides a very hard, smooth surface.
- Transfer the Design: The design is transferred to the smooth end-grain surface.
- Carving: Using sharp burins or gravers, the artist cuts fine lines and shapes into the wood. The tools are pushed or pulled across the surface to create the marks. Because you’re working across the grain, you can achieve very fine, controlled lines and subtle shading by varying the pressure and depth of the cut.
- Inking: Ink is carefully applied to the surface of the block. The ink settles into the incised lines and the uncarved areas.
- Wiping and Printing: Often, a slight wipe or brush is used to remove excess ink from the incised lines, ensuring they remain white in the print. Then, paper is pressed onto the block, and the ink from the uncarved surfaces transfers to the paper.
The ability to create such fine detail with wood engraving was revolutionary for illustration, especially for publications like engraving in the 19th century, where intricate images were crucial.
Pros and Cons: What to Consider
Like any craft, both woodcut and wood engraving have their strengths and weaknesses. Knowing these can help you decide which might be better suited for a particular project or your personal preference.
Woodcut Pros and Cons
Pros:
- Bold & Expressive: Excellent for creating strong, graphic images with a distinct character.
- Accessible Tools: The tools are generally more common and can be less expensive than specialized engraving tools.
- Working with Grain: The wood grain can be used as an expressive element in the artwork.
- Good for Larger Prints: Can be easier to create larger blocks with simpler carving.
Cons:
- Limited Detail: The wood grain and the nature of the tools can make very fine detail challenging.
- Less Smooth Tones: Achieving subtle tonal gradations can be more difficult than with engraving.
- Wood Grain Texture: While sometimes a pro, the grain can also be an unwanted texture if not carefully managed.
Wood Engraving Pros and Cons
Pros:
- Exceptional Detail: Allows for incredibly fine lines, intricate patterns, and subtle shading.
- Smooth Tones: Capable of producing smooth gradations of tone, similar to drawing.
- Precise Control: The end grain surface and specialized tools offer a high degree of control.
- Durability: Hardwood end-grain blocks are very durable and can withstand many impressions.
Cons:
- Difficult to Learn: Requires significant practice and precision to master.
- Expensive Materials: Hardwood blocks like boxwood can be costly.
- Specialized Tools: Requires specific, often sharp, engraving tools (burins) that need careful maintenance.
- Labor Intensive: Creating detailed work can be very time-consuming.
When to Choose Which Technique
So, how do you decide which technique is right for your project? It really comes down to the look you’re aiming for and the kind of experience you want.
Choose Woodcut if:
- You want a bold, graphic style with strong lines and high contrast.
- You’re interested in exploring expressive marks and don’t need ultra-fine detail.
- You want to work with the natural texture of wood as part of your design.
- You’re looking for a more accessible entry point into printmaking with simpler tools.
Choose Wood Engraving if:
- You need to create very detailed illustrations or images with subtle tonal variations.
- You admire the look of fine line work and smooth shading.
- You are patient and enjoy the challenge of precise, meticulous work.
- You’re aiming for a look that can mimic pencil or pen drawings on wood.
A Note on Modern Adaptations
It’s worth noting that while traditional woodcut and wood engraving have these distinct characteristics, modern printmakers often adapt these techniques. Some artists might use end-grain blocks for woodcut-like effects, or use different types of wood, or even combine elements from both. The spirit of exploration is a big part of art!
Frequently Asked Questions
Here are some common questions beginners have about woodcut and wood engraving.
Q1: Can I use any type of wood for woodcut or wood engraving?
For woodcut, you can use softer woods like pearwood, cherry, or even good quality plywood. The key is that the surface is smooth and the grain isn’t too wild. For traditional wood engraving, you really need a dense hardwood like boxwood for its smooth end-grain surface, which allows for fine detail. Using softer woods for engraving would be very difficult and wouldn’t yield the same results.
Q2: Are woodcut and wood engraving the same as linocut?
No, they are related but different. Linocut is a type of relief printing like woodcut, but it uses linoleum instead of wood. Linoleum is softer and has no grain, which makes it easier to carve in any direction and achieve fine details, but it also has a different texture and ink-holding quality than wood.
Q3: What is the main difference in the final print between woodcut and wood engraving?
The main difference is the level of detail and the texture. Woodcuts tend to be bolder and more graphic, often showing the grain of the wood. Wood engravings are much finer and can have smooth gradations of tone, looking more like a detailed drawing.
Q4: Is wood engraving harder to do than woodcut?
Generally, yes. Wood engraving requires more precision, specialized tools (burins), and often uses harder wood (end grain), making the carving process more demanding than woodcut, which typically uses knives and gouges on plank grain wood.
Q5: Can I achieve a wood engraving look using woodcut tools?
It’s very difficult to achieve the fine detail and smooth tones of wood engraving using only woodcut tools. The tools and the wood surface are designed for different types of carving. You might get closer with very precise knife work on a fine-grained wood, but true wood engraving relies on burins on end-grain blocks.
Q6: Which technique is better for beginners?
Woodcut is generally considered more beginner-friendly. The tools are more intuitive, and you can achieve satisfying results without needing the extreme precision of wood engraving. It’s a great way to start exploring relief printmaking.
Q7: What kind of ink should I use?
For both techniques, you’ll typically use oil-based block printing inks. These inks have a good consistency for both relief (woodcut) and intaglio-like (wood engraving) printing. Water-based block printing inks can also be used, but oil-based inks often give richer results and longer working times.
Conclusion
So there you have it! Woodcut and wood engraving are both incredible art forms that have graced our world for centuries, each with its own unique charm and technical demands. Understanding the difference between carving along the grain versus across it, and the tools that facilitate these processes, really opens up an appreciation for the craftsmanship involved.
Whether you’re drawn to the bold, graphic statements of woodcut or the intricate, detailed beauty of wood engraving, both offer rewarding experiences for any woodworker or art enthusiast. Don’t be afraid to experiment! Start with a simple woodcut, get a feel for the carving, and then, if you’re feeling adventurous, explore the world of wood engraving. You might just discover a new passion. Keep those tools sharp and your creativity flowing – happy carving!