Do LED Bulbs Need a Ballast: Essential Guide
Quick Summary:
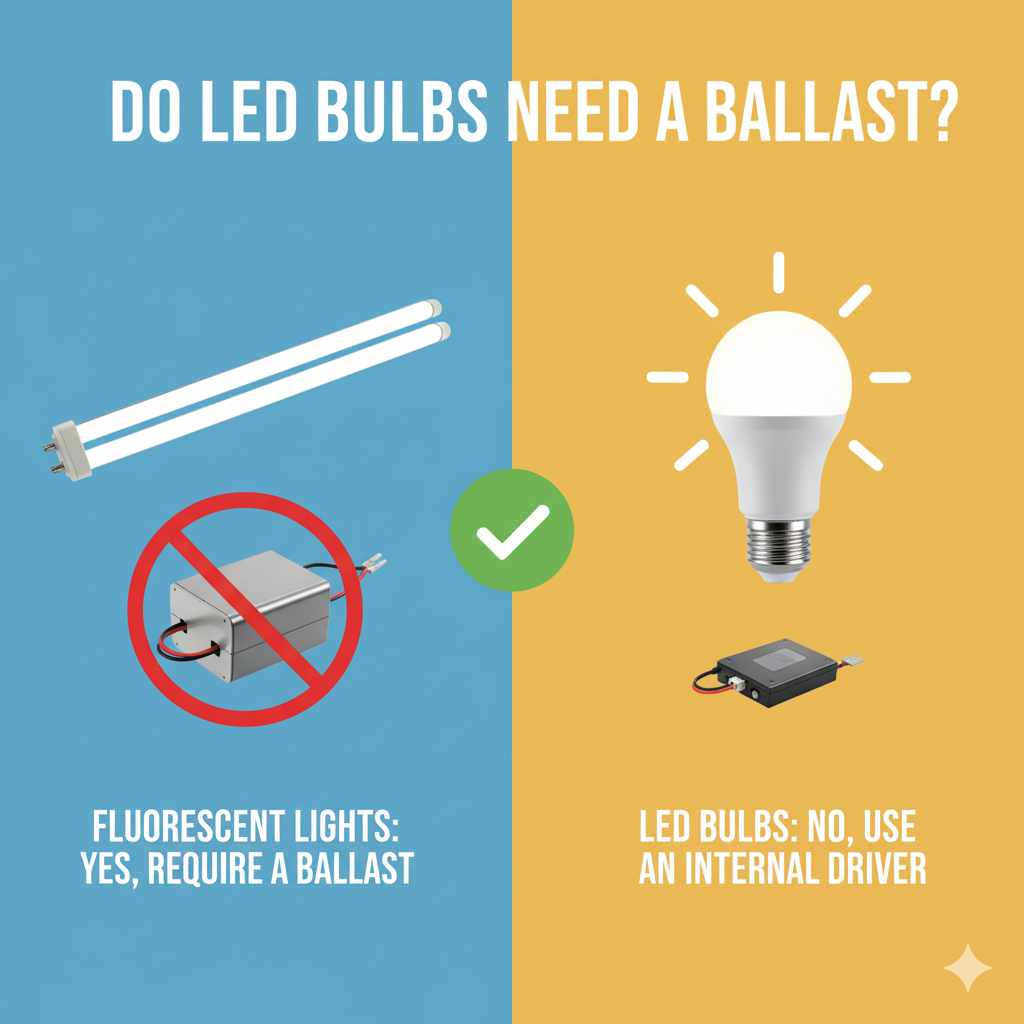
No, most LED bulbs do not need a ballast. Many LED bulbs are designed to be direct replacements for older fluorescent or incandescent bulbs and have the necessary components built-in. You’ll typically bypass or remove the old ballast when installing a new LED bulb.
Hey there, DIYers! Md Meraj here. Ever looked at those long, tube-shaped lights in your garage or workshop and wondered about upgrading to LEDs? It’s a fantastic idea for saving energy and getting better light. But then you see the old fixture, and you start thinking about that mysterious box inside – the ballast. Does your new LED bulb need it? It’s a common question, and honestly, it can be a bit confusing when you’re just trying to get a simple upgrade done. Don’t worry, we’ll break it down step-by-step. By the end of this guide, you’ll know exactly what to do with that ballast and feel confident making the switch to brighter, more efficient LED lighting.
Understanding Ballasts: What They Are and Why They Exist
Before we dive into LED bulbs, let’s quickly chat about what a ballast is and why older lights, particularly fluorescent ones, need it. Think of a ballast as the ‘traffic cop’ for electricity in certain types of lights. It’s a crucial component that controls the amount of power going to the bulb.
Why Fluorescent Lights Need Ballasts
Fluorescent tubes work a bit differently than your standard incandescent bulbs. They contain a gas that, when an electric current passes through it, emits ultraviolet (UV) light. This UV light then hits a coating on the inside of the tube, which glows and produces visible light. However, this process is a bit finicky:
- Starting the Arc: Fluorescent tubes need a high initial voltage surge to start the electric arc through the gas.
- Controlling the Current: Once the arc is established, the gas becomes a much better conductor of electricity. Without a ballast, the current would rapidly increase, destroying the bulb. The ballast limits this current to a safe level.
So, in essence, a ballast does two main jobs for fluorescent lights: it provides the initial jolt to get things started and then regulates the flow of electricity to keep the light running smoothly and safely.
Types of Ballasts
You might encounter a couple of different types of ballasts in older lighting fixtures:
- Magnetic (or Electromagnetic) Ballasts: These are the older, heavier, and bulkier types. They use a large coil of wire and iron core. They are less energy-efficient and can sometimes produce a noticeable hum.
- Electronic Ballasts: These are newer, lighter, and more efficient. They use solid-state components (like transistors) to manage the power. Electronic ballasts typically run cooler, quieter, and don’t waste as much energy as magnetic ones.
Knowing the type of ballast you have isn’t always critical for installing LEDs, but it’s good background information. The main takeaway is that fluorescent and some older discharge lamps absolutely require a ballast to function. But what about LEDs?

Do LED Bulbs Need a Ballast? The Straight Answer
Here’s the good news: Most LED bulbs are designed to work without a ballast. This is one of the biggest advantages of switching to LED technology.
LEDs (Light Emitting Diodes) are solid-state semiconductor devices. They don’t use gas to produce light, nor do they need a high-voltage arc. Instead, they generate light directly when electricity passes through them. Because of this fundamental difference in how they operate, they don’t have the same power requirements as fluorescent or incandescent bulbs.
How LED Bulbs Are Designed
LED bulbs are engineered to be user-friendly and energy-efficient. To achieve this, they often have what’s called a “driver” built right into the bulb itself. This driver is essentially a small, integrated electronic circuit that:
- Converts AC to DC: Household electricity is Alternating Current (AC), but LEDs work best with Direct Current (DC). The driver converts the AC power from your home’s wiring into the DC power the LED chips need.
- Regulates Voltage and Current: Just like a ballast, the driver ensures the correct voltage and current reach the LED chips, protecting them from damage and ensuring optimal performance and lifespan.
Because this driver is integrated into the LED bulb, you don’t need an external ballast. The LED bulb handles its own power management.
Types of LED Replacements and Their Ballast Compatibility
When you’re looking to replace your old lights with LEDs, you’ll find a few different types of LED bulbs available, and they have varying relationships with existing ballasts.
1. Type A: “Ballast Compatible” or “Plug-and-Play” LED Tubes
These are the easiest to install because they are designed to work directly with your existing fluorescent fixture and its ballast. You simply swap out the old fluorescent tube for the new LED tube.
- How they work: These LED tubes are designed with internal electronics that can communicate with and operate from your existing ballast. They essentially trick the ballast into thinking it’s powering a fluorescent tube.
- Pros: Extremely easy installation – no rewiring or ballast removal needed. This is the quickest way to get LED benefits.
- Cons: They are often less energy-efficient than other LED types because the old ballast still consumes some power. If the ballast fails, you’ll need to replace it or convert the fixture. Not all ballasts are compatible, so you need to check the bulb’s specifications.
- When to use: Ideal for users who want a super simple, no-hassle upgrade and are comfortable with the slight energy loss compared to other LED types.
2. Type B: “Ballast Bypass” or “Direct Wire” LED Tubes
These LED tubes do not use the existing ballast at all. Instead, they are wired directly to the power source, bypassing the ballast entirely.
- How they work: Before installing these tubes, you (or an electrician) need to modify the fixture by removing the ballast and rewiring the sockets to receive direct AC power.
- Pros: More energy-efficient because there’s no ballast to draw power. They offer the longest lifespan as they rely solely on the LED’s integrated driver. They also eliminate the potential failure point of the ballast.
- Cons: Installation is more complex and requires electrical knowledge or the help of a professional. It involves working with your fixture’s wiring.
- When to use: Best for those who want maximum energy savings and a long-term, reliable solution and are comfortable with or can hire someone for the rewiring.
3. Type C: External Driver LED Tubes
These are less common for simple replacements but are found in some specialized fixtures. They use an external driver that is wired into the fixture, and the LED tube then connects to this driver.
- How they work: The external driver manages the power for the LED tube. The fixture itself might need modification to accommodate the driver and wiring.
- Pros: Can offer excellent control over light output and dimming capabilities.
- Cons: Installation is typically the most complex, often requiring professional installation.
- When to use: Usually for specific applications where advanced lighting control is needed.
4. Integrated LED Fixtures
These are not tubes at all, but complete lighting units where the LED and its driver are built into the fixture. You don’t replace a bulb; you replace the entire fixture.
- How they work: They are wired directly into your home’s electrical system, similar to a Type B LED tube installation but without any existing ballast to worry about.
- Pros: Often very energy-efficient and can be designed for specific lighting needs (e.g., slim profiles, high output).
- Cons: Requires complete fixture replacement, which is more labor-intensive than just changing a bulb.
- When to use: When you want to replace an old fixture entirely or when upgrading a space where a tube light isn’t the best fit.
So, while the LED bulb itself doesn’t need a ballast, the type of LED replacement you choose will determine whether you keep, bypass, or remove the old ballast.
When Do You NOT Need a Ballast?
You do NOT need a ballast if you are using:
- Type B (Ballast Bypass) LED Tubes: These require you to remove the ballast.
- Integrated LED Fixtures: These have no ballast to begin with.
- Standard LED A19, BR30, etc. bulbs: These are designed to screw into standard lamp sockets and replace incandescent or CFL bulbs. They have their drivers built-in and do not interact with ballasts.
The only time you might interact with a ballast when installing an LED is if you choose a Type A (Plug-and-Play) LED tube, which is designed to use the existing ballast.
When Do You Need to Deal With a Ballast?
You need to address the ballast if you are:
- Installing Type A (Plug-and-Play) LED Tubes: You leave the ballast in place and the LED tube works with it.
- Installing Type B (Ballast Bypass) LED Tubes: You must remove and bypass the ballast.
- Upgrading from Fluorescent to LED: This is where the decision point is – choose Type A or Type B.
For traditional screw-in LED bulbs (like those replacing your old A19 bulbs in a table lamp or ceiling fixture), there is no ballast involved at all. The fixture is wired directly to your home’s power, and the LED bulb’s internal driver handles everything.
Step-by-Step Guide: Replacing Fluorescent Tubes with LEDs
This is where we get hands-on! Let’s walk through the process of upgrading your fluorescent lights. We’ll cover both Type A and Type B installations, so you can choose the best method for you.
Safety First!
Before you even think about touching any wiring or fixtures, always turn off the power to the circuit at your breaker box. Double-check that the power is off by trying to turn on the light switch. If it doesn’t come on, you’re good to go. Wearing safety glasses is also a smart move to protect your eyes from dust or debris.
Step 1: Identify Your Fixture and Bulb Type
Open up your existing fluorescent fixture. Note the type of bulbs currently installed (e.g., T8, T12) and look at the ballast. You might see a label on the ballast indicating its model and specifications. This information can be helpful, especially if you’re considering Type A bulbs.
Step 2: Choose Your LED Replacement Type
Based on your comfort level with electrical work and your desired energy savings, decide between:
- Type A (Plug-and-Play): Easiest for beginners. Buy LED tubes that are compatible with your existing ballast.
- Type B (Ballast Bypass): Requires rewiring but offers better efficiency. Buy LED tubes specifically labeled as “ballast bypass” or “direct wire.”
Important: Make sure the LED tubes you buy are the correct size (length and diameter, e.g., T8, T12) and base type (e.g., G13) to fit your existing fixture sockets.
Step 3: Installation – Type A (Plug-and-Play)
This is the simplest swap:
- Ensure the power is OFF at the breaker.
- Carefully remove the old fluorescent tube by twisting it about a quarter turn and gently pulling it out.
- Take your new Type A LED tube and insert it into the sockets, twisting it a quarter turn to lock it in place.
- Turn the power back on at the breaker. Your new LED tube should light up!
Note: Some older magnetic ballasts might hum slightly or take a second or two to ignite the LED tube. This is usually normal for Type A bulbs.
Step 4: Installation – Type B (Ballast Bypass)
This requires more caution and electrical knowledge. If you are not comfortable with wiring, hire a qualified electrician.
- Ensure the power is OFF at the breaker.
- Remove the old fluorescent tube.
- Open the fixture and locate the ballast. You will need to disconnect the wires leading to the ballast.
- Remove the ballast: This usually involves unscrewing it and disconnecting its wiring.
- Rewire the fixture: You will need to connect the power wires (from the socket ends) directly to the power source wires, bypassing where the ballast was connected. The exact wiring diagram will depend on your fixture and the specific Type B LED tube instructions. Refer to the manufacturer’s guide for your LED tubes. A common setup involves connecting the “hot” wire from the power source to one end of the fixture’s sockets and the “neutral” wire to the other end.
- Secure all connections with wire nuts and ensure no bare wires are exposed.
- Install the Type B LED tube into the sockets.
- Turn the power back on at the breaker.
Where to find wiring diagrams: Always consult the instructions that come with your Type B LED bulbs. Many manufacturers also provide diagrams on their websites. For example, the U.S. Department of Energy offers resources on lighting efficiency, including guidance on LED retrofits. You can find helpful information at energy.gov/eere/lighting/lighting-basics.
Step 5: Test and Secure
Once installed, turn the power back on. The LED bulbs should illuminate. If they don’t, immediately turn the power off and re-check your wiring (for Type B) or ensure the bulb is seated correctly (for Type A). Once confirmed working, reassemble any covers and ensure the fixture is securely mounted.
Pros and Cons of Using LED Bulbs Instead of Fluorescent
Switching to LEDs offers many advantages, but it’s always good to know the full picture.
Advantages of LED Lighting
- Energy Efficiency: LEDs use significantly less energy than fluorescent bulbs, often saving 50-70% on lighting costs. This means lower electricity bills and a smaller carbon footprint.
- Longer Lifespan: LED bulbs can last 25,000 to 50,000 hours or more, which is many times longer than fluorescent tubes. This means fewer replacements and less maintenance.
- Improved Light Quality: LEDs offer instant-on brightness with no flickering or warm-up time. They also come in a wide range of color temperatures (from warm white to cool daylight) and have excellent color rendering capabilities, making colors appear more vibrant and natural.
- Durability: LEDs are solid-state devices, making them more resistant to shock and vibration than fragile glass fluorescent tubes.
- No Hazardous Materials: Unlike fluorescent bulbs, which contain mercury, LEDs do not contain hazardous materials, making them safer to handle and dispose of.
- Directional Light: LEDs emit light in a specific direction, which can be more efficient in applications where light is needed downwards, reducing light loss.
Disadvantages to Consider
- Upfront Cost: LED bulbs and fixtures can have a higher initial purchase price compared to traditional options. However, the energy savings and long lifespan typically make them more cost-effective over time.
- Compatibility Issues (Type A): While Type A bulbs are easy to install, their efficiency is still tied to the older ballast. If the ballast is old or inefficient, it can reduce the overall energy savings and lifespan.
- Installation Complexity (Type B): Bypassing the ballast requires electrical work, which can be daunting for beginners and may necessitate hiring an electrician, adding to the overall cost.
- Heat Management: While LEDs are much cooler than incandescent bulbs, they do produce heat. This heat is typically managed by a heat sink integrated into the bulb. In very hot environments or enclosed fixtures, this heat can affect performance and lifespan if not properly managed.
When to Consider an Electrician
While many LED upgrades are DIY-friendly, there are times when calling a professional is the smartest and safest choice:
- If you are uncomfortable with electrical wiring: Especially for Type B (ballast bypass) installations, if you’re not confident in your ability to safely disconnect and rewire the fixture, it’s best to hire an electrician.
- If your fixture is old or damaged: Older fixtures may have brittle wiring or outdated components that could pose a safety risk. An electrician can assess the fixture’s condition.
- If you encounter unexpected issues: If the power doesn’t turn off, or if you see signs of damage like melted wires or scorch marks, stop immediately and call a professional.
- For complex installations: If you’re upgrading multiple fixtures, dealing with high ceilings, or installing specialized LED systems (like dimmable or smart lighting), an electrician can ensure everything is installed correctly and up to code.
Remember, safety is paramount. It’s always better to spend a little extra on an electrician than to risk injury or damage to your home.

Frequently Asked Questions (FAQ)
Q1: Can I just screw an LED bulb into a fluorescent fixture?
A1: No, not typically. Standard screw-in LED bulbs (like A19) are designed for standard lamp sockets. Fluorescent fixtures have specific sockets (like G13 for T8/T12 tubes) and require either a compatible LED tube (Type A), a ballast-bypass LED tube (Type B), or an entirely new fixture.
Q2: My fluorescent fixture hums. Will an LED bulb fix that?
A2: If you use a Type A (Plug-and-Play) LED bulb, it might reduce or eliminate the hum, as the LED’s electronics can sometimes be quieter than the old ballast. However, the hum is often from the ballast itself. For the best chance of silence, a Type B (Ballast Bypass) LED installation is recommended, as it removes the ballast entirely.
Q3: Do I need to remove the old ballast if I install a Type A LED tube?
A3: No, Type A LED tubes are specifically designed to work with your existing ballast. You simply replace the fluorescent tube with the Type A LED tube.
Q4: What happens if I install a Type B LED tube without bypassing the ballast?
A4: This is a bad idea and can damage the LED tube, the ballast, or both. Type B tubes require the ballast to be removed and the fixture to be rewired for direct power. They are not designed to work with a ballast.
Q5: Can I use LED bulbs in enclosed light fixtures?
A5: Yes, but you need to be careful. Ensure the LED bulb is rated for use in enclosed fixtures. LEDs generate heat, and enclosed fixtures can trap this heat, potentially shortening the bulb’s lifespan. Check the bulb’s packaging for specific ratings and recommendations.
Q6: How do I know if my ballast is magnetic or electronic?
A6: Magnetic ballasts are usually heavier, larger, and may have a distinctive hum. Electronic ballasts are lighter, more compact, and operate silently. Often, you can find a label on the ballast itself that indicates its type and specifications.
Q7: What is the lifespan of LED bulbs compared to fluorescent bulbs?
A7: LED bulbs generally last much longer. A typical LED bulb can last 25,000 to 50,000 hours, while a fluorescent tube typically lasts around 10,000 to 20,000 hours. This means LEDs can last 2 to 5 times longer.
Conclusion
Upgrading your lighting to LEDs is a smart move, and understanding how they interact with ballasts is key to a successful project. The good news is that most LED bulbs, especially the common screw-in types, don’t need a ballast at all. For fluorescent tube replacements, you have options: Type A LED tubes offer a simple plug-and-play experience that works with your existing ballast, while Type B LED tubes require you to bypass and remove the ballast for maximum efficiency. Always prioritize safety by turning off power at the breaker before working on any fixtures. If you’re ever in doubt or uncomfortable with electrical work, don’t hesitate to call a qualified electrician. With the right approach, you can enjoy the benefits of LED lighting – saving energy, reducing maintenance, and enjoying brighter, better light in your home or workshop!