Does Putting Plywood Under A Mattress Make It Firmer? Essential
Putting plywood under your mattress absolutely can make it feel firmer, especially if your current foundation is sagging or old. Plywood acts as a solid, flat barrier, instantly leveling the surface and supporting your mattress evenly, which reduces that sinking feeling.
Is your mattress starting to feel a bit too soft? Maybe you notice a dip right where you sleep, or perhaps you’ve heard that adding a simple piece of wood underneath is a budget-friendly fix. Many homeowners run into this exact problem, especially with older innerspring mattresses or softer foam models. It can be frustrating when you wake up feeling unrested! Don’t worry; this is a very common issue, and it has a simple, often affordable, DIY solution. As your woodworking guide, I’m here to show you exactly how to use plywood correctly to give your bed the sturdy support it needs. We will cover the right wood type, the perfect thickness, and the safe way to place it so you get a firmer, more supportive night’s sleep.
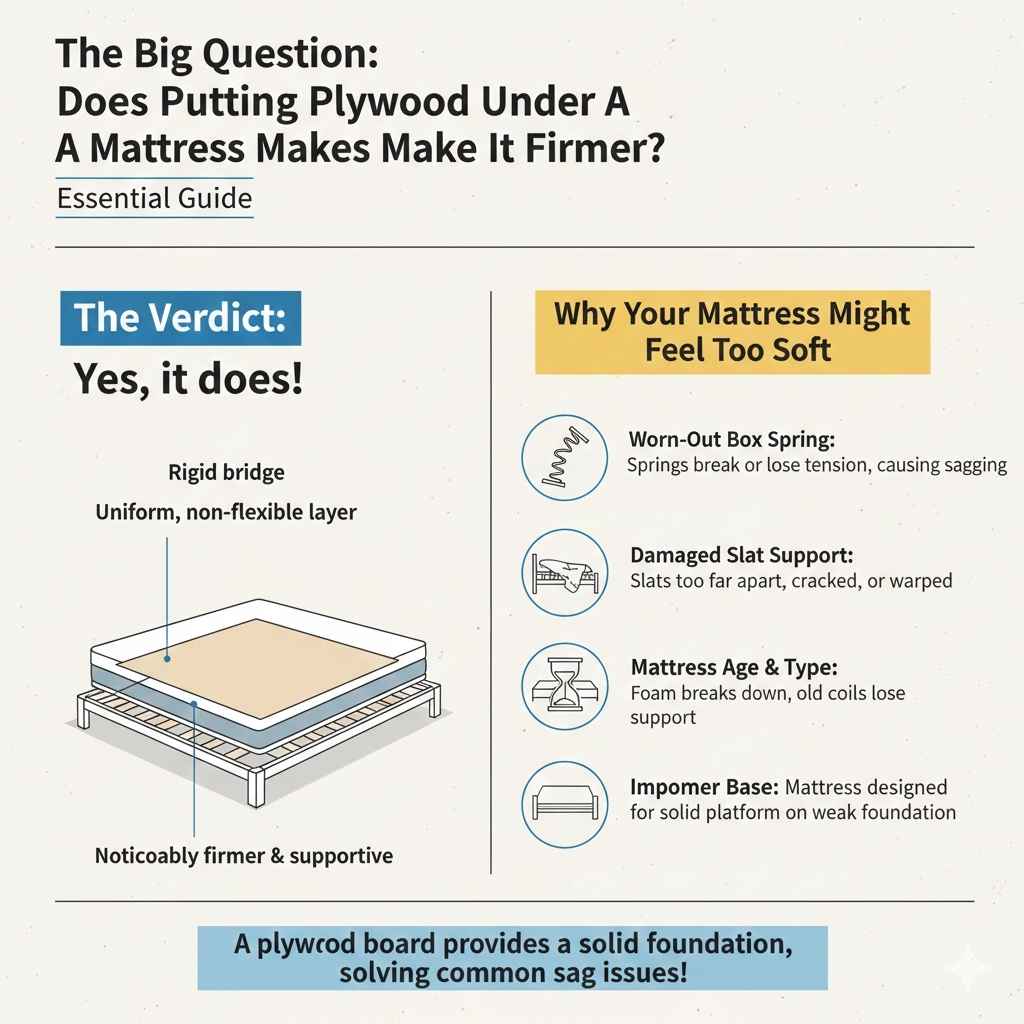
The Big Question: Does Putting Plywood Under A Mattress Make It Firmer?
Yes, it does! Think of plywood as a rigid bridge built directly under your mattress. Mattresses are designed to sit on something strong and stable. When the existing support system—like worn-out box springs or widely spaced bed slats—fails, the mattress sinks in the middle, leading to that mushy or overly firm (in a bad way) feeling.
When you add a sheet of plywood, you are creating a completely uniform, non-flexible layer. This solid barrier prevents the mattress materials from pressing down between the gaps or bowing due to old internal damage. This uniform resistance makes the overall feel noticeably firmer and much more supportive.
Why Your Mattress Might Feel Too Soft
Understanding why you need the plywood helps you choose the right solution. Here are the most common reasons a mattress starts feeling soft prematurely:
- Worn-Out Box Spring: Box springs are essentially springs wrapped in fabric. Over years of use, those internal springs break or lose their tension, leading to sagging spots.
- Damaged Slat Support: If your bed frame uses slats, they might be too far apart, or they could have cracked or warped. The mattress material sinks into these open spaces.
- Mattress Age and Type: Memory foam mattresses naturally soften over time as the foam breaks down. Older innerspring units lose their coil support.
- Improper Base: Sometimes, a mattress designed for a solid platform base is placed on a flexible or weak foundation, causing immediate softness.
Choosing the Right Plywood for Mattress Support
This isn’t the time to grab any scrap wood you have lying around. The thickness and type of plywood matter greatly for both support and safety. We need a material that is strong, resists warping, and won’t introduce harmful chemicals into your sleeping environment.
Recommended Plywood Thicknesses
The thickness dictates how much rigidity you add. For most standard bed frames (Queen, King, Full), you need substantial coverage.
| Mattress Type | Recommended Plywood Thickness (Nominal) | Notes |
|---|---|---|
| All-Foam (Memory, Latex) | 1/2 inch (at least 5-ply) | Needs good airflow; use widely spaced slats underneath if possible. |
| Innerspring/Hybrid | 3/4 inch (for maximum stability) | Better at handling the weight of coils and distributing pressure. |
| Temporary/Budget Fix | 5/8 inch | A good middle ground if 3/4″ feels too thick or expensive. |
The Best Types of Plywood (And What to Avoid)
When shopping at the hardware store, you’ll see a dizzying array of options. For under-mattress support, we prioritize strength and air circulation.
Top Choices:
- Cabinet-Grade Plywood (CDX or Better): This is usually the standard go-to. It’s strong, relatively inexpensive, and durable. Look for CDX (Construction Grade Exterior) if you need something very budget-friendly, but ensure it’s smooth on the top surface.
- Hardwood Plywood: If you want the absolute best—though it costs more—hardwood plywood (like birch or oak core) is denser and resists bowing better over many years.
What to Strictly Avoid:
You must avoid materials that trap moisture or degrade quickly. Moisture is the enemy of mattresses and can lead to mold growth.
- Particleboard or MDF (Medium-Density Fiberboard): These materials crumble under sustained, focused weight and absorb moisture easily. They are not suitable for long-term mattress support.
- Plywood Treated with Harsh Chemicals: Avoid chemically treated lumber intended for outdoor use, as fumes might off-gas into your bedroom environment.
Safety Note on VOCs: Plywood often contains glues that release Volatile Organic Compounds (VOCs). Look for “Low-VOC” adhesives or consider “Sanded Furniture Grade” plywood, which generally uses safer binding agents, especially since this surface will be right next to your sleeping surface.
Step-by-Step Guide: How to Install Plywood Under Your Mattress
This project should take less than an hour and requires minimal tools. It’s one of the easiest home improvements you can do!
Tools You Will Need
Before you start, gather your gear. Keeping everything handy makes the job fast and safe.
- Measuring Tape
- Pencil or Marker
- Circular Saw or Jigsaw (If you need to cut the sheet)
- Safety Glasses (Always wear these when cutting!)
- Electric Drill or Screwdriver
- Exterior-Grade Screws (Short ones, if you plan to secure the board to the frame)
Step 1: Measure Your Bed Frame Foundation
You need the plywood to cover the entire area that currently supports your mattress, ideally edge-to-edge across the support slats or box springs.
- Remove the mattress completely and set it safely aside (it’s heavy, so ask a friend to help!).
- Measure the interior dimensions of your bed frame where the mattress normally rests. Measure the width and the length precisely.
- If you are placing the plywood on top of existing slats, measure the distance between the slats. This confirms you need a full, solid sheet underneath to bridge the gaps.
Step 2: Purchasing and Cutting the Plywood
Standard plywood sheets are 4 feet by 8 feet. Most queen and king beds are slightly larger than 4 feet wide, but a standard full or queen mattress often fits perfectly with a single sheet cut down.
- Take your measurements to the lumber store. Many big box hardware stores offer a basic “cut-to-size” service for a small fee, which saves you the hassle of cutting at home.
- If cutting at home, place your measured dimensions onto the plywood sheet. Measure twice, cut once!
- Put on your safety glasses. Use a circular saw for straight, long cuts or a jigsaw for maneuvering around odd frame corners. Keep the saw base flat and stable on the wood.
Step 3: Airflow Check (Crucial for Foam Mattresses)
This is the step that most beginners skip, but it’s vital for mattress longevity, especially for modern foam mattresses that need to “breathe.”
If you are using the plywood to replace a slatted foundation, you must ensure airflow.
- Lay the cut plywood sheet on the frame base.
- If your bed frame has solid side rails but no bottom support (rare, but happens), you may need to drill many small holes (about 1/2 inch diameter) spaced every 6 to 8 inches across the entire plywood sheet. This allows moisture and heat to escape.
- If you are placing the plywood on top of existing support slats, the gaps between the slats already provide airflow, so no drilling is necessary.
Step 4: Placement and Securing (Optional but Recommended)
For a temporary firmness boost, simply laying the plywood down is enough. However, for a long-term fix, securing it prevents shifting.
You have two main options:
Option A: Resting on Slats (No Drilling into Frame)
This is the easiest route. Simply lay the plywood on top of your existing bed slats or box spring platform. The weight of the mattress will keep it mostly in place. This is best if your slats are spaced less than 3 inches apart.
Option B: Securing to the Frame (For Maximum Stability)
If your frame uses solid wood side rails, you can secure the plywood directly to the frame for zero movement.
- Place the plywood down. Ensure it is centered and flush with the edges.
- Using your electric drill and short screws (check that they are shorter than the plywood thickness plus the frame rail depth!), drive screws through the plywood and into the wooden rails of the frame, especially near the corners and center supports.
- The National Institute of Standards and Technology (NIST) emphasizes proper load distribution, and securing the base ensures that load is evenly spread across all support points.
Step 5: Reassembling the Bed
Carefully place your mattress back onto the new, firm plywood base. Check the edges to ensure the plywood isn’t sticking out anywhere where it could cause harm. Test the firmness—you should immediately notice less sinking and a more stable feel!
Troubleshooting Common Plywood Foundation Issues
While this fix is usually straightforward, a few snags can pop up. Here is how we solve them, mentor-style.
Issue 1: The Plywood is Too Thick or Makes the Bed Too High
This happens if you use 3/4-inch plywood on a bed that already has a high foundation, like an old-school metal bed frame.
- Solution: If you used 3/4-inch, switch to 1/2-inch or even 5/8-inch plywood for the next attempt. Alternatively, if you secured the plywood to the frame, simply remove the screws and place it on top of the existing structure instead of replacing the foundation entirely.
Issue 2: Mattress Warranty Concerns
Some mattress manufacturers void warranties if they find non-approved foundations are used. If you have a very expensive new mattress, always check the warranty documentation first.
- Solution: Most warranties require slat spacing of no more than 2.75 inches apart or support beams every 3 inches. Plywood, which offers solid support, often meets or exceeds these requirements, provided you drilled adequate ventilation holes if it is covering solid support or if you are using it over very wide gaps.
Issue 3: The Mattress Feels Too Hard Now
If you went from a sagging mess to a surface as hard as concrete, the new firmness might be jarring.
- Solution: This means you added too much rigidity. If you are using a high-density foam mattress, the plywood is working too well. Try lifting the plywood and placing a thin layer of soft padding (like a quilted mattress topper or thin foam pad) between the plywood and the mattress to restore a little give without sacrificing all the support.
When Plywood Isn’t the Right Fix: Alternatives to Consider
Plywood is fantastic for budget fixes, but sometimes the underlying problem requires a different approach. Before you commit to cutting wood, quickly check these alternatives.
1. Replacing the Box Spring Entirely
If your current box spring is visibly broken or the metal coils are popping through, replacing it is the best long-term option. A new box spring is designed specifically for your mattress type (e.g., low-profile for modern beds).
2. Adding Support Slats
If you have a platform bed with widely spaced slats (more than 3 inches apart), plywood might not be necessary. Instead, you can purchase inexpensive, pre-cut wooden slats designed for platform beds. These slot right into your existing frame, effectively bridging the gap without needing a full sheet of wood. Ensure the new slats are the same thickness as the old ones or slightly thicker.
3. Using Bed Risers or Extenders
If the issue is that the bed frame itself is too low, strong bed risers (often made of heavy plastic or metal) can lift the frame, which sometimes allows you to place additional cross-beams underneath, fixing the support structure without modifying the top layer.
Understanding Bed Support Standards: Why Consistency Matters
As a DIY enthusiast, knowing the industry standard helps you build something that lasts. Mattress support isn’t just about comfort; it’s about maintaining the structure and integrity of the foam or coil system inside your mattress.
| Foundation Type | Typical Gap Tolerance | Pros |
|---|---|---|
| Standard Slats | Under 3 inches | Good airflow, moderate cost. |
| Plywood Barrier (Solid) | 0 inches (Complete Support) | Maximum firmness and no sagging; cost-effective. |
| Metal Grid Foundation | Varies, usually small mesh | Very durable and excellent airflow. |
If your current setup has gaps larger than 3 inches, using plywood ensures that your mattress coils or foam layers won’t push down into the void, which causes premature wear and a feeling of uneven softness.
Quick Project Safety Checklist for Woodworking Beginners
When working with tools like saws and drills, safety is always step one. You don’t need to be a seasoned pro, but you do need to respect the tools.
- Wear Eye Protection: Always wear safety glasses when cutting or drilling wood. Wood dust and chips fly fast!
- Secure Your Wood: If you are cutting the plywood, clamp it down firmly to sawhorses or a sturdy workbench before starting the saw. Never try to hold large pieces steady by hand while cutting.
- Check Screw Length: When securing the plywood to the frame (if you chose that option), ensure your screws are too short to pierce the surface where the mattress rests. We only want to anchor into the frame rails below.
- Ventilation: If you must cut wood indoors, open a window. While low-VOC plywood is better, sawing creates fine dust that you shouldn’t breathe in deeply.

Frequently Asked Questions (FAQ) About Plywood Under Mattresses
Q1: Will putting plywood under my mattress affect its warranty?
A: It depends on your specific mattress warranty. Some require solid support (which plywood provides), while others strictly mandate specific slat spacing. Always check your mattress paperwork first. Plywood generally works better for older mattresses that have already lost some structure.
Q2: What is the best thickness of plywood to use?
A: For most standard beds (Queen/Full), 3/4-inch plywood offers the best combination of strength and minimal height increase. Half-inch (1/2″) plywood is usually sufficient for all-foam mattresses if the slats underneath are not too far apart.
Q3: Do I need to cut holes in the plywood for airflow?
A: Only if the plywood is sitting directly on the solid bottom of a platform bed base with no existing airflow. If you are laying the plywood over existing bed slats, the gaps between the slats provide the necessary ventilation, and you should not drill holes.
Q4: Can I use oriented strand board (OSB) instead of plywood?
A: While cheaper, OSB is not recommended. It is much less resistant to moisture and tends to break down faster under the constant, focused pressure of a mattress. Plywood is stronger and lasts longer in this application.
Q5: How do I prevent the plywood from sliding around?
A: If you don’t screw it down, you can apply small pieces of non-slip shelf liner or rubber furniture pads between the plywood and the bed frame or slats at the corners. For the best results, use a couple of short wood screws in the frame rails (Step 4, Option B).
Q6: My mattress is now too firm. What should I do?
A: If the firmness is too much, the plywood is doing its job perfectly! You need to reintroduce a slight layer of softness on top of the wood. Add a thick, quilted mattress protector or a 2-inch memory foam topper between the plywood and the mattress.
Conclusion: Building Confidence with a Firmer Bed Base
Seeing that sag in your mattress can make you feel like you need a major, expensive renovation. But as we’ve walked through today, adding a simple sheet of the correct plywood is an incredibly effective, affordable, and fast way to restore that supportive, firm feel you’re missing. You now know exactly which thickness to choose, which wood types to favor, and the safe steps to install it. By taking control of your sleep foundation with this straightforward DIY fix, you’re not just improving a piece of furniture; you’re investing in better rest without needing a professional contractor. Go ahead, measure that frame, head to the hardware store, and enjoy the solid, firm sleep surface you deserve!