Door Repair: Sticking, Rubbing, Latching and Seals
Diagnose the symptom first: rubbing at one corner points to hinge or frame movement, a latch miss over 1/8 inch usually needs alignment work, and drafts with normal operation usually mean threshold or weatherstrip failure. If you guess wrong, you can buy the wrong parts, make the fit worse, or leave water and air leaks that drive up energy use and invite rot. Start by sorting the problem into sticking, rubbing, latching, threshold, or weatherstripping trouble, then match that symptom to the repair that fits.
Check the reveal first, then latch action, then bottom clearance, then draft locations, and only after that the hardware and seals. That order keeps weatherstripping in its proper role, a seal for a sound door, not a patch for a sagging slab, a misaligned strike plate, or a failing threshold.
Start with door triage, not parts


The four failure groups
Most exterior door complaints fit one of four patterns: rubbing, latching trouble, bottom-seal failure, or whole-frame movement. The reveal, the gap around the door perimeter, usually tells you where to look first.
An even reveal usually points away from sag and toward a seal or strike problem. An uneven reveal, especially a tight top corner or a widening gap on the hinge side, points toward hinge movement, slab sag, or frame rack.
The five-minute check order
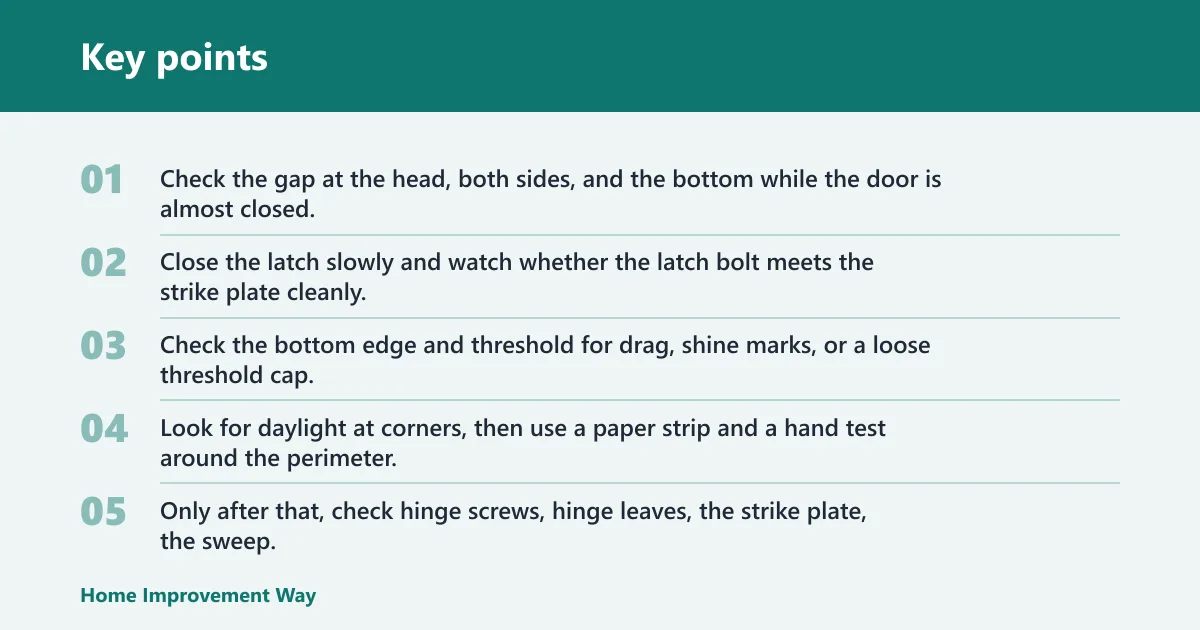
- Check the gap at the head, both sides, and the bottom while the door is almost closed.
- Close the latch slowly and watch whether the latch bolt meets the strike plate cleanly.
- Check the bottom edge and threshold for drag, shine marks, or a loose threshold cap.
- Look for daylight at corners, then use a paper strip and a hand test around the perimeter.
- Only after that, check hinge screws, hinge leaves, the strike plate, the sweep, and the weatherstripping profile.
What each symptom rules in and rules out
Top-corner rubbing often points to hinge looseness or frame rack. A latch that retracts and releases fine but will not catch often points to strike-plate misalignment, even when the door slab is not rubbing anywhere.
Light showing at the top or side edges is a clear sign that the perimeter seal is not making contact. A front door can look fine and still let cold air, moisture, dust, and outdoor noise into the house.
At the bottom, a draft can come from the sweep, the threshold seal, a bent threshold cap, rot under the sill, or a gap so large that a fresh seal will still miss the door. Thresholds and sweeps work together, but they are not interchangeable parts.
Why is my door sticking at the top corner?

Top-corner sticking usually means the door has shifted out of square, most often from top-hinge looseness, hinge wear, or a racked frame. If the bind is at the top latch corner, check the reveal first: a narrowing gap there with a wider gap near the lower latch side usually points to sag rather than bad weatherstripping.
What top latch-side rubbing usually means
The top latch corner is the classic sag clue. As the slab drops on the latch side, the top latch corner rises into the head jamb and the bottom latch side often moves closer to the threshold.
The top hinge is the common sag point because it carries much of the hanging load. Loose screws there can let the slab rotate downward. A top-hinge screw that reaches through the jamb into framing can pull a sagging door snug against the frame.
How the reveal changes with hinge loosening or frame rack
Read the reveal, not only the rub mark. If the gap is tight at the top latch corner and wider at the top hinge corner, the slab has usually rotated. If both upper corners look wrong, or the head gap changes from one end to the other, the frame itself may be out of square.
For example, a 36-inch exterior wood door may start brushing only at the top latch corner after a wet week, while the side reveal stays fairly even. That pattern fits seasonal swelling more than hinge sag, because moisture often affects one whole edge rather than one isolated corner.
When humid weather fits better than hinge sag
A door that sticks only in humid weather may be responding to moisture. Wood doors move the most, especially if one face or one edge takes on more moisture than the other.
Seasonal swelling usually shows up along a longer stretch of one edge, not only at a single strike point. If the bind eases when humidity drops and the reveal remains generally even, alignment changes may be temporary. That is the time to avoid planing until the hardware and seasonal pattern are checked.
What causes a door to rub along the latch side?
Latch-side rubbing can come from slab sag, hinge-side bind that pushes the latch edge over, frame twist, a swollen wood edge, or built-up paint. The reveal tells the difference: a tapered gap points to alignment, while a nearly uniform but too-tight latch-side gap points more toward swelling, paint, or a door made too wide for the opening.
Sagging slab versus swollen edge versus strike-side bind
If the door rubs mostly near the top latch side and the latch side gap narrows upward, suspect sag. If the whole latch edge drags with a fairly constant reveal, inspect for seasonal wood movement, paint buildup, or a slab that has taken on moisture.
Hinge-side bind can create a false latch-side complaint. A hinge leaf that is bent, packed with old paint, or not seated flat can change the swing arc and force the latch edge into the jamb.
How to read the latch-side reveal
Look for where the gap changes. A reveal that is wider near the top and tighter near the bottom can mean the slab has moved the opposite way, or that the threshold is forcing the bottom into a new path.
Picture a fiberglass door that closes freely until the last 2 inches, then scrapes along the latch side while the latch bolt also starts hitting the strike lip. That sequence often means the slab has shifted, then the strike problem appeared as a second symptom, not the first cause.
Fix paths
Start with hinge screws and hinge condition. Tighten loose screws, especially at the top hinge. If screw holes are stripped, repair the anchoring point and retighten. If the hinge knuckles are worn or the leaves are bent, replacement is usually better than trying to bend hardware back in place.
If the reveal says swelling rather than sag, let the weather pattern declare itself before removing material. If paint ridges or old finish are the contact point, correct that after confirming the slab is aligned.
If the reveal shows frame twist or several gaps changing at once, move to structural clues instead of adding thicker seals.
How do I know if the strike plate is misaligned?
If the door closes against the stop but the latch bolt hits the strike high, low, or too shallow, the strike plate is misaligned. This can feel like a sticking door because the handle needs extra push or lift, even when the slab itself does not rub the frame.
Signs the latch is hitting high, low, or shallow
A high hit shows bright wear at the top of the strike opening and may require lifting the handle to latch. A low hit leaves marks at the bottom of the opening. A shallow hit means the bolt nose strikes the strike lip because the plate sits too far inboard or outboard.
If the latch misses by more than an eighth of an inch, you may need to move the plate entirely. Small misses can sometimes be corrected by careful filing or minor repositioning.
Simple transfer tests
Close the door slowly while watching the latch meet the strike. A pencil mark or removable tape on the latch face can show where contact is happening without guessing.
Another useful test is to latch the door gently with weatherstripping pressure reduced by pulling a paper strip at the latch side. If the latch works only when seal pressure is reduced, the strike may be close but not quite aligned, or the seal may be too thick there.
When to reposition, file, or replace
Reposition the strike plate when the latch lands clearly high or low. File only for very small corrections where the plate location is otherwise right. Replace the plate if it is badly worn, bent, or too small for the latch throw.
If the latch hardware itself is failing, a standard passage latch set runs $10 to $25. That does not mean the latch set is always the culprit, it simply keeps hardware replacement in perspective when the real issue is alignment.
Door symptom matrix
| Symptom location | Likely cause | First test | Typical gap clue | Next step |
|---|---|---|---|---|
| Top latch-side rubbing | Top-hinge looseness, hinge wear, slab sag, or frame rack | Check top hinge screws, then compare head and latch-side reveal | Tight at top latch corner, wider at lower latch side | Hinge adjustment first; replace worn hinges or inspect frame if reveal stays uneven |
| Bottom edge drag | Low slab, high threshold, loose threshold, bent cap, or rot beneath sill | Open door and inspect threshold for movement, bends, or soft spots | Bottom gap disappears or changes only at threshold area | Threshold work first; reset loose parts, replace damaged threshold, inspect sill if rotten |
| Latch closes but will not catch | Strike plate high, low, or shallow; slab shifted without visible rubbing | Watch latch bolt enter strike and look for contact marks | Reveal may look normal; latch miss over 1/8 inch is a strong clue | Strike-plate correction first; then check hinge alignment if miss keeps changing |
| Daylight at corners | Seal not contacting, frame out of square, or slab alignment problem | Close door and inspect upper and lower corners for light | Corner light with uneven reveal points to alignment before seals | Alignment check first; weatherstripping only if reveal is good and door operates normally |
| Draft at threshold | Worn sweep, failed threshold insert, oversized bottom gap, or warped bottom edge | Paper-strip test across bottom and hand test on a cold or windy day | Consistent bottom leak with normal side reveal | Threshold and sweep measurement; replace the failed bottom seal parts that match the gap |
| Multiple doors failing together | Building movement, settlement, moisture-related frame shift, or racking | Compare several doors and look for new wall cracks or out-of-square frames | More than one opening changes at the same time | Structural inspection next; do not rely on weatherstripping as the fix |
Should I replace weatherstripping or adjust the door first?
Adjust the door first whenever rubbing or latching trouble is present. Replace weatherstripping first only when the door operates normally, the reveal is even, and the complaint is draft-only leakage at the jamb or threshold.
Draft-only failures with a good reveal
If the door closes smoothly, latches without extra force, and shows an even reveal, new seals may be the right first repair. A hand held near the perimeter can often detect a draft, especially on a cold or windy day.
Light at a corner still deserves caution. Light showing at the top or side edges is a clear sign that the perimeter seal is not making contact, but upper or lower corner light often points to alignment trouble first, not only worn seals.
Rubbing or latching failures need alignment first
Weatherstripping should contact the door firmly enough to block air, but not so tightly that the door is difficult to close. That means a misaligned door can become worse after a seal replacement, because new material adds closing pressure to a door that already sits in the wrong place.
A common first-timer mistake is adding oversized adhesive foam to a latch-side draft when the top hinge is loose. The draft may shrink for a day, then the latch starts missing because the new foam pushes the door farther away from the strike.
Use seals as seals
Foam tape is inexpensive and easy to install, but it is best for smaller, consistent gaps. Tubular vinyl or rubber weatherstripping provides a more durable seal for many exterior doors.
Clean surfaces matter for adhesive products, but fit matters more. If the gap varies around the perimeter, changing to a thicker seal usually hides the diagnosis instead of solving it.
Which weatherstripping works best for an exterior door?
The best weatherstripping depends on the door type, the jamb detail, and the measured gap. Use foam tape only for small, even gaps; use tubular vinyl or rubber for many exterior jambs; and use kerf-in profiles when the jamb has a matching groove.
Foam tape versus tubular vinyl or rubber
Foam tape fits older openings with minor, consistent leakage where the surface is flat and clean. It is a poor choice for wide, changing gaps or doors that already need a push to latch.
Tubular vinyl or rubber usually lasts longer on working exterior doors because the hollow profile can compress and recover better. It also tolerates regular opening cycles better than thin adhesive foam.
Kerf-in weatherstripping and groove fit
Kerf-in weatherstripping is common on newer fiberglass, steel, and wood doors. Its barbed edge presses into a groove in the jamb, so the replacement must match both the groove size and the sealing profile.
If the barb is too small, the strip pulls out. If the bulb profile is too large, the door becomes hard to latch. If the profile is too small, the leak remains even though the material is new.
Door-material differences
Wood doors are often the most responsive to seasonal moisture and are more likely to show whole-edge swelling. Fiberglass doors are more stable in humidity, but their seals still fail when frames shift or thresholds settle. Steel doors resist moisture movement in the skin, yet dents, frame shift, and worn sweeps can still create air leaks and latch issues.
On wood, a changing fit across seasons is common. On fiberglass or steel, a sudden fit change is more likely to point to hinges, the frame, or the threshold rather than slab swelling.
How do threshold and sweep problems differ?
A sweep seals the moving bottom edge of the door, while the threshold is the fixed surface and seal system beneath it. If the bottom leaks, measure both before buying parts, because a worn sweep, cracked threshold insert, bent cap, or rotten sill can each produce the same draft from inside the house.
Failure modes at the bottom
At the bottom of the door, you may need a sweep, a replacement threshold seal, or both. A sweep mounts to the door and closes the gap above the threshold. The threshold supports the contact surface and may include a replaceable insert or cap.
Look for loose fasteners, a bent cap, a cracked insert, or soft wood beneath the threshold. If the threshold rocks under pressure or the sill below is rotten, replacing only the seal usually wastes time.
How to measure before ordering
Measure the sweep width across the door bottom from end to end. Then measure the fin or bulb depth from the sweep body to the lowest sealing point. For the threshold gap, close the door gently and note where a paper strip pulls free and where it grips.
For the reveal, compare the gap visually on all sides first, then use a stack of identical cards or drill bits as a simple reference if needed. You do not need a lab number. You need to know whether the gap is even enough for the same seal profile to work around the opening.
When bottom repair stops being a seal job
If the threshold is visibly bent, loose, cracked through, or sitting over rotten material, move past seal replacement. If the bottom gap is much larger near one corner than the other, look at slab alignment and frame condition before fitting a thicker sweep.
Say your door passes the latch test and side reveal check, but a paper strip slides out freely only at the latch-side bottom corner. That often means the sweep is worn or the threshold is low at that corner, not that the whole door needs adjustment.
When is it weather, and when is it structural movement?
Weather-related movement usually affects one door and changes with humidity or temperature, while structural movement often changes several openings at once. If multiple doors begin rubbing, latches shift, or the frames look out of square alongside new wall cracks, treat that as a building issue before buying more seals.
One-door seasonal movement versus several-door change
A door that sticks only in humid weather may be responding to moisture. That pattern fits one wood door much better than three unrelated doors changing together in the same week.
Building movement tends to show up across the house: more than one door, a new crack above an opening, or a frame that no longer looks square. Racking can also make one corner show daylight while the opposite corner binds.
Structural warning signs
- Several doors start rubbing or missing latches at the same time.
- New wall cracks appear near doors or windows.
- One side of the reveal opens while the opposite side closes.
- The frame looks out of square or the head gap slopes.
- Problems begin after settlement, heavy moisture, or drainage trouble.
When adjustment stops making sense
If hinge tightening, strike correction, and threshold repair do not stabilize the fit, the problem may be beyond routine door adjustment. A settled corner with foundation repair can typically land around $2,500 to $6,000. Slab foundation repair is priced by pier count, about $600–$1,000 per pier.
Those numbers do not diagnose your house, but they do show why repeated door tweaks can become false economy when several openings move together. At that point, structural inspection is the better next step.
Frequently asked questions
How do I tell if a door problem is weather or foundation movement?
If one door changes with humidity and the fit later improves, weather is more likely, especially with wood. If several doors change together, frames look racked, or new wall cracks appear, think building movement first and stop treating it as a simple seal or hinge issue.
What type of weatherstripping works best for an exterior door?
For small, even gaps, adhesive foam can work. For many exterior doors, tubular vinyl or rubber is the better general choice. If the jamb has a groove, match it with the right kerf-in profile, because the barb and bulb shape both need to fit.
When is a sticking door a sign of a bigger structural problem?
It becomes a bigger concern when more than one door changes at once, the reveal shifts quickly, wall cracks appear, or frame corners look out of square. In that situation, door repair may still be needed later, but structural inspection comes before more weatherstripping or repeated hinge tweaks.
Sponsored / affiliate links. As an Amazon Associate I earn from qualifying purchases. I may earn additional commission from eligible campaigns.