How to Assemble a Door Knob Step-by-Step
Putting a new doorknob on can feel tricky, especially if you haven’t done it before. Lots of people wonder How to Assemble a Door Knob Step-by-Step because the parts look a bit confusing at first. But don’t worry!
It’s much simpler than you might think. We’ll break it down into easy steps so you can get that door working perfectly in no time. Get ready to see how easy it is.
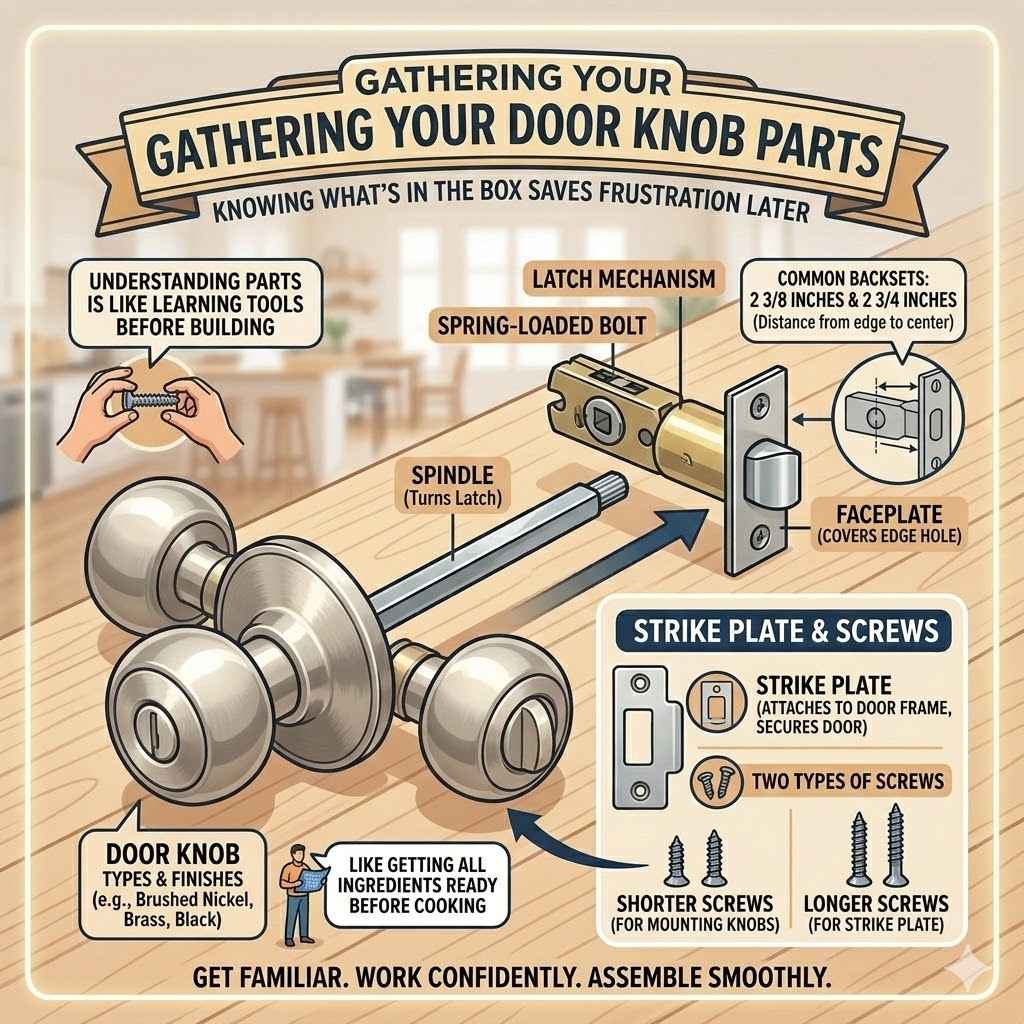
Gathering Your Door Knob Parts
Before you start putting anything together, it’s smart to know what pieces come in the box. This section helps you get familiar with each part so you know what you’re working with. You’ll see a few main items, and knowing their names makes the next steps much clearer.
It’s like learning the names of tools before you start building.
The Door Knob Itself
You’ll get two knobs, one for each side of the door. These are the parts you’ll actually touch to open and close the door. They come in many styles and finishes, like brushed nickel, brass, or black.
The knob connects to a spindle, which is a metal rod that goes through the door. This spindle is what turns the latch mechanism.
The Latch Mechanism
This is the part that slides into the edge of your door. It has a spring-loaded bolt that extends into the door frame when the door is closed. When you turn the doorknob, it retracts this bolt, allowing the door to open.
The latch assembly usually includes a faceplate that covers the hole on the edge of the door. Make sure the latch is the correct backset for your door, meaning the distance from the edge of the door to the center of the doorknob hole. Common backsets are 2 3/8 inches and 2 3/4 inches.
The Strike Plate and Screws
The strike plate is a metal piece that attaches to your door frame. It has a hole that the latch bolt goes into when the door is closed. This keeps the door securely shut.
The screws are what hold everything together. You’ll typically have longer screws for the strike plate and shorter screws for mounting the doorknob assembly.
Having all your parts ready makes the process smooth. It’s like getting all your ingredients out before you start cooking. This simple preparation step saves a lot of frustration later on.
You can be confident that you have everything you need.
Preparing the Door For Installation
Getting the door ready is super important for a good fit. This involves making sure the holes are clear and ready for the new doorknob. If you’re replacing an old knob, you’ll need to remove that first.
If it’s a new door, there might be pre-drilled holes already. Either way, a little prep work goes a long way.
Removing the Old Doorknob
Most older doorknobs are held in place by visible screws. Find these screws on the interior side of the knob. Use a screwdriver that matches the screw type (usually Phillips head).
Unscrew them completely. Once the screws are out, the knob assembly should come apart easily. You might need to gently wiggle or pry them apart if they are stuck.
Take note of how the old parts are arranged; this can be helpful for installing the new one.
Checking Existing Holes
If your door already has holes for a doorknob, check if they are the right size and placement for your new knob. The latch mechanism needs to fit snugly into the hole on the edge of the door. The larger hole in the face of the door needs to accommodate the knob’s internal workings.
If the holes are slightly off, you might need to do some minor adjustments with a chisel or drill, but most standard doorknobs are designed to fit common door preps.
Measuring the Backset
The backset is the distance from the edge of the door to the center of the large hole where the doorknob will go. This is a critical measurement. You can measure it from your old latch mechanism or directly on the door.
Most residential doors have a 2 3/8 inch or 2 3/4 inch backset. Your new latch mechanism will either be adjustable or come with a specific backset. Ensure it matches.
Proper preparation means the new doorknob will install smoothly. It sets the stage for success. Taking these few minutes now prevents problems down the road.
You’ll feel much more confident moving to the next stages.
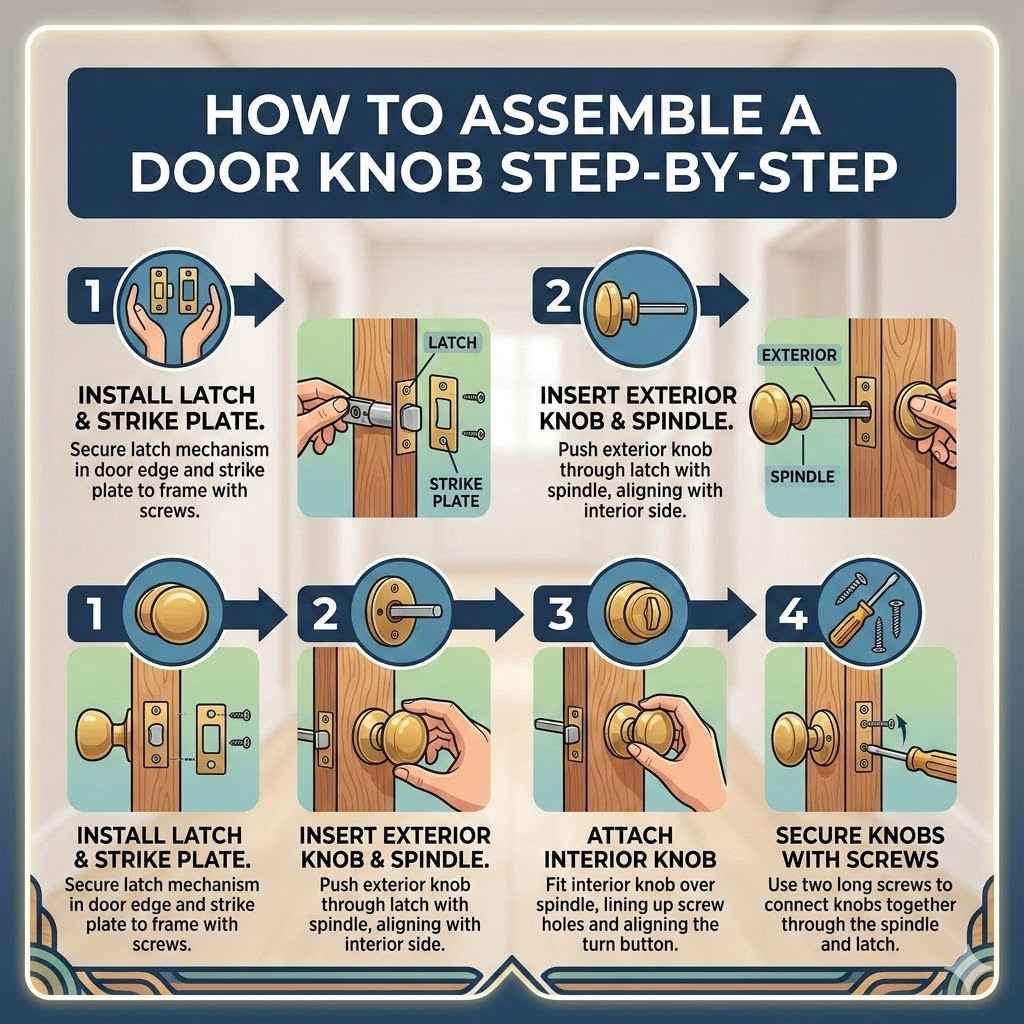
Installing the Latch Mechanism
The latch mechanism is the heart of the doorknob. It’s the part that actually lets the door open and close. Installing it correctly is key.
This part slides into the edge of the door and has a metal piece that sticks out. We’ll make sure it fits perfectly and is secure.
Inserting the Latch
Slide the latch mechanism into the large hole on the edge of your door. The flat metal faceplate should be flush with the edge of the door. If your latch is adjustable, you can usually twist or slide parts to set the correct backset.
If it’s not adjustable, make sure you bought the right size. The bolt should slide smoothly in and out.
Securing the Latch
Once the latch is in place, you’ll see two small screw holes on the faceplate. Use the shorter screws provided with your doorknob kit to secure the latch mechanism to the door. Make sure it’s snug but don’t overtighten, which could strip the screws or damage the door.
The faceplate should be level and not sticking out.
A properly installed latch is smooth and secure. This forms the foundation for the rest of the doorknob assembly. It’s a crucial step that ensures the knob will function as intended.
Attaching the Doorknob Assembly
Now for the fun part – putting the actual doorknob onto the door! This is where you’ll see the door knob start to look like a finished product. We’ll attach the knobs to both sides and connect them through the latch.
It’s simpler than it sounds and goes pretty quickly.
Mounting the First Knob
Take one of the doorknobs. It will have a spindle that needs to go through the latch mechanism. The spindle is the metal rod that connects the two knobs.
You’ll usually align the knob so the spindle passes through the hole in the center of the latch. The knob should sit flush against the door. There might be a small hole or slot on the neck of the knob that connects to the latch’s interior mechanism.
Connecting the Spindle and Interior Piece
On the opposite side of the door, you’ll attach the other doorknob. This knob also has a spindle. You’ll need to connect both spindles to the latch mechanism, and often they connect to each other or a central connecting piece.
The key is that turning either knob will operate the latch bolt. Many knobs have a way for the spindles to interlock or connect securely.
Installing the Mounting Screws
Most modern doorknobs use concealed screws. You’ll see a small opening or hole on the inside of one of the knobs, usually on the neck of the knob. Insert the longer screws provided into this opening.
These screws pass through the door and screw into the other doorknob or a mounting plate. Tighten these screws until the doorknobs are snug and don’t wiggle. Again, avoid overtightening.
Once the screws are tight, the doorknobs should feel secure and operate smoothly. This is the main installation part. You’re almost done!
Installing the Strike Plate
The strike plate is what your door latch fits into on the door frame. It makes sure your door closes securely. This step is important for the door to latch properly.
We’ll make sure it’s aligned just right.
Positioning the Strike Plate
Close the door gently. You should see where the latch bolt is making contact with the door frame. The strike plate needs to be positioned so the bolt slides easily into the hole.
Often, there’s an existing strike plate you can replace, or you’ll need to screw the new one into place. If you’re installing on a new door, you’ll likely need to mortise (cut a small recess) for the strike plate to sit flush.
Securing the Strike Plate
Use the remaining screws to attach the strike plate to the door frame. Ensure the bolt hole is aligned correctly with the latch bolt. If it’s not aligned, the door might not latch properly, or it could be difficult to close.
Adjust the position of the strike plate as needed. Tighten the screws securely.
A well-placed strike plate ensures your door closes and locks smoothly every time. It’s the final piece that makes your new doorknob fully functional and secure.
Testing Your New Door Knob
Before you consider the job done, it’s vital to test your work. This ensures everything is functioning correctly and smoothly. You want to be sure the knob turns easily and the latch engages and retracts properly.
Checking the Turn and Latch Action
Open and close the door several times. Turn both the interior and exterior knobs. Listen for any sticking or catching.
The latch bolt should slide in and out of the strike plate smoothly without too much force. If it’s difficult, you may need to slightly adjust the strike plate or the latch position. Make sure the knob feels solid and doesn’t wobble.
Testing the Locking Mechanism (If Applicable)
If your doorknob has a locking mechanism (like a button or a keyhole), test it thoroughly. Lock the door from both sides. Ensure the lock engages completely and unlocks without sticking.
If you have a deadbolt, test that it extends and retracts fully into the strike plate on the frame.
A successful test means your doorknob is installed correctly and ready for use. It provides peace of mind and ensures your door works as it should.
Frequently Asked Questions
Question: How long does it typically take to install a door knob?
Answer: Installing a standard door knob usually takes about 30 to 60 minutes, depending on your experience and if you’re replacing an old knob or installing a new one.
Question: Do I need special tools to install a door knob?
Answer: You typically only need a screwdriver, usually a Phillips head. Sometimes a flathead screwdriver might be needed for prying or a measuring tape for backset.
Question: What if the new door knob holes don’t match my door?
Answer: If the holes don’t match, you may need to drill new holes or enlarge existing ones. This might require a drill and a hole saw bit for the main knob opening.
Question: Can I install a door knob if I’m not handy?
Answer: Yes, this guide breaks down How to Assemble a Door Knob Step-by-Step in simple terms. If you can use a screwdriver, you can likely do it.
Question: My door is difficult to close after installing the knob, what should I do?
Answer: This often means the latch or strike plate is misaligned. Try adjusting the position of the strike plate on the door frame or checking that the latch mechanism is fully seated in the door edge.
Summary
Installing a door knob is a straightforward DIY project. By gathering your parts, preparing the door, and following these clear steps, you can easily manage the process. You now know How to Assemble a Door Knob Step-by-Step and can tackle this task with confidence.
Enjoy your newly fitted door knob.