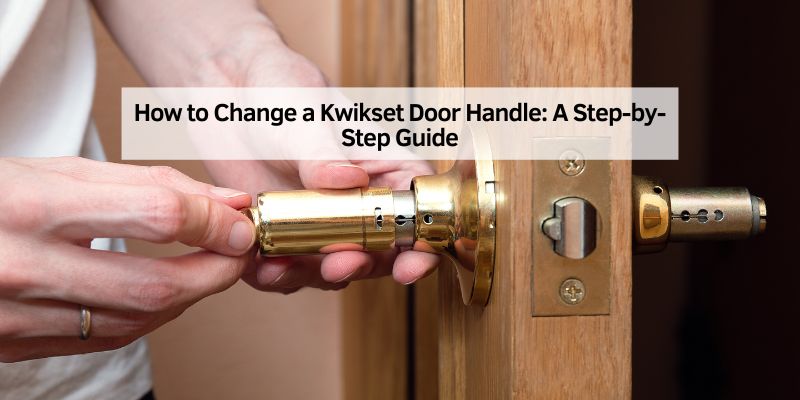
How to Change a Kwikset Door Handle: A Step-by-Step Guide
Hey there! So, you’re looking to change a Kwikset door handle, huh? I totally get it—those handles can get loose, outdated, or just not match your vibe anymore. I’ve been there, standing in front of my door with a screwdriver in hand, wondering where to start. Over the years, I’ve swapped out a bunch of Kwikset door handles in my home, from upgrading to a sleek new design to fixing a wobbly one that drove me nuts. It’s not as hard as it seems, and I’m excited to walk you through the process like we’re tackling this together. Whether you’re a DIY newbie or a seasoned pro, this guide will make changing your Kwikset door handle a breeze. Let’s dive in and get that door looking and working great!
Why Change Your Kwikset Door Handle?
Let’s start with why you might want to swap out your Kwikset door handle. For me, it was a mix of reasons. Sometimes, the handle gets loose after years of use, and tightening it just doesn’t cut it anymore. Other times, I’ve wanted to update the look of my home—maybe a modern matte black handle instead of that old brass one. Or perhaps the lock mechanism is acting up, and a new handle is easier than dealing with repairs. Whatever your reason, changing a Kwikset door handle is a quick way to boost your home’s security, style, and function. Plus, it’s a DIY project that doesn’t require a ton of tools or time. I’ve done it in under 30 minutes once I got the hang of it!
Kwikset handles are popular because they’re reliable, affordable, and come in tons of styles. But like anything, they wear out or might not fit your needs forever. Maybe you’re moving into a new place and want to rekey the locks for safety. Or you’re upgrading to a smart lock for that keyless entry life. No matter the case, swapping out the handle is a straightforward fix that can make a big difference.
Tools You’ll Need to Get Started
Before we jump into the steps, let’s talk tools. I learned the hard way that having the right tools makes this job so much easier. The first time I tried changing a Kwikset handle, I was digging through my toolbox, hoping a random screwdriver would do the trick. Spoiler: it didn’t. Here’s what you’ll need to make this smooth:
| Tool | Purpose |
|---|---|
| Phillips screwdriver | To remove and tighten screws holding the handle and faceplate. |
| Flathead screwdriver | To pry off decorative plates or covers hiding screws. |
| 3/32-inch Allen wrench | To loosen set screws on some Kwikset lever handles. |
| SmartKey tool (optional) | For rekeying SmartKey locks if you’re keeping the same cylinder. |
| New Kwikset handle | The replacement handle you’ve chosen to match your door and style. |
| Tape measure | To check door thickness and ensure the new handle fits properly. |
| Rag or cloth | To clean the door and handle area for a polished finish. |
Most of these are probably already in your toolbox. If you don’t have an Allen wrench, you can grab one at any hardware store for a couple of bucks. I keep a small kit with these tools in my garage now, just for projects like this. Also, make sure your new Kwikset handle is compatible with your door’s thickness—most standard doors are 1-3/8 to 1-3/4 inches thick, but it’s worth double-checking.
Preparing Your Door for the Swap
Alright, let’s get ready to make this happen. Preparation is key, and I’ve learned that a little setup goes a long way. First, open the door fully. This gives you space to work and prevents you from getting locked out mid-project (yep, I’ve made that mistake). If your door has a deadbolt, lock it to keep the latch mechanism steady. If it’s a knob or lever, make sure it’s in the locked position too. I also like to prop the door open with a doorstop or a heavy object to keep it from swinging shut.
Next, take a moment to clean the area around the handle. I use a damp rag with a bit of soap to wipe away dust or grime. It’s not just about looks—cleaning makes it easier to see screws and components clearly. If you’re rekeying the lock or using a SmartKey system, grab your current key and the new key you want to use. This is also a good time to check the new handle’s packaging for any specific instructions. Kwikset usually includes a manual, and I always skim it to avoid surprises.
Step-by-Step Guide to Removing the Old Kwikset Door Handle
Now, let’s get that old handle off. I’ll break this down into simple steps based on my own trial and error. Kwikset handles come in two main types: those with exposed screws and those with hidden screws (usually under a decorative cover). I’ll cover both so you’re ready for whatever you’re dealing with.
For Handles with Exposed Screws
If your Kwikset handle has visible screws on the interior side of the door, you’re in luck—this is the easier setup. Here’s what to do:
- Locate the Screws: Look on the interior side of the door (the side facing inside your home). You’ll see two or more screws on the faceplate or around the base of the handle.
- Unscrew the Handle: Grab your Phillips screwdriver and turn the screws counterclockwise to loosen them. I like to keep a small bowl nearby to hold the screws so they don’t roll away.
- Remove the Handle: Once the screws are out, gently pull the interior and exterior handles away from the door. They should come off easily, along with the spindle (the rod connecting the two sides).
- Take Out the Latch: The latch is the part that sticks out into the door frame. Use your flathead screwdriver to remove the two screws on the edge of the door holding the latch in place. Pull the latch out carefully.
For Handles with Hidden Screws
If you don’t see any screws, don’t panic—your handle likely has a decorative cover hiding them. This was the case with my front door, and it took me a minute to figure out. Here’s how to handle it:
- Find the Set Screw: Look for a small hole on the side of the interior handle. This is where the set screw hides. You’ll need your 3/32-inch Allen wrench for this.
- Loosen the Set Screw: Insert the Allen wrench and turn it counterclockwise. You don’t need to remove the screw completely—just loosen it enough to release the handle. I found that turning it a few times did the trick.
- Remove the Handle: Pull the interior handle off the spindle. It might take a little wiggle, but it should come free.
- Pry Off the Rose Plate: The rose plate is the decorative cover hiding the mounting screws. Use your flathead screwdriver to gently pry it off. I slide the screwdriver under the edge and work my way around to avoid scratching the door.
- Unscrew the Mounting Plate: Now you’ll see two screws holding the mounting plate. Use your Phillips screwdriver to remove them, then pull the exterior handle and spindle out.
- Remove the Latch: Just like with exposed screws, remove the two screws on the edge of the door and pull out the latch.
Pro tip: If the handle feels stuck, double-check for a hidden set screw or detent (a small spring-loaded catch). I once spent 10 minutes tugging on a handle before realizing I missed a tiny set screw!
Installing the New Kwikset Door Handle
With the old handle off, it’s time to install the new one. I love this part—it’s like giving your door a mini makeover. Kwikset handles are designed to fit standard door preps, so as long as your new handle matches your door’s specifications, this should be straightforward. Here’s how I do it:
- Install the New Latch: Insert the new latch into the hole on the edge of the door. Make sure the curved or beveled side faces the direction the door closes (this helps it slide into the strike plate smoothly). Secure it with the two screws provided, using your Phillips screwdriver.
- Insert the Spindle: Take the exterior handle (the part that goes outside) and insert the spindle through the latch opening. The spindle is the rod that connects both sides of the handle. Make sure it’s aligned properly—Kwikset often marks the spindle to show which way it should face.
- Attach the Interior Handle: If your handle has a mounting plate, screw it onto the interior side of the door first. Then, slide the interior handle onto the spindle. For handles with exposed screws, line up the holes and tighten the screws with your Phillips screwdriver. For hidden screws, snap the handle onto the spindle and tighten the set screw with your Allen wrench.
- Secure the Rose Plate: If your handle has a decorative rose plate, snap it back into place over the mounting screws. I give it a gentle press to make sure it’s secure.
- Test the Handle: Turn the handle or knob to make sure it moves smoothly and the latch retracts fully. Open and close the door a few times to check that everything feels solid.
If you’re installing a SmartKey handle, you might need to rekey the lock. I’ll cover that next, since it’s a game-changer for keeping your existing keys.
Rekeying a Kwikset SmartKey Lock (Optional)
One of the coolest things about Kwikset’s SmartKey system is that you can rekey the lock to match your existing keys without replacing the whole cylinder. I did this when I moved into my house to make sure all my doors used the same key. It’s a bit finicky at first, but once you get it, it’s super satisfying. Here’s how:
- Prepare the Lock: Make sure the door is open and the lock is in the locked position (deadbolt extended or knob/lever locked).
- Insert the Current Key: Use the key that currently works with the lock. Insert it fully and turn it 90 degrees clockwise.
- Use the SmartKey Tool: Insert the SmartKey tool (a small metal tool included with the lock) into the SmartKey hole on the cylinder. Push it in firmly until you feel a click.
- Remove the Old Key: Take out the SmartKey tool, then remove the old key.
- Insert the New Key: Fully insert the new key you want to use. Don’t push or pull it—just let it sit snugly.
- Rotate the Key: Turn the key 180 degrees counterclockwise, then 180 degrees clockwise. This resets the lock to the new key.
- Test It: Lock and unlock the door with the new key to make sure it works smoothly.
I messed this up the first time by not inserting the key fully, so take your time. If it doesn’t work, repeat the steps and make sure the door is locked during the process.
Troubleshooting Common Issues
Even with the best prep, things can go wrong. I’ve hit a few snags over the years, so here are some common issues and how to fix them:
- Handle Won’t Come Off: If the handle is stuck, check for a hidden set screw or detent. Use your Allen wrench or a small screwdriver to release it. Sometimes, turning the handle while loosening the screw helps.
- Latch Doesn’t Retract Fully: This happened to me once, and it was because the latch was installed upside down. Remove it and make sure the beveled side faces the door frame.
- Screws Won’t Tighten: If the screws feel loose, they might be stripped. Try using a thread locker (a type of adhesive) or slightly larger screws. If it’s really bad, you might need a new mounting plate.
- SmartKey Won’t Rekey: Double-check that the key is fully inserted and the lock is in the locked position. If it still doesn’t work, the cylinder might be faulty, and you’ll need to contact Kwikset or a locksmith.
If you’re still stuck, don’t be afraid to call a locksmith. I’ve done it once when a handle was just too stubborn, and they had it fixed in minutes.
Maintaining Your New Kwikset Door Handle
Once your new handle is installed, a little maintenance goes a long way. I learned this after neglecting a handle and ending up with a squeaky, sticky mess. Here’s what I do to keep my Kwikset handles in top shape:
- Clean Regularly: Wipe the handle with a damp cloth and mild soap to remove dirt and fingerprints. Avoid harsh chemicals that can damage the finish.
- Lubricate Moving Parts: Every few months, I spray a bit of graphite-based lubricant (not WD-40, which can gunk things up) into the latch and lock mechanism to keep it smooth.
- Check Screws: Every six months, I give the screws a quick tighten to prevent wobbling. Don’t overdo it, though—stripping the screws is worse than a loose handle.
- Inspect for Wear: If the handle starts feeling loose or the latch sticks, address it early to avoid bigger problems.
Taking care of your handle can make it last years longer, and it’s way cheaper than replacing it again.
Choosing the Right Kwikset Door Handle
Picking a new Kwikset handle is half the fun! I spent way too long browsing options at the hardware store, but it was worth it to find one that matched my home’s style. Here are some things to consider:
- Style: Kwikset offers knobs, levers, and handlesets in finishes like satin nickel, matte black, and polished brass. I went with a lever handle for my front door because it’s easier to use with full hands.
- Function: Decide if you need a keyed entry, privacy (for bedrooms or bathrooms), or passage (for non-locking doors). I chose a keyed entry for my exterior doors for added security.
- Smart Features: If you’re into tech, Kwikset’s smart locks like Halo or Premis let you unlock your door with a code or app. I haven’t gone full smart lock yet, but I’m tempted!
- Budget: Kwikset handles range from $20 to $100+, depending on features and finish. I found a great lever handle for about $40 that looks high-end without breaking the bank.
Check your door’s handing (left or right) and make sure the handle is reversible if needed. Most Kwikset handles are, but it’s good to confirm.
Why I Love Doing This Myself
Changing a Kwikset door handle is one of those projects that makes you feel like a home improvement rockstar. The first time I did it, I was nervous I’d mess something up, but it was so satisfying to see the new handle in place and working perfectly. It’s not just about saving money (though skipping the locksmith fee is nice). It’s about taking control of your space and making it yours. Every time I walk through my front door now, I smile knowing I installed that sleek new handle myself.
Plus, it’s a skill you can use again and again. I’ve helped friends and family swap out their handles, and it’s become a bit of a party trick. With a little patience and the right tools, you’ll be amazed at how easy it is to transform your door.
Conclusion
There you go! Changing a Kwikset door handle is a simple, rewarding project that anyone can tackle with the right know-how. From gathering your tools to installing that shiny new handle, I hope this guide has given you the confidence to get it done. I’ve been there, fumbling with screws and cursing a stuck latch, but each time I do it, it gets easier. Now, every time you open your door, you’ll feel a little burst of pride knowing you made it happen. So, grab your screwdriver, pick out a stylish new handle, and give your door the upgrade it deserves. You’ve got this!
FAQs
How Long Does It Take to Change a Kwikset Door Handle?
It usually takes me about 20-30 minutes to swap out a Kwikset door handle. If it’s your first time or you’re dealing with hidden screws, it might take closer to 45 minutes. The key is to go slow and double-check each step.
Can I Use a Different Brand Handle with a Kwikset Lock?
It’s tricky. Kwikset handles are designed to work with their own spindles and latches, so mixing brands often doesn’t fit right. I tried it once with a different brand, and the spindle didn’t align. Stick with Kwikset for a smooth install.
What If My Door Handle Screws Are Stripped?
Stripped screws are a pain! I’ve had luck using a thread locker to secure them or switching to slightly larger screws. If the hole is too damaged, you might need a repair kit or a new mounting plate.
Do I Need a Locksmith to Change a Kwikset Door Handle?
Not usually! If you follow the steps and have the right tools, you can do it yourself. I only called a locksmith once when a SmartKey cylinder wouldn’t rekey, and they fixed it fast. Save the locksmith for tough cases.
Can I Rekey My Kwikset Handle Without a SmartKey Tool?
Without the SmartKey tool, it’s tough. I tried using a paperclip once, and it was a nightmare. You can buy a SmartKey tool for cheap at most hardware stores, or contact Kwikset for a replacement.
How Do I Know If My New Handle Fits My Door?
Measure your door’s thickness (usually 1-3/8 to 1-3/4 inches) and check the handle’s specs. Most Kwikset handles are adjustable, but I always double-check the packaging to avoid surprises.