How to Clean Crystal Chandelier: Effortless Guide
Quick Summary:
Effortlessly clean your crystal chandelier without removing it by dusting regularly, using a specialized spray cleaner, and gently wiping each crystal with a lint-free cloth. This guide provides simple, safe steps to restore its sparkle, making it look brand new.
A dazzling crystal chandelier can be the crown jewel of any room, adding elegance and sparkle. But over time, dust and grime can dim its brilliance, making it look a bit sad. You might think cleaning it is a huge, complicated job, maybe even requiring taking the whole thing down. Don’t worry! With a few simple tools and a straightforward method, you can bring back that magnificent shine without the hassle. This guide will walk you through everything you need to know to clean your crystal chandelier safely and effectively, right where it hangs. Get ready to see your chandelier sparkle like never before!
Why Cleaning Your Crystal Chandelier Matters
Your crystal chandelier isn’t just a light fixture; it’s a statement piece, an heirloom, and a source of beautiful light. When dust, grease from cooking, or even tiny insects settle on its surfaces, it can significantly dull its shine. This buildup not only makes the chandelier look less impressive but can also affect how it reflects and refracts light, diminishing its overall impact on your room’s ambiance. Regular cleaning ensures that your chandelier continues to be a breathtaking focal point, casting warm, sparkling light throughout your home. It’s a simple maintenance task that makes a world of difference to your home’s aesthetic.

Gathering Your Crystal Cleaning Arsenal: What You’ll Need
Before you start, having the right tools makes the job much easier and safer. Think of this as preparing your workspace for a delicate, yet important, task. You want to have everything within reach so you don’t have to climb up and down repeatedly, which can be tiring and a bit risky.
Essential Tools for a Sparkling Chandelier
- Step Ladder or Sturdy Stool: Ensure it’s stable and tall enough to comfortably reach the chandelier. Safety first!
- Soft, Lint-Free Cloths: Microfiber cloths are excellent for this. You’ll want several – some for cleaning and some for drying.
- Cotton Gloves: To avoid leaving fingerprints on the sparkling crystals.
- Crystal Chandelier Cleaner Spray: Look for one specifically designed for crystal. Avoid harsh chemicals.
- Small Bowl or Container: For any loose crystal parts you might need to handle or reattach.
- Drop Cloth or Old Sheets: To protect the furniture and flooring below from any drips.
- Small, Soft Brush or Feather Duster: For initial dusting of frames and less delicate parts.
- Optional: Isopropyl Alcohol (90%): For stubborn spots, diluted with distilled water. Always test first!
The Effortless Step-by-Step Guide to Cleaning Your Crystal Chandelier
Cleaning a crystal chandelier doesn’t have to be a daunting task. We’ll break it down into simple, manageable steps. The key is to work carefully and systematically. Remember, patience is your best friend here!
Step 1: Prepare Your Workspace
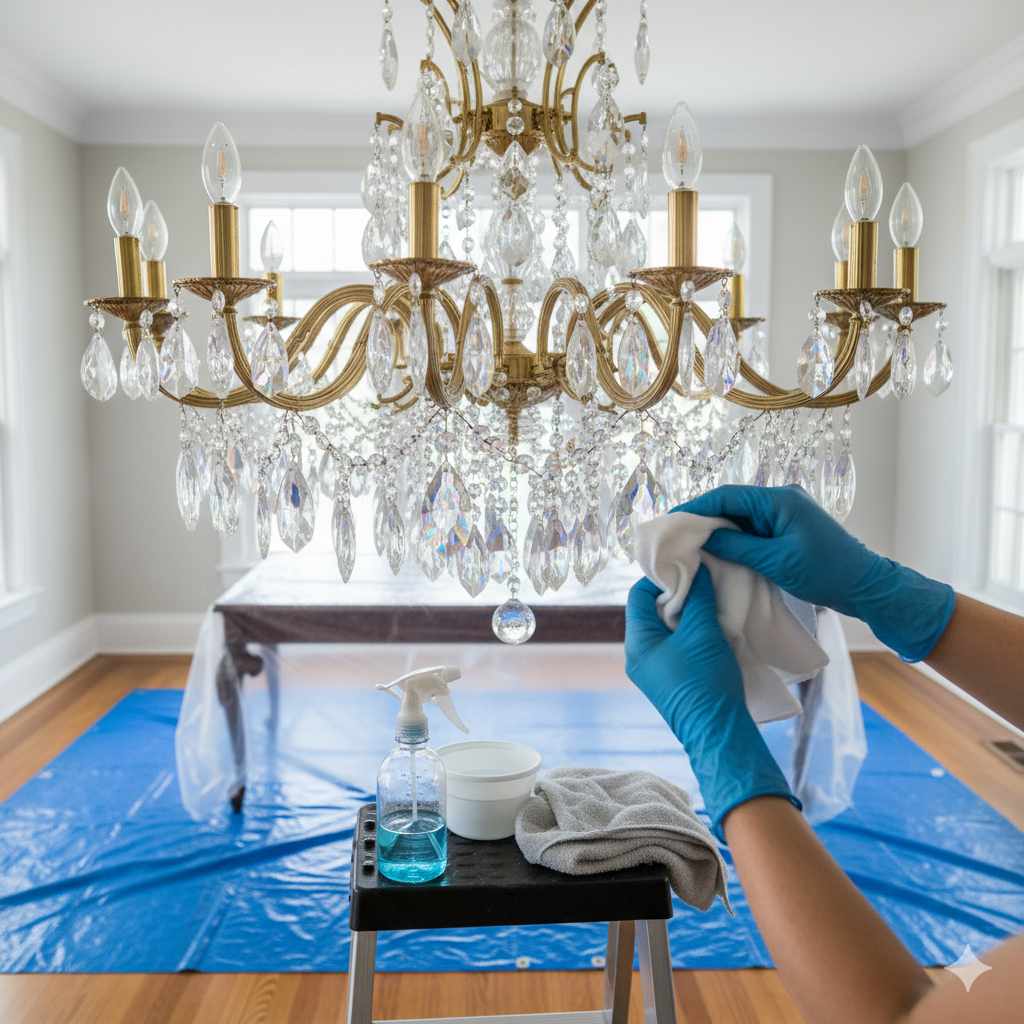
Safety and cleanliness start here. Lay down your drop cloth or old sheets directly beneath the chandelier. This will catch any drips from the cleaning solution and protect your furniture and floor. If your chandelier has exposed bulbs, ensure the light is turned OFF at the switch and, for extra safety, consider turning off the power at the circuit breaker. This is a crucial step to prevent electrical hazards.
Step 2: Initial Dusting
Before applying any cleaning solution, it’s important to remove loose dust and debris. Put on your cotton gloves. Gently use a soft brush or a dry microfiber cloth to dust the metal frame and any larger, non-crystal components. For the crystals themselves, a very light dusting with a dry microfiber cloth can remove surface dust. Be gentle; you don’t want to knock anything loose.
Step 3: Prepare the Cleaning Solution (If Not Using a Spray)
If you’re not using a ready-made spray cleaner, you can create a simple solution. Mix one part isopropyl alcohol (90%) with three parts distilled water in a clean spray bottle. Distilled water is important because it doesn’t contain minerals that can leave spots. Always test this solution on an inconspicuous crystal first to ensure it doesn’t cause any discoloration or damage.
Step 4: Cleaning the Crystals – The Gentle Approach
Now for the main event! Lightly spray your chosen crystal cleaner (or your DIY solution) onto a clean, lint-free cloth. Do NOT spray directly onto the chandelier. Spraying the cloth prevents overspray onto the electrical components or ceiling. Work on one section or a few crystals at a time. Gently wipe each crystal, turning the cloth as needed to use a clean section. The goal is to lift the dirt, not scrub it.
For stubborn spots or grime, you might need to gently rub a bit more, but always with care. If a crystal is particularly grimy, you may need to apply a tiny bit more cleaner to your cloth. Take your time and enjoy seeing the sparkle return to each piece.
Step 5: Drying and Polishing
After wiping each crystal, use a separate, dry microfiber cloth to gently buff it dry. This step is vital to prevent water spots and streaks, ensuring a brilliant shine. Again, work one crystal or a small section at a time. The combination of cleaning and immediate drying is what gives that professional, streak-free finish.
Step 6: Addressing Stubborn Grime and Frame Details
Sometimes, you’ll encounter areas with more stubborn buildup, especially on the metal frame or in tight crevices. For the frame, you can use a slightly damp cloth (with just water or a very mild, diluted cleaner suitable for the frame’s material) and then immediately dry it thoroughly. For very tough spots on crystals, a cotton swab lightly dampened with your cleaning solution can be useful for precise application, followed by buffing with a dry cloth.
Step 7: Final Inspection and Reassembly (If Necessary)
Once you’ve cleaned all the crystals and the frame, take a step back and admire your work. Look closely for any missed spots or streaks. Gently buff any areas that need it. If any crystals happened to come loose during cleaning, carefully reattach them. Keep a small container handy for any parts that might detach so you can easily put them back.
Step 8: Restore Power and Enjoy
Once you are completely finished and confident that everything is dry, you can carefully turn the power back on at the circuit breaker and then at the light switch. Now, turn on your chandelier and bask in its renewed, sparkling glory!
Tips for Cleaning Different Types of Chandeliers
Not all chandeliers are created equal, and some materials require a slightly different touch. Here’s a quick guide for common types:
Crystal vs. Glass vs. Acrylic
While many people use the terms interchangeably, there are differences:
- Genuine Crystal: Often leaded glass, it’s heavier and has a high refractive index, meaning it sparkles brilliantly. It’s more delicate.
- Glass: Can mimic crystal but may be lighter and less sparkly. It’s generally more durable than crystal.
- Acrylic: A plastic material, it’s lightweight and very durable, making it a safer choice for high-traffic areas or homes with children. It doesn’t sparkle quite like glass or crystal.
Cleaning Considerations for Each Type:
- Crystal: Use specialized crystal cleaners or the diluted isopropyl alcohol solution. Be extra gentle.
- Glass: Most glass cleaners or the DIY solution will work well. Still, avoid harsh chemicals.
- Acrylic: Use only mild soap and water or a cleaner specifically for plastics. Avoid alcohol or ammonia-based cleaners, as they can cause clouding or damage. Always use a soft cloth.
When to Consider Professional Cleaning
While this guide covers most DIY cleaning scenarios, there are times when calling a professional is the best option:
- Very Large or Complex Chandeliers: If your chandelier is exceptionally large, has intricate wiring, or is extremely heavy, a professional has the right equipment and expertise.
- Antique or Valuable Chandeliers: For irreplaceable pieces, professional restoration and cleaning services ensure the utmost care and preservation.
- Electrical Concerns: If you have any doubts about the electrical safety of your chandelier, it’s best to have a professional inspect it.
- Inaccessible Locations: If your chandelier is hung very high or in a difficult-to-reach spot, a professional with specialized equipment might be necessary.
You can find professional chandelier cleaning services by searching online for local lighting specialists or restoration companies. Reputable companies often have certifications and good reviews. For instance, the Illuminating Engineering Society (IES) offers resources on lighting best practices, which can sometimes include maintenance advice or lead to professional contacts.
Maintaining Your Chandelier’s Sparkle Between Cleanings
Keeping your chandelier looking its best doesn’t require a full cleaning every month. A little bit of regular upkeep goes a long way in reducing the need for deep cleaning and ensuring it always looks its best.
Regular Dusting Schedule
Aim to dust your chandelier at least once a month. This can be done quickly with a dry microfiber cloth or a soft feather duster. Getting into the habit of this simple task will prevent heavy buildup, making your more thorough cleanings much easier and faster.
Address Spills and Spots Immediately
If you notice a fresh spill or spot on a crystal, try to gently dab it away with a dry cloth as soon as possible. This prevents the substance from drying and becoming harder to remove later.
Consider an Air Purifier
If your home tends to get dusty quickly, especially if you have pets or live in a drier climate, an air purifier can help reduce the amount of airborne dust that settles on your chandelier. This is a proactive measure that contributes to a cleaner home environment overall.
Safety First: Important Precautions
Working with electricity and heights requires careful attention to safety. Always prioritize your well-being. Here are some key precautions:
Electrical Safety
- Always turn off the power to the chandelier at the circuit breaker before you begin cleaning. This is non-negotiable.
- Never spray cleaning solutions directly onto the chandelier, especially near electrical sockets or wiring.
- Ensure all parts are completely dry before restoring power.
Ladder Safety
- Use a sturdy, stable ladder or step stool.
- Ensure the ladder is on a level surface.
- Do not overreach. Move the ladder as needed.
- Have someone spot you if possible, especially for taller chandeliers.
Handling Crystals
- Be gentle. Crystals can be fragile.
- Avoid dropping or banging crystals together.
- If a crystal comes loose, handle it carefully and place it in a safe container.
For more detailed safety guidelines on home electrical work, you can refer to resources from organizations like the U.S. Consumer Product Safety Commission (CPSC), which provides excellent advice on ladder safety.
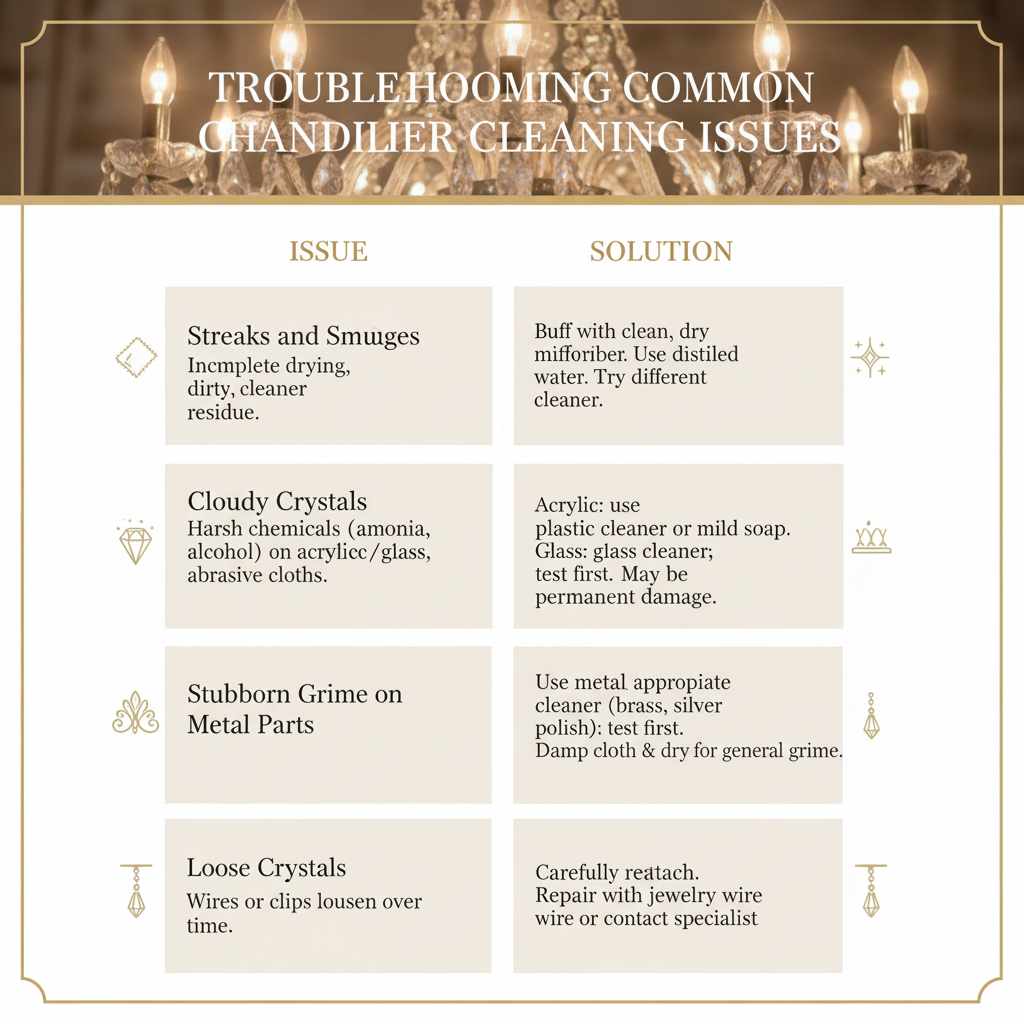
Troubleshooting Common Chandelier Cleaning Issues
Even with the best intentions, you might run into a few hiccups. Here’s how to handle them:
Streaks and Smudges
Cause: Incomplete drying, using a dirty cloth, or a cleaning solution that leaves residue.
Solution: Buff immediately with a clean, dry microfiber cloth. If streaks persist, try a slightly different cleaner or ensure you’re using distilled water for any DIY solutions. For persistent streaks, sometimes a very light mist of plain distilled water on a cloth, followed by buffing, can help remove residue.
Cloudy Crystals
Cause: Often happens with acrylic or certain types of glass when exposed to harsh chemicals (like ammonia or alcohol not meant for them) or abrasive cloths.
Solution: For acrylic, use a cleaner specifically designed for plastic or mild soap and water. For glass, try a glass cleaner, but always test first. If the cloudiness is permanent damage, unfortunately, it may not be reversible.
Stubborn Grime on Metal Parts
Cause: Oxidation, grease buildup, or tarnish.
Solution: Use a cleaner appropriate for the metal type (e.g., brass cleaner for brass, silver polish for silver). Always test in an inconspicuous area first. For general grime, a slightly damp cloth followed by immediate drying is usually sufficient.
Loose Crystals
Cause: Over time, wires or clips can loosen.
Solution: Carefully reattach them. If a wire is broken, you might be able to repair it with jewelry wire or a similar fine gauge wire, or contact a specialist if it’s a critical component.
FAQ: Your Crystal Chandelier Cleaning Questions Answered
Here are some common questions homeowners have about cleaning their crystal chandeliers:
Q1: How often should I clean my crystal chandelier?
A: For best results, aim for a light dusting once a month and a more thorough cleaning every 6-12 months, depending on your home’s environment and how dusty it gets.
Q2: Can I use Windex to clean my crystal chandelier?
A: It’s generally not recommended. Windex contains ammonia, which can damage certain types of crystal and glass, potentially causing cloudiness or etching over time. Stick to cleaners specifically designed for crystal or a mild DIY solution.
Q3: What if I don’t have a special crystal cleaner?
A: You can create a simple, effective cleaner by mixing one part 90% isopropyl alcohol with three parts distilled water in a spray bottle. Always test this on an inconspicuous spot first.
Q4: My chandelier has a lot of small crystals. Is there a faster way to clean them?
A: While there’s no magic shortcut for individual cleaning, working in small sections and using a good quality spray cleaner on your cloth can speed up the process. Ensuring they are dry and buffed immediately is key to a good finish.
Q5: How do I clean the metal parts of the chandelier?
A: Use a soft cloth slightly dampened with water or a mild cleaner suitable for the metal. Immediately follow with a dry cloth to prevent water spots or corrosion. For specific metals like brass or silver, use a dedicated metal polish, but always test it first.
Q6: Can I clean my chandelier without a ladder?
A: For most standard ceiling heights, a sturdy step stool or a small ladder is usually necessary to reach the chandelier safely and effectively. If you cannot safely reach it, it’s best to hire a professional.
Q7: What’s the best way to avoid streaks?
A: The key to streak-free cleaning is to use a good quality cleaner, spray it onto your cloth (not the chandelier), clean one crystal or section at a time, and immediately buff it dry with a separate, clean, lint-free cloth.
Conclusion
You’ve now got all the knowledge you need to tackle that crystal chandelier cleaning project with confidence! Remember, the process is all about careful preparation, gentle handling, and taking your time. By following these steps, using the right tools, and prioritizing safety, you can restore your chandelier’s dazzling sparkle without the stress. Seeing that brilliant light dance off the crystals once again will be incredibly rewarding. So, gather your supplies, put on some music, and get ready to make your chandelier the showstopper it was meant to be. Happy cleaning!