
How to Cut Tile on Wall: Master the Art of Precision
To cut tile on a wall, measure and mark the desired cut, score the tile using a tile cutter, snap the tile along the scored line, and smooth any edges with a tile file or sandpaper.
Choosing The Right Tools
If you’re planning to cut tiles on a wall, it’s essential to choose the right tools for the job. Having the appropriate tools not only ensures precision but also guarantees your safety during the cutting process. In this section, we will discuss the essential measuring and marking tools, cutting tools, and safety equipment you’ll need to successfully cut tiles on a wall.
Measuring And Marking Tools
Before beginning your tile-cutting project, accurate measurements are crucial to ensure the tiles fit perfectly on the wall. Here are the essential measuring and marking tools you should have:
- Tape Measure: A tape measure is a versatile tool that allows you to take precise measurements of the wall and the tiles. Make sure to use a tape measure with clear markings to avoid any errors.
- Square: A square is necessary for marking straight lines on the tiles. It helps ensure that the tiles are cut at a perfect 90-degree angle, resulting in a professional finish.
- Pencil or Marker: You’ll need a pencil or marker to mark your measurements on the tiles accurately. Opt for a non-permanent marker to easily remove the marks once the cutting is complete.
Cutting Tools
Once you have your measurements in place, it’s time to gather the cutting tools for the tile cutting process. These tools are essential for achieving clean and precise cuts:
- Tile Cutter: A tile cutter is a handy tool used to make straight cuts on ceramic and porcelain tiles. It features a scoring wheel that scores the tile surface, allowing you to snap it cleanly along the scored line.
- Wet Saw: A wet saw is a powerful tool that is primarily used for cutting large and thick tiles. This tool uses a diamond blade and water to cool the blade while cutting, ensuring clean and precise cuts.
- Tile Nippers: Tile nippers are plier-like tools perfect for shaping and trimming tiles. They are ideal for making irregular cuts and trimming tile edges to fit corners or angles.
Safety Equipment
Lastly, never compromise on safety when working with tiles. Protect yourself by having the following safety equipment with you:
- Safety Goggles: Safety goggles are an essential tool to protect your eyes from any flying tile debris during the cutting process.
- Mask: Wearing a mask is crucial to prevent inhaling harmful dust particles that may be released while cutting tiles.
- Gloves: Heavy-duty gloves will provide protection and ensure a secure grip while handling the cutting tools and sharp tile edges.
Preparing The Tile And Wall
Before you start cutting tiles on the wall, there are a few essential steps you need to take to ensure a smooth and successful process. Preparing the tile and the wall will not only help achieve accurate cuts but also prevent any damage to the surrounding tiles or the wall surface. In this section, we will cover the three key aspects of preparation: cleaning the wall, measuring and marking the tile, and protecting adjacent tiles.
Cleaning The Wall
The cleanliness of the wall surface is crucial for a secure and long-lasting bond between the tile and the wall. Before you begin cutting the tile, thoroughly clean the wall using a mild detergent and water solution. Ensure that any dirt, grime, or grease is completely removed. Once the wall is clean, rinse it with water and let it dry completely.
Measuring And Marking The Tile
Accurate measurements and markings are vital to ensure precise cutting of the tile. Use a tape measure to measure the area where the tile needs to be cut. Take note of any obstacles, such as electrical outlets or fixtures, and make appropriate allowances in your measurements. Mark the measurements directly on the tile’s surface using a pencil or a tile marker. Double-check your measurements before proceeding to the cutting phase to avoid any unnecessary mistakes.
Protecting Adjacent Tiles
When cutting tiles on a wall, it is essential to protect the surrounding tiles from any potential damage. One effective way to achieve this is by using adhesive tape. Carefully place adhesive tape along the edges of the adjacent tiles that are in close proximity to the tile you are about to cut. This will act as a protective barrier, preventing accidental scratches or chipping of the neighboring tiles during the cutting process.
Cutting Techniques
When it comes to tiling a wall, achieving precise cuts is essential for a professional and polished finish. Whether you need a straight cut, a curved cut, or a diagonal cut, having the right cutting techniques can make the job much easier and more efficient. In this section, we will explore three cutting techniques that you can use to cut tiles on the wall: straight cuts, curved cuts, and diagonal cuts.
Straight Cuts
Straight cuts are the most common type of tile cut you will encounter when tiling a wall. These cuts are used to trim edges, fit tiles around switches or outlets, or create straight lines in your tile pattern. To make a straight cut, you have several options, including using a tile cutter, a wet saw, or a handheld tile scorer and snap cutter.
- Tile cutter: A tile cutter is a handheld tool that can quickly and easily cut ceramic and porcelain tiles. It works by scoring the tile surface and then snapping it along the scored line. To make a straight cut with a tile cutter, simply measure and mark the desired cutting line on the tile, align the scoring wheel on the cutter with the mark, and then apply pressure to score the tile. Once scored, use the lever on the cutter to snap the tile along the scored line.
- Wet saw: A wet saw is a power tool that uses a diamond-coated blade to cut through tiles. It is especially useful for cutting thicker or harder tiles, such as natural stone or mosaic tiles. To make a straight cut with a wet saw, measure and mark the tile, ensuring the blade is aligned with the mark, and then slowly feed the tile into the saw, applying light pressure to guide the cut.
- Handheld tile scorer and snap cutter: This is a budget-friendly option for making straight cuts on ceramic tiles. It consists of a scoring wheel and a snapping mechanism. To make a straight cut using this tool, score the surface of the tile along the desired cutting line using the scoring wheel. Then, apply gentle pressure to snap the tile along the scored line, using the snapping mechanism.
Curved Cuts
In some instances, you may need to make curved cuts to fit tiles around pipes, corners, or other irregular shapes on the wall. To achieve this, you can use a tile nipper or a tile saw with a diamond-coated blade.
- Tile nipper: A tile nipper is a handheld tool with two opposing carbide jaws that can be used to nibble away small pieces of tile to create curved cuts. Start by making small, incremental bites along the cutting line until the desired curve is achieved.
- Tile saw: A tile saw with a diamond-coated blade is especially useful for making precise curved cuts on thicker or harder tiles. Simply set the saw blade to the desired angle, align the tile, and slowly feed it into the saw, following the curved cutting line.
Diagonal Cuts
Diagonal cuts are necessary when tiling walls with corner edges or when creating specific patterns. To make diagonal cuts, you can use the same tools mentioned for straight cuts, such as a tile cutter, a wet saw, or a handheld tile scorer and snap cutter. The process is similar to making straight cuts, but the cutting line will be at a diagonal angle.
By mastering these cutting techniques, you will have the skills needed to navigate various cutting scenarios when tiling a wall. Remember to always measure and mark accurately before making any cuts and wear appropriate safety gear to protect yourself from any potential hazards.
Cutting Tips And Tricks
Learn valuable cutting tips and tricks for tile on walls to achieve a flawless result. Discover efficient techniques to ensure precise cuts and seamless installation for your upcoming tile project.
Cutting tiles can be a challenging task, particularly when working on a wall. However, with the right techniques and tools, you can achieve precise and clean cuts effortlessly. In this section, we will explore some essential cutting tips and tricks to help you effectively cut tiles on the wall.
Using A Wet Saw
One of the most commonly used tools for cutting tiles is a wet saw. This powerful and efficient tool uses a diamond blade combined with a water reservoir to create smooth and accurate cuts. Here are some tips for using a wet saw:
- Start by setting up the wet saw in a well-ventilated area or outside to minimize exposure to dust and debris.
- Measure and mark the tile where you need to make the cut. Use a pencil or tile marker for accurate markings.
- Fill the water reservoir of the wet saw according to the manufacturer’s instructions. This ensures the diamond blade remains cool and lubricated during the cutting process.
- Position the tile on the saw table, aligning the marked line with the blade. Hold the tile firmly against the fence or guide to maintain stability.
- Switch on the wet saw and slowly push the tile towards the blade. Allow the blade to do the cutting without applying excessive force.
- Continue cutting until you have completed the desired section. Remember to wear protective eyewear and gloves for safety.
Using A Tile Cutter
If you prefer a manual cutting tool, a tile cutter can be an excellent alternative. Here’s how to make the most of a tile cutter:
- Place the tile on the tile cutter, ensuring the marked line aligns with the scoring wheel.
- Adjust the guide or fence to the desired cutting width, depending on your requirements.
- Apply gentle pressure to the tile and run the scoring wheel along the marked line. This scores the surface of the tile.
- Next, position the tile cutter’s jaws along the scored line, aligning them with the score mark.
- Apply even pressure on the handle to snap the tile along the scored line.
- Smooth any rough edges using a tile file or sandpaper.
Making Small Adjustments
Sometimes, you may encounter scenarios where you need to make minor adjustments to a tile while it’s already on the wall. Here are a few tricks to help you with these small modifications:
- Tile Nippers: Use tile nippers to trim small sections or create curves along the edges of the tile. Gradually nibble away the excess tile until you achieve the desired shape.
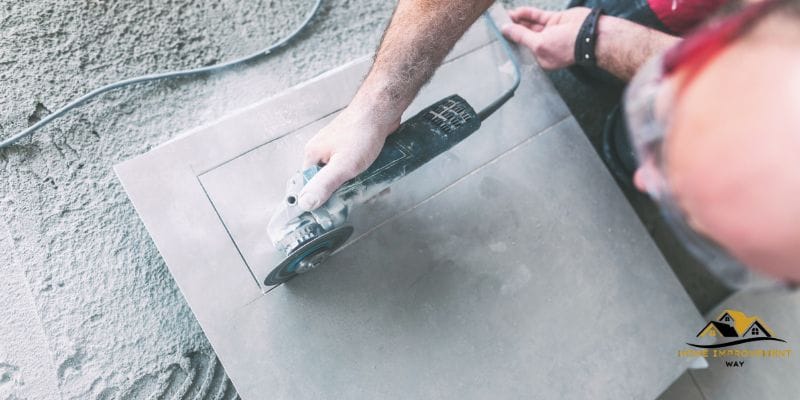
- Tile Grinder: In cases where more precise adjustments are required, a tile grinder can be used. This tool allows you to carefully trim or smooth the edges of the tile to fit specific areas.
- Small Diamond Blade: If you have a small handheld grinder, you can attach a diamond blade to make small and controlled cuts on tiles. This is especially useful for intricate cuts or making notches.
By following these cutting tips and tricks, you’ll be able to tackle any tile-cutting project with ease and confidence. Remember to prioritize safety and use appropriate protective gear when handling cutting tools.

Installing The Cut Tile
Once you have successfully cut your tile to the desired size, it’s time to install it on the wall. This process involves applying adhesive, placing the cut tile, and then grouting and finishing.
Applying Adhesive
To ensure a secure and long-lasting installation, it’s important to apply adhesive properly. Follow these steps:
- Clean the wall surface using a damp cloth to remove any dust or debris.
- Prepare the adhesive according to the manufacturer’s instructions, making sure to wear gloves for protection.
- Using a notched trowel, spread a thin layer of adhesive on the wall, focusing on a small area at a time.
- Hold the trowel at a 45-degree angle and create grooves in the adhesive. This will help the tile adhere better.
- Repeat the above steps until the entire area where the cut tile will be placed is covered with adhesive.
Placing The Cut Tile
Now that the adhesive is applied, it’s time to place the cut tile on the wall. Follow these steps:
- Starting from the bottom, position the cut tile onto the adhesive, aligning it with the surrounding tiles.
- Press the tile firmly into place, ensuring it is level and properly aligned.
- Use a rubber mallet or a wooden block wrapped in a cloth to gently tap the tile, ensuring it is securely set in the adhesive.
- Continue placing the remaining cut tiles in the same manner, maintaining consistent spacing between each tile.
Grouting And Finishing
Now that the cut tiles are installed, it’s time to complete the project by grouting and finishing. Follow these steps:
- Mix the grout according to the manufacturer’s instructions, making sure to wear gloves for protection.
- Using a grout float, spread the grout evenly between the tiles, making sure to fill all the gaps.
- Hold the float at a 45-degree angle and press the grout into the gaps, removing any excess grout from the tile surface.
- Allow the grout to set for the specified time, typically around 10-15 minutes.
- Using a damp sponge, gently wipe away any excess grout from the tile surface.
- Once the grout is completely dry, use a clean cloth to polish the tiles and remove any remaining grout haze.
Congratulations! You have successfully installed the cut tile on your wall. Now you can enjoy the beautiful and professional-looking results of your hard work.
Conclusion
Cutting tile on a wall can seem daunting at first, but with the right tools and techniques, it’s a manageable DIY task. By measuring carefully, using the correct saw, and taking safety precautions, you can achieve professional-looking results. Remember to always practice patience and take your time when working with tile to ensure accuracy.
With these tips in mind, you’ll be able to tackle any tile-cutting project with confidence. Happy tiling!