How To Disassemble A Kwikset Deadbolt: Proven Guide
Quick Summary (Top of Article)
To disassemble a Kwikset deadbolt, start by removing the interior thumbturn screws, then carefully pull the thumbturn and interior trim off. Next, locate and remove the set screws holding the exterior cylinder, followed by the through-bolts securing the latch mechanism. Always work slowly and keep parts organized for easy reassembly.
Taking apart a Kwikset deadbolt can seem tricky, especially when you just need to swap out a piece or clean up a sticky lock. Many homeowners worry about losing tiny parts or breaking the mechanism. Don’t fret! With the right approach, this job is straightforward and something you can handle yourself.
We are going to walk through every step, showing you exactly where those hidden screws are. You will gain the confidence to tackle this project without calling a professional. Ready to see the inside of your trusty deadbolt? Let’s grab our tools and get started!
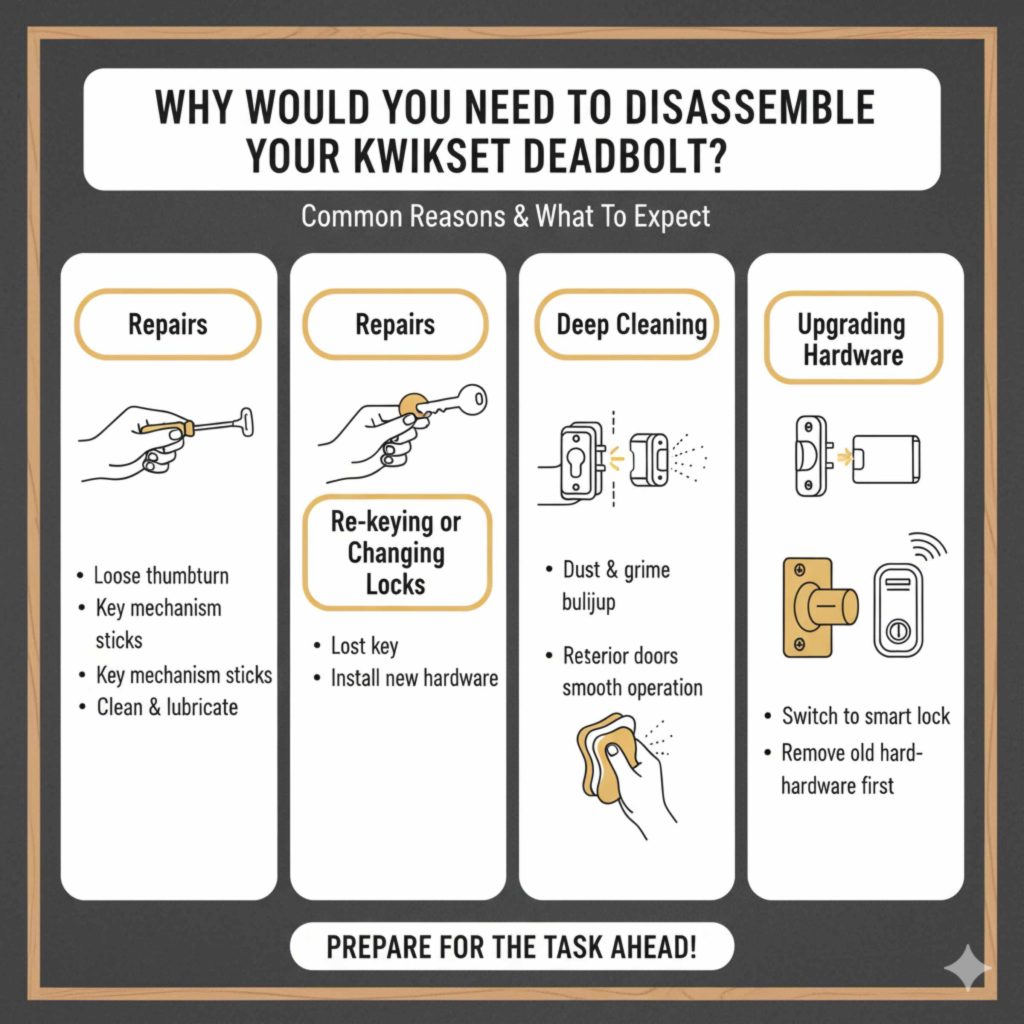
Why Would You Need to Disassemble Your Kwikset Deadbolt?
Knowing why you are taking something apart helps you stay focused. Most homeowners only need to disassemble their Kwikset lock for a few common reasons. Understanding these reasons helps you prepare for the task ahead.
- Repairs: Sometimes the thumbturn gets loose, or the key mechanism sticks. Taking it apart allows you to clean, lubricate, or replace a specific worn component.
- Re-keying or Changing Locks: If you move into a new home or lose a key, you might want to change the internal pins (re-keying) or install a completely new trim set.
- Deep Cleaning: Dust and grime build up over time, especially on exterior doors. A deep cleaning can restore smooth operation.
- Upgrading Hardware: You might want to switch from a traditional keyed deadbolt to a smart lock, which requires removing the old hardware first.
Essential Tools for the Job
You don’t need a full workshop for this. Kwikset designs its locks to be homeowner-friendly. Having the right, simple tools on hand makes the process smooth and prevents frustration. Always check your specific Kwikset model, as older or specialized locks might have slight variations.
Here is a list of the basic tools you should gather before you begin:
- Screwdriver Set: Usually, you will need a Phillips head screwdriver. Some models might use a flathead or even Torx bits (star-shaped). A small set is perfect.
- Allen Wrench Set (Hex Keys): This is crucial for Kwikset locks. Often, a small 1/8-inch or 3/32-inch Allen wrench is needed to remove the set screws holding the exterior cylinder in place.
- Small Container or Magnetic Tray: Kwikset screws are tiny! Use this to keep all screws, pins, and springs organized. Losing one small piece means the whole lock stops working.
- Pliers (Needle-Nose): Helpful for gently pulling out small components or springs if they stick.
- Towel or Drop Cloth: To protect your door finish and provide a clean workspace.
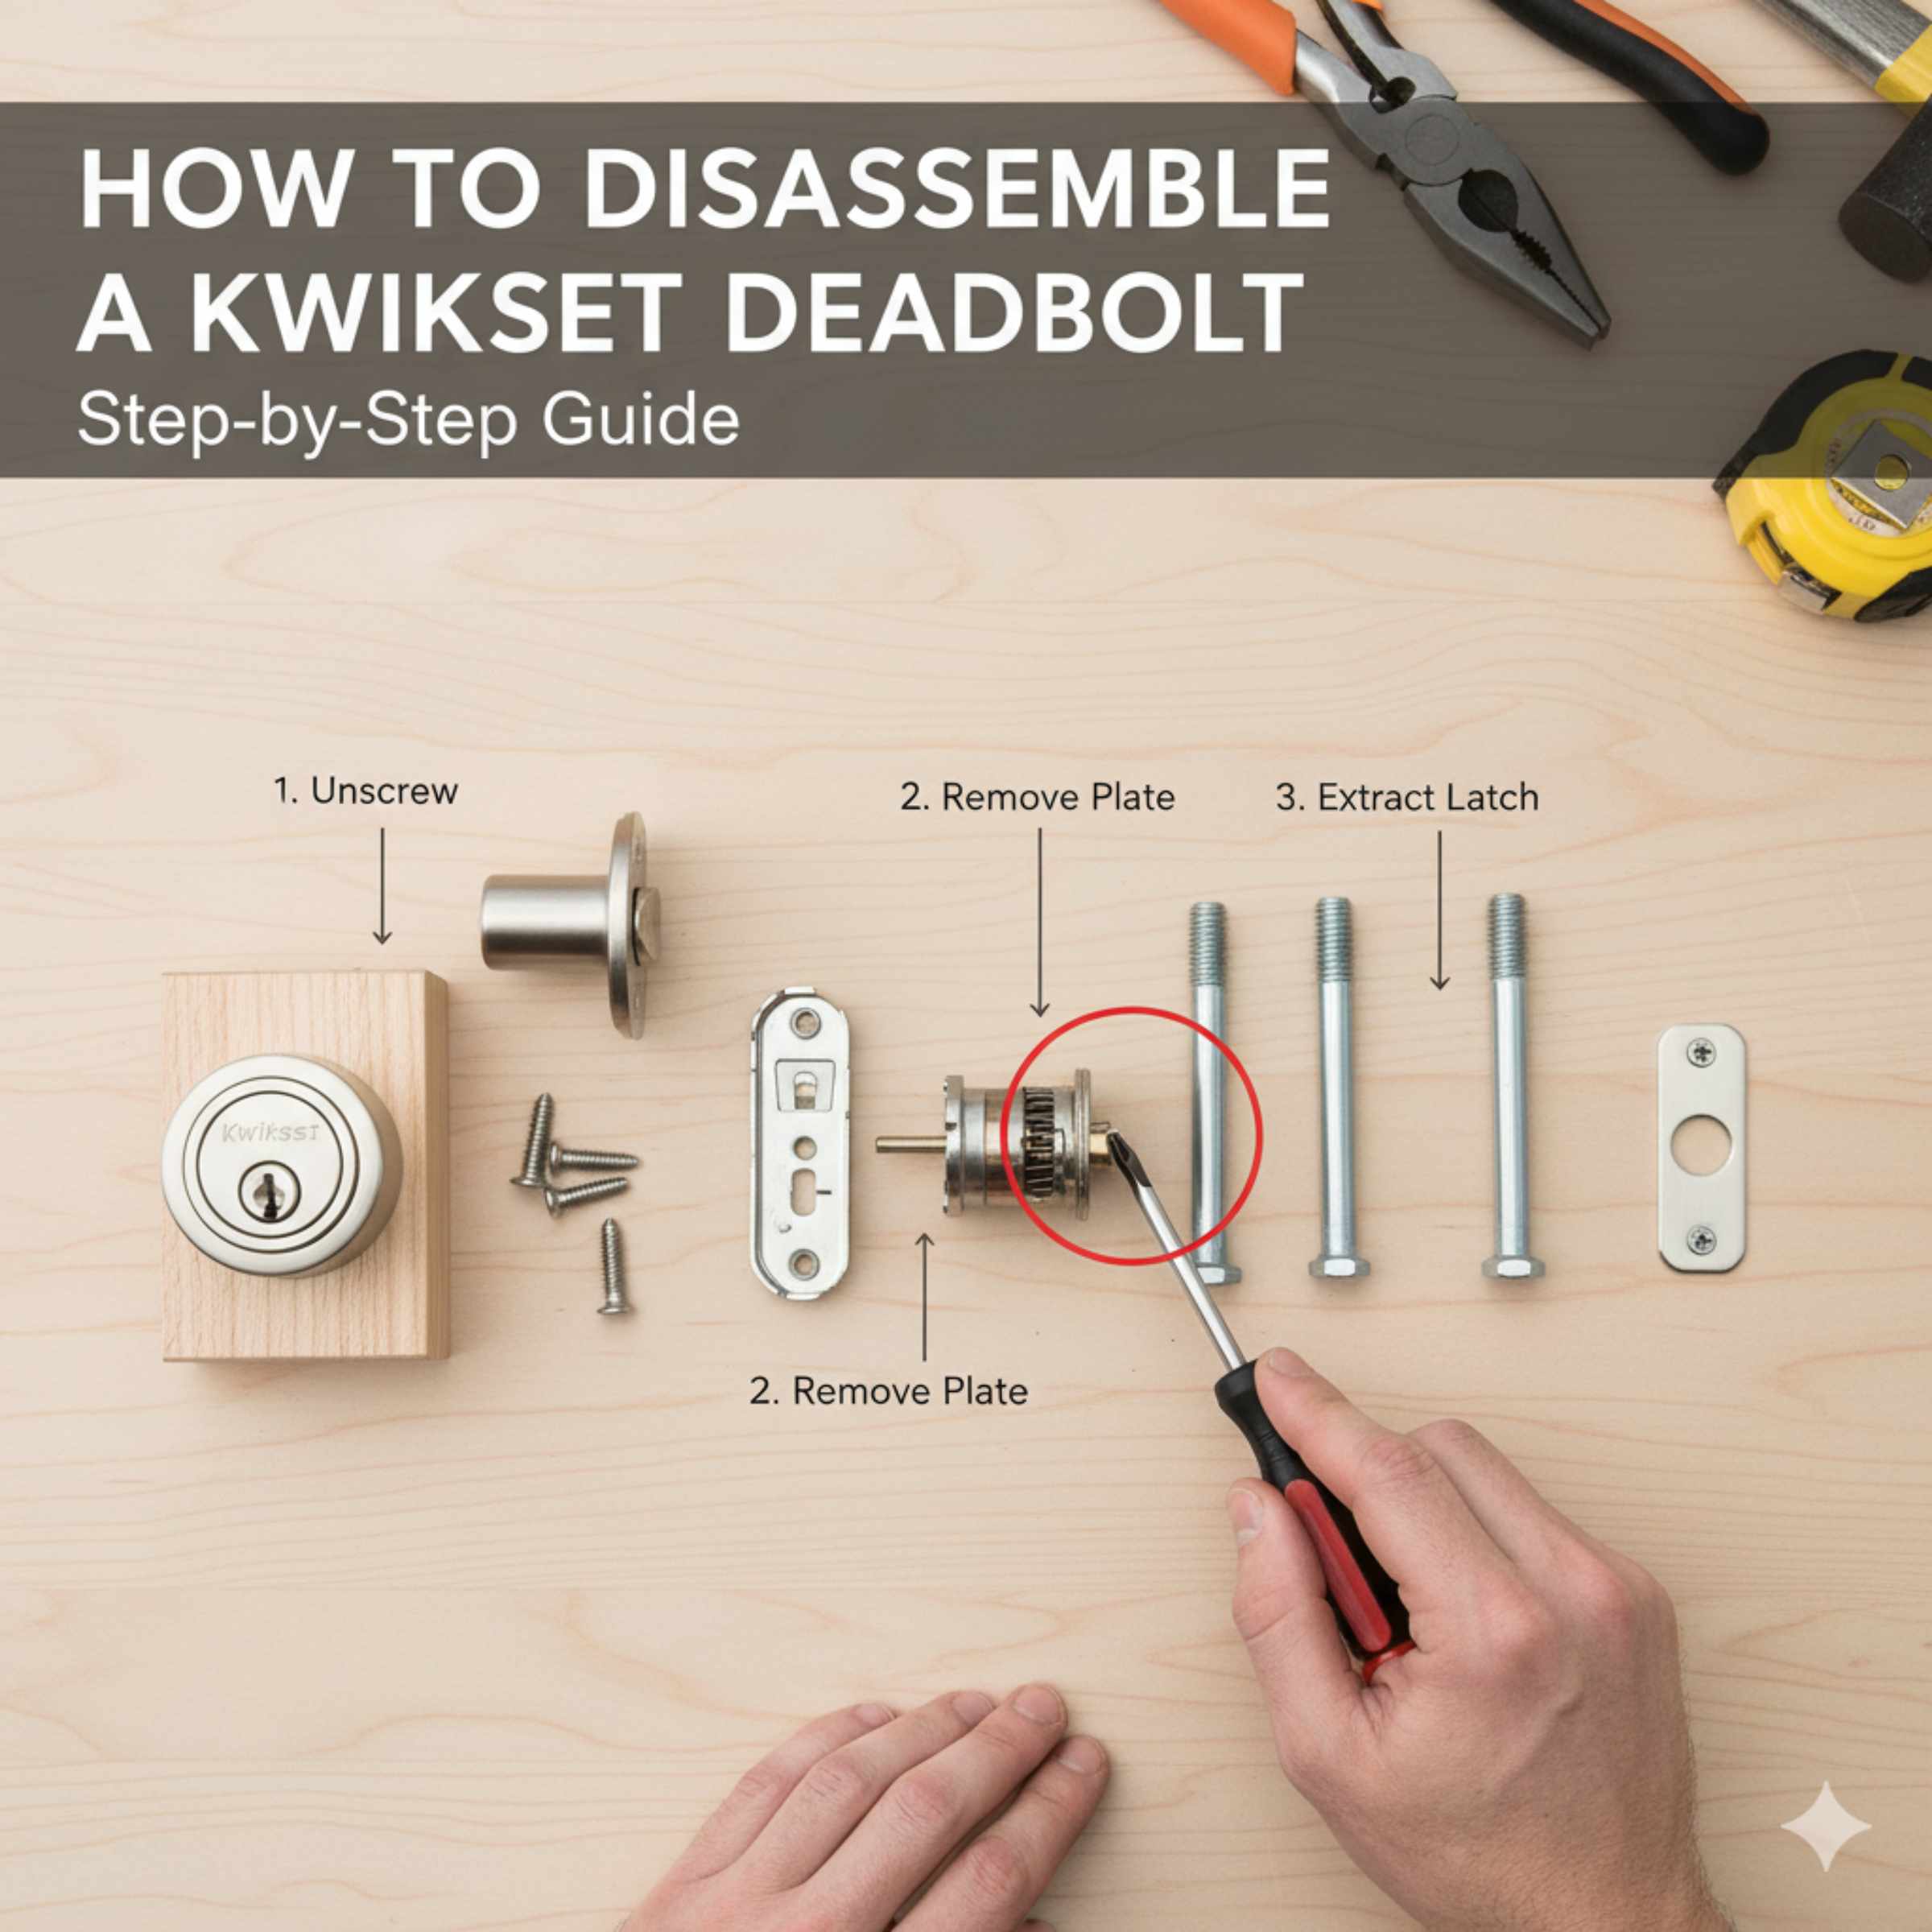
Step-by-Step Guide: How to Disassemble a Kwikset Deadbolt
We will break this down into three main phases: removing the interior assembly, removing the exterior cylinder, and finally, removing the latch mechanism. Remember, patience is your best tool here!
Phase 1: Removing the Interior Thumbturn Assembly
The inside part of the lock is usually the easiest to access because it doesn’t have weather exposure. This is where you’ll find the main mounting screws.
Step 1: Locate and Remove the Interior Screws
Look at the inside rose (the round or square plate) of the deadbolt. You will see two visible screws holding the thumbturn mechanism onto the mounting plate.
- Use your Phillips head screwdriver to carefully loosen and remove these screws.
- Place the screws immediately into your designated container.
- Pro Tip: If you cannot see any screws, your Kwikset model might be a “concealed screw” type. In this case, look for small slots or openings on the side of the interior plate. You may need to gently pry the decorative cover off first to expose the mounting screws underneath.
Step 2: Remove the Interior Trim and Thumbturn
Once the screws are out, the entire interior assembly—the thumbturn piece and the backplate—should lift straight off the door. If it resists, wiggle it gently.
- Note how the thumbturn connects to the spindle (the shaft that turns the bolt).
- Set the interior assembly aside. You should now see the main body of the lock sticking through the door, held in place by the exterior hardware.
Phase 2: Disassembling the Exterior Cylinder
This phase deals with the part that takes the key. This is often the trickiest part because it involves set screws.
Step 3: Identify the Set Screw Location
Examine the exterior side of the deadbolt. Look closely at the edge of the cylinder housing—the piece where you insert the key. Kwikset often uses a small set screw to lock the cylinder in place so it doesn’t spin freely.
- This set screw is usually very small and often requires an Allen wrench (hex key).
- If you don’t see a screw head, check for a small hole on the side. Insert your Allen wrench and turn it counter-clockwise until you feel it loosen. You usually don’t need to remove the screw completely, just loosen it enough so the cylinder can slide out.
Step 4: Remove the Exterior Cylinder
With the set screw loosened, you should be able to gently pull the exterior key cylinder straight out from the door. If it’s stuck, a light tap on the back of the cylinder might help free it.
- Keep track of any small spacers or washers that might fall out with the cylinder.
Phase 3: Removing the Through-Bolts and Latch Mechanism
The final pieces holding the lock to the door are the long bolts that pass all the way through the door thickness, securing both the interior and exterior plates together.
Step 5: Locate and Remove the Through-Bolts
Look back at the interior side of the door. You will see two long screws (through-bolts) that run from the interior mounting plate into the exterior housing. These are the main structural fasteners.
- Use your Phillips head screwdriver to fully unscrew these bolts. Since they are long, this might take several turns.
- These bolts often hold the entire assembly tight against the door. Once they are removed, the remaining parts should separate easily.
Step 6: Separate the Components
Carefully separate the remaining parts. You should now have:
- The exterior key housing (if you removed the cylinder in Step 4).
- The interior mounting plate.
- The latch mechanism (the part that slides into the door frame).
If you are only replacing the latch (the part inside the door edge), you will need to remove the two small screws holding the faceplate of the latch to the door edge, then slide the bolt mechanism out. For more information on standard door hardware installation and latch depth, consult resources from organizations like the International Association of Certified Home Inspectors (NACHI) for general best practices.
Understanding the Parts of Your Kwikset Deadbolt
To reassemble correctly, it helps to know what each piece does. Kwikset deadbolts are surprisingly simple machines when broken down. Here is a quick breakdown of the major components you just removed.
| Component Name | Primary Function |
|---|---|
| Key Cylinder | Holds the internal pin tumblers that align when the correct key is inserted. |
| Thumbturn/Interior Trim | The knob you turn inside the house to lock or unlock the door. |
| Through-Bolts | The long screws that physically clamp the interior and exterior hardware onto the door. |
| Latch Mechanism (Bolt) | The physical bolt that extends into the door jamb to secure the door. |
| Spindle/Actuator | The shaft that transfers the rotation from the thumbturn or key to the latch mechanism. |
Troubleshooting Common Disassembly Issues
Sometimes, things don’t come apart as smoothly as planned. If you run into a snag, don’t force it! A little targeted effort usually solves the problem.
The Interior Trim Won’t Budge
If the interior plate won’t come off after removing the main screws, it is likely catching on the door edge or the spindle is stuck.
- Check the Spindle: Make sure the thumbturn spindle (the metal rod) is fully disengaged from the interior mechanism. Sometimes it catches. Wiggle it gently.
- Look for Hidden Clips: On some models, the decorative exterior cover snaps onto the main mounting plate. Gently slide a thin putty knife around the edge to release the clips, revealing the hidden screws underneath.
The Exterior Cylinder is Stuck
If the cylinder won’t pull out after loosening the set screw, it is usually due to corrosion or paint buildup around the edge.
- Apply a small amount of graphite lubricant (never oil-based lubricant on a lock cylinder) around the seam where the cylinder meets the housing.
- Try turning the key slightly while pulling. Sometimes, turning the key just a hair aligns the shear line, allowing the cylinder to slide out freely.
The Latch Bolt Won’t Come Out
If you are replacing just the latch installed in the door edge, it is held by two screws on the side of the door.
- Ensure both screws are completely removed.
- If it still won’t slide out, check the “backset”—the distance from the door edge to the center of the hole. If the new latch has a different backset, the old one might be slightly wedged. Push the bolt fully retracted and then pull firmly.
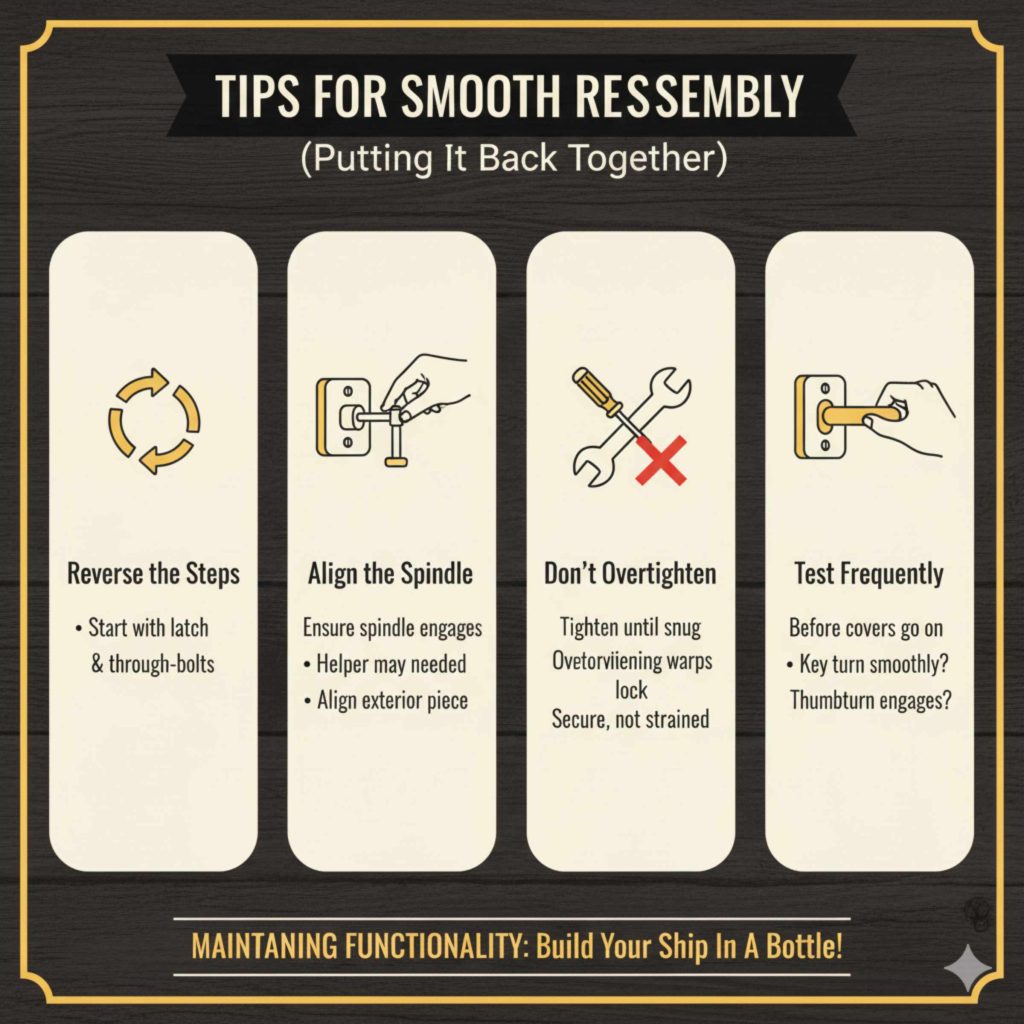
Tips for Smooth Reassembly (Putting It Back Together)
Disassembly is only half the battle. Reassembly needs even more care, as you are putting things back in the exact order they came out. Think of it like building a ship in a bottle!
- Reverse the Steps: Reassembly is simply the reverse of disassembly. Start with the latch mechanism (if you removed it) and the through-bolts.
- Align the Spindle: When placing the interior thumbturn back on, ensure the spindle correctly engages the mechanism. You might need a helper to hold the exterior cylinder in place while you align the interior piece.
- Don’t Overtighten: Tighten the through-bolts until the interior and exterior plates are snug against the door, but stop there. Overtightening can warp the lock mechanism, making it stiff or causing it to fail prematurely. You want it tight enough to be secure, but not strained.
- Test Frequently: After installing the interior trim (Phase 1), test the lock functionality before putting the decorative covers back on. Does the key turn smoothly? Does the thumbturn engage the bolt? Fixing issues now is much easier than later.
For reference on proper door preparation and alignment, resources on door hardware installation often stress the importance of precise measurements, which directly impact how smoothly your reassembled lock operates. Check out guides from reputable hardware manufacturers for detailed schematics if you get stuck on a specific component alignment.
Frequently Asked Questions (FAQ) About Kwikset Disassembly
Q1: Do I need to remove the door handle (knob) to take apart the deadbolt?
A: Generally, no. Kwikset deadbolts and handle sets are usually separate mechanisms. You only need to remove the deadbolt components unless the handle set is interfering with the deadbolt’s interior plate.
Q2: What is the best way to keep track of all the tiny Kwikset screws?
A: Use a magnetic tray or an ice cube tray. Label each section of the tray with the step number (e.g., “Step 1 Screws,” “Step 3 Set Screw”) so you know exactly where each fastener belongs during reassembly.
Q3: Can I use WD-40 to lubricate my deadbolt while it’s disassembled?
A: No. WD-40 is a water dispersant, not a long-term lubricant for locks. Use a dry lubricant like powdered graphite or a silicone-based spray designed specifically for locks to prevent dust attraction and gumming up the pins.
Q4: My Kwikset uses an Allen wrench, but I don’t have the right size. Can I use a paperclip?
A: Absolutely not. Using the wrong tool will strip the soft metal of the set screw, making it nearly impossible to remove later. Invest in a small, inexpensive Allen wrench set; it’s worth the few dollars.
Q5: What if I cannot find the set screw on the exterior cylinder?
A: Check the small gap between the interior and exterior trim pieces. Sometimes the set screw is located there, accessible only when the interior plate is partially removed. If it’s still missing, you might have a model that uses a simple friction fit, requiring a firm pull after the through-bolts are removed.
Q6: How tight should I make the through-bolts when putting it back together?
A: Tighten them until the interior and exterior parts sit flush against the door surface without any gap. Then, stop turning. Overtightening can cause binding, especially on hollow-core or thinner doors.
Conclusion
See? You successfully navigated the disassembly of your Kwikset deadbolt! By taking the time to organize your small parts and following these clear, phased steps—removing the interior trim, addressing the exterior cylinder, and finally separating the latch assembly—you have gained valuable insight into your home’s security hardware.
Remember the key takeaways: use the right tools (especially the Allen wrench), keep those screws safe, and never force a stuck component. Whether you were fixing a minor sticking issue or preparing for an upgrade, you now have the confidence and knowledge to handle this common home improvement task. Take a moment to admire your work, test the lock a few times to ensure smooth operation, and congratulate yourself on a job well done!