How to Easily Repair a Hole in a Porcelain Sink
To fix a hole in a porcelain sink, you can use an epoxy or porcelain repair kit. Simply clean the area, apply the filler, let it dry, and sand it smooth.
A porcelain sink can be a beautiful addition to any bathroom or kitchen. However, accidents happen, and holes can sometimes appear in these delicate surfaces. Whether it’s caused by a dropped object or a small crack that has developed over time, a hole in a porcelain sink can be an eyesore and potentially lead to further damage if left untreated.
Fortunately, there are simple and effective ways to fix this issue. We will explore the steps involved in repairing a hole in a porcelain sink, using readily available tools and materials. By following these instructions, you can restore the sink’s pristine appearance and extend its lifespan, saving you the cost and hassle of replacing the entire fixture.
Assessing The Damage
Before you jump into fixing a hole in your porcelain sink, it’s essential to assess the damage properly. By taking the time to identify the type of hole and examining the extent of the damage, you can determine the best course of action. This will help you fix the hole effectively and restore your sink to its former glory. Let’s dive into the details of how to assess the damage step by step.
Identifying The Type Of Hole
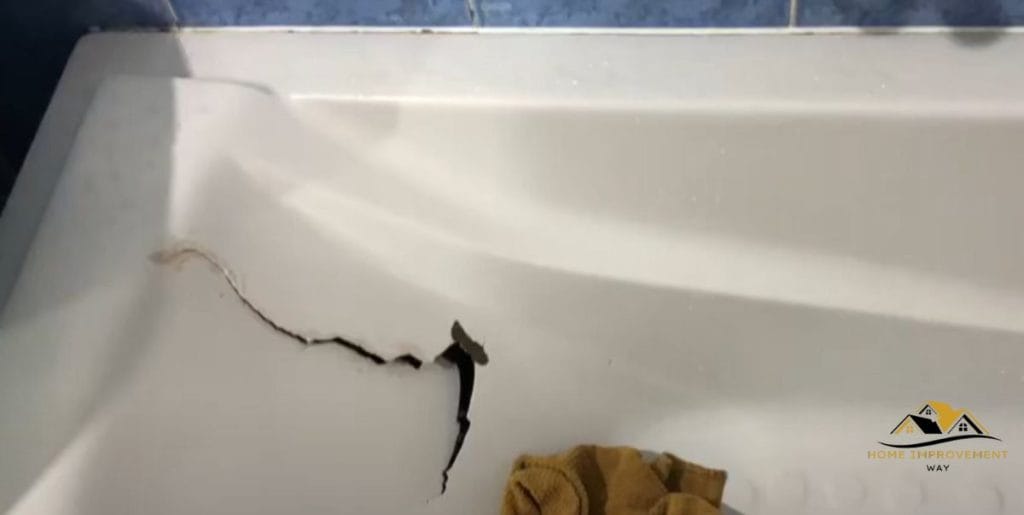
Firstly, you need to identify the type of hole in your porcelain sink. There are several common types, including chips, cracks, and punctures. Identifying which type of hole you’re dealing with will provide valuable insights into the appropriate repair method.
To identify a chip in your porcelain sink, look for small pieces of porcelain that might have been chipped off, exposing the underlying material. Cracks, on the other hand, are typically thin lines that extend across the surface of the sink. Punctures are small holes caused by sharp objects, such as dropped utensils or heavy impacts. By closely examining the hole, you can determine its specific characteristics.
Examining The Extent Of The Damage
Once you have identified the type of hole, it’s time to examine the extent of the damage. This step will provide you with an understanding of how severe the hole is and how deep it goes into the porcelain material.
Using your fingers or a small tool, gently run it along the edges of the hole to determine if it is merely superficial or if it extends deeper into the sink. Pay attention to any sharp edges that might pose a risk of injury or further damage.
Additionally, observe if the hole affects the functionality of the sink, such as water leakage. This will help you prioritize the repair process and decide whether you need to seek professional assistance or if you can handle the fix on your own.
Your goal in examining the extent of the damage is to gather as much information as possible to ensure you choose the most suitable repair method. Assessing both the type of hole and the depth of the damage will guide you toward a successful repair solution.
Gathering The Necessary Tools And Materials
Before you start fixing a hole in your porcelain sink, it’s important to gather all the essential tools and materials you’ll need for the repair. Having everything ready will save you time and ensure a smooth and successful repair process. Here is a breakdown of the tools and materials you should have:
List Of Required Tools:
- Protective gloves
- Safety goggles
- Respirator mask
- Putty knife
- Sandpaper (fine grit)
- Epoxy adhesive
- Acetone or rubbing alcohol
- Small paintbrush
- Plastic wrap
- Masking tape
- Disposable container for mixing
- Lint-free cloth
Materials Needed For The Repair:
- Porcelain repair kit
- Porcelain filler compound
- Porcelain touch-up paint (matching the sink color)
- Isopropyl alcohol (for cleaning)
- Clean water
Preparing The Sink For Repair
To repair a hole in a porcelain sink, follow these steps: clean and dry the area, apply epoxy filler, sand the surface, and then paint over the repair with a porcelain touch-up kit. Easily fix the hole and restore the sink to its original condition.
Cleaning The Sink Surface
Before starting the repair process, it is crucial to clean the surface of the porcelain sink thoroughly. Proper cleaning ensures better adhesion and a successful repair. To clean the sink surface:
- Prepare a mixture of warm water and mild dish soap.
- Dampen a soft sponge or cloth in the soapy water solution.
- Gently scrub the surface of the sink, paying extra attention to the area around the hole.
- Rinse the sink with clean water and wipe it dry using a lint-free cloth or paper towel.
By following these simple steps, you can remove any dirt, grease, or other residues that may hinder the repair process.
Removing Any Loose Material
Before attempting to fix the hole in your porcelain sink, it’s important to remove any loose or flaking material around the damaged area. This will provide a clean and stable surface for the repair. Here’s how you can do it:
- Use a sharp utility knife or a scraper tool to carefully scrape away any loose or peeling material around the hole.
- Be cautious not to apply too much pressure or cause further damage to the sink.
- Ensure you remove any loose particles and create a smooth edge around the hole.
- After removing the loose material, use a clean, damp cloth to wipe away any debris.
By properly preparing the sink and removing any loose material, you can ensure a strong and durable repair.
Repairing The Hole
When it comes to repairing a hole in a porcelain sink, you may be surprised to find that it is a fairly simple process. By using a porcelain repair kit and following a few steps, you can fix the hole and restore your sink to its former glory. In this article, we will guide you through the process of repairing the hole in your porcelain sink, from using a porcelain repair kit to applying the filler, and finally, smoothing and blending the repair for a seamless finish.
Using A Porcelain Repair Kit
If you want to repair a hole in your porcelain sink, a porcelain repair kit is essential. These kits contain all the necessary materials and tools you’ll need to complete the repair. Here’s a step-by-step guide on using a porcelain repair kit to fix the hole:
- Start by cleaning the surface around the hole with a mild detergent and warm water. Make sure to remove any dirt, debris, or old caulk from the area.
- Once the surface is clean, dry it thoroughly using a clean cloth.
- Next, prepare the porcelain repair compound according to the instructions on the kit. This usually involves mixing two or more parts together.
- Apply the prepared compound to the hole in the sink using a small spatula or putty knife. Make sure to fill the hole completely and evenly.
- Use the spatula or putty knife to smooth the surface of the repair compound. This will help create a seamless finish.
Applying The Filler
After using the porcelain repair kit, the next step is applying the filler. The filler will help reinforce the repair and ensure a long-lasting fix. Follow these steps to apply the filler:
- Start by preparing the filler according to the instructions on the kit. This may involve mixing different components together.
- Apply the filler to the repaired area using a spatula or putty knife. Make sure to spread it evenly and fill any gaps or imperfections in the repair.
- Allow the filler to dry completely, as specified in the kit instructions. This will ensure a strong and solid repair.
Smoothing And Blending The Repair
Once the repair compound and filler have dried, the final step is smoothing and blending the repair for a seamless finish. Follow these steps to achieve a polished look:
- Start by using fine-grit sandpaper to gently sand the repaired area. This will help to smooth out any rough edges.
- Continue sanding until the repaired area is flush with the surrounding porcelain surface.
- Wipe away any dust or debris from the sanded area using a clean cloth.
- Finally, apply a porcelain glaze or paint that matches the color of your sink to the repaired area. This will further blend the repair and ensure it seamlessly blends with the rest of the sink.
By following these steps, you can easily repair a hole in your porcelain sink and restore its original beauty. With the help of a porcelain repair kit and a little bit of patience, your sink will look as good as new without any signs of previous damage. Remember to always read and follow the instructions provided with your porcelain repair kit for the best results.
Finishing Touches And Aftercare
Once you have patched up the hole in your porcelain sink, it’s time to focus on the finishing touches and aftercare to ensure a long-lasting repair. These final steps will help to create a seamless finish and protect your sink from further damage.
Sanding The Repair
After the patching compound has fully dried, you will need to sand down the repair to create a smooth and even surface. Start by using fine-grit sandpaper and gently sand the repaired area in small circular motions. Be sure to feather the edges of the repair to blend it seamlessly into the surrounding porcelain.
Applying A Protective Sealant
Once the repair has been done, it’s important to apply a protective sealant to prevent any future water damage. Look for a waterproof sealant specifically designed for porcelain surfaces. Apply a thin and even layer of the sealant over the repaired area, using a small brush or applicator. Let the sealant dry completely before moving on to the next step.
Curing Time And Proper Care
Allow the sealant to cure according to the manufacturer’s instructions. This usually takes several hours or overnight. During this time, avoid using the sink or placing any heavy objects on the repaired area. It is important to give the sealant enough time to fully harden and ensure the repair is fully protected.
Once the sealant has cured, it’s important to practice proper care to maintain the longevity of the repair. Here are a few tips to follow:
- Avoid placing sharp or heavy objects directly on the repaired area.
- Use a non-abrasive cleaner and a soft sponge or cloth to clean the sink.
- Regularly inspect the repaired area for any signs of damage or wear and reapply sealant as needed.
- In case of any chips or cracks, address them promptly to prevent further damage.
With these finishing touches and aftercare steps, you can ensure that your porcelain sink remains in pristine condition for years to come. Follow these guidelines to maintain the repair and prevent any future holes or damage to your sink.
Conclusion
Fixing a hole in a porcelain sink doesn’t have to be a daunting task. With the right tools and techniques, you can restore your sink to its former glory. Remember to clean the area, fill the hole with epoxy, and smooth out any imperfections.
By following these steps, you can save money and avoid the need for a costly replacement. A little DIY can go a long way in maintaining the beauty of your porcelain sink.