How To Fix A Scratch In Laminate Wood Floors Without Replacing
You can fix many common scratches in laminate wood floors using simple DIY methods. These involve cleaning the area and then filling or disguising the scratch with repair kits, markers, or waxes. For deeper damage, professional help might be needed, but most surface scratches are fixable at home.
Understanding Laminate Floor Scratches
Laminate flooring is tough. But it’s not indestructible. It’s made of layers.
The top layer is a clear, hard coat. This is called the wear layer. It protects the printed design below.
And the core is usually a dense fiberboard. When you get a scratch, it means something cut through that top wear layer. Sometimes it just scuffs the surface.
Other times, it digs in a bit. The depth of the scratch tells you how easy it will be to fix. Deeper scratches are trickier.
They go down into the design layer. Or even the core. Shallow scratches are much easier to deal with.
They often just need a good clean and a little cover-up. Knowing what kind of scratch you have is the first step. It helps you pick the right fix.
Why do these scratches happen? It’s usually friction. Something rough dragging across the surface.
Like a chair leg without felt pads. Or dragging a heavy box. Even pet nails can do it.
Small pebbles stuck in shoe soles are also common culprits. Dirt and grit act like sandpaper. Over time, they wear down the surface.
The more traffic you have, the more chances for a scratch. Kids playing, pets running, or just everyday life can lead to them. It’s how the floor gets used.
The environment around it matters too. A busy entryway sees more grit. A dining room might see chair scrapes.
How does the damage look? A light scratch might be a white or silvery line. You can often see the texture of the laminate.
A deeper scratch might show the brown or gray color of the core. Or you might see the pattern layer peeking through. It’s important to look closely.
Get down low. Use good light. This helps you see the real extent of the damage.
It’s not just about the length. It’s also about how deep it is. And if it’s just a surface mark or a true gouge.
This detail is key to choosing the best repair.
My Own Laminate Floor Mishap
I remember one time, I was rearranging my living room. Big mistake. I had this heavy bookshelf.
I thought I could slide it. Just a little nudge. Wrong.
It snagged on a tiny bit of grit. And it dragged. It made this long, ugly line across my beautiful laminate floor.
It wasn’t a deep gouge, thank goodness. But it was wide and white. It looked awful.
I felt sick to my stomach. My whole living room looked ruined by this one scratch. I stood there for a minute.
Just staring at it. I was so annoyed with myself. I wanted to just cover it with a rug.
But it was in the middle of the room. It was a constant reminder of my mistake. I knew I had to try and fix it.
I started looking for solutions online. I didn’t want to spend a fortune. Or call someone for something I might be able to do myself.
Quick Scan: Common Scratch Causes
Pet Nails: Can cause light to moderate scratches, especially on corners.
Furniture Movement: Dragging chairs or tables without protection is a big one.
Dropped Items: Keys, tools, or heavy objects can cause deep gouges.
Dirt and Grit: Acts like sandpaper under shoes and furniture.
High Heels: The hard tips can mark the surface.
Cleaning Before You Repair
This step is super important. Before you try to fix any scratch, you must clean the area. Dirt, dust, or old polish can get in the way.
They can make the fix look worse. Or they can stop the repair product from sticking. Use a soft broom or a vacuum cleaner.
Get all the loose debris out of the scratch and around it. Then, use a damp cloth. You can use plain water.
Or a cleaner made for laminate floors. Don’t use too much water. Laminate doesn’t like sitting in puddles.
Wipe the area gently. Make sure to get into the scratch itself. If there’s any sticky residue, try a little bit of rubbing alcohol on a cotton swab.
Just dab it on the spot. Then wipe it clean. Let the area dry completely.
This might take an hour or so. A clean, dry surface is key to a good repair. It’s like painting a wall.
You clean it first. The same rule applies here. A little extra time spent cleaning pays off later.
It makes your fix look much better. It helps the repair material bond well.
Sometimes, the scratch looks worse than it is. It might just be a scuff mark. This is where cleaning really shines.
A good clean might even make it look like it’s gone. Especially if it’s a lighter, surface-level mark. It’s like removing a smudge from a window.
The view becomes clear again. Don’t skip this step. It’s simple, but it makes a big difference.
You’re preparing the surface for the repair. You’re giving it the best chance to work well. Think of it as prepping for a craft project.
You lay down newspaper. You gather your tools. Cleaning the floor is your prep work.
It’s essential for success. So take your time here. Get it right.
Then you can move on to the actual fixing.
DIY Fixes for Light Scratches
For those minor scratches, you have a few easy options. These are great because they don’t require special tools. They are often things you might already have at home.
Or they are inexpensive to buy.
1. The Walnut Trick: This sounds a little funny. But it works for light scratches.
Get a raw walnut. You know, the kind you crack open. Rub the meaty part of the walnut over the scratch.
The oils from the nut can help fill and darken the scratch. It blends the scratch in with the rest of the floor. It’s best for darker wood tones.
You might need to do it a few times. After rubbing, buff it with a soft cloth. This is a quick, natural way to try.
It won’t fix a deep gouge. But for a light scuff, it’s surprising how well it works. It’s a trick many people use.
2. Crayon or Wax Stick: You can buy repair crayons or wax sticks. They come in many wood colors.
Pick one that closely matches your laminate floor. Clean the scratch well. Then, rub the crayon or wax stick into the scratch.
Fill it completely. You want it level with the floor surface. After filling, scrape off any excess wax.
Use a plastic scraper or an old credit card. Be gentle. Then, buff the area with a soft cloth.
This can hide the scratch very effectively. It’s a simple filler. It works best on shallow marks.
Make sure the color is a good match. Too dark or too light will stand out.
3. Shoe Polish: This is another home remedy. Use a cream-based shoe polish.
Again, match the color to your floor. Apply a small amount to the scratch with a cotton swab. Gently rub it in.
Let it sit for a few minutes. Then, buff the area with a soft cloth. This can help darken and fill the scratch.
Be careful not to use too much. You don’t want to stain the surrounding area. It’s a temporary fix.
But it can make a light scratch much less noticeable. Test it in an inconspicuous spot first. Just to be sure about the color.
4. Touch-Up Markers: These are specifically made for wood furniture and floors. They are like felt-tip markers.
You can find them in various wood shades. Clean the scratch well. Then, color directly into the scratch.
Apply light coats. Let each coat dry before adding another. This helps you build up the color.
You want to match the depth of the scratch. It’s good for hiding thin lines. It’s not a filler.
It’s more of a colorant. It makes the scratch less visible. Like coloring in a coloring book.
You fill in the lines to make the picture whole again.
Split Insight: DIY Fixes at a Glance
Method: Walnut Rub
Best For: Light scuffs, darker floors.
What You Need: Raw walnut.
Method: Wax Crayon/Stick
Best For: Shallow scratches, color matching.
What You Need: Repair crayon/stick, plastic scraper, cloth.
Method: Shoe Polish
Best For: Light scratches, darker colors.
What You Need: Cream shoe polish, cotton swab, cloth.
Method: Touch-Up Marker
Best For: Thin lines, hiding visible damage.
What You Need: Wood repair marker.
Using Laminate Floor Repair Kits
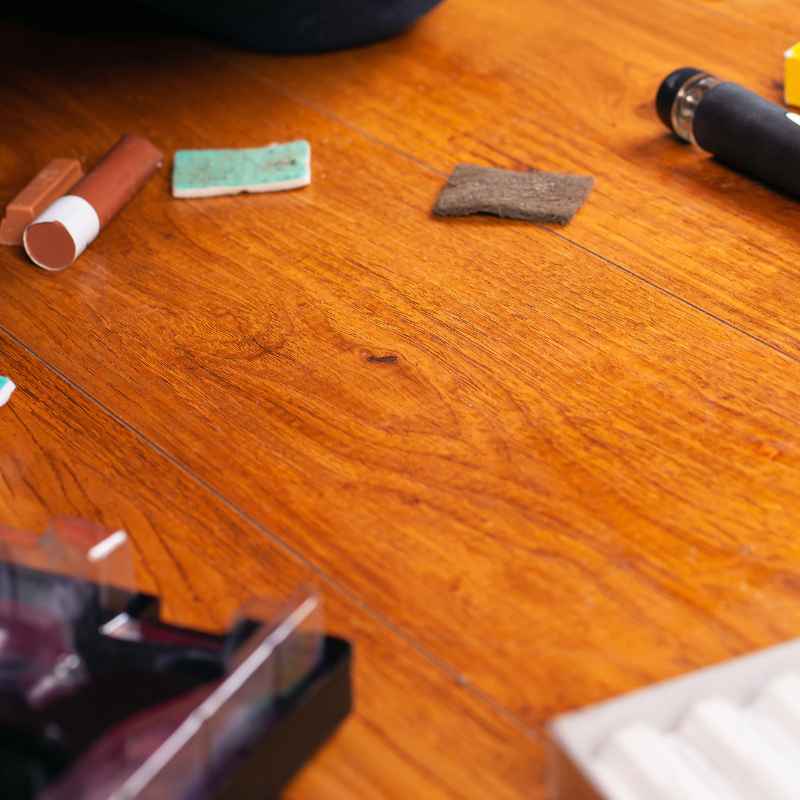
When the home remedies aren’t enough, a laminate floor repair kit is your next step. These kits are designed for the job. They usually come with a filler material and some colorants.
Or they might have a wax or putty you can use. Here’s how they generally work.
First, clean the damaged area thoroughly. This is always step one. Make sure it’s completely dry.
Some kits come with a small spatula or applicator. You’ll use this to apply the filler. If your scratch is deep, you might need to build up the filler in layers.
Follow the kit’s instructions closely. You want to fill the scratch so it’s level with the floor. Don’t overfill.
You can always add more. It’s harder to take away. Once the filler is in place, you might need to let it dry or cure.
This varies by kit. Some dry quickly. Others need a few hours.
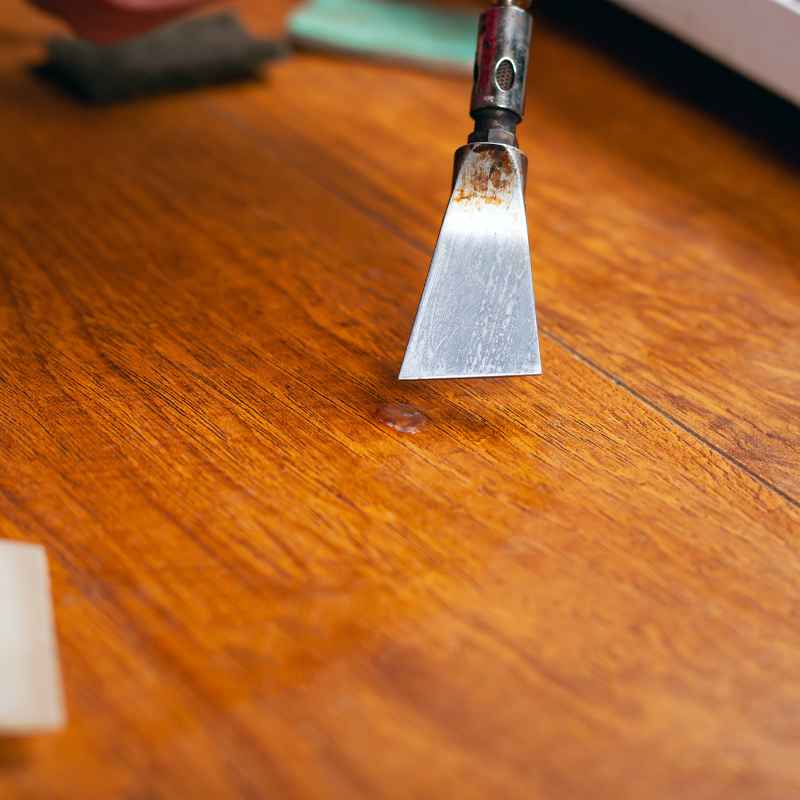
Read the packaging. After it’s set, you might need to sand it very lightly. Use a very fine grit sandpaper.
Just enough to make it smooth. Be super careful not to sand the surrounding good floor.
The color is important. Some kits come with a few colors you can mix. Or they have a system for matching colors.
You might apply a colorant over the filler. Or the filler itself is colored. Again, follow the instructions.
The goal is to match the color and sheen of your floor. If you can, test the color in an unseen area. Or start with a light application.
You can always add more color. It’s hard to take it away. Once the color is right, you might need to apply a clear sealant.
This protects the repair. And helps it match the shine of the rest of the floor. These kits are more robust than crayons.
They offer a more durable repair. Especially for slightly deeper scratches. They bridge the gap between minor marks and major damage.
I used a repair kit once on a scratch that went through the pattern layer. It was a bit of a project. The kit had a putty-like filler.
I had to press it in firmly. It took a couple of tries to get it just right. The color matching was the hardest part.
I mixed a couple of shades. It took some patience. But in the end, you could barely see the scratch.
It wasn’t perfect. But it was a huge improvement. It saved me from having to replace a whole section of flooring.
That’s the beauty of these kits. They give you the tools to fix things yourself. They make the damage less obvious.
It’s about making the floor look good again. And saving money too.
Contrast Matrix: Repair Kit vs. Basic Fixes
Feature | Basic Fixes (Crayon, Walnut) | Repair Kit
Difficulty | Easy | Moderate
Depth of Scratch | Light to shallow | Light to moderate
Durability | Temporary to moderate | Moderate to good
Cost | Very low | Low to moderate
Appearance | Can be good if color matches | Can be very good if done well
Tools Needed | Minimal | Basic tools (spatula, sandpaper)
Dealing with Deeper Scratches and Gouges
So, what if the scratch is more like a deep cut? Or a gouge where a chunk of material is missing? These are tougher.
The simple fillers and crayons might not be enough. Or they won’t last. For these, you might need a more advanced repair.
Or professional help.
1. Wood Filler/Putty: For deeper gouges, a good quality wood filler or putty is needed. Make sure it’s one that can be stained or painted to match your floor.
Clean the gouge out. Remove any loose bits. Then, carefully pack the filler into the gouge.
Use a putty knife. Press it in firmly. You want it to fill the void completely.
Let it dry according to the product directions. This can take several hours. Once dry, you’ll likely need to sand it smooth.
Use fine-grit sandpaper. Again, be very careful not to damage the surrounding floor. After sanding, you’ll need to color it.
This is the hardest part. You might need wood stains. Or a repair marker.
You’re trying to match the color and sheen. It’s a process. It takes patience and a good eye.
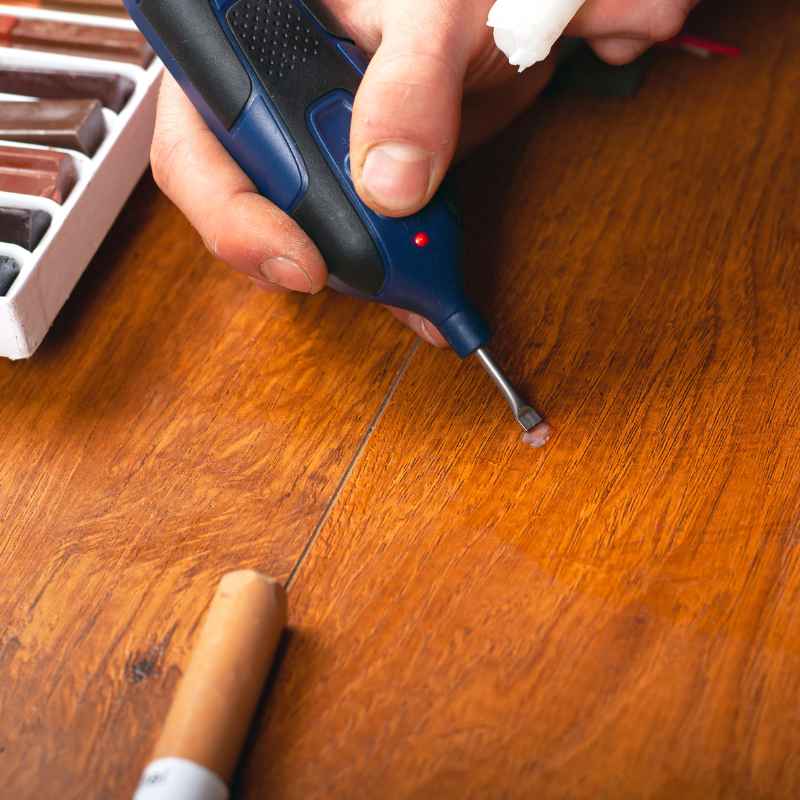
2. Laminate Repair Wax Systems: Some professional-grade systems use hard wax. You melt the wax into the scratch or gouge.
They come with special melting tools. And a variety of color waxes. You can mix them to get the right shade.
These systems are more robust. They create a more durable fill. They are what professionals often use.
But they can be more expensive. And they have a steeper learning curve. If you have a lot of deep scratches, this might be an investment.
For just one or two small areas, it might be overkill.
3. Patching: If the damage is really bad, you might consider patching. This means cutting out the damaged piece.
And inserting a new piece. This is very advanced. It requires specialized tools.
Like a laminate flooring cutter or a multi-tool. You need to be very precise. You also need a spare piece of your flooring.
If you don’t have any spares, this isn’t an option. Or you might have to buy a whole new box just for one piece. This is often best left to professionals.
A poorly done patch will look worse than the scratch.
Observational Flow: Fixing Deeper Damage
Step 1: Assess the Damage. Is it a scratch or a gouge? How deep is it?
Step 2: Clean the Area. Remove all debris and dust. Let it dry.
Step 3: Choose Your Filler. Wood filler, putty, or hard wax system.
Step 4: Apply the Filler. Pack it in firmly, level with the surface.
Step 5: Let it Cure. Follow product drying times.
Step 6: Sand Smooth. Use fine-grit sandpaper. Be gentle.
Step 7: Color Match. Use stains, markers, or wax colors.
Step 8: Seal (if needed). Apply a protective clear coat.
When to Call a Professional
Sometimes, you have to admit defeat. Or at least, admit that it’s beyond your DIY skills. When is it time to call in the experts?
If the scratch is very deep. And it goes through multiple layers of the laminate. Or if the damage is widespread.
Like a whole section of the floor is marred. If you’ve tried a few DIY methods. And they haven’t worked.
Or they made it look worse. That’s a good sign to stop. Professionals have tools and materials you likely don’t.
They have experience. They know how to color match. And they can often fix damage that looks impossible.
Another reason to call a pro is if you’re worried about making it worse. Laminate can be tricky. If you’re not comfortable with sanding or using fillers, it’s best to let someone else do it.
A professional can also assess if the damage is more serious. Maybe the wear layer is compromised in a big way. Or maybe there’s water damage underneath.
A pro can spot these things. They can give you an honest opinion. They can tell you if a repair is even worth it.
Or if replacement is the better option. Don’t feel bad about calling for help. It’s better than causing more damage.
And sometimes, their fixes are so good, you can’t even tell there was a problem.
I once saw a friend try to fix a deep scratch with wood putty. They used the wrong kind. It never dried properly.
It stayed soft. Then, their dog scratched it again. It looked like a gooey mess.
It was a total disaster. They ended up having to replace the whole plank. It would have been cheaper and less stressful to call a flooring specialist.
So, trust your gut. If you’re unsure, or if the damage is significant, get a quote from a pro. It might save you time, money, and a lot of headaches in the long run.
Preventing Future Scratches
The best way to deal with laminate scratches is to not get them in the first place. Prevention is key. Think about how you use your floors.
And what can be done to protect them.
1. Furniture Pads: This is huge. Put felt pads on the bottom of all your furniture legs.
Chairs, tables, sofas, even beds. Check them regularly. They can wear out.
Or get clogged with dirt. Replace them as needed. It’s a small effort that saves a lot of damage.
Especially for chairs that get moved a lot.
2. Use Rugs and Mats: Place area rugs in high-traffic zones. Like hallways, entryways, and living rooms.
Use doormats at all entrances. This traps dirt, sand, and grit before it gets onto your laminate. It’s like a first line of defense.
Make sure the rug pads don’t cause issues. Some can leave marks on certain laminates. Check manufacturer recommendations.
3. Clean Regularly: Sweep or vacuum your floors often. This removes abrasive particles.
Use a good laminate floor cleaner. Avoid harsh chemicals. Or steam mops.
Steam can seep into the seams. And damage the core. Stick to recommended cleaning methods.
4. Pet Care: Keep your pet’s nails trimmed. Regular trims make a big difference.
Especially for dogs. Consider protective mats under food and water bowls. These can prevent spills and scratches.
5. Be Careful Moving Things: When moving furniture or appliances, don’t drag them. Lift them.
Or use furniture sliders. If you’re carrying something heavy, like a new appliance, put down a protective sheet. Or a piece of thick cardboard.
This prevents accidental drops or scrapes.
6. Avoid High Heels Indoors: If you wear stiletto heels, consider changing them when you get home. The sharp points can easily scratch laminate.
It’s a small change for a big impact on your floor’s condition.
Stacked Micro-Sections: Prevention Tips
Furniture Feet: Always add felt pads.
Entry Zones: Use doormats inside and out.
High Traffic: Place rugs in busy areas.
Daily Cleaning: Sweep or vacuum dirt away.
Pet Paws: Trim nails regularly.
Moving Heavy Items: Use sliders or protective layers.
Real-World Scenarios
Let’s look at some common situations where scratches happen. And how different fixes might apply.
Scenario 1: The Kitchen Chair Scrape. You pull out your dining chair. The metal leg catches. It leaves a light, silvery scratch.
This is often a surface scuff. Cleaning thoroughly might make it vanish. If not, a laminate touch-up marker or a wax crayon in a matching color will likely do the trick.
It’s a common, easily fixed issue.
Scenario 2: The Dropped Can of Beans. You’re unloading groceries. A can slips from your hand. It hits the floor hard.
This could be a gouge. Depending on the depth, you might need wood filler. Or a repair kit with a putty.
Color matching will be key here. If it’s a severe gouge, you might need to consider replacing the plank. This is where professional assessment is good.
Scenario 3: The Dog’s Playtime Zoomies. Your dog gets excited. Their nails scratch across the floor. This usually results in multiple fine scratches.
Or sometimes, a few deeper ones if they slide. Regular cleaning and nail trims are the best prevention. For the existing scratches, a touch-up marker or wax can help blend them in.
If the damage is extensive, you might have to live with it or consider a more robust solution.
Scenario 4: Moving Day Chaos. You’re dragging a heavy couch. It snags on a rough spot. A long, deep scratch appears.
This is a serious one. It might go through all the layers. You’ll likely need a repair kit with a good filler.
Or wood putty. The color and texture matching will be challenging. This is a situation where professional repair or plank replacement might be the best option for a seamless look.
Scenario 5: The Kid’s Toy Incident. A toy car with a hard plastic wheel drags. It leaves a faint line. It might be just a scuff.
Or a light scratch. Cleaning is the first step. If it remains, try the walnut trick for a natural fix.
Or a light-colored wax crayon. These are usually simple fixes for minor wear and tear.
These examples show that the fix depends on the cause and the severity of the scratch. Always start with cleaning. Then, choose your repair method based on the damage.
Don’t be afraid to try simple things first.
What This Means for You
Understanding how to fix laminate floor scratches means you have control. You can maintain the beauty of your home. You don’t have to live with unsightly marks.
For most minor scratches, you can easily fix them yourself. This saves you money. It gives you a sense of accomplishment.
Knowing the right method for each type of scratch is empowering. It means you can tackle small issues before they become big problems.
When is a scratch normal? It’s normal to get small scuffs and light scratches over time. Especially in busy homes.
It’s part of life. If you have pets or kids, some wear and tear is expected. What’s not normal?
Deep gouges that go through the entire floor. Or large areas of widespread damage. If the laminate starts to peel or lift at the edges of a scratch, that’s concerning.
This might indicate moisture issues. Or that the laminate is failing. This kind of damage usually needs more than just a cosmetic fix.
Simple checks you can do include running your finger over the scratch. Does it feel deep? Can you catch a fingernail on it?
Look at the color. Is it just white, or is it showing the core material? Check the edges.
Are they lifting or peeling? These simple checks help you decide if it’s a DIY job or a call to a professional. Being proactive is the best approach.
Fix small scratches as soon as you see them.
Quick Fixes & Tips for Laminate Scratch Repair
Here are some quick tips to keep in mind for laminate scratch repair:
- Always clean first. This is non-negotiable.
- Match colors carefully. Get a few shades if possible for wax or markers.
- Work in good light. You need to see what you’re doing.
- Test in an unseen area. Especially with stains or strong cleaners.
- Apply fillers in thin layers. For deep gouges, build it up slowly.
- Be patient. Rushing leads to mistakes.
- Buff gently. After applying any fix, buff to blend.
- Don’t use too much water. Keep laminate dry.
These tips will help you get the best results. They are simple reminders that make the repair process smoother. They help you avoid common pitfalls.
Think of them as your repair checklist.
Frequent Questions About Fixing Laminate Scratches
Can I use nail polish to fix a scratch in laminate flooring?
It’s generally not recommended. Nail polish can be hard to remove if you make a mistake. It also might not match the sheen of your laminate.
It can also peel off later. It’s better to use products designed for floor repair.
How do I know if a scratch is too deep to fix?
If you can easily catch your fingernail on the scratch, it’s likely too deep for simple fixes. If the damage goes through the printed design layer and into the core, it’s deep. You might see the brown or gray material of the core itself.
These usually require wood filler or professional repair.
Will cleaning the scratch make it disappear?
Sometimes, yes! If the scratch is just a surface scuff or a mark from a rubber shoe, thorough cleaning with a laminate-safe cleaner can often remove it completely. Always try cleaning first, especially for lighter marks.
Can I use a wood stain pen on laminate scratches?
A wood stain pen might work for very fine scratches on certain types of laminate. However, most laminate has a clear wear layer over the design. A stain might not penetrate.
It could just sit on the surface and rub off. Repair markers or wax sticks are often a better choice.
What’s the best way to match the color of my laminate floor?
This is tricky. If using a repair kit or wax, try to get samples of colors. Mix them if allowed.
For markers, look at your floor in different lights. Compare the marker color to the floor color in the scratch area. Sometimes, a slightly darker shade blends better than a lighter one.
Always test in an inconspicuous spot first.
Can I fix scratches on waterproof laminate flooring?
Yes, you can fix scratches on waterproof laminate. The repair methods are the same. However, be extra careful not to let water seep into the scratch itself during the cleaning or repair process.
Even waterproof laminate can be damaged by prolonged water exposure in seams.
Conclusion
Seeing a scratch on your laminate floor can be disheartening. But it doesn’t mean the end of your floor’s beauty. With the right knowledge and a little effort, most scratches are fixable.
From simple walnut tricks to dedicated repair kits, you have options. Remember to always start with a good clean. Then, choose your method based on the scratch’s depth.
Prevention is always the easiest way. But when damage happens, you know how to handle it. Enjoy your beautiful, repaired floors!