How To Install Laminate Flooring On Plywood Subfloor
Yes, you can absolutely install laminate flooring directly over a plywood subfloor. The key is proper preparation of the plywood. This includes ensuring it’s clean, dry, level, and free from damage.
A moisture barrier and underlayment are also crucial for a successful installation and a long-lasting floor.
Understanding Your Plywood Subfloor
Your plywood subfloor is the base for your new laminate. Think of it like the foundation of a house. It needs to be strong and stable.
If it’s not, your new floor won’t perform well. It might creak. Or it might feel soft when you walk on it.
This is because plywood is a wood product. It can react to moisture. It can also shift a little over time.
Plywood is made from thin layers of wood veneer. These layers are glued together. This makes it strong.
But it also means it can swell if it gets wet. Or it can shrink when it’s dry. Understanding these natural tendencies helps you prepare it right.
You want a smooth, flat surface for the laminate planks. Any bumps or dips can show through your new floor. They can also cause the locking system of the laminate to fail.
So, why is plywood a common subfloor material? It’s strong. It’s readily available.
And it’s a good base for many types of flooring. But like anything, it needs attention. Especially before you put something new on top.
We need to check its condition. We need to make sure it’s ready for the job. This preparation phase is super important.
Don’t skip it!
The Best Laminate Flooring for Plywood
When you choose laminate, pick one that fits your needs. For a plywood subfloor, most modern laminates work well. Look for thicker planks.
These tend to feel more solid underfoot. They can also hide minor subfloor imperfections better. High-quality laminate often has a better locking system.
This means the planks click together more securely. That’s vital for a stable floor.
Consider the wear layer. This is the top protective coating. A thicker wear layer means more durability.
It protects the visual layer underneath. This is especially true in high-traffic areas. Think kitchens or entryways.
If you have pets or kids, look for scratch-resistant options. Some laminates are made with extra tough surfaces. This is a smart choice for busy homes.
The thickness of the laminate plank itself matters too. Thicker planks, usually 8mm or more, often feel more substantial. They can also handle a bit more variation in the subfloor.
Always check the manufacturer’s recommendations. They will tell you what subfloors their product is suitable for. And what underlayment is needed.
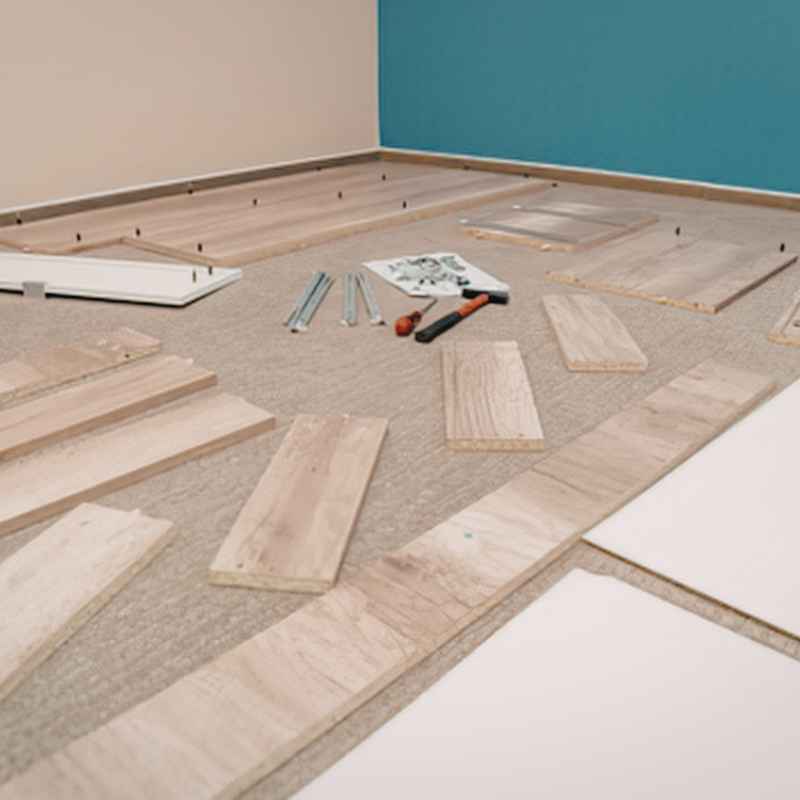
Gathering Your Tools and Materials
Before you start, make sure you have everything. This makes the job go much smoother. You don’t want to stop halfway to run to the store.
For installing laminate on plywood, you’ll need a few key items.
First, the laminate flooring itself. Always buy a little extra. About 10% more than you calculate.
This covers mistakes or damaged pieces. Next, you’ll need an underlayment. This is a thin layer that goes between the plywood and the laminate.
It cushions the floor. It also helps with sound and moisture. Some laminate planks come with attached underlayment.
Check your product details.
You will also need a moisture barrier. This is especially important if your plywood subfloor is over a basement or crawl space. A plastic sheeting works well.
You’ll need tape to seal the seams of the barrier. A good utility knife is useful for cutting. You’ll need a tape measure.
And a pencil for marking.
For cutting the laminate planks, you have options. A laminate flooring cutter is specialized and easy to use. A miter saw or a jigsaw can also work.
Safety glasses are a must. You’ll need a tapping block. This protects the edges of the laminate when you tap the planks together.
A pry bar is handy for pulling stubborn planks. And a rubber mallet is good for gentle tapping.
You might also need a level. And shims if your subfloor has low spots. A vacuum cleaner is essential for keeping the area clean.
Lastly, a knee kicker can help tighten the planks at the end of a row. Having all your supplies ready saves time and frustration.
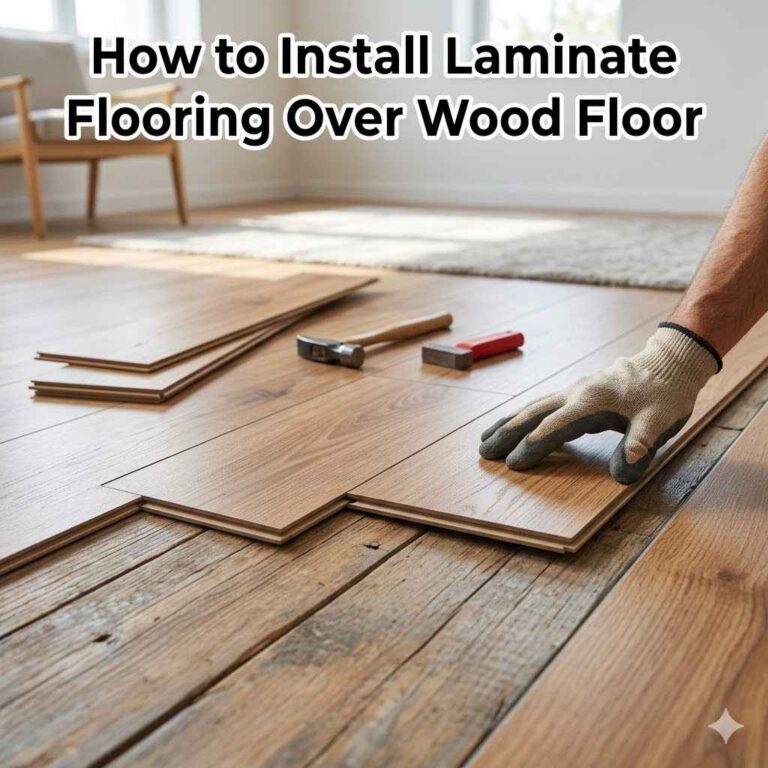
Step-by-Step Installation Guide
Let’s get down to the actual work. The process is straightforward if you follow the steps. It’s all about careful preparation and patient execution.
1. Prepare the Plywood Subfloor
This is the most critical step. Start by clearing the room completely. Remove all furniture and rugs.
Sweep and vacuum the subfloor thoroughly. Get rid of all dust, dirt, and debris. Next, inspect the plywood.
Look for any loose boards. If you find any, nail them down securely. Use screws for a more permanent fix.
Check for any damage. Are there water stains or soft spots? These areas might need repair or
Make sure the subfloor is completely dry. If it’s a basement or crawl space, check for moisture. Use a moisture meter if you’re unsure.
If it’s damp, you might need to address the source of the moisture first. This could involve ventilation or sealing. Ensure there are no nails or staples sticking up.
Hammer them down or remove them.
Subfloor Preparation Checklist
Inspect: Look for damage, rot, or softness.
Clean: Sweep and vacuum all dust and debris.
Fasten: Nail or screw down any loose plywood.
Level: Fill low spots with compound, sand high spots.
Dry: Ensure the subfloor is completely dry.
Smooth: Remove any protruding nails or staples.
2. Install the Moisture Barrier
If your subfloor is over an unconditioned space like a basement or crawl space, a moisture barrier is a must. Lay down the plastic sheeting. Overlap the edges by at least 6 inches.
Tape all seams securely with a strong moisture-resistant tape. Run the barrier up the walls about 4-6 inches. This creates a seal.
Trim the excess later.
Some underlayments include a built-in moisture barrier. Check your product. If it does, you might not need a separate plastic sheet.
But if you’re on the fence, an extra layer of protection is wise. Moisture is the enemy of wood products, including plywood and laminate.
3. Lay Down the Underlayment
Unroll the underlayment material over the moisture barrier. Most underlayments have a specific side that faces up. Check the manufacturer’s instructions.
If it has an attached moisture barrier, ensure that side is facing down. Overlap the edges of the underlayment according to the product instructions. Usually, it’s a simple butt joint or a slight overlap.
Tape the seams if recommended.
The underlayment provides a smooth, uniform surface. It also absorbs sound, making your new floor quieter. It adds a little extra cushion for comfort.
Don’t skip this step. It’s part of what makes your new floor feel and sound good.
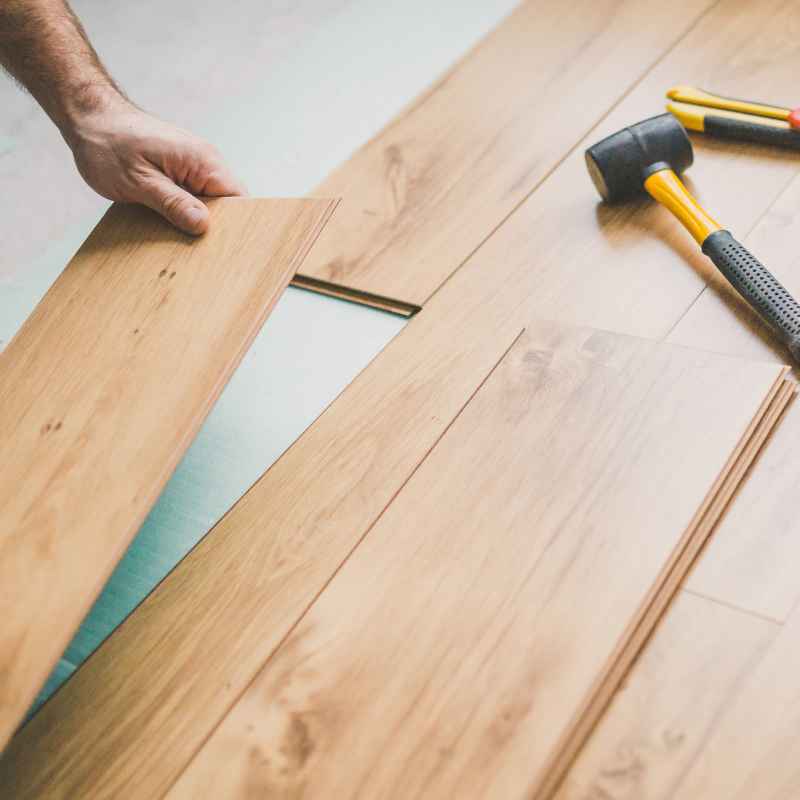
4. Start Laying the Laminate Planks
Decide which direction your planks will run. Typically, they run parallel to the longest wall in the room. This makes the room look bigger.
Start in a corner. Leave an expansion gap around the perimeter of the room. This gap should be about 1/4 to 3/8 inch.
This allows the laminate to expand and contract with changes in humidity and temperature. You can use spacers to maintain this gap.
Place the first plank with the tongue side facing the wall. If your planks have a click-lock system, insert the tongue of the next plank into the groove of the first. Gently tap it with the rubber mallet and tapping block until it’s snug.
For the end joints, you usually angle the new plank into the previous one. Then lower it to lock. Follow your specific laminate’s locking mechanism.
5. Cutting the Planks
You’ll need to cut planks to fit the length of your rows. And to go around obstacles like doorways or cabinets. Measure carefully.
Remember to account for the expansion gap. For cutting, use your chosen tool. A laminate cutter makes straight cuts easy.
A miter saw is good for crosscuts and angle cuts. A jigsaw is helpful for curved cuts, like around door frames.
Always cut with the decorative side of the laminate facing down if using a jigsaw or miter saw. This helps prevent chipping the top layer. Wear safety glasses!
It’s also helpful to have a vacuum nearby to clean up sawdust as you go.
6. Finishing the Rows
As you get to the end of a row, you’ll likely need to cut a plank to fit. Measure the remaining space. Subtract your expansion gap.
Cut the plank to size. You might need to use a pry bar to gently lift and lock the last plank in place. Sometimes, you might need to cut off the tongue of the first plank in a row.
This is so it can sit closer to the wall, with the groove facing the previously laid planks.
For subsequent rows, you’ll stagger the joints. This makes the floor stronger and look more natural. Start the second row with the offcut from the first row’s last plank.
Ensure it’s at least 6 inches shorter than the first plank of the previous row. This creates a strong bond and prevents repeating patterns.
7. Working Around Obstacles
Doorways and cabinets require careful cutting. For doorways, you might need to trim the bottom of the door casing. Then slide the laminate plank underneath.
This gives a clean, professional look. You’ll still need to maintain your expansion gap against the wall behind the casing.
Around cabinets or other fixed objects, cut the planks to fit. Remember the expansion gap. You can cover this gap later with trim or quarter round molding.
This molding is attached to the wall, not the laminate floor. This allows the floor to move freely.
8. The Final Row
The last row can be tricky. You’ll need to cut the planks lengthwise. Measure the distance from the edge of the second-to-last plank to the wall.
Remember to subtract your expansion gap. Use your utility knife or saw to cut the planks to the correct width. You may need to use a pry bar to lock the last row into place.
Sometimes, the last plank needs to be cut to fit the full width of the room. Be precise with your measurements. Ensure the locking mechanism still engages properly.
9. Install Trim and Moldings
Once the floor is installed, you’ll need to cover the expansion gaps. Install baseboards or quarter round molding around the perimeter of the room. This molding is nailed or glued to the wall, not the floor.
This is essential. It allows the floor to expand and contract without buckling.
If you have transitions to other flooring types, use transition strips. These are designed to create a smooth, safe edge between different floor materials.
Quick Installation Tips
- Measure Twice, Cut Once: Accuracy prevents waste.
- Stagger Joints: Start each new row with a different length piece.
- Use Spacers: Maintain an even expansion gap along all walls.
- Tap Gently: Use a rubber mallet and tapping block to avoid damage.
- Read Instructions: Every laminate is slightly different.
Real-World Context: When Plywood Subfloors Cause Trouble
I remember a time when a friend called me, frantic. He had just installed new laminate flooring. It looked beautiful in the store.
But after a few weeks, it started to sound… off. Every step made a popping or creaking sound. It was driving him crazy.
He felt like he’d wasted a lot of money and effort.
We went over to his house. The first thing I noticed was the feel of the floor. It wasn’t firm.
It had a bit of a bounce to it. We then checked the edges. Some planks were lifting slightly near the walls.
And there were a few areas where the joints looked a bit strained.
He had assumed his plywood subfloor was fine. It looked okay on the surface. But what we discovered was that some of the plywood sheets were slightly warped.
There were also a few low spots that hadn’t been filled. And crucially, he hadn’t used a proper moisture barrier. His house had a damp basement.
This caused the plywood to expand unevenly.
The laminate flooring was trying to lay flat. But the uneven, slightly damp plywood underneath wouldn’t let it. The locking mechanisms were stressed.
This caused the creaking and popping. It was a classic case of rushing the subfloor preparation. He had to carefully pull up the entire floor.
Then he had to flatten and dry the plywood. It was a huge amount of extra work. And a really frustrating lesson for him.
This story highlights why we emphasize subfloor prep so much. The plywood itself is often fine. But its condition and stability are paramount.
Humidity fluctuations are a common culprit. Especially in homes with basements or crawl spaces. Or in areas with high outdoor humidity.
Even small amounts of moisture can cause wood to swell. This expansion can push against the laminate planks. It can break the tongue-and-groove system.
Another common issue is old, uneven subflooring. Sometimes houses settle. Or the original installation wasn’t perfectly flat.
Even a slight dip can cause the laminate to flex too much. This flexing puts stress on the joints. It can lead to them separating or breaking over time.
And that unwanted noise!
What’s fascinating is how much the subfloor affects the final outcome. It’s hidden, so people sometimes overlook it. But the best laminate flooring can fail on a poor subfloor.
Conversely, even a budget-friendly laminate can look and feel amazing on a perfectly prepared base.
I’ve also seen issues with old vinyl flooring left down. People sometimes think they can lay laminate directly over old vinyl. This is rarely a good idea.
The vinyl can create a soft layer. Or it can trap moisture. It needs to be removed.
Same goes for carpet. Always get down to the bare subfloor.
The most important takeaway from experiences like my friend’s is this: your subfloor is the canvas. Make sure it’s smooth, flat, dry, and stable. Everything else depends on it. Taking the extra time upfront saves you a massive headache later.
What This Means for You: Assessing Your Plywood Subfloor
So, how do you know if your plywood subfloor is ready for laminate? It’s about a few key checks. Think of it like giving your subfloor a quick health check.
Is it Flat?
Use a long, straight edge. A 6-foot level works well. Lay it across different sections of the subfloor.
Check for gaps underneath. If you can slide your fingers under the level, you have a low spot. If the level rocks, you have a high spot.
Manufacturers usually allow a small tolerance, like 1/8 inch over 6 feet. But flatter is always better. Most dips can be fixed with a floor leveling compound.
High spots can be sanded down.
Is it Dry?
This is crucial. If you have a basement or crawl space, pay extra attention. You can often feel dampness.
But a moisture meter is the best tool. You can rent or buy one. Test several spots.
If readings are high, you need to address the moisture source before installing. This might involve sealing the foundation walls, improving ventilation, or using a more robust moisture barrier.
Is it Solid?
Walk all over the subfloor. Listen for any squeaking or flexing. If you hear noises, it means the plywood might be loose.
Or it might not be properly supported from underneath. You’ll need to find the source. Then secure the plywood with screws.
Drive them in until they are flush with the surface. Don’t let them stick up.
Is it Clean?
I can’t stress this enough. Any grit, dust, or old adhesive can create high spots. It can also prevent the laminate from locking properly.
Sweep and vacuum thoroughly. If there are old glues or coatings, you might need to scrape or sand them off.
Is it Damaged?
Look for any signs of rot, water damage, or large cracks. These areas compromise the integrity of the subfloor. Small holes or gouges can be filled.
But extensive damage means you might need to replace the section of plywood. Safety first here. Damaged subfloors are not stable.
When to Worry About Your Plywood
Concerning: Significant dips or humps (more than 1/8 inch over 6 feet).
Concerning: Damp or wet to the touch, or high moisture meter readings.
Concerning: Soft spots or areas that feel spongy underfoot.
Concerning: Large cracks or visible rot/water damage.
Concerning: Loose boards that squeak or flex when walked on.
Action: Address these issues before installing laminate. A stable, dry, flat base is non-negotiable.
If your plywood subfloor passes these checks, you’re in great shape! If it has minor issues, they are usually fixable with a bit of effort. It’s always better to fix them now than to deal with a failing floor later.
Quick Fixes and Tips for a Better Install
Sometimes, a few simple tricks can make a big difference. Here are some tips that experienced installers often use. They help ensure a smoother, more professional finish.
Starting with a Straight Line
It sounds simple, but it’s important. Your first row of planks sets the tone for the entire floor. Make sure that first plank is perfectly straight and parallel to your wall.
If your wall isn’t perfectly straight (and most aren’t), you’ll use spacers to maintain the gap. This ensures your expansion gap is consistent.
The “Break” in Rows
When you start a new row, don’t just use the offcut from the previous row. Make sure the end joints of your planks are staggered. Aim for a minimum 6-inch “break” between the end joints of adjacent rows.
This creates a much stronger floor. It prevents patterns from repeating too closely. It also distributes stress better.
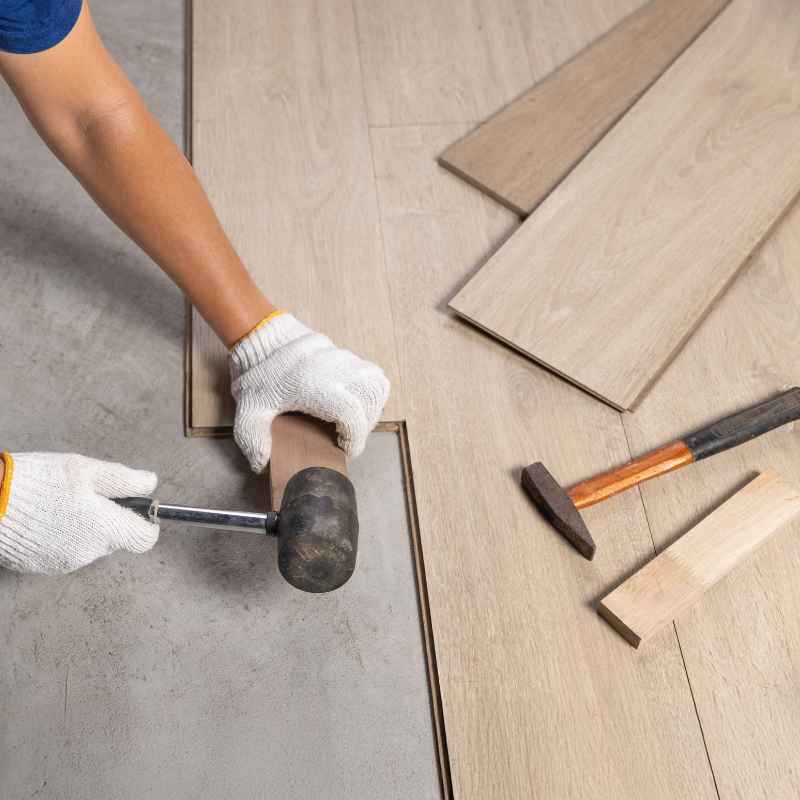
Tapping Wisely
When you’re locking planks together, use the tapping block correctly. Place it against the edge of the plank you are tapping. Gently tap with the rubber mallet.
Don’t wail on it. You want to close the gap, not damage the locking mechanism. Sometimes, a slight angle can help the joint connect.
Then you can tap it flat.
Dealing with Stubborn Joints
If a joint is being difficult to lock, check for debris in the groove. Sometimes a tiny piece of sawdust can stop it. Ensure the planks are aligned correctly.
If it’s still stubborn, you might need a knee kicker. This tool gently kicks the plank into place. Use it with care.
The Expansion Gap is Your Friend
I know it’s tempting to push the planks right up to the wall. Especially if the wall looks straight. But remember, the floor needs room to move.
That gap is vital. It prevents buckling. Don’t skip it.
Use your spacers consistently. You’ll cover them with trim later.
Cutting Around Door Frames
The best way to handle door casings is to undercut them. Use a handsaw or an oscillating multi-tool. Cut the bottom of the casing so the laminate can slide underneath.
This creates a very clean, professional finish. You’ll still need your expansion gap behind the casing.
Smart Installer Habits
Pre-cut Pieces: Cut several planks to different lengths beforehand. This speeds up the process of staggering rows.
Clean Workspace: Regularly sweep or vacuum sawdust. It makes the job safer and easier.
Use a Pull Bar: For planks near the wall that are hard to tap, a pull bar is essential. It hooks onto the plank and lets you pull it tight.
Check the Floor: Periodically step on the planks as you lay them. Ensure they are locking securely and there are no gaps.
These little things add up. They help you avoid common mistakes. And they contribute to a floor that looks and performs its best for years to come.
Frequently Asked Questions
Can I install laminate flooring directly over old vinyl flooring on a plywood subfloor?
It’s generally not recommended. Old vinyl can be soft, trap moisture, or not provide a stable enough base. It’s best to remove old vinyl and prepare the bare plywood subfloor for the best results.
Do I need a vapor barrier if my plywood subfloor is on the second story?
Typically, a vapor barrier is not needed for upper floors unless there’s a specific moisture concern, like a very humid room or an unusually cold attic space directly above. Check the laminate manufacturer’s guidelines for their specific recommendations.
How do I fix squeaky spots in my plywood subfloor before installing laminate?
If you hear squeaks, the plywood is likely loose. Drive screws through the plywood into the floor joists below. Use enough screws to secure the board firmly.
Ensure screw heads are flush with or slightly below the surface.
What is the proper expansion gap for laminate flooring on a plywood subfloor?
Most manufacturers recommend an expansion gap of around 1/4 to 3/8 inch. This gap is left around the entire perimeter of the room. It allows the laminate to expand and contract with temperature and humidity changes.
Can I install laminate flooring over an uneven plywood subfloor without fixing it?
No, this is strongly discouraged. Uneven subfloors can cause the laminate’s locking system to fail, leading to gaps, cracks, and creaking. It’s essential to level the subfloor before installation for a durable, long-lasting floor.
How important is the underlayment when installing laminate on plywood?
The underlayment is very important. It provides a cushion for comfort, helps dampen sound, and can offer a layer of moisture protection. Many underlayments also help smooth out minor subfloor imperfections, contributing to a better final finish.
Conclusion
Installing laminate flooring over a plywood subfloor is a achievable DIY project. The success hinges on thorough subfloor preparation. Ensure your plywood is flat, dry, and solid.
Then, lay down your underlayment and moisture barrier if needed. Follow the manufacturer’s instructions for your specific laminate. With careful planning and execution, you’ll create a beautiful, durable floor.
Enjoy your newly transformed space!